Automated Device Enrollment
What is Automated Device Enrollment
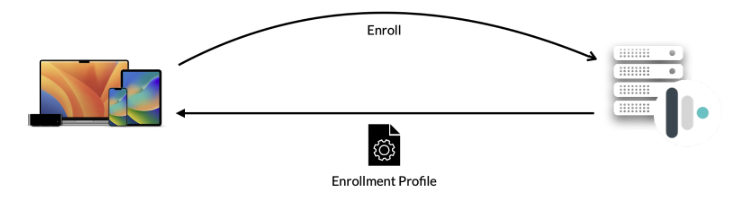
Automated Device Enrollment provides an automated approach to enrolling devices owned by the school or district the moment they are unboxed. In order to enroll using Automated Device Enrollment, devices must exist in an Apple School Manager account and be assigned to the Mosyle MDM server. Devices purchased from Apple or an Apple Authorized Reseller or carrier can be automatically added to the Apple School Manager account. Other devices can be manually added to Apple School Manager using Apple Configurator 2 (certain restrictions apply). Click here for more information on manually adding devices to Apple School Manager.
Devices assigned to the Mosyle MDM server from Apple School Manager can be assigned to an Automated Device Enrollment profile created in Mosyle to be synced with Apple's Cloud Configuration servers. Doing this will ensure devices automatically download the enrollment profile when the devices are powered on for the first time, or erased and the OS reinstalled, and connected to the network. Different settings can be configured in the Automated Device Enrollment profile to dictate the Setup Assistant steps that will be presented when enrolling devices.
In addition to the benefit of over-the-air hands off deployment and enrollment of devices, enrolling devices using Automated Device Enrollment provides:
- Supervision of devices;
- Ability to lock the MDM profile on the device so it cannot be manually removed;
- Ability to block users from enabling User-Initiated Activation Lock;
- Ability to automatically advance through Setup Assistant steps for Mac computers and Apple TVs connected to Ethernet;
- Ability to customize Setup Assistant screens;
- Ability to enroll iPadOS devices as Shared iPad
During Automated Device Enrollment, devices will attempt to retrieve/download the cloud configuration profile that is synced with Apple servers. In order to successfully retrieve the profile and complete enrollment it's critical the network allows for proper communication, including access to all Mosyle and Apple domains. Click here for information on which hosts and ports are required for Apple products.
Enrolling devices using Automated Device Enrollment
The first steps to enrolling devices into Mosyle using Automated Device Enrollment include:
- Integrating the Apple School Manager account with Mosyle
- Assigning devices in Apple School Manager to the Mosyle MDM Server
- Creating and syncing an Automated Enrollment profile
Steps 1 and 2 have been reviewed in previous lessons. In the next sections we'll review the many configuration options available in the Mosyle Automated Device Enrollment profile.
All Mosyle accounts include a Default enrollment profile which has basic enrollment settings configured. All devices assigned to the Mosyle MDM server will be assigned to the Default profile unless they are manually assigned to a different enrollment profile. Modify the Default profile at any time to meet the needs of the school or district.
View devices assigned to the Mosyle MDM server and their current status by going to My School > Apple Basic Setup > Enrollment > Automated Device Enrollment > View devices. The following statuses are retrieved from Apple servers and will be listed for each device:
- Associated with the ASM: Date and time the device was assigned to the Mosyle MDM from ASM
- Profile associated: Date and time the Automated Device Enrollment profile was assigned to the device and synced with Apple servers
- Profile installed: Date and time Apple servers recognize the device retrieved and installed the Automated Device Enrollment profile
Each status is color-coded to assist with quick identification. If needed, the devices and their current status can be exported from this screen using the “Download devices” option at the bottom of the list.
Update the list of devices and their status by clicking the “Update” button in this screen.
Tip: It's recommended to work within your Mosyle Education account while going through this section to configure the Automated Device Enrollment profiles to meet your school or district's needs.
Automated Device Enrollment configurations for iOS/iPadOS
Use the Automated Device Enrollment profile(s) to specify how the devices will behave after they're unboxed, or after Erasing all Content and Settings. Multiple enrollment profiles can be created if needed.
To start, go to My School > Apple Basic Setup > Enrollment > Automated Device Enrollment. Choose the iOS/iPadOS platform from the dropdown menu at the top. Click the Default profile to make any changes or adjustments, or create a new profile by clicking “New profile”. The Automated Device Enrollment profiles are separated into different sections. Each is addressed below.
Profile Name
Enter a name for the enrollment profile. Only Mosyle Administrators will see this information, so feel free to use a name that will help organize and identify the enrollment settings configured.
The default enrollment profile will be named the same as the Mosyle account. You can update the name at any time by clicking the profile and editing this field.
Check the options you want to activate on the device
- Allow devices to connect to a Mac: Unchecking this option will prevent iOS/iPadOS devices from pairing with a computer. This option is deprecated on devices running iOS/iPadOS 13 and later. For those devices you can use the restriction “Do not allow host pairing” to prevent users from being able to connect and pair the device with a computer.
- Install MDM Profile (mandatory): It is required for devices assigned to the Automated Device Enrollment profile to automatically download and install the Mosyle MDM enrollment profile.
- Supervise the devices (mandatory): By default, all devices enrolled using Automated Device Enrollment will be supervised. Supervision typically indicates the device is owned by the school/district and provides access to more management functionality.
- Do not allow manual removal of the MDM: When enrolling devices using Automated Device Enrollment you have the ability to lock the MDM enrollment profile on the device, preventing users from being able to manually remove the profile. This is recommended.
-
Multi-user (Apple Shared iPad): Check the box to configure devices as Apple Shared iPad devices. Click here for more information about Apple Shared iPad. When configuring devices as Shared iPad devices, you can configure additional settings such as user storage space and session timeout by clicking the button to “Configure Shared iPad”. When configuring the maximum number of shared users, keep iPad storage and partitioning in consideration.
- Allow User-Initiated Activation Lock: By default, devices enrolled using Automated Device Enrollment will block the ability for end users to enable Activation Lock with their personal Apple ID. If you wish to allow end users to enable Activation Lock with their personal Apple ID, check this box.
Each new enrollment profile created in Mosyle will automatically have the default settings configured. Feel free to check any new options or uncheck options as needed.
Supervision Identity
The Supervision Identity is required in order to pair a device with a computer when the restriction “Do not allow host pairing” is applied. When the restriction is applied, devices will not be able to connect or pair with computers. By installing the Supervision Identity on the Mac, you grant permission for the device to pair with the computer. Devices will only be able to pair with computers that have the Supervision Identity certificate installed.
The options that can be configured in Mosyle include:
- No Supervision Identity: If the restriction “Do not allow host pairing” is applied, the device will not be able to pair or connect to any computer.
- Upload your own Supervision Identity: With this option, you'll need to generate the Supervision Identity using Apple Configurator 2 on a Mac and upload it to the Automated Device Enrollment profile in Mosyle. The Supervision Identity must be uploaded and the profile saved and synced prior to the device enrollment in order to be properly applied. Devices enrolled with the enrollment profile will automatically understand to trust devices with the uploaded Supervision Identity installed.
- Download and use a Mosyle Supervision Identity: With this option selected, devices enrolled with the enrollment profile will automatically understand to trust devices that have the Mosyle Supervision Identity installed. This option must be selected and the profile saved and synced prior to the device enrollment in order to be properly applied. When you need to pair a device with a computer, you can download the Supervision Identity from within Mosyle to install it on the device.
In most cases when pairing is required, a command from Mosyle MDM can be sent to the device to remove the restriction profile and allow host pairing. If the device loses network connectivity and is unable to receive commands from the MDM to remove the restriction profile, the Supervision Identity is useful to allow pairing access.
Devices will be used in which model?
- Devices on Limbo: Devices enrolled in Limbo will not be assigned to a specific user or Shared Device Group.
- Devices for 1:1 users: Devices enrolled for 1:1 users can be assigned to specific users during the enrollment process.
- After the enrollment allow device usage - devices will be placed in limbo until the user logs in: This option will allow the device use immediately after enrollment. Select this option if you are planning to assign the devices using Custom Setup Assistant, pre-assign using a spreadsheet, or if the device was previously enrolled and assigned to a user.
- Require user authentication: This option will allow you to force users to authenticate with Active Directory during the enrollment, or force users to login to the Mosyle Manager application after the device is enrolled. Do not use this option if using the Custom Setup Assistant for user authentication.
- Devices for Shared Device Groups: Devices enrolled for Shared Device Groups can be assigned to a specific group during the enrollment process.
If you choose to enroll devices to limbo and they are assigned after the enrollment, if the device is ever wiped it will automatically re-enroll in Mosyle and will automatically be reassigned to the user. If you do not want this to happen, please check the option to Return devices to assignment model selected above after wipe.
Select the location responsible for the devices
Here you can choose which of the locations in Mosyle the device should be assigned after it is enrolled. If the device will be assigned 1:1 to a user or to a Shared Device Group, the device will assume the location of the user or shared group.
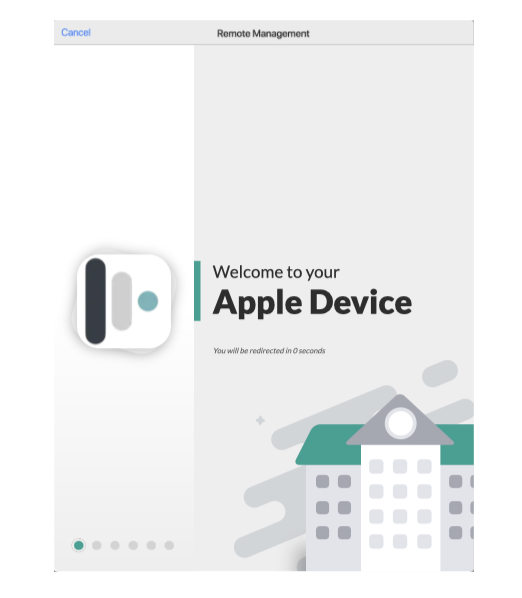
Customize Setup Assistant (Available only for iOS 13+)
The options available allow you to customize the end user experience during the enrollment process. Include items such as a welcome message, an End User License Agreement Screen, and/or authentication. Each option is described in more detail below. As items are added, they can be rearranged by dragging and dropping the tile in any order desired.
- Welcome: Customize a welcome message for end users during the enrollment. Use the Personalize area to change the font and color scheme. Users will remain on this screen for 8 seconds before being redirected to any other screens or proceeding through the Setup Assistant.
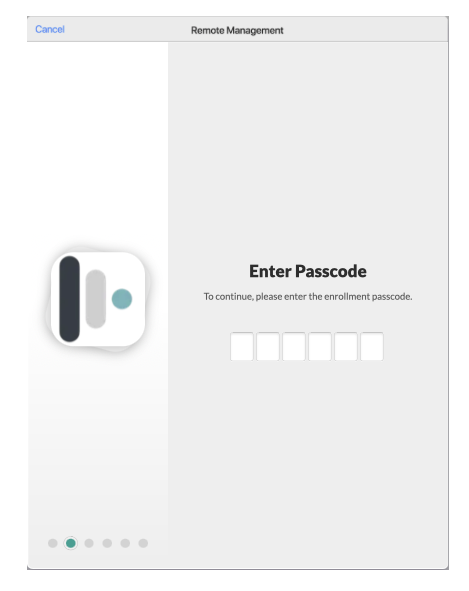
- Set Enrollment Passcode: Configure a predefined enrollment passcode that must be entered in order to proceed through the Setup Assistant and Automated Device Enrollment. This option can be used as an alternative to having users authenticate during the enrollment while still securing which devices can be enrolled.
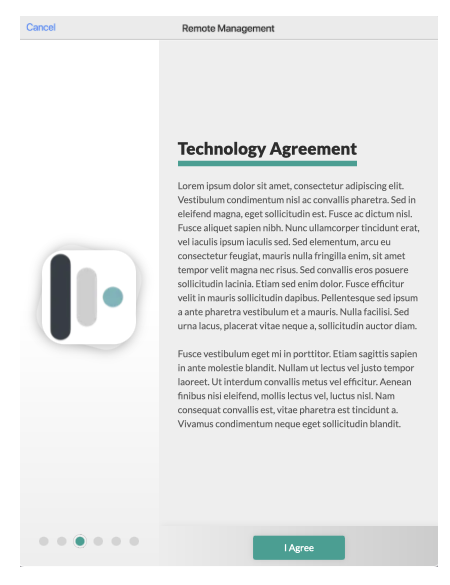
- End User License Agreement Screen (EULA): Customize an End User License Agreement (EULA), Acceptable Use Policy, or any other text that must be accepted in order to proceed through Automated Device Enrollment. If users do not agree, they will be unable to proceed through Automated Device Enrollment and the device will not be enrolled in the Mosyle MDM.
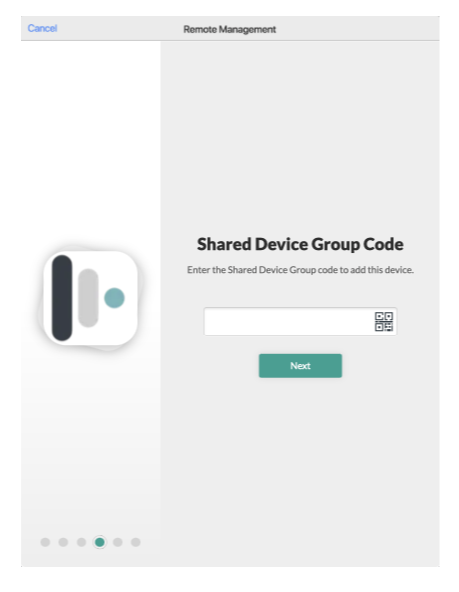
- Add to a Shared Device Group: Prompt users to enter the Access Code for a Shared Device Group during the enrollment to assign the device to the Shared Device Group immediately after enrollment. To find the Shared Device Group access code, go to My School > Hierarchy > Shared Device Groups > Select the shared device group. Once the device is assigned to the Shared Device Group, it will receive any and all management profiles and configurations assigned to the group.
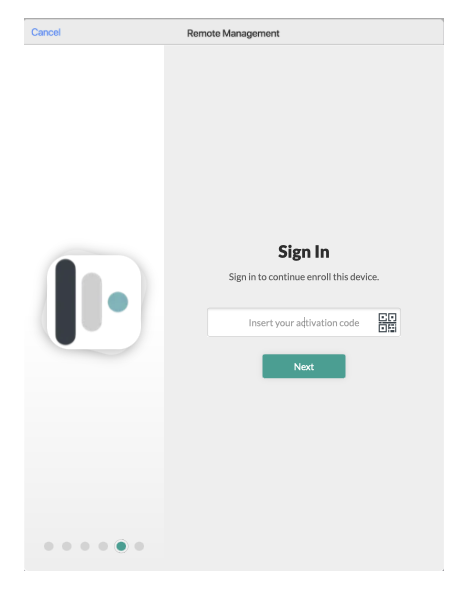
- Mosyle User Authentication*: Prompt users to enter their unique user Access Code during the enrollment to assign the device to the user. This option should not be used in conjunction with any other Single Sign-On options or with the above option to Require user authentication. When using this option to complete the device assignment, the user must exist in Mosyle. To find the user's Access Code, go to My School > Users > Search for the user > Click the user's name > The user's unique Access Code will be displayed.
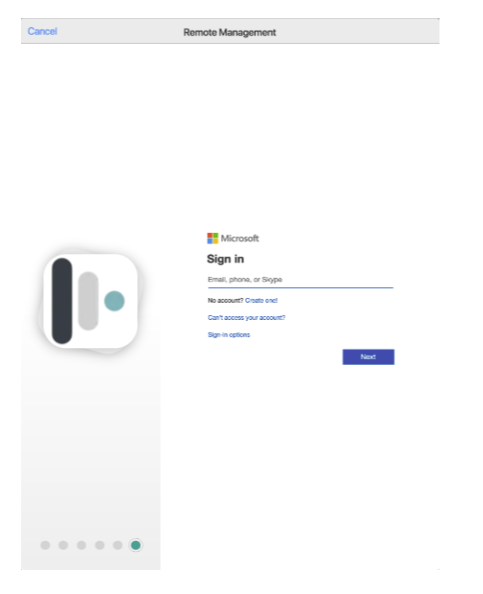
- Single Sign-On Authentication*: Prompt users to authenticate with their school or district Google, Microsoft, or Active Directory (LDAP or ADFS) credentials during the enrollment to assign the device to the user. This option should not be used in conjunction with the Mosyle User Authentication option or with the above option to Require user authentication. When using this option to complete the device assignment, the user must exist in Mosyle. If users are authenticating with Google or Microsoft, the email address in Mosyle must match the email address used to authenticate. If users are authenticating with Active Directory (LDAP or ADFS), the User ID in Mosyle must match the Active Directory query attribute (ex: samaccountname).
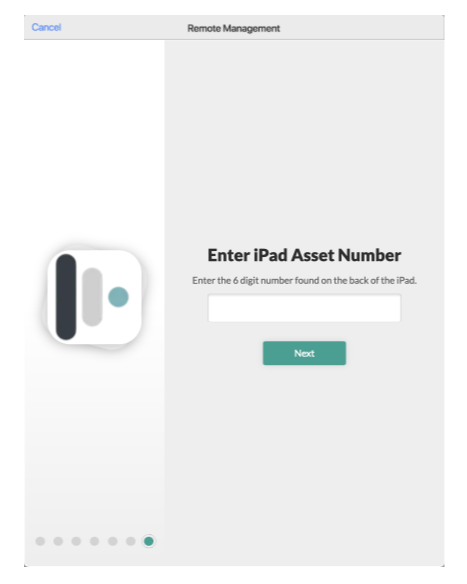
- Set device attribute: Prompt users to enter any device information during enrollment that will be available in Mosyle as the device Tag or Asset Tag. If you are using this option, you can then use the %Tags% or %AssetTag% variables to rename devices in the Automated Enrollment profile. A common use case for this option is to have users enter a device asset number so that it is available in Mosyle for inventory purposes. Tags and Asset Tags can be added after devices are enrolled under the Management tab.
*When using the options in the Custom Setup Assistant to complete device assignment (Mosyle User Authentication and Single Sign-On Authentication), be sure the Device Assignment options configured in your account are correct. To confirm, go to My School > Users > Device Assignment > User Authentication Assignment. Be sure the option under the heading 'Assignment through SSO Authentication during Automated Device Enrollment' is configured with the selection Auto-assign the device to the Authenticated user during the SSO Sign In.
Select the iOS/iPadOS devices that will receive this profile
Choose the device serial numbers to receive the enrollment profile. Assign all devices or specific devices to the enrollment profiles as needed to meet the needs of your school or district.
By default, devices that are erased and re-enrolled in Mosyle will automatically keep the user assignment. Therefore, if you wish to always enroll devices as freshly unassigned devices check the box for “Enroll devices as unassigned devices”.
Select the options that will not be presented to the user in Setup Assistant
Check any of the Setup Assistant steps you wish to skip during the enrollment. Uncheck any steps you wish to present to the user during the enrollment. Anything skipped during the enrollment can always be configured at a later time through the device Settings unless it is configured to be restricted.
It's recommended to not skip the Location Services prompt so that users will be prompted to enable Location Services during enrollment, which will ensure the device date and time is correct.
Phone & Email Support (optional)
These fields are optional. If information is entered here it will be displayed on the Remote Management screen during the enrollment as the School/District Support Email and Phone Number.
Rename devices after enrollment
Automatically rename devices during the enrollment flow using device or user variables. If users are authenticating during the enrollment and completing the device assignment, any available 1:1 variables can be used for the renaming. If prompting users to enter Tag or Asset Tag information with the Custom Setup Assistant, use the corresponding variables to rename the devices.
After configuring the Automated Device Enrollment profile for iOS/iPadOS devices, click Save. View the device list to ensure the devices show a “Profile Associated” (Enrollment > Automated Device Enrollment > View Devices). Once the devices show a “Profile Associated” they are ready to be enrolled.
iOS and iPadOS devices will prompt the enrollment process in one of two ways:
- Brand new devices can simply be unboxed and turned on. Select the Language, Region, and connect to Wifi. Once connected to Wifi the device will prompt to proceed with the Remote Management.
- Devices that have already been setup or have been in use can be erased using Erase all Content and Settings either from the device Settings or through Apple Configurator 2. Once the device is erased, it will prompt to select the Language, Region, and connect to Wifi. Once connected to Wifi the device will prompt to proceed with the Remote Management.