Deploy Docker Container on Cloud

Objective:
In this Article we want you to be able to deploy secure apps with containers in the cloud space. This deployment is useful for deploying apps or services without the need of a separate Firewall on prem or the cloud to secure and encrypt the communication. Another benefits of this design is, that the user's never interact with the actual server.
Understanding the Design:
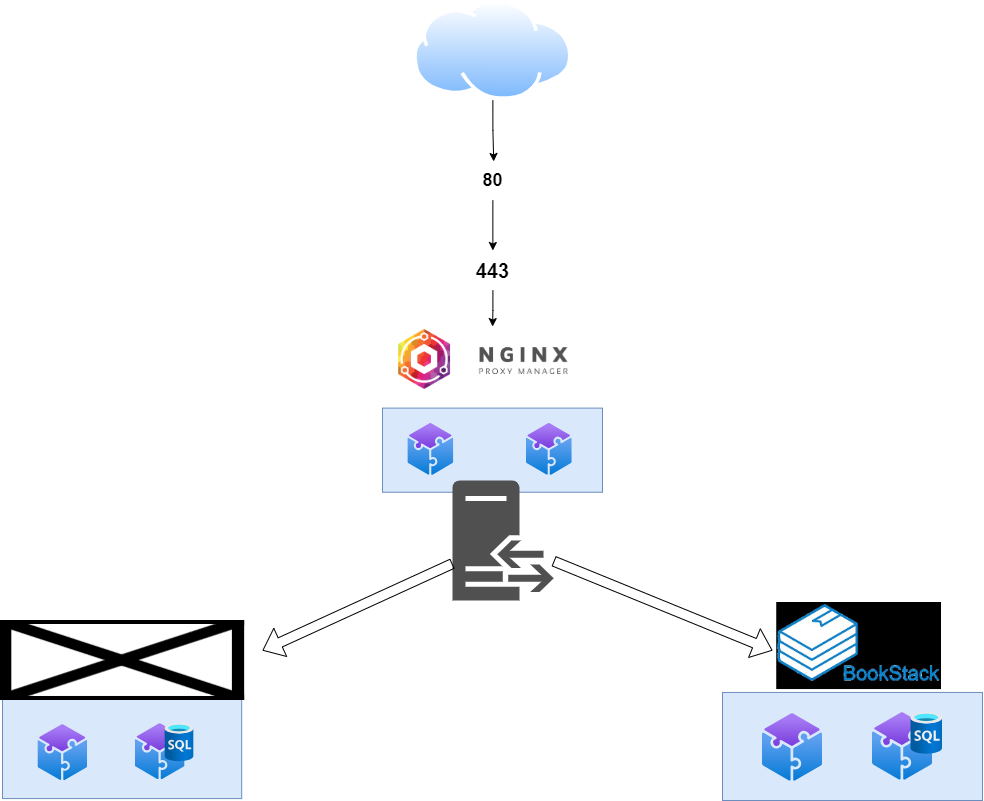
The above shows how we intend the communication to work. In this design, you will always use Nginx Proxy manager (NPM), and to manage docker from a web-ui we are going to use Portainer. We will expose to the public port 80 TCP and port 443 TCP. We will also open temporarily port 81 TCP for NPM's initial setup / management.
This guide will not show you how to create a VM, open the necessary ports on your VPS ( 80, 81, 443 ), or create the necessary DNS records on your Public DNS Server or Domain Registrar.
Install Docker using the convenience script
Docker provides a convenience script at https://get.docker.com/open_in_new to install Docker into development environments non-interactively. The convenience script isn't recommended for production environments, but it's useful for creating a provisioning script tailored to your needs. Also refer to the install using the repository steps to learn about installation steps to install using the package repository. The source code for the script is open source, and you can find it in the docker-install repository on GitHubopen_in_new.
Always examine scripts downloaded from the internet before running them locally. Before installing, make yourself familiar with potential risks and limitations of the convenience script:
- The script requires
rootorsudoprivileges to run. - The script attempts to detect your Linux distribution and version and configure your package management system for you.
- The script doesn't allow you to customize most installation parameters.
- The script installs dependencies and recommendations without asking for confirmation. This may install a large number of packages, depending on the current configuration of your host machine.
- By default, the script installs the latest stable release of Docker, containerd, and runc. When using this script to provision a machine, this may result in unexpected major version upgrades of Docker. Always test upgrades in a test environment before deploying to your production systems.
- The script isn't designed to upgrade an existing Docker installation. When using the script to update an existing installation, dependencies may not be updated to the expected version, resulting in outdated versions.
Tip: preview script steps before running
You can run the script with the
--dry-runoption to learn what steps the script will run when invoked:$ curl -fsSL https://get.docker.com -o get-docker.sh $ sudo sh ./get-docker.sh --dry-run
This example downloads the script from https://get.docker.com/open_in_new and runs it to install the latest stable release of Docker on Linux:
$ curl -fsSL https://get.docker.com -o get-docker.sh
$ sudo sh get-docker.sh
Executing docker install script, commit: 7cae5f8b0decc17d6571f9f52eb840fbc13b2737
<...>
Linux post-installation steps for Docker Engine
These optional post-installation procedures describe how to configure your Linux host machine to work better with Docker.
Manage Docker as a non-root user
The Docker daemon binds to a Unix socket, not a TCP port. By default it's the root user that owns the Unix socket, and other users can only access it using sudo. The Docker daemon always runs as the root user.
If you don't want to preface the docker command with sudo, create a Unix group called docker and add users to it. When the Docker daemon starts, it creates a Unix socket accessible by members of the docker group. On some Linux distributions, the system automatically creates this group when installing Docker Engine using a package manager. In that case, there is no need for you to manually create the group.
Warning
The
dockergroup grants root-level privileges to the user. For details on how this impacts security in your system, see Docker Daemon Attack Surface.
Note
To run Docker without root privileges, see Run the Docker daemon as a non-root user (Rootless mode).
To create the docker group and add your user:
-
Create the
dockergroup.$ sudo groupadd docker -
Add your user to the
dockergroup.$ sudo usermod -aG docker $USER -
Log out and log back in so that your group membership is re-evaluated.
If you're running Linux in a virtual machine, it may be necessary to restart the virtual machine for changes to take effect.
You can also run the following command to activate the changes to groups:
$ newgrp docker -
Verify that you can run
dockercommands withoutsudo.$ docker run hello-worldThis command downloads a test image and runs it in a container. When the container runs, it prints a message and exits.
If you initially ran Docker CLI commands using
sudobefore adding your user to thedockergroup, you may see the following error:WARNING: Error loading config file: /home/user/.docker/config.json - stat /home/user/.docker/config.json: permission deniedThis error indicates that the permission settings for the
~/.docker/directory are incorrect, due to having used thesudocommand earlier.To fix this problem, either remove the
~/.docker/directory (it's recreated automatically, but any custom settings are lost), or change its ownership and permissions using the following commands:$ sudo chown "$USER":"$USER" /home/"$USER"/.docker -R $ sudo chmod g+rwx "$HOME/.docker" -R
Configure Docker to start on boot with systemd
Many modern Linux distributions use systemd to manage which services start when the system boots. On Debian and Ubuntu, the Docker service starts on boot by default. To automatically start Docker and containerd on boot for other Linux distributions using systemd, run the following commands:
$ sudo systemctl enable docker.service
$ sudo systemctl enable containerd.service
To stop this behavior, use disable instead.
$ sudo systemctl disable docker.service
$ sudo systemctl disable containerd.service
If you need to add an HTTP proxy, set a different directory or partition for the Docker runtime files, or make other customizations, see customize your systemd Docker daemon options.
Creating a new Docker network
I’m going to demonstrate how to create a bridge network and then show you how to deploy a container on that network. We’ll create a network called net-to-proxy. The creation of this network can be achieved with a single command:
docker network create --driver bridge net-to-proxy
The output of that command will be a long string of characters that represents the ID of that newly-created network
Install Docker-Compose standalone
Important
From July 2023 Compose V1 stopped receiving updates. It's also no longer available in new releases of Docker Desktop.
Compose V2 is included with all currently supported versions of Docker Desktop. For more information, see Migrate to Compose V2.
Docker's documentation refers to and describes Compose V2 functionality.
On this page you can find instructions on how to install Compose standalone on Linux or Windows Server, from the command line.
On Linux
Compose standalone
Note that Compose standalone uses the
-composesyntax instead of the current standard syntaxcompose.
For example typedocker-compose upwhen using Compose standalone, instead ofdocker compose up.
- To download and install Compose standalone, run:
$ curl -SL https://github.com/docker/compose/releases/download/v2.23.0/docker-compose-linux-x86_64 -o /usr/local/bin/docker-compose
-
Apply executable permissions to the standalone binary in the target path for the installation.
-
Test and execute compose commands using
docker-compose.Tip
If the command
docker-composefails after installation, check your path. You can also create a symbolic link to/usr/binor any other directory in your path. For example:$ sudo ln -s /usr/local/bin/docker-compose /usr/bin/docker-compose
Creating a new Docker Network
I’m going to demonstrate how to create a bridge network and then show you how to deploy a container on that network. We’ll create a network called net-to-proxy. The creation of this network can be achieved with a single command:
docker network create --driver bridge net-to-proxyThe output of that command will be a long string of characters that represents the ID of that newly-created network