XCP-NG
Welcome to the XCP-NG Home Page on the MSLS Partner's BookStack Wiki!
Explore the world of XCP-NG, the powerful and open-source virtualization platform, right here on our dedicated home page. Whether you're a seasoned IT professional or a curious enthusiast, you'll find a wealth of information and resources to help you master virtualization, optimize your infrastructure, and enhance your virtualized environment.
Intro
XCP-ng is a high performance enterprise level virtualization platform with a rich ecosystem.
About XCP-NG
XCP-ng is a high performance enterprise level virtualization platform with a rich ecosystem.
Originally based on XenServer (opens new window)(now Citrix Hypervisor (opens new window)), it's the result of massive cooperation between individuals and companies, to deliver a product without limits. No restrictions on features and every bit available on GitHub!
Visit the main website to learn more: https://xcp-ng.org(opens new window)

#Overview
TIP
Those videos are made independently by Lawrence Systems / PC Pickup, thanks for bringing quality content like this! YouTube channel(opens new window)
Here is some content explaining XCP-ng in detail:
About the project itself, please see the project page.
#XCP-ng comparing to other products
#vs VMware
#vs Proxmox
#vs Xen vs XenServer vs KVM vs Proxmox
TIP
No flamewar! There are no miracle solutions, but only solutions adapted to your usage. We truly respect all other virtualization platforms!
Useful commands in the XCP-ng Command Line Interface (CLI)
XCP-NG Useful Commands
Here are some useful commands in the XCP-ng Command Line Interface (CLI) that can help you manage and interact with your virtualization environment:
1. Listing VMs and Hosts:
- List all VMs:
xe vm-list
List all hosts:
xe host-list
2. VM Operations:
- Start a VM:
xe vm-start vm=<VM UUID>
- Shut down a VM:
xe vm-shutdown vm=<VM UUID>
- Reboot a VM:
xe vm-reboot vm=<VM UUID>
- Suspend a VM:
xe vm-suspend vm=<VM UUID>
- Reset VM Powerstate
xe vm-reset-powerstate uuid=******* --force
3. Host Operations:
- Reboot the host:
xe host-reboot host=<Host UUID>
- Shutdown the host:
xe host-shutdown host=<Host UUID>
- Put the host into maintenance mode:
xe host-disable host=<Host UUID>
4. Snapshot Management:
- Take a snapshot of a VM:
xe vm-snapshot vm=<VM UUID> new-name-label=<Snapshot Name>
- Revert a VM to a snapshot:
xe vm-revert-to-snapshot snapshot=<Snapshot UUID>
- List snapshots of a VM:
xe snapshot-list vm=<VM UUID>
5. Storage Operations:
- List SRs (Storage Repositories):
xe sr-list
- Scan for new SRs:
xe sr-scan
6. Networking:
- List network interfaces on a host:
xe pif-list host=<Host UUID>
- List VM's VIFs (Virtual Network Interfaces):
xe vif-list vm=<VM UUID>
7. Resource Pool Operations:
List resource pools:
xe pool-list
- Create a new resource pool:
xe pool-create name-label=<Pool Name>
8. Performance Monitoring:
- Display VM performance statistics:
xe vm-param-list uuid=<VM UUID> | grep guest-metrics
9. Logs and Diagnostics:
- Display host logs:
less /var/log/xensource.log
- Display VM logs:
less /var/log/xensource/vm-logs/<VM UUID>.log
These are just a few examples of the commands you can use to manage your XCP-ng environment. Be sure to refer to the official XCP-ng documentation for more details and command options specific to your version and setup. Always exercise caution when using CLI commands, especially in production environments.
Compute and GPU Passthough
This section is dedicated to compute related things, from Xen to GPU/vGPU or PCI passthrough
Compute and GPU
PCI Passthrough
#0. Prerequisites
WARNING
Ensure VT-d/IOMMU Support Is Enabled
In order to use PCI passthrough your host system must have VT-d/IOMMU functionality enabled. This should be more commonly enabled by default on enterprise hardware than on consumer hardware. It can be enabled in the BIOS/UEFI of systems with CPUs and chipsets which support it. For Intel platforms the feature is typically referred to as VT-d (Intel Virtualization Technology for Directed I/O); on AMD platforms it is typically listed as IOMMU or AMD-Vi. Please note that this is not the same as VT-x/AMD-v virtualisation support, and so these options are often listed separately.
Consult your system or motherboard manual for instructions on where to find the setting in your BIOS/UEFI. In addition, system BIOS updates may reset the feature to its default state, which may require you to re-enable it.
If you attempt to perform PCI passthrough on a system which does not have VT-d/IOMMU enabled, you may encounter the following error when you start the target virtual machine:
Internal error: xenopsd internal error: Device.PCI.Cannot_add(_, _)
WARNING
You may not be able to passthrough USB controllers
Internal error: xenopsd internal error: Cannot_add(0000:00:1d.0, Xenctrlext.Unix_error(30, "1: Operation not permitted"))
and an error in /var/log/xen/hypervisor.log
[2020-08-22 10:09:03] (XEN) [  297.542134] [VT-D] It's disallowed to assign 0000:08:00.0 with shared RMRR at 7ba77000 for Dom32753.
[2020-08-22 10:09:03] (XEN) [  297.542136] d[IO]: assign (0000:08:00.0) failed (-1)
This indicates that your device is using RMRR (opens new window). Intel IOMMU does not allow DMA to these devices (opens new window)and therefore PCI passthrough is not supported.
#1. Find your devices ID (B/D/F (opens new window)) on the PCI bus using one of the following methods:
Method 1: List PCI Devices with lspci
This method is the easiest way to find devices.
[root@xen ~]# lspci
...
04:01.0 Ethernet controller: Intel Corporation 82541PI Gigabit Ethernet Controller (rev 05)
Method 2: List System Device Classes with find
This method works best for finding the device ID by class. The example below the class is net and shows how to find the device ID of a specific network interface.
[root@xen ~]# find /sys/class/net -exec readlink {} +
../../devices/virtual/net/lo
../../devices/pci0000:00/0000:04:01.0/net/eth1
#2. Tell XCP-ng not to use this device ID for Dom0
Add the xen-pciback.hide parameter to the kernel boot parameters:
/opt/xensource/libexec/xen-cmdline --set-dom0 "xen-pciback.hide=(0000:04:01.0)"
You can hide multiple devices. If you wanted to add another device at
00:19.0just append it to the parameter.
/opt/xensource/libexec/xen-cmdline --set-dom0 "xen-pciback.hide=(0000:04:01.0)(0000:00:19.0)"
To remove any passthrough devices from dom0:
/opt/xensource/libexec/xen-cmdline --delete-dom0 xen-pciback.hide
TIP
This kernel parameter is not retained when you upgrade an XCP-ng host using the installation ISO. Remember to re-do this step after the upgrade.
#3. Reboot the XCP-ng host
[root@xen ~]# reboot
#4. Check with xl pci-assignable-list on CLI
[root@xen ~]# xl pci-assignable-list
0000:04:01.0
#5. Put this PCI device 'into' your VM
[root@xen ~]# xe vm-param-setother-config:pci=0/0000:04:01.0uuid=<vm uuid>
You can also pass through multiple devices. If you wanted to pass through another device at
00:19.0just append it to the parameter.
[root@xen ~]# xe vm-param-setother-config:pci=0/0000:04:01.0,0/0000:00:19.0uuid=<vm uuid>
#6. Start your VM and be happy 😃
[root@xen ~]# xe vm-start uuid=<vm uuid>
#GPU Passthrough
To passthrough a complete graphics card to a VM (not virtualize it into multiple virtual vGPUs, which is different, see the vGPU section below), just follow the regular PCI passthrough instructions, no special steps are needed. Most Nvidia and AMD video cards should work without issue.
TIP
Previously, Nvidia would block the use of gaming/consumer video cards for passthrough (the Nvidia installer would throw an Error 43 when installing the driver inside your VM). They lifted this restriction in 2021 with driver R465 and above, so be sure to use the latest driver. Details from Nvidia here.(opens new window)
#vGPU
#NVIDIA vGPU
WARNING
Due to a proprietary piece of code in XenServer, XCP-ng doesn't have (yet) support for NVIDIA vGPUs.
#MxGPU (AMD vGPU)
AMD GPU are trivial using industry standard.
Version 2.0 of the mxgpu iso should work on any 8.X version of XCP-ng
- Enable SR-IOV in the server's BIOS
- Install XCP-ng
- Download Citrix XenServer from AMD's Drivers & Support page. (Currently version 2.0.0 for XenServer 8.1)
- Copy the
mxgpu-2.0.0.amd.isoto the host - Install the supplemental pack:
cd /tmp
xe-install-supplemental-pack mxgpu-2.0.0.amd.iso
- Reboot the XCP-ng
- Assign an MxGPU to the VM from the VM properties page. Go to the GPU section. From the Drop down choose how big of a slice of the GPU you want on the VM and click OK
Start the VM and log into the guest OS and load the appropriate guest driver from AMD's Drivers & Support page.
Known working cards:
- S7150x2
#USB Passthrough
TIP
There's no need to alter any files manually as some older guides suggest
It's fairly easy using the xe CLI. First use xe pusb-list to list all the physical USB devices on your host available for passthrough:
[root@xenserver ~]# xe pusb-list
uuid ( RO)            : 10fbec89-4472-c215-5d55-17969b473ee6
            path ( RO): 2-1.1
       vendor-id ( RO): 0781
     vendor-desc ( RO): SanDisk Corp.
      product-id ( RO): 5591
    product-desc ( RO):
          serial ( RO): 4C530001151223117134
         version ( RO): 2.10
     description ( RO): SanDisk Corp._4C530001151223117134
Find your USB device there, and note the uuid. Then use that uuid to enable passthrough for it:
[root@xenserver ~]# xe pusb-param-set uuid=10fbec89-4472-c215-5d55-17969b473ee6 passthrough-enabled=true
This will create a usb-group containing this USB device. We need to find the uuid of that group, so we use the usb-group-list command, specifying the physical USB uuid we got in step one:
[root@xenserver ~]# xe usb-group-list PUSB-uuids=10fbec89-4472-c215-5d55-17969b473ee6
uuid ( RO)                : 1f731f6a-6025-8858-904d-c98548f8bb23
name-label ( RW): Group of 0781 5591 USBs
name-description ( RW):
Note the uuid of this usb-group, then use it in the following command to attach this USB device to your desired VM. Remember to first shut down the target VM as hot-plug for USB passthrough is not supported:
xe vusb-create usb-group-uuid=<usb_group_uuid> vm-uuid=<vm_uuid>
So using the examples above, it would look like:
xe vusb-create usb-group-uuid=1f731f6a-6025-8858-904d-c98548f8bb23 vm-uuid=4feeb9b2-2176-b69d-b8a8-cf7289780a3f
Finally, start the target guest VM:
[root@xenserver ~]# xe vm-start uuid=<vm_uuid>
Note: If you get a message containing internal error when trying to start the VM after assigning it a USB device, try the following command to ensure its platform:usb parameter is set correctly:
xe vm-param-set uuid=<vm_uuid> platform:usb=True
In the future if you ever need to unplug the virtual USB device from your VM, or remove and unassign it completely, find the uuid of the virtual USB device by running xe vusb-list. Then use the uuid of the virtual USB device in one or both of the following commands:
xe vusb-unplug uuid=<vusb_uuid>
xe vusb-destroy uuid=<vusb_uuid>
#Passing through Keyboards and Mice
xcp-ng host uses usb-policy.conf at /etc/xensource/usb-policy.conf with ALLOW and DENY rules for different classes of usb devices. The default file contains Mice and Keyboards with DENY rules. You can edit this file to allow these devices (and any other ones similarly).
Once edited, run the following command to refresh:
/opt/xensource/libexec/usb_scan.py -d
Then run
xe pusb-scan host-uuid=<host_uuid>VM & Guest Tools
This section guides you through installing an agent on the VM for a better integration with XC-NG
VM & Guest Tools
VM
#All VMs
#Dynamic Memory
Using Dynamic Memory Control (DMC) can be a good way to reduce your memory consumption, but you have to be careful: during live migration of a VM, XCP-ng will automatically reduce the VM memory to it's minimal settings and this can cause VM crash if it's not ready to function with this smaller amount of RAM.
We recommand you check your VM settings to verify if dynamic memory has been enabled. In Xen Orchestra, the Advanced tab of your VM will display the memory limits, in the "VM limits" section:

If dynamic min is equal to dynamic max - as displayed in the screenshot - then dynamic memory is disabled. If dynamic min < dynamic max, then make sure your VM is able to fully function with as little RAM as defined in dynamic min.
#Use a VNC client
- Connect to a XCP-ng server using SSH, then execute this command with the VM UUID to join:
xe vm-list params=dom-id,resident-on uuid=<VM_UUID>
For example:
xe vm-list params=dom-id,resident-on uuid=b2632c6a-8c0c-2fcc-4f1f-5b872733f58c
resident-on ( RO)    : 888254e8-da05-4f86-ad37-979b8d6bad04
         dom-id ( RO): 2
- Then, check you are on the host where the VM is currently running using the host UUID:
xe pif-list management=true params=IP host-uuid=888254e8-da05-4f86-ad37-979b8d6bad04
IP ( RO)    : 172.16.210.15
If not, use this IP to create an SSH connection to the right host.
- Ensure
socatis installed and execute this command with the DOM ID got earlier and a free TCP port:
socat TCP-LISTEN:<TCP_PORT_TO_USE> UNIX-CONNECT:/var/run/xen/vnc-<DOM_ID>
What have we done? We exposed a UNIX domain socket (which allows us to connect to the VM using VNC) directly over TCP.
- Fine, now open a new shell, and on your local machine create a SSH tunnel with a free TCP port:
ssh -L <LOCAL_PORT>:localhost:<REMOTE_PORT> root@<HOST_IP>
- Finally, start the client, for example
vncviewer:
vncviewer localhost:<LOCAL_PORT>
#Windows VMs
#Manage screen resolution
#Bios VM
For a Bios VM, screen resolution can be managed directly through the OS:
- Right click on the desktop
- Display settings
- Choose resolution
#UEFI VM
For a UEFI VM, you will need to set up your resolution in the UEFI settings of the VM. For that you first will need to enter the VM UEFI setup:
- At VM start, during Tiano firmware logo display, press ESC.

- You will enter the UEFI firmware management interface. Navigating with keyboard arrows, select Device Manager and press Enter.

- In the next screen select OVMF platform configuration.

- In the OVMF settings, select Change Preferred then the resolution you want.
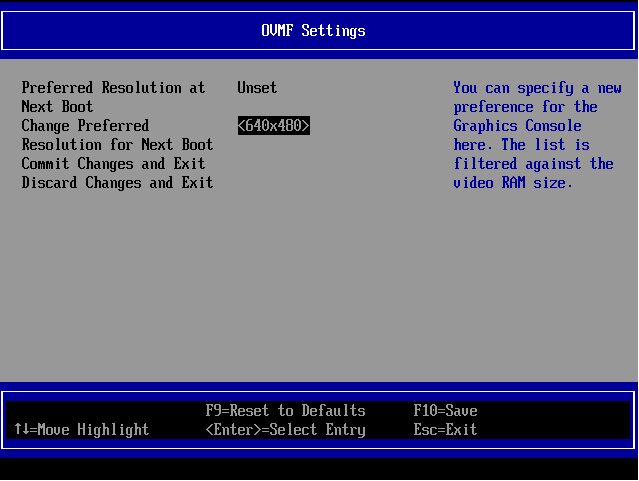
- Press F10 and save the changes.
- Restart your VM by sending a CTRL+ALT+DEL.
- After reboot your VM will display the selected resolution.
#Guest tools
XCP-ng needs guest tools to be installed in the VMs in order to communicate with the guest operating system. This brings better performance and is required for various features.
In short: always install the guest tools to your VMs.
The tools are made of two main components:
- kernel drivers for the OS
- a management agent
#Linux
Xen guest drivers have been built-in in the Linux kernel for many years. All currently supported Linux distributions include them.
So all we need is to install the management agent, which comes either as a systemd or as a sysvinit service, depending on the Linux distribution. The service is usually named xe-linux-distribution.
Those guest tools can be installed:
- from the target distribution's online repositories if available
- from the Guest Tools ISO image that can be attached to any VM in XCP-ng
#Install from the distro's online repositories
Distros may provide guest tools for XCP-ng and Citrix Hypervisor in their own repositories. When they don't, or when the packages are outdated, we enjoin you to contact them to ask for new packages. Upstream sources are available at https://github.com/xenserver/xe-guest-utilities.
Distros often have policies that forbid enabling new services by default, so most of the time the steps are:
- enable the appropriate repository
- install the package from it
- enable the service
#CentOS and Fedora
Enable the EPEL repository in the VM, then:
yum install xe-guest-utilities-latest
The service is not enabled by default, so enable it and start it:
systemctl enable xe-linux-distribution
systemctl start xe-linux-distribution
#Alpine
Enable the community repository in /etc/apk/repositories, then:
apk add xe-guest-utilities
The service is not enabled by default, so enable it and start it:
rc-update add xe-guest-utilities
rc-service xe-guest-utilities start
#Ubuntu
apt install xe-guest-utilities
The last known package was published for the LTS release Focal Fossa. It was dropped from more recent releases. We enjoin you to contact ubuntu packagers for them to start packaging it again. In the meantime you can install the guest tools from our guest tools ISO image, as explained below.
Feel free to add other distros to the above list if they provide the tools in their repositories.
#Install from the guest tools ISO
#"Supported" Linux distributions
For distros that are supported by the install.sh script (Debian, CentOS, RHEL, SLES, Ubuntu...), the process is:
- Attach the guest tools ISO to the guest from Xen Orchestra or using
xe. - Then inside the VM, as root:
mount /dev/cdrom /mnt
bash /mnt/Linux/install.sh
umount /dev/cdrom
- No need to reboot the VM even if the script asks to. That's an old message from back when it was needed to install a kernel module in addition to the management agent. We'll get rid of it at some point.
- Eject the guest tools ISO
#Derived Linux distributions
If your Linux distribution is not recognized by the installation script but derives from one that is supported by the script, you can override the detection and force the tools to install by using:
bash /mnt/Linux/install.sh -d $DISTRO -m $MAJOR_VERSION
Examples:
## derived from debian 10
bash /mnt/Linux/install.sh -d debian -m 10
## derived from RHEL or CentOS 8
bash /mnt/Linux/install.sh -d rhel -m 8
The likeliness for the installation to work correctly will depend on how much those distros differ from their "parent".
#Other Linux distributions
For the remaining Linux distributions, mount the guest tools ISO as described above, then look for the xe-guest-utilities_*_all.tgz archive. Copy its contents on the system in /etc and /usr. It contains a System V init script by default but there's also a systemd unit file available on the ISO (xe-linux-distribution.service).
See also Contributing below.
#Specific cases
#openSUSE Leap 15.2 with transactional-updates
For the xe-daemon to start it is necessary that insserv is installed on the system. To make sure that is the case run
sudo transactional-uptdates pkg install insserv-compat
and as good measure reboot if they weren't already installed.
To install the guest tools open up the chroot environment with
sudo transactional-updates shell
and mount the ISO like with every other derived distro
mount /dev/cdrom /mnt
bash /mnt/Linux/install.sh -d sles -m 15
umount /dev/cdrom
To exit the chroot cleanly you have to kill the xe-daemon process that may have been automatically started. Otherwise you end up with a corrupted snapshot and transactional-updates will fail.
And again reboot the system to go to your newest snapshot.
After the reboot enable the service and start it with
systemctl enable xe-linux-distribution.service
systemctl start xe-linux-distribution.service
#Update the guest tools
It's a good habit, and may be even required in some cases (that would then be described in the Release Notes, to update the guest tools to their latest version when your XCP-ng hosts are updated.
Depending on the situation, just update from your distribution's online repositories, or follow the above installation process again.
#FreeBSD
FreeBSD is a 30-year-old operating system used widely to run all sorts of systems and has served as the basis for a number of operating systems, including MacOS, pfSense, and FreeNAS. The Xen kernel modules are built and distributed in the GENERIC kernel, so if you haven't customised or recompiled your kernel, the drivers will be present.
To communicate with the hypervisor, you need to install two ports (opens new window):
The install.sh script on the guest tools ISO does not yet support FreeBSD, so there is no point in mounting the guest tools ISO on a FreeBSD VM.
To manually install xe-guest-utilities from a package (opens new window)you can run:
pkg install xen-guest-tools xe-guest-utilities
service xenguest start
By default the xe-daemon will run if FreeBSD detects the Xen hypervisor at boot. If that autodetection fails for some reason, you can force it to try by putting xenguest_enable=YES in your rc.conf file: sysrc xenguest_enable=YES.
Run service xenguest [stop|start|restart] to respectively stop, start, or restart the xe-daemon.
#OpenBSD
On OpenBSD, the xen drivers are also already part of the kernel. The install.sh script doesn't support OpenBSD, but there are ways to install the management agent anyway.
TIP
For OpenBSD search the forum (opens new window). See for example this thread (opens new window).
#FreeNAS/TrueNAS
FreeNAS is a locked-down version of FreeBSD, with many packages disabled to ensure a more stable environment for the fileserver. xe-guest-utilities is part of the packages that are not available in FreeNAS. But because it's based on FreeBSD, the packages from that OS can be installed, at your own risk. This is not a big issue for this particular package, because it's a leaf in the chain of dependencies - nothing in FreeNAS depends on it.
To install it on versions 11 or higher, until version 12.0-U1 of TrueNAS that includes it as default, follow these steps.
-
Enable the FreeBSD repo first:
# sed -i '' 's/enabled: no/enabled: yes/' /usr/local/etc/pkg/repos/FreeBSD.confIf you are using FreeNAS v11.2 or higher, you also have to disable the local package repository to avoid an issue in that particular release and that may affect later versions (opens new window)before running
pkg install:# sed -i '' 's/enabled: yes/enabled: no/' /usr/local/etc/pkg/repos/local.conf -
Create a temporary directory and move into it:
# mkdir /tmp/repo # cd /tmp/repo -
Fetch the required packages. A directory All will be created and you will find the packages with their current versions under there:
# pkg fetch -o /tmp/repo/ xen-guest-tools # pkg fetch -o /tmp/repo/ xe-guest-utilities -
Add the downloaded packages, without their dependencies:
# pkg add -M All/xen-guest-tools-4.14.0.txz
# pkg add -M All/xe-guest-utilities-6.2.0_3.txz
The versions reported here are just the current version and they maybe different in your installation.
-
Revert the repos to their original settings to avoid surprises down the road. The second command should be run just if you disabled the local repo in step 1:
# sed -i '' 's/enabled: yes/enabled: no/' /usr/local/etc/pkg/repos/FreeBSD.conf
# sed -i '' 's/enabled: no/enabled: yes/' /usr/local/etc/pkg/repos/local.conf
A restart of the VM will perform a reset of these files to their original settings too.
-
Once the package is installed, you need to tell FreeNAS to start the
xe-daemonprocess when starting:- Go to Tasks -> Init/Shutdown Script
- Create a new task with the following settings:
- Type: Command
- Command:
/usr/local/sbin/xe-daemon -p /var/run/xe-daemon.pid & - When: Pre Init
- Enabled: Checked
-
Reboot. If you do not plan to reboot the VM, you can start the daemon manually running the command
/usr/local/sbin/xe-daemon -p /var/run/xe-daemon.pid &. After you'll see a FreeBSD icon in your VM list on Xen Orchestra, and you can restart/shutdown the VM properly from the Web UI.
More insights and options are available in this issue (opens new window)or this issue (opens new window).
#Windows
Windows guests need both the device drivers and the management agent.
- The device drivers bring optimized I/O performances.
- The management agent brings more manageability of the VM from XCP-ng, and guest metrics reporting to the host.
#Citrix tools vs XCP-ng tools
There exists two different set of tools that you can use on your VMs: the official tools from Citrix Hypervisor, or the fully open-source tools from XCP-ng. Both work well. The important point is not to mix them in the same VM.
Citrix tools:
- ➕ Benefit from all the testing by Citrix QA team.
- ➕ The drivers can be updated through Windows Update.
- ➖ Proprietary, closed-source.
XCP-ng tools:
- ➕ Fully open-source.
- ➕ Maintained by the XCP-ng project.
- ➕ ➖ The sources for the drivers are from the Xen project directly, without additional Citrix patches. This is good, but it may be that in some specific situations Citrix drivers behave better (None known at the moment).
- ➖ The sources for the management agent are older than that of Citrix (they have stopped updating GitHub a while ago).
- ➖ Maintained by one overloaded community member until Vates finds a developer to hire or contract with in order to maintain them more efficiently.
- ➖ Won't transparently replace existing Citrix tools. You need to remove Citrix tools first if they are present, in order to install XCP-ng tools.
It's now up to you to choose.
#XCP-ng Windows Guest Tools
Drivers built by the XCP-ng community.
Download: https://github.com/xcp-ng/win-pv-drivers/releases(opens new window)
Stability and testing status: Windows guest tools community testing (opens new window).
#How to know if tools are already installed and working
The VM needs to be running for this test.
#From Xen Orchestra
You can see this information in the General tab of the VM view.
- Device drivers: XO displays "Hardware virtualization with paravirtualization drivers enabled (PVHVM)" on the General tab
- Management agent: XO displays "Management agent detected" or "Management agent version {version} detected"
More detailed information can also be found in the Advanced tab.
#From command line
- Device drivers:
xe vm-param-get param-name=PV-drivers-detected uuid={VM-UUID} - Management agent:
xe vm-param-get param-name=PV-drivers-version uuid={VM-UUID}(ok if not empty)
#Installing on fresh installed Windows
#Prerequisite: Disable "Windows Update tools"
The first step, before the VM creation and first start, is to make sure than Windows Update is not going to install Citrix tools automatically at first boot. This behaviour is governed by the "Windows Update tools" parameter in a VMs advanced view. It must be off.
Before creating the VM:
- Make sure you are not creating it from a custom template than has the "Windows Update tools enabled.
- ⚠️ Do not create it from XCP-ng Center. XCP-ng Center automatically enables that option when the license allows it (and in XCP-ng the license always allows it...). This behaviour may be modified in the future.
Before starting the VM:
- Check the value of "Windows Update tools" in the Advanced tab of your VM in Xen Orchestra. Must be off.
If you already started the VM with the option on, then the Citrix drivers have been installed automatically. Restart from scratch or see below how to remove them.
Tip: you can also check the value of the parameter from the command line.
xe vm-param-get param-name=has-vendor-device uuid={VM-UUID}
True means that it's active, False that it isn't. It needs to be False.
#Install the XCP-ng drivers
- snapshot before just in case
- unpack the ZIP file
- start setup.exe
- follow the install wizard
Note: Restart can take a while if your windows is currently updating. Restart only occurs after windows has the updates finished.
- after restart one of two messages should pop up
- request for restart <- just restart!
- Management Agent installed successfully <- enjoy 😃
#Upgrade from Citrix ®️ XenServer ®️ client tools
Our installer is not able currently to cleanly uninstall Citrix tools. Citrix tools' uninstaller itself isn't either: it leaves various things behind.
So we need to perform a complete manual clean-up of the tools:
- either entirely manually
- or using the experimental PowerShell script contributed by one of our users at https://github.com/siodor/win-tools-cleanup(opens new window)
⚠️ In any case, first disable "Windows Update tools" for the VM (Xen Orchestra, advanced tab) and reboot it.
Following is the manual process.
#The confident option
You can try a simple process first with some chances of success.
- Make a snapshot so you can rollback. Windows can get unstable/unbootable if things go wrong.
- Uninstall Citrix ®️ XenServer ®️ Client Tools
- Reboot
- Uninstall
XenServer PV-Drivers in Device Manager in following order (reboots may be needed):XenServer PV Network Device(one ore more Devices)XenServer PV Storage Host AdapterXenServer PV Network ClassXenServer InterfaceXenServer PV Bus (c000)(if present)XenServer PV Bus (0002)orXenServer PV Bus (0001)
- Reboot
- Check that you see this unknown device in Device Manager:
SCSI-Controller- PCI-Device ID5853:0002
- Unpack ZIP file
- Start setup.exe
- Follow the install wizard
Note: Restart can take a while if your windows is currently updating. Restart only occurs after windows has the updates finished.
#The nuclear option
If the confident option above didn't yield the expected results, then we switch to a more aggressive attitude towards the old tools.
TIP
What follows works in many cases, but some users occasionally still meet the following issues: XCP-ng tools not installing (but Citrix tools install well, so that is a solution to have working tools), and occasional BSODs in some cases or versions of Windows.
Through many tests, a user came up with a similar yet slightly different procedure that allowed them to avoid Blue Screens Of Death in their situation: https://xcp-ng.org/forum/post/27602.
Help is welcome to help us reconcile both procedures into one.
- Follow the steps 0 to 4 of the "confident option" above if not done yet.
- Follow this (ignore steps 6 and 7, do not try to install the tools yet) https://support.citrix.com/article/CTX215427(opens new window)
- Now open regedit and go to HKLM\SYSTEM\CurrentControlSet\Services and delete entries for all xen* services.
- In regedit, also go to HKLM\SOFTWARE\Microsoft\Windows\CurrentVersion\DIFx\DriverStore and remove ONLY xennet* xenvif*
- Go to C:\Windows\System32 and remove: (you may not have all these)
- xenbus_coinst*.dll
- xenvbd_coinst*.dll
- liteagent.exe
- Now go to C:\Windows\System32\drivers and remove any files named xen*
- Go to C:\Windows\system32\DriverStore\FileRepository and remove xennet* and Xenvif* directories.
- Open the Device Manager and Click View --> Show Hidden Devices. Select Other Devices and Right click on XENBUS VIF and select uninstall. If it asks to delete the driver, check yes. Do this for any xen related thing you see in device manager. Also do the same for any unknown devices.
- Lastly, reboot the VM. You should now hopefully be able to install xen tools regularly.
Note: Also have a look at our Troubleshooting Guide - Windows PV-Tools.
#VMs with INACCESSIBLE_BOOT_DEVICE error
You can try to manually inject the missing drivers in recovery mode.
- Get the "Drivers" folder from the XCP Tools installation path (C:\PROGRAM FILES...) - from another VM or install the tools somewhere else to get it.
- Create an ISO-Image containing the "Drivers" folder (see http://imgburn.com (opens new window)) and mount that ISO-Image to your VM
- Boot to recovery mode and use the command line and the tool "dism" (see Microsoft Docs (opens new window)) to inject the drivers (specifically the xenbus and xenvbd drivers) - watch out for the drive letter of the Windows installation and the CD-Drive ('D' and 'E' in the following example):
dism /image:d:\ /add-driver /driver:e:\Drivers\xenbus\x64\xenbus.inf
dism /image:d:\ /add-driver /driver:e:\Drivers\xenvbd\x64\xenvbd.inf
#Using the Windows guest tools from Citrix
Tools from Citrix are not included in the guest tools ISO distributed with XCP-ng for legal reasons.
#A reminder
As written above:
- The device drivers bring optimized I/O performances.
- The management agent brings more manageability of the VM from XCP-ng, and guest metrics reporting to the host.
#Management agent + device drivers
The only way to get the management agent is from Citrix. It can be freely downloaded from the Citrix Hypervisor download page (opens new window), provided you create an account on their site. Name of the item: "Citrix VM Tools for Windows". The installer will install both the management agent and the device drivers.
Update (2022-02-02)
Since Citrix released their 8.2 CU1 version of Citrix Hypervisor, the Express edition is not available anymore for download. However, you can still get the Windows tools from the previous releases that are still available under "Citrix Hypervisor and XenServer Legacy Versions". You will also find present and past releases of the tools at: https://support.citrix.com/article/CTX235403 (opens new window).
#Automated installation via Windows Update: device drivers alone
If you are using Xen Orchestra, you can switch the "Windows Update tools" advanced parameter on from the "Advanced" tab of the VM view. This will install the device drivers automatically at next reboot ⚠️ but not the management agent which still needs to be installed from Citrix tools' installer.
... So the "Windows Update tools" option is not a complete solution if you need the guest metrics from the management agent. However it may be a convenient way to get future driver updates if you wish so.
#Switching from XCP-ng tools to Citrix tools
If your VM already has XCP-ng tools and you wish to switch to Citrix tools, then you need to do the same kind of clean-up as described higher in this document for the opposite situation.
#Contributing
#Linux / xBSD
If you would like to contribute improvements to the install.sh script so that it supports your distro, create a pull request against: https://github.com/xcp-ng/xe-guest-utilities/tree/master/mk. Relevant files are usually xe-linux-distribution and install.sh.
#Windows
The XCP-ng team is looking for help in improving the guest tools installer, build process, and clean-up tools.
Networking
XCP-ng is using Open vSwitch as its core, and supports various features from it.
Networking
XCP-ng is using Open vSwitch as its core, and supports various features from it.
Tip :
Even if one NIC can be enough for your host, having a dedicated NIC for storage will be really important to get consistent performances (especially if you use shared storage like iSCSI or NFS).
#Concepts
This section describes the general concepts of networking in XCP-ng.
XCP-ng creates a network for each physical NIC during installation. When you add a server to a pool, the default networks are merged. This is meant to be sure that all physical NICs with the same device name are attached to the same network, authorizing seamless VM flexibility on any host of the pool.
Typically, you add a network to create a new external network (bridge), set up a new VLAN using an existing NIC, or create a NIC bond.
You can configure four different types of networks in XCP-ng:
- Default Networks have an association with a physical network interface. Those are also called "External networks" provide a bridge between a virtual machine and the physical network interface connected to the network. External networks enable a virtual machine to connect to resources available through the server’s physical NIC.
- Bonded networks create a bond between two or more NICs to create a single, high-performing channel between the virtual machine and the network.
- Global Private Networks extend the single server private network concept to allow VMs on different pools and/or hosts to communicate with each other by using the XOA SDN controller.
#Network objects
This section uses three types of server-side software objects to represent networking entities. These objects are:
- A PIF, which represents a physical NIC on a host. PIF objects have a name and description, a UUID, the parameters of the NIC they represent, and the network and server they are connected to.
- A VIF, which represents a virtual NIC on a virtual machine. VIF objects have a name and description, a UUID, and the network and VM they are connected to.
- A network, which is a virtual Ethernet switch on a host. Network objects have a name and description, a UUID, and the collection of VIFs and PIFs connected to them.
xe CLI, Xen Orchestra or XCP-ng center allow you to configure networking options. You can control the NIC used for management operations, and create advanced networking features such as VLANs and NIC bonds.
#Networks
Each XCP-ng server has one or more networks, which are virtual Ethernet switches. Networks that are not associated with a PIF are considered internal. Internal networks can be used to provide connectivity only between VMs on a given XCP-ng server, with no connection to the outside world. Networks associated with a PIF are considered external. External networks provide a bridge between VIFs and the PIF connected to the network, enabling connectivity to resources available through the PIF’s NIC.
#VLANs
VLANs, as defined by the IEEE 802.1Q standard, allow a single physical network to support multiple logical networks. XCP-ng hosts support VLANs in multiple ways.
#VLANs for VMs
Switch ports configured as 802.1Q VLAN trunk ports can be used with XCP-ng VLAN features to connect guest virtual network interfaces (VIFs) to specific VLANs. In this case, XCP-ng server performs the VLAN tagging/untagging functions for the guest, which is unaware of any VLAN configuration.
XCP-ng VLANs are represented by additional PIF objects representing VLAN interfaces corresponding to a specified VLAN tag. You can connect XCP-ng networks to the PIF representing the physical NIC to see all traffic on the NIC. Alternatively, connect networks to a PIF representing a VLAN to see only the traffic with the specified VLAN tag. You can also connect a network such that it only sees the native VLAN traffic, by attaching it to VLAN 0.
To use VLANs for your network logical isolation, it's really easy. You'll create a new network with a VLAN ID, and all virtual interfaces created on this network will transparently have traffic tagged in this VLAN. No need to configure anything inside your VM.
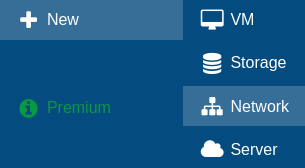
First step, go in Xen Orchestra menu, "New" then "Network":
Then, select a pool where you want to create this network, and fill what's required, like physical interface selection, name and description and also VLAN number:

Finally, click on "Create network":

That's it!
#Bonds
It's same as previous section, just check the "Bonded Network" and select multiple PIFs in the Interface selector. You can either use VLANs or not, it doesn't matter!
#Manage physical NICs
#Add a new NIC
After physically installing a new NIC, you'll need to run a xe pif-scan command on the host to get this NIC added as an available PIF. xe pif-scan host-uuid=<HOST UUID> Check new NIC by UUID: xe pif-list Plug new NIC: xe pif-plug uuid=<NIC UUID>
#Renaming NICs
In a pool, all NICs across your hosts should match up exactly. So if your management is NIC 0 and your 10Gbit storage interface is NIC 4 on host 1, it should be the same on host 2.
If for some reason the NIC order between hosts doesn't match up, you can fix it with the interface-rename command.
TIP
These commands are meant to be done on non-active interfaces. Typically this will be done directly after install, before even joining a pool.
interface-rename --help
This will display all available options.
interface-rename --list
This will display the current interface mapping/assignments.
Interfaces you wish to rename need to be downed first:
ifconfig eth4 down
ifconfig eth8 down
The most common use will be an update statement like the following:
interface-rename --update eth4=00:24:81:80:19:63 eth8=00:24:81:7f:cf:8b
This example will set the mac-address for eth4 & eth8, switching them in the process.
The XAPI database needs the old PIFs removed. First list your PIFs for the affected NICs:
xe pif-list
xe pif-forget uuid=<uuid of eth4>
xe pif-forget uuid=<uuid of eth8>
Reboot the host to apply these settings.
The interfaces by their new names need to be re-enabled:
ifconfig eth4 up
ifconfig eth8 up
The new interfaces need to be introduced to the PIF database:
xe host-list
Make note of the host uuid. Then introduce the interfaces:
xe pif-introduce device=eth4 host-uuid=<host uuid> mac=<mac>
xe pif-introduce device=eth8 host-uuid=<host uuid> mac=<mac>
By renaming/updating interfaces like this, you can assure all your hosts have the same interface order.
#Remove a physical NIC
Before removing it, just be sure to remove its associated networks, so it won't cause trouble. Then, shutdown, remove the NIC and finally boot. After the boot, do a xe pif-forget uuid=<OLD PIF UUID> to get rid of the object record.
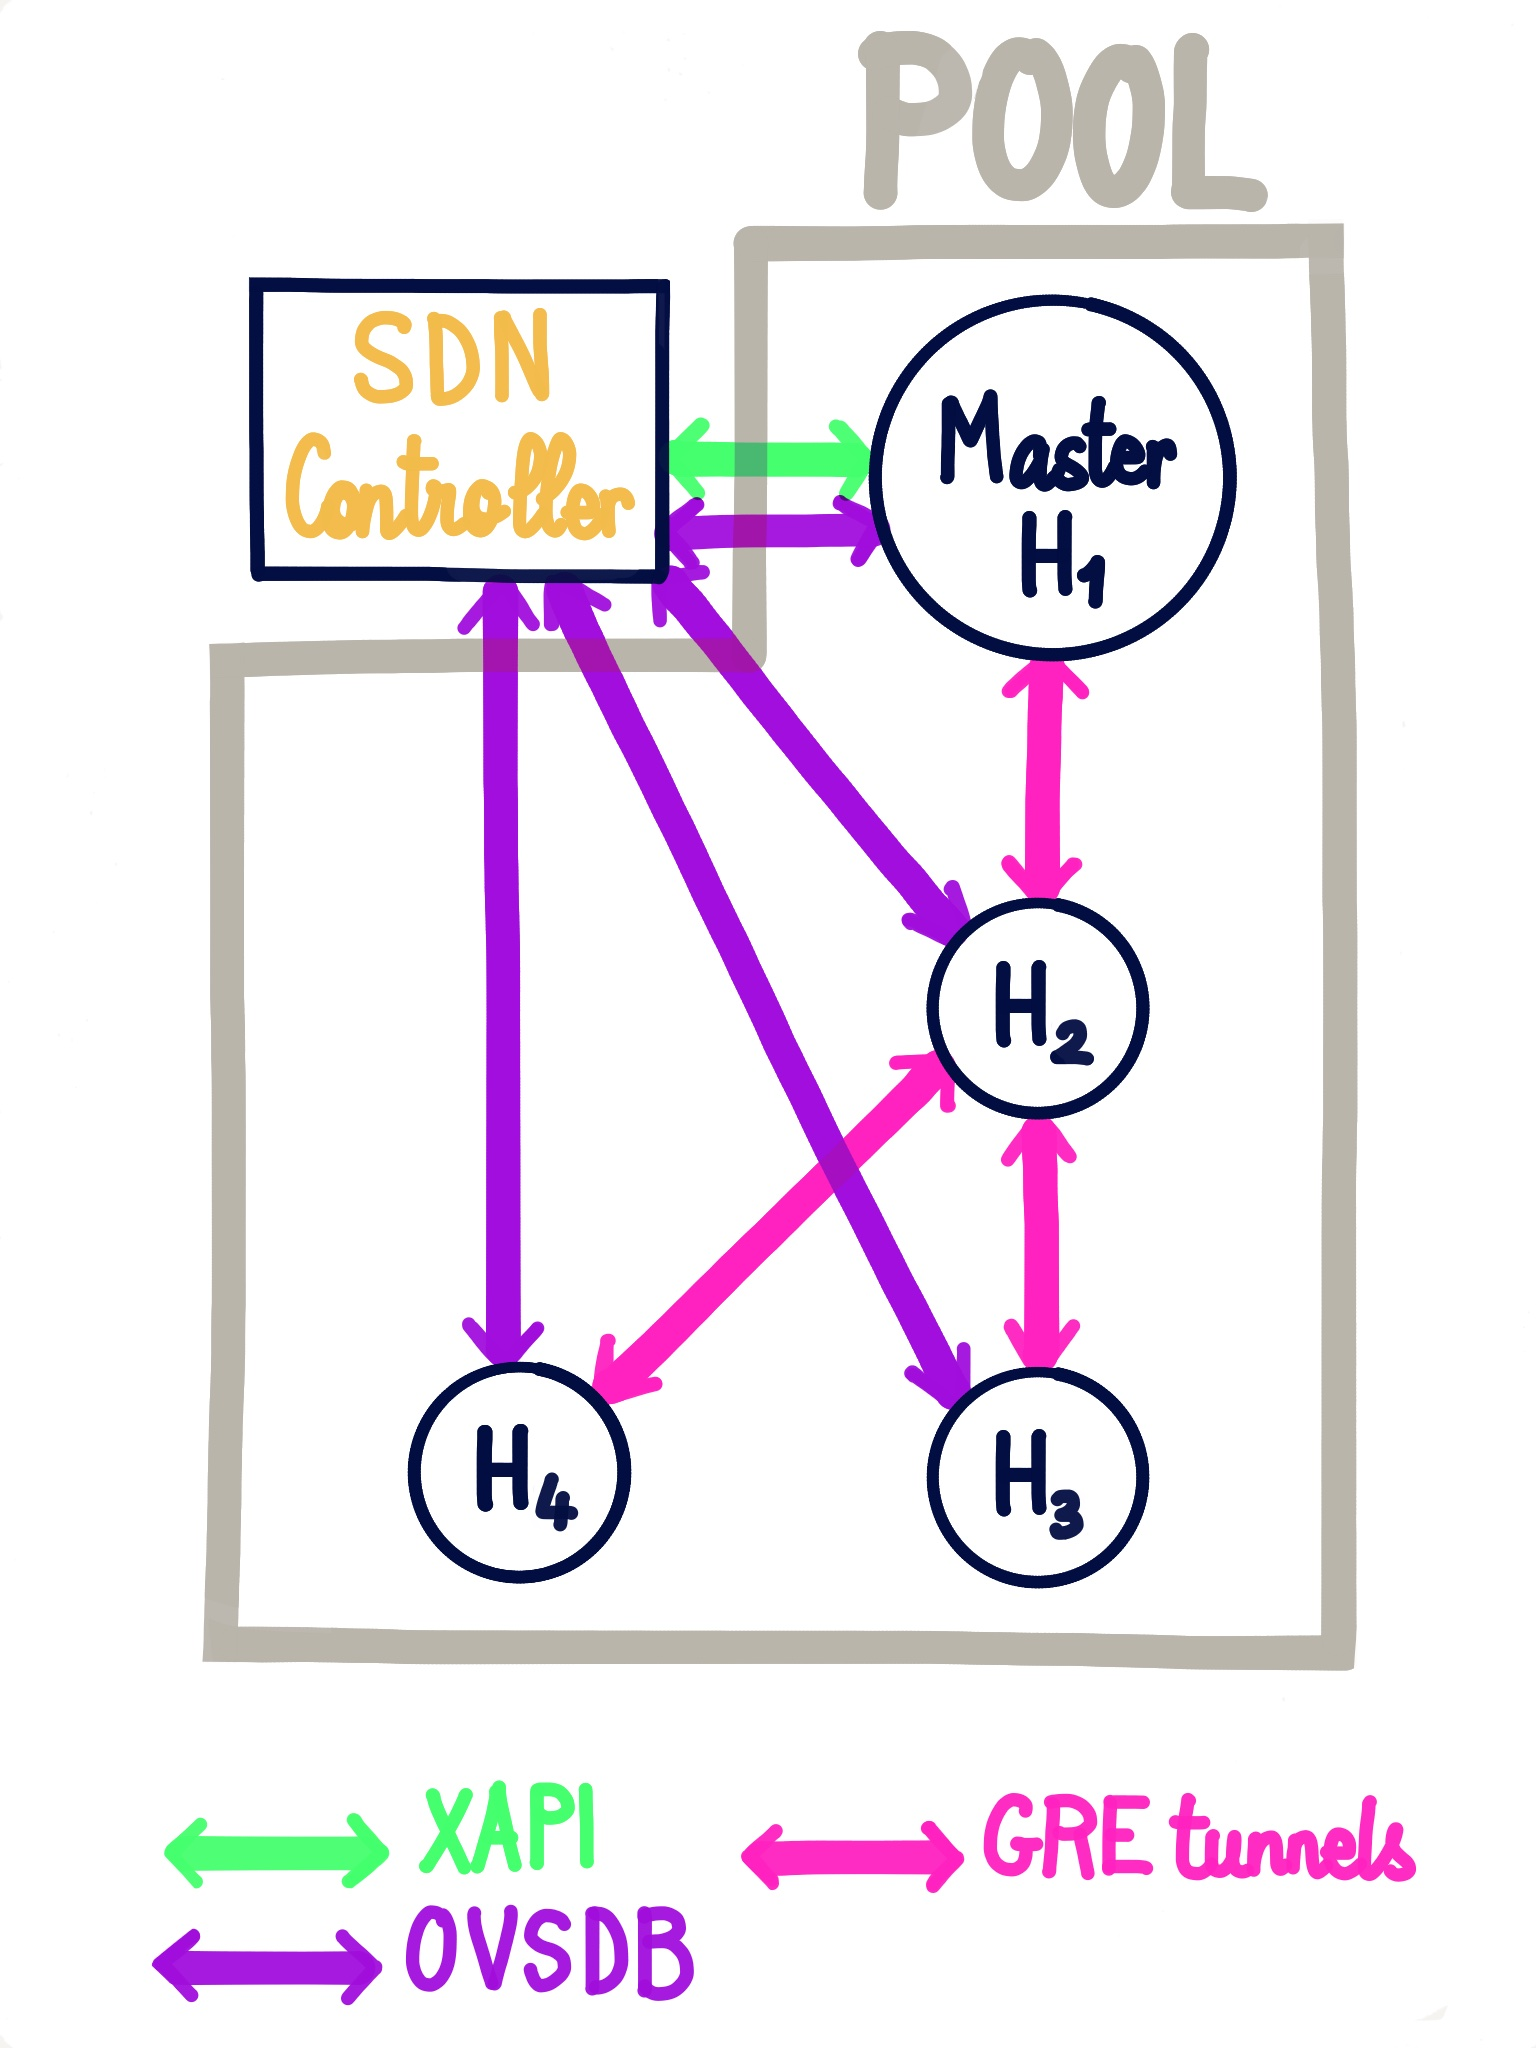
#SDN controller
An SDN controller is provided by a Xen Orchestra plugin. Thanks to that, you can enjoy advanced network features.
#GRE/VXLAN tunnels
Private network (using tunnels) are very handy when you want to access resources in a secure manner, that are not in the same physical network.
So we want a network that is:
- reachable by all the hosts in a pool or even between different pools!
- unreachable by anything outside the network
- reactive when the pool changes (new host, host ejected,
PIFunplugged etc):
That's exactly what you can have thanks to XO SDN controller (here via GRE tunnels):
To create a private network, go in Xen Orchestra, New/Network and select "Private Network":
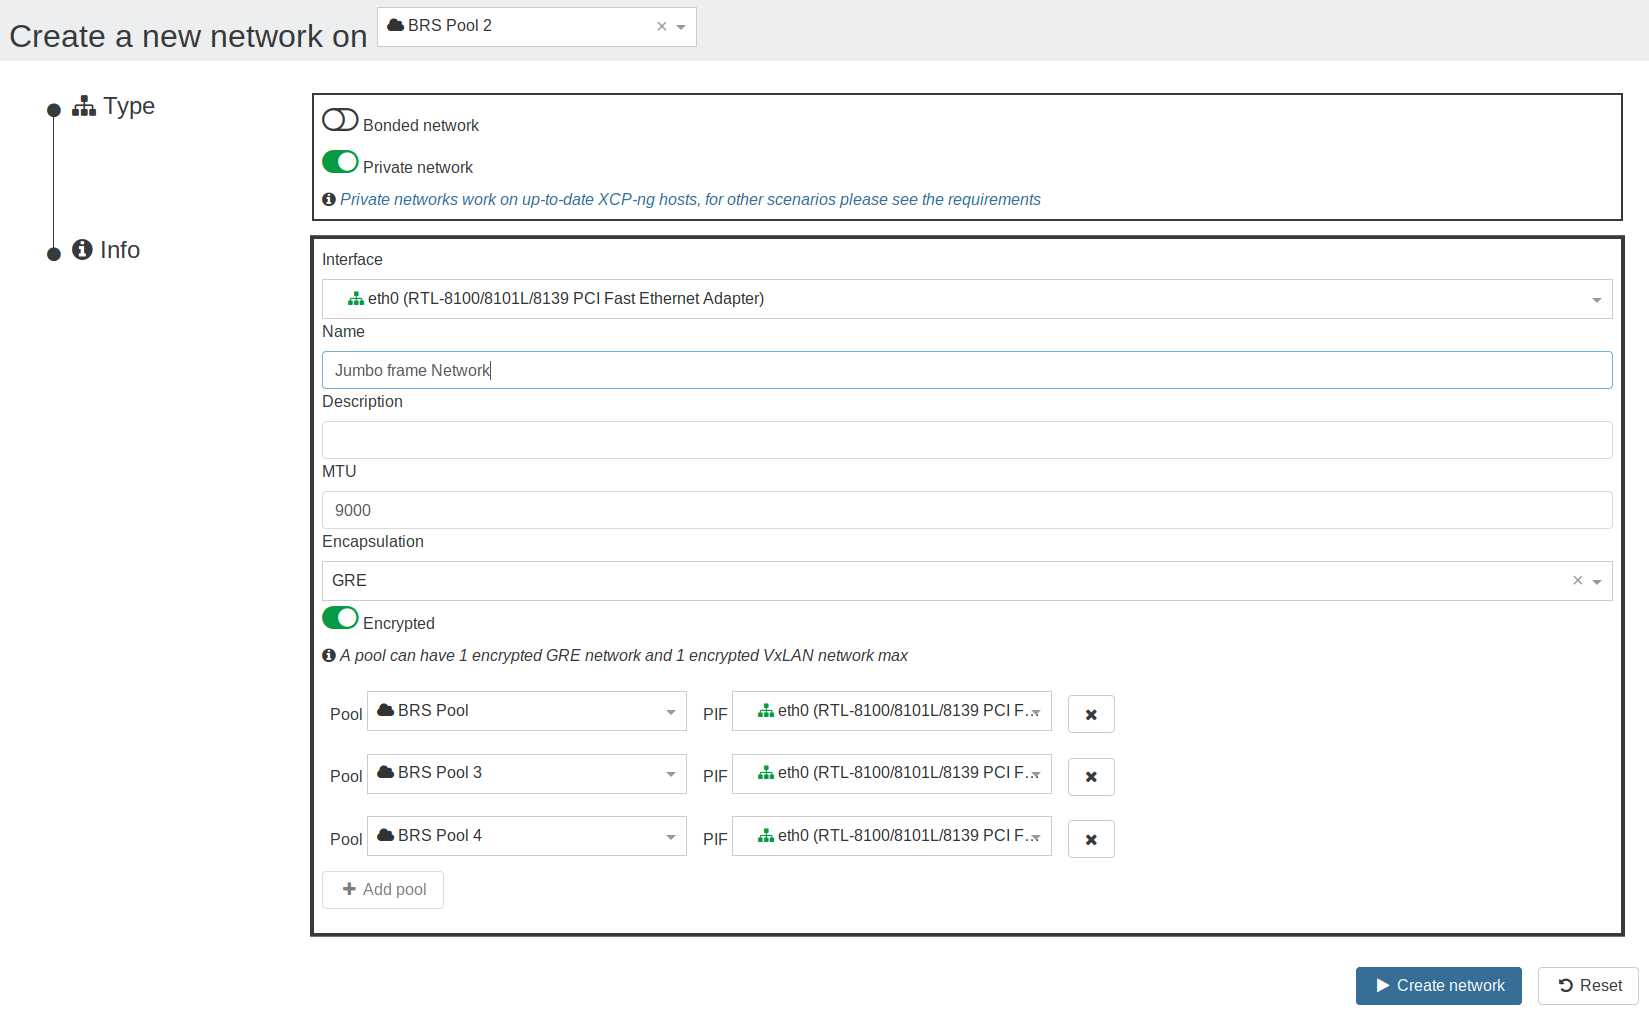
#Encryption
To be able to encrypt the networks, openvswitch-ipsec package must be installed on all the hosts:
yum install openvswitch-ipsec --enablerepo=xcp-ng-testingsystemctl enable ipsecsystemctl enable openvswitch-ipsecsystemctl start ipsecsystemctl start openvswitch-ipsec
More information available on XO official documentation for SDN controller (opens new window).
#OpenFlow rules
TIP
This feature is coming very soon!
#Common errors
#TLS connection issue
The error would look like this:
Client network socket disconnected before secure TLS connection was established
It means the TLS certificate, used to identify a SDN controller, on the host doesn't match the one of the plugin, to solve it:
- unload the SDN Controller plugin
- in plugin config, set
override-certsoption to on (it will allow the plugin to uninstall the existing certificate before installing its own) - load the plugin
The issue should be fixed.
#Static routes
Sometimes you need to add extra routes to an XCP-ng host. It can be done manually with an ip route add 10.88.0.0/14 via 10.88.113.193 (for example). But it won't persist after a reboot.
To properly create persistent static routes, first create your xen network interface as usual. If you already have this network created previously, just get its UUID with an xe network-list. You're looking for the interface you have a management IP on typically, something like xapi0 or xapi1 for example. If you're not sure which one it is, you can run ifconfig and find the interface name that has the IP address this static route traffic will be exiting. Then get that interfaces UUID using the previous xe network-list command.
Now insert the UUID in the below example command. Also change the IPs to what you need, using the following format: <network>/<netmask>/gateway IP>. For example, our previous ip route add 10.88.0.0/14 via 10.88.113.193 will be translated into:
xe network-param-set uuid=<network UUID> other-config:static-routes=10.88.0.0/14/10.88.113.193
TIP
You must restart the toolstack on the host for the new route to be added!
You can check the result with a route -n afterwards to see if the route is now present. If you must add multiple static routes, it must be in one command, and the routes separated by commas. For example, to add both 10.88.0.0/14 via 10.88.113.193 and 10.0.0.0/24 via 192.168.1.1, you would use this:
xe network-param-set uuid=<network UUID> other-config:static-routes=10.88.0.0/14/10.88.113.193,10.0.0.0/24/192.168.1.1
#Removing static routes
To remove static routes you have added, stick the same network UUID from before in the below command:
xe network-param-remove uuid=<network UUID> param-key=static-routes param-name=other-config
A toolstack restart is needed as before.
TIP
XAPI might not remove the already-installed route until the host is rebooted. If you need to remove it ASAP, you can use ip route del 10.88.0.0/14 via 10.88.113.193. Check that it's gone with route -n.
#Full mesh network
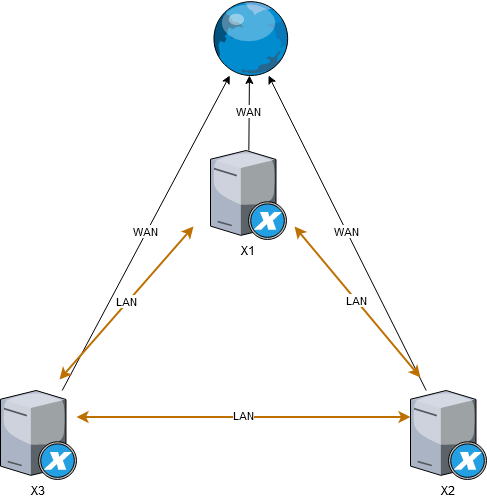
This page describes how to configure a three node meshed network (see Wikipedia (opens new window)) which is a very cheap approach to create a 3 node HA cluster, that can be used to host a Ceph cluster, or similar clustered solutions that require 3 nodes in order to operate with full high-availability.
Meshed network requires no physical network switches, the 3 physical nodes are interlinked with each other using multiple network interfaces.
Example with 3 nodes that each has 3 NIC, 1 is for WAN connection and 2 are used to interlink with remaining 2 nodes:
WARNING
Right now only known-to-work option is to use bridge network backend, but hopefully in future it should be possible to setup meshed network using Open vSwitch as well (should you know how, please update this wiki)
#Using bridge backend
WARNING
These steps will require reboot of all 3 nodes multiple times. They will also require you to use bridge network backend instead of Open vSwitch, which will result in loss of some functionality and is not commercially supported
#Switch to bridge mode on all nodes
SSH to dom0
# on dom0 on each hypervisor as root user
xe-switch-network-backend bridge
# reboot the hypervisor
reboot
#Create a bond on all nodes
In XCP-ng Center go to NICs tab and create a bond, selecting eth1 and eth2 as bond devices, leave all options as default
#Reconfigure the bond device to broadcast mode
Again, ssh to dom0 on all nodes and execute
xe pif-list
# Example output
uuid ( RO)                  : f1580a37-6726-6479-d399-635e2cb719b6
                device ( RO): eth2
    currently-attached ( RO): false
                  VLAN ( RO): -1
          network-uuid ( RO): b33187c0-b231-0c69-6ee9-3ad2dcefa6f8


uuid ( RO)                  : 63abf866-890d-79bb-d276-8a50e8e4a94b
                device ( RO): eth0
    currently-attached ( RO): true
                  VLAN ( RO): -1
          network-uuid ( RO): 7404e9f7-7dfe-b666-d6f2-1fe9886498cd


uuid ( RO)                  : 77826c83-4b60-8137-c00f-3027d89b86b2
                device ( RO): eth1
    currently-attached ( RO): false
                  VLAN ( RO): -1
          network-uuid ( RO): ae9847e4-5587-2e61-4870-365143837aba


uuid ( RO)                  : 65380308-0c53-3d96-f564-06a724a792be
                device ( RO): bond0
    currently-attached ( RO): true
                  VLAN ( RO): -1
          network-uuid ( RO): b7e4d20b-64ed-bf38-c56f-4d740b579005

# Replace the UUID with the bond ID and execute following command
xe pif-param-set uuid=65380308-0c53-3d96-f564-06a724a792be other-config:bond-mode=broadcast
reboot
#Configure the interface in XCP-ng center
Go to tab Networking, rename bond1+2 device to something more memorable such as "MeshLAN", then add IP to all dom0 VMs to test it out, click "Configure" in IP configuration, add IP address and insert following addresses (you can use different addresses and range if you prefer to):
On each node respectively
- 192.168.10.1
- 192.168.10.2
- 192.168.10.3
Netmask: 255.255.255.0 Gateway: leave empty
Now SSH to each dom0 and try if you can ping all 3 IP addresses. If you can, you successfully created a meshed network. This network is going to provide interconnection between all 3 nodes and even if some node die, connectivity between remaining 2 nodes will remain operational.
This setup will save you costs of 2 network switches you would otherwise have to purchase and use instead to achieve HA connectivity.
#References
Forum post: https://xcp-ng.org/forum/topic/1897/mesh-network(opens new window)
Proxmox wiki: https://pve.proxmox.com/wiki/Full_Mesh_Network_for_Ceph_Server(opens new window)
#DNS Search Domains
When XCP-ng is configured for static IP configuration there are no DNS search domains added. It is possible to add search domains into /etc/resolv.conf, however those won't persist across reboots. Use xe pif-param-set to add search domains that should persist across reboots.
- First identify the PIF used as management interface.
# xe pif-list host-name-label=xcpng-srv01 management=true
uuid ( RO)                  : 76608ca2-e099-9344-af36-5b63c0022913
                device ( RO): bond0
    currently-attached ( RO): true
                  VLAN ( RO): -1
          network-uuid ( RO): cc966455-d5f8-0257-04a7-d3d7c671636b
- Take note of the
uuidfield and pass that toxe pif-param-set
# xe pif-param-set uuid=76608ca2-e099-9344-af36-5b63c0022913 other-config:domain=searchdomain1.com,searchdomain2.com,searchdomain3.com
This procedure has to be done for all hosts in the same pool.
#Network Troubleshooting
#Network corruption
Disabling TX offload might help to diagnose NIC issues:
xe pif-param-set uuid=<PIF UUID> other-config:ethtool-tx=off
#Disabling FCoE
If you are using bonds on FCoE capable devices, it's preferable to disable it entirely:
systemctl stop fcoe
systemctl stop xs-fcoe
systemctl disable fcoe
systemctl disable xs-fcoe
See https://github.com/xcp-ng/xcp/issues/138 (opens new window).
#Emergency Network Reset
Incorrect networking settings can cause loss of network connectivity. When there is no network connectivity, XCP-ng host can become inaccessible through Xen Orchestra or remote SSH. Emergency Network Reset provides a simple mechanism to recover and reset a host’s networking.
The Emergency network reset feature is available from the CLI using the xe-reset-networking command, and within the Network and Management Interface section of xsconsole.
Incorrect settings that cause a loss of network connectivity include renaming network interfaces, creating bonds or VLANs, or mistakes when changing the management interface. For example, typing the wrong IP address. You may also want to run this utility in the following scenarios:
WARNING
If a Pool master or host in a resource pool is unable to contact with other hosts.
Use the xe-reset-networking utility only in an emergency because it deletes the configuration for all PIFs, bonds, VLANs, and tunnels associated with the host. Guest Networks and VIFs are preserved. As part of this utility, VMs are shut down forcefully. Before running this command, cleanly shut down the VMs where possible. Before you apply a reset, you can change the management interface and specify which IP configuration, DHCP, or Static can be used.
If the pool master requires a network reset, reset the network on the pool master first before applying a network reset on pool members. Apply the network reset on all remaining hosts in the pool to ensure that the pool’s networking configuration is homogeneous. Network homogeneity is an important factor for live migration.
TIP
- If the pool master’s IP address (the management interface) changes as a result of a network reset or xe host-management-reconfigure, apply the network reset command to other hosts in the pool. This is to ensure that the pool members can reconnect to the Pool Master on its new IP address. In this situation, the IP address of the Pool Master must be specified.
- Network reset is NOT supported when High Availability is enabled. To reset network configuration in this scenario, you must first manually disable high availability, and then run the network reset command.
#Verifying the network reset
After you specify the configuration mode to be used after the network reset, xsconsole and the CLI display settings that will be applied after host reboot. It is a final chance to modify before applying the emergency network reset command. After restart, the new network configuration can be verified in Xen Orchestra and xsconsole. In Xen Orchestra, with the host selected, select the Networking tab to see the new network configuration. The Network and Management Interface section in xsconsole display this information.
#SR-IOV
TO have SR-IOV enabled, you need:
- SR-IOV / ASPM compatible mainboard
- SR-IOV compatible CPU
- SR-IOV compatible network card
- SR-IOV compatible drivers for XCP-ng
WARNING
You can't live migrate a VM with SR-IOV enabled. Use it only if you really need it!
#Setup
- enable SR-IOV in your BIOS
- enable ASPM (seem to be needed acording to https://www.juniper.net/documentation/en_US/contrail3.1/topics/concept/sriov-with-vrouter-vnc.html and https://www.supermicro.com/support/faqs/faq.cfm?faq=26448)
- enable SR-IOV in your network card firmware
Then, you can enable and configure it with xe CLI:
xe network-create name-label=SRIOV
xe network-sriov-create network-uuid=<network_uuid> pif-uuid=<physical_pif_uuid>
xe network-sriov-param-list uuid=<SR-IOV Network_uuid>
The last command will tell you if you need to reboot or not.
Assign the SR-IOV network to your VM:
xe vif-create device=<device index> mac=<vf_mac_address> network-uuid=<sriov_network> vm-uuid=<vm_uuid>
If you want to disable it:
xe network-sriov-destroy uuid=<network_sriov_uuid>
TIP
You can read a Citrix guide here: https://support.citrix.com/article/CTX235044(opens new window)
#Intel i218/i219 slow speed
With kernel version 4.15 a fix in the e1000e driver has been introduced (opens new window). However, this fix slightly slows down DMA access times to prevent the NIC to hang up on heavy UDP traffic. This impacts the TCP performance. A workaround to regain full transfer speeds, you can turn off TCP segmentation offloading via the following command:
ethtool -K <interface> tso off gso off
There is currently no fix available / announced that allows offloading TCP segmentation to the NIC without sacrificing performance.
TIP
The following error message can be ignored: Cannot get device udp-fragmentation-offload settings: Operation not supported
📚 Making MTU 9000 Persistent on XCP-ng (OVS)
📚 Guide Overview
Title: Making MTU 9000 Persistent on XCP-ng (OVS)
Last Updated: April 2025
Description: This guide explains how to configure MTU 9000 for Open vSwitch (OVS) inside XCP-ng environments. It ensures that jumbo frames remain active and survive reboots, greatly improving network performance for storage and virtual machines.
Difficulty Level: Intermediate 🛠️
Estimated Time: 15–20 minutes
📖 Table of Contents
📖 Purpose
This guide explains how to correctly configure MTU 9000 on Open vSwitch (OVS) inside XCP-ng to ensure jumbo frames survive across reboots.
📖 Requirements
- XCP-ng 8.x or newer
- Open vSwitch in use (default in XCP-ng)
- SSH access to the hypervisor
- Root privileges
📖 Background
- XCP-ng uses Open vSwitch (OVS) to manage VM networking.
- Setting MTU at the Linux NIC level is not enough; OVS controls the real MTU behavior.
- XCP-ng resets network bridges at boot, so MTU settings must be reapplied automatically.
📖 Steps
🛠 Step 1: Create the MTU Fix Bash Script
sudo nano /usr/local/bin/fix-ovs-mtu.sh
Paste this:
#!/bin/bash
sleep 20
ovs-vsctl set interface eth4 mtu_request=9000
ovs-vsctl set interface xenbr4 mtu_request=9000
echo "$(date) - MTU 9000 applied to eth4 and xenbr4" >> /var/log/fix-ovs-mtu.log
Make it executable:
sudo chmod +x /usr/local/bin/fix-ovs-mtu.sh
🛠 Step 2: Create the systemd Service
sudo nano /etc/systemd/system/fix-ovs-mtu.service
Paste this:
[Unit]
Description=Fix OVS Interfaces MTU to 9000 After Boot
After=network-online.target openvswitch-switch.service

[Service]
ExecStart=/usr/local/bin/fix-ovs-mtu.sh
Type=oneshot
RemainAfterExit=yes

[Install]
WantedBy=multi-user.target
🛠 Step 3: Enable the Service
sudo systemctl daemon-reload
sudo systemctl enable fix-ovs-mtu.service
sudo systemctl start fix-ovs-mtu.service
sudo systemctl status fix-ovs-mtu.service
🛠 Step 4: Validate
- Check service status:
sudo systemctl status fix-ovs-mtu.service
- Check MTU settings:
ip link show eth4
ip link show xenbr4
- Verify inside OVS:
ovs-vsctl list interface eth4 | grep mtu
ovs-vsctl list interface xenbr4 | grep mtu
📖 Expected Results
- eth4 MTU = 9000
- xenbr4 MTU = 9000
- VMs' VIFs inherit MTU 9000
- Jumbo frames supported end-to-end
- Performance improvement (storage, VM transfers)
📖 Troubleshooting
| Symptom | Likely Cause | Solution |
|---|---|---|
| MTU resets to 1500 after reboot | Systemd service not enabled | Check service status |
| Ping fragmentation on large packets | Switch ports not configured for MTU 9000 | Enable jumbo frames on switch ports |
| iperf3 speed low | MTU not properly set at all layers | Double-check NIC, bridge, VM, and switch |
📖 Bonus: Quick MTU Validation Script
#!/bin/bash
echo "Checking eth4:"
ip link show eth4 | grep mtu
echo "Checking xenbr4:"
ip link show xenbr4 | grep mtu
echo "Checking VMs VIFs:"
ip link | grep vif | grep mtu
📖 Final Notes
- Always verify MTU from storage to VM.
- Setting
mtu_requestinside OVS and a systemd fix ensures full persistence. - Better performance, lower CPU usage for 10GbE network operations.
✅ Quick Steps Checklist
- Create the MTU fix script at
/usr/local/bin/fix-ovs-mtu.sh - Make the script executable
- Create the systemd service at
/etc/systemd/system/fix-ovs-mtu.service - Reload systemd
- Enable and start the service
- Verify MTU settings on
eth4andxenbr4after boot - Validate VMs inherit MTU 9000
- Test with
iperf3andping -M do -s 8972
Created and maintained by MSLS Partners LLC 📚
Empowering IT with clear documentation and professional best practices.
Version 1.0 | Last Reviewed: April 2025