mtu 65536 qdisc noqueue state UNKNOWN group default qlen 1000
link/loopback 00:00:00:00:00:00 brd 00:00:00:00:00:00
inet 127.0.0.1/8 scope host lo
valid_lft forever preferred_lft forever
inet6 ::1/128 scope host
valid_lft forever preferred_lft forever
```
## Name resolution
Name resolution (as it relates to IP networking) is the process of mapping hostnames to IP addresses, and vice-versa, making it easier to identify resources on a network. The following section will explain how to properly configure your system for name resolution using DNS and static hostname records.
### DNS client configuration
Traditionally, the file `/etc/resolv.conf` was a static configuration file that rarely needed to be changed, or it automatically changed via DCHP client hooks. `systemd-resolved` handles nameserver configuration, and it should be interacted with through the `systemd-resolve` command. Netplan configures `systemd-resolved` to generate a list of nameservers and domains to put in `/etc/resolv.conf`, which is a symlink:
```
/etc/resolv.conf -> ../run/systemd/resolve/stub-resolv.conf
```
To configure the resolver, add the IP addresses of the appropriate nameservers for your network to the `netplan` configuration file. You can also add optional DNS suffix search-lists to match your network domain names. The resulting file might look like the following:
```
network:
version: 2
renderer: networkd
ethernets:
enp0s25:
addresses:
- 192.168.0.100/24
routes:
- to: default
via: 192.168.0.1
nameservers:
search: [mydomain, otherdomain]
addresses: [1.1.1.1, 8.8.8.8, 4.4.4.4]
```
The *search* option can also be used with multiple domain names so that DNS queries will be appended in the order in which they are entered. For example, your network may have multiple sub-domains to search; a parent domain of *`example.com`*, and two sub-domains, *`sales.example.com`* and *`dev.example.com`*.
If you have multiple domains you wish to search, your configuration might look like the following:
```
network:
version: 2
renderer: networkd
ethernets:
enp0s25:
addresses:
- 192.168.0.100/24
routes:
- to: default
via: 192.168.0.1
nameservers:
search: [example.com, sales.example.com, dev.example.com]
addresses: [1.1.1.1, 8.8.8.8, 4.4.4.4]
```
If you try to ping a host with the name `server1`, your system will automatically query DNS for its Fully Qualified Domain Name (FQDN) in the following order:
1. `server1.example.com`
2. `server1.sales.example.com`
3. `server1.dev.example.com`
If no matches are found, the DNS server will provide a result of *notfound* and the DNS query will fail.
### Static hostnames
Static hostnames are locally defined hostname-to-IP mappings located in the file `/etc/hosts`. Entries in the `hosts` file will have precedence over DNS by default. This means that if your system tries to resolve a hostname and it matches an entry in `/etc/hosts`, it will not attempt to look up the record in DNS. In some configurations, especially when Internet access is not required, servers that communicate with a limited number of resources can be conveniently set to use static hostnames instead of DNS.
The following is an example of a `hosts` file where a number of local servers have been identified by simple hostnames, aliases and their equivalent Fully Qualified Domain Names (FQDN’s):
```
127.0.0.1 localhost
127.0.1.1 ubuntu-server
10.0.0.11 server1 server1.example.com vpn
10.0.0.12 server2 server2.example.com mail
10.0.0.13 server3 server3.example.com www
10.0.0.14 server4 server4.example.com file
```
> **Note**
> In this example, notice that each of the servers were given aliases in addition to their proper names and FQDN’s. *Server1* has been mapped to the name *vpn*, *server2* is referred to as *mail*, *server3* as *www*, and *server4* as *file*.
### Name Service Switch (NSS) configuration
The order in which your system selects a method of resolving hostnames to IP addresses is controlled by the Name Service Switch (NSS) configuration file `/etc/nsswitch.conf`. As mentioned in the previous section, typically static hostnames defined in the systems `/etc/hosts` file have precedence over names resolved from DNS. The following is an example of the line responsible for this order of hostname lookups in the file `/etc/nsswitch.conf`.
```
hosts: files mdns4_minimal [NOTFOUND=return] dns mdns4
```
- **`files`** first tries to resolve static hostnames located in `/etc/hosts`.
- **`mdns4_minimal`** attempts to resolve the name using Multicast DNS.
- **`[NOTFOUND=return]`** means that any response of `notfound` by the preceding `mdns4_minimal` process should be treated as authoritative and that the system should not try to continue hunting for an answer.
- **`dns`** represents a legacy unicast DNS query.
- **mdns4** represents a multicast DNS query.
To modify the order of these name resolution methods, you can simply change the `hosts:` string to the value of your choosing. For example, if you prefer to use legacy unicast DNS versus multicast DNS, you can change the string in `/etc/nsswitch.conf` as shown below:
```
hosts: files dns [NOTFOUND=return] mdns4_minimal mdns4
```
## Bridging multiple interfaces
Bridging is a more advanced configuration, but is very useful in multiple scenarios. One scenario is setting up a bridge with multiple network interfaces, then using a firewall to filter traffic between two network segments. Another scenario is using bridge on a system with one interface to allow virtual machines direct access to the outside network. The following example covers the latter scenario:
Configure the bridge by editing your `netplan` configuration found in `/etc/netplan/`, entering the appropriate values for your physical interface and network:
```
network:
version: 2
renderer: networkd
ethernets:
enp3s0:
dhcp4: no
bridges:
br0:
dhcp4: yes
interfaces:
- enp3s0
```
Now apply the configuration to enable the bridge:
```
sudo netplan apply
```
The new bridge interface should now be up and running. The `brctl` provides useful information about the state of the bridge, controls which interfaces are part of the bridge, etc. See `man brctl` for more information.
## networkd-dispatcher for hook scripts
Users of the former `ifupdown` may be familiar with using hook scripts (e.g., pre-up, post-up) in their interfaces file. [Netplan configuration](https://netplan.readthedocs.io/en/stable/netplan-yaml/) does not currently support hook scripts in its configuration definition.
Instead, to achieve this functionality with the `networkd` renderer, users can use [networkd-dispatcher](http://manpages.ubuntu.com/manpages/focal/man8/networkd-dispatcher.8.html). The package provides both users and packages with hook points when specific network states are reached, to aid in reacting to network state.
> **Note**:
> If you are on Desktop (not Ubuntu Server) the network is driven by Network Manager - in that case you need [NM Dispatcher scripts](https://developer.gnome.org/NetworkManager/unstable/NetworkManager.html) instead.
The [Netplan FAQ has a great table](https://netplan.io/faq/#use-pre-up%2C-post-up%2C-etc.-hook-scripts) that compares event timings between `ifupdown`/`systemd-networkd`/`network-manager`.
It is important to be aware that these hooks run asynchronously; i.e. they will not block transition into another state.
The [Netplan FAQ also has an example](https://netplan.io/faq/#example-for-an-ifupdown-legacy-hook-for-post-up%2Fpost-down-states) on converting an old `ifupdown` hook to `networkd-dispatcher`.
## Resources
- The [Ubuntu Wiki Network page](https://help.ubuntu.com/community/Network) has links to articles covering more advanced network configuration.
- The [Netplan website](https://netplan.io/) has additional [examples](https://netplan.readthedocs.io/en/stable/netplan-yaml/) and documentation.
- The [Netplan man page](https://manpages.ubuntu.com/manpages/focal/man5/netplan.5.html) has more information on Netplan.
- The [systemd-resolved man page](https://manpages.ubuntu.com/manpages/focal/man8/systemd-resolved.8.html) has more information on systemd-resolved service.
- For more information on *bridging* see the [netplan.io examples page](https://netplan.readthedocs.io/en/stable/netplan-yaml/#properties-for-device-type-bridges)
# Tutorials
This section of our documentation contains step-by-step tutorials to help outline what Ubuntu Server is capable of while helping you achieve specific aims.
# Basic installation
This chapter provides an overview of how to install Ubuntu Server Edition. You can also refer to this guide on [how to operate the installer](https://ubuntu.com/server/docs/install/general) for more information on using the installer, and to this [screen-by-screen reference guide](https://ubuntu.com/server/docs/install/step-by-step) for more information about each of the installer screens.
## Preparing to install
This section explains various aspects to consider before starting the installation.
## System requirements
Ubuntu Server Edition provides a common, minimalist base for a variety of server applications, such as file/print services, web hosting, email hosting, etc. This version supports four 64-bit architectures:
- amd64 (Intel/AMD 64-bit)
- arm64 (64-bit ARM)
- ppc64el (POWER8 and POWER9)
- s390x (IBM Z and LinuxONE)
The recommended system requirements are:
- CPU: 1 gigahertz or better
- RAM: 1 gigabyte or more
- Disk: a minimum of 2.5 gigabytes
## Perform a system back up
Before installing Ubuntu Server Edition you should make sure all data on the system is backed up.
If this is not the first time an operating system has been installed on your computer, it is likely you will need to re-partition your disk to make room for Ubuntu.
Any time you partition your disk, you should be prepared to lose everything on the disk should you make a mistake or something goes wrong during partitioning. The programs used in installation are quite reliable, most have seen years of use, but they also perform destructive actions.
## Download the server ISO
You can obtain the amd64 server download from [https://releases.ubuntu.com/](https://releases.ubuntu.com/). Select the version you wish to install and select the “server install image” download. Note that the server download includes the installer.
There are platform specific how-to guides for installations on:
- [s390x LPAR](https://ubuntu.com/server/docs/install/s390x-lpar)
- [z/VM](https://ubuntu.com/server/docs/install/s390x-zvm)
- [ppc64el](https://ubuntu.com/server/docs/install/ppc64el)
## Create a bootable USB
There are many ways to boot the installer but the simplest and most common way is to [create a bootable USB stick](https://ubuntu.com/tutorials/tutorial-create-a-usb-stick-on-ubuntu) to boot the system to be installed with ([tutorials for other operating systems](https://ubuntu.com/search?q=%22create+a+bootable+USB+stick%22) are also available).
## Boot the installer
Plug the USB stick into the system to be installed and start it.
Most computers will automatically boot from USB or DVD, though in some cases this is disabled to improve boot times. If you don’t see the boot message and the “Welcome” screen which should appear after it, you will need to set your computer to boot from the install media.
There should be an on-screen message when the computer starts telling you what key to press for settings or a boot menu. Depending on the manufacturer, this could be Escape, F2, F10 or F12. Simply restart your computer and hold down this key until the boot menu appears, then select the drive with the Ubuntu install media.
If you are still having problems, check out the [Ubuntu Community documentation on booting from
CD/DVD](https://help.ubuntu.com/community/BootFromCD).
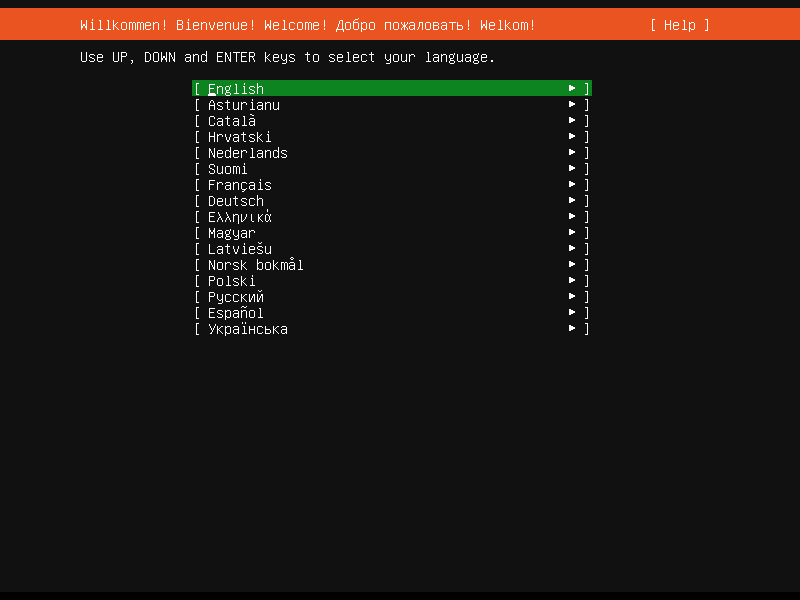
After a few moments, the installer will start in its language selection screen.
## Using the installer
The installer is designed to be easy to use and have sensible defaults so for a first install you can mostly just accept the defaults for the most straightforward install:
- Choose your language
- Update the installer (if offered)
- Select your keyboard layout
- Do not configure networking (the installer attempts to configure wired network interfaces via DHCP, but you can continue without networking if this fails)
- Do not configure a proxy or custom mirror unless you have to in your network
- For storage, leave “use an entire disk” checked, and choose a disk to install to, then select “Done” on the configuration screen and confirm the install
- Enter a username, hostname and password
- On the SSH and snap screens, select “Done”
- You will now see log messages as the install is completed
- Select restart when this is complete, and log in using the username and password provided
# How to operate the Server installer
# How to operate the Server installer
This document explains how to use the installer in general terms. For a step-by-step guide through the screens of the installer, you can use our [screen-by-screen reference guide](https://ubuntu.com/server/docs/install/step-by-step).
## Get the installer
Installer images are made (approximately) daily and are available from [https://cdimage.ubuntu.com/ubuntu-server/daily-live/current/](https://cdimage.ubuntu.com/ubuntu-server/daily-live/current/). These are not tested as extensively as the images from release day, but they contain the latest packages and installer, so fewer updates will be required during or after installation.
You can download the server installer for amd64 from [https://ubuntu.com/download/server](https://ubuntu.com/download/server) and other architectures from [http://cdimage.ubuntu.com/releases/20.04/release/](http://cdimage.ubuntu.com/releases/20.04/release/).
## Installer UI navigation
In general, the installer can be used with the up and down arrows and space or Enter keys and a little typing.
Tab and Shift + Tab move the focus down and up respectively. Home / End / Page Up / Page Down can be used to navigate through long lists more quickly in the usual way.
## Running the installer over serial
By default, the installer runs on the first virtual terminal, `tty1`. This is what is displayed on any connected monitor by default. However, servers do not always have a monitor. Some out-of-band management systems provide a remote virtual terminal, but some times it is necessary to run the installer on the serial port. To do this, the kernel command line needs to [have an appropriate console](https://www.kernel.org/doc/html/latest/admin-guide/serial-console.html) specified on it – a common value is `console=ttyS0` but this is not something that can be generically documented.
When running on serial, the installer starts in a basic mode that does using only the ASCII character set and black and white colours. If you are connecting from a terminal emulator such as gnome-terminal that supports Unicode and rich colours you can switch to “rich mode” which uses Unicode, colours and supports many languages.
## Connecting to the installer over SSH
If the only available terminal is very basic, an alternative is to connect via SSH. If the network is up by the time the installer starts, instructions are offered on the initial screen in basic mode. Otherwise, instructions are available from the help menu once networking is configured.
In addition, connecting via SSH is assumed to be capable of displaying all Unicode characters, enabling more translations to be used than can be displayed on a virtual terminal.
## Help menu
The help menu is always in the top right of the screen. It contains help – both general and for the currently displayed screen – and some general actions.
## Switching to a shell prompt
You can switch to a shell at any time by selecting “Enter shell” from the help menu, or pressing Control + Z or F2.
If you are accessing the installer via `tty1`, you can also access a shell by switching to a different virtual terminal (Control + Alt + arrow, or Control + Alt + number keys, move between virtual terminals).
## Global keys
There are some global keys you can press at any time:
| KEY | ACTION |
|---|
| ESC | Go back |
| F1 | Open help menu |
| Control + Z, F2 | Switch to shell |
| Control + L, F3 | Redraw screen |
| Control + T, F4 | Toggle rich mode (colour, Unicode) on and off |
[](https://ubuntucommunity.s3.dualstack.us-east-2.amazonaws.com/original/2X/2/28369a33c14efbbd4769a17e7235666b4c908d1a.png "network")
This screen allows the configuration of the network. Ubuntu Server uses NetPlan to configure networking and the UI of the installer can configure a subset of NetPlan’s capabilities. In particular it can configure DHCP or static addressing, VLANs and bonds.
If networking is present (defined as “at least one interface has a default route”) then the installer will install updates from the archive at the end of installation.
## Proxy
[](https://ubuntucommunity.s3.dualstack.us-east-2.amazonaws.com/original/2X/6/6c7f84e37cda91e797f62b61148e10d1aa93c056.png "proxy")
The proxy configured on this screen is used for accessing the package repository and the snap store both in the installer environment and in the installed system.
## Mirror
[](https://ubuntucommunity.s3.dualstack.us-east-2.amazonaws.com/original/2X/3/30b527e810914da07ab11c3448750868809f88ac.png "mirror")
The installer will attempt to use `geoip` to look up an appropriate default package mirror for your location. If you want or need to use a different mirror, enter its URL here.
## Storage
[](https://ubuntucommunity.s3.dualstack.us-east-2.amazonaws.com/original/2X/7/7484e986d5be44cf83952ede99e2bb8aaf9ed9c7.png "storage_config")
Storage configuration is a complicated topic and [has its own page for documentation](https://ubuntu.com/server/docs/install/storage).
[](https://ubuntucommunity.s3.dualstack.us-east-2.amazonaws.com/original/2X/c/cc7abf276409bdb9cb0d653f700785c421afe332.png "storage_confirm")
Once the storage configuration is confirmed, the install begins in the background.
## Identity
[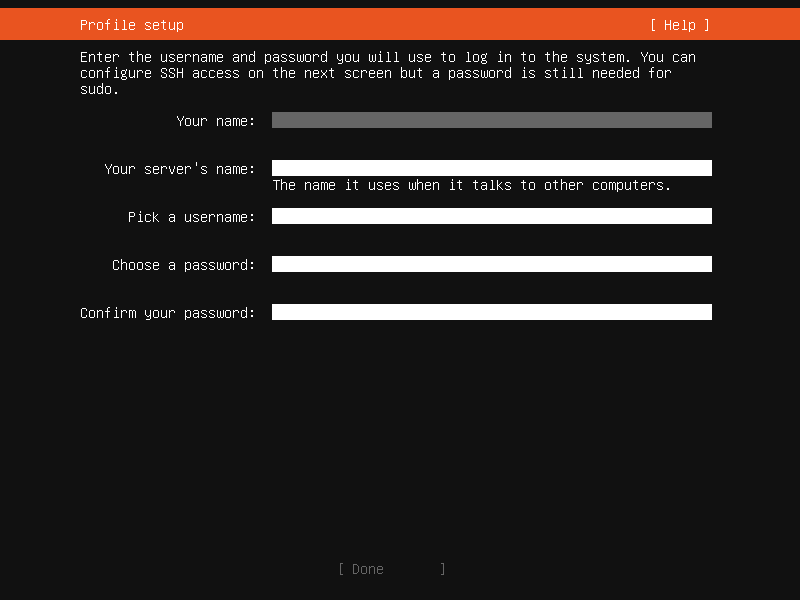](https://ubuntucommunity.s3.dualstack.us-east-2.amazonaws.com/original/2X/9/9e79b5ead9b27622c6eccb3e075bbafc8d6644dd.png "identity")
The default user will be an administrator, able to use `sudo` (this is why a password is needed, even if SSH public key access is enabled on the next screen).
## SSH
[](https://ubuntucommunity.s3.dualstack.us-east-2.amazonaws.com/original/2X/f/fb7af722915a3fd55954df01e8ea418846055123.png "ssh")
A default Ubuntu install has no open ports. It is very common to administer servers via SSH so the installer allows it to be installed with the click of a button.
You can import keys for the default user from GitHub or Launchpad.
If you import a key, then password authentication is disabled by default but it can be re-enabled again if you wish.
## Snaps
[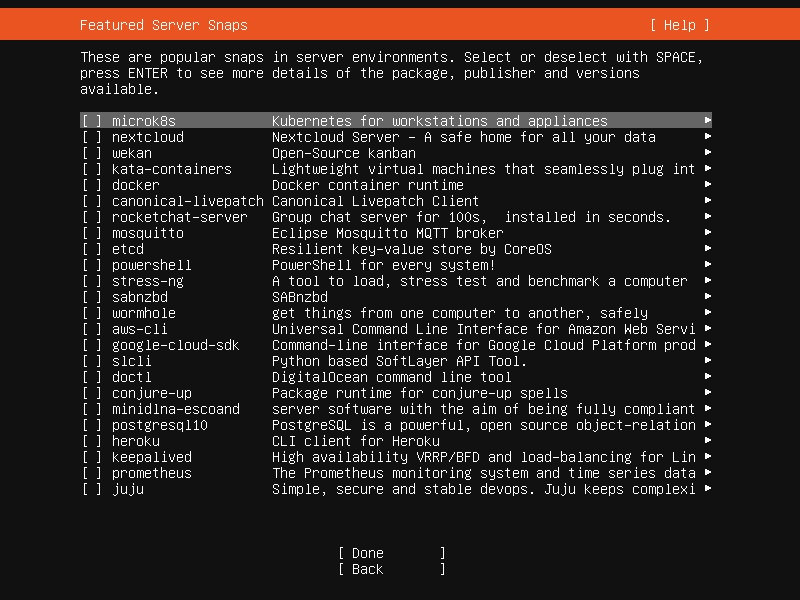](https://ubuntucommunity.s3.dualstack.us-east-2.amazonaws.com/original/2X/3/3bd814edad81fbdfd8a13d3c8b5e79eb2a55293c.png "snaps")
If a network connection is enabled, a selection of snaps that are useful in a server environment are presented and can be selected for installation.
## Installation logs
[](https://ubuntucommunity.s3.dualstack.us-east-2.amazonaws.com/original/2X/2/2e65fa0e78235d4a3b9f0dc071577d5f5e4d938d.png "install_progress")
The final screen of the installer shows the progress of the installer and allows viewing of the full log file. Once the install has completed and security updates installed, the installer waits for confirmation before restarting.
[](https://ubuntucommunity.s3.dualstack.us-east-2.amazonaws.com/original/2X/2/2e77da21332fcf631c1995271b58518a87b2dbd1.png "install_done")
# Configuring storage in the Server installer
## Guided options
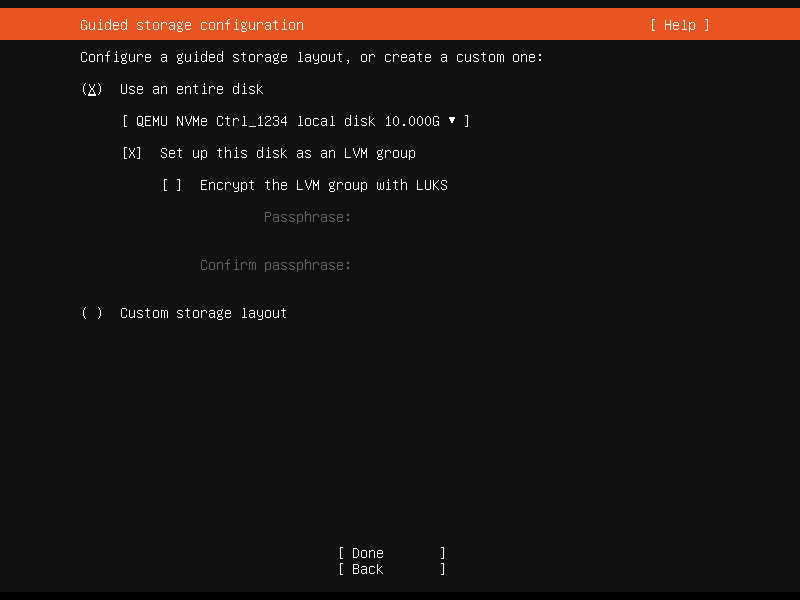
Selecting “Use an entire disk” on the Guided storage configuration screen will install Ubuntu onto the selected disk, replacing any partitions or data already there.
You can choose whether or not to set up LVM, and if you do, whether or not to encrypt the volume with LUKS. If you encrypt the volume, you need to choose a passphrase that will need to be entered each time the system boots.
If you select “Custom storage layout”, no configuration will be applied to the disks.
In either case, the installer moves onto the main storage customisation screen.
## The main storage screen

This screen presents a summary of the current storage configuration. Each device or partition of a device corresponds to a different row (which can be selected), and pressing Enter or space while a device is selected opens a menu of actions that apply to that device.
## Partitions

To add a partition to a device, select “Add GPT Partition” for that device.

You can leave “Size” blank to use all the remaining space on the device.
## RAID
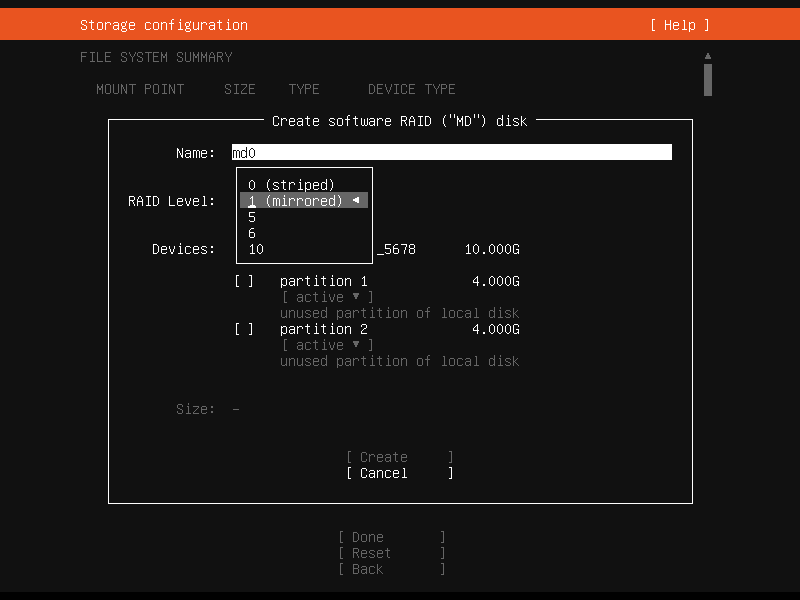
[Linux software RAID](https://raid.wiki.kernel.org/index.php/Linux_Raid) (RAID stands for “Redundant Array of Inexpensive Disks”) can be used to combine several disks into a single device that is (usually) tolerant to any one disk failure.
A software RAID device can be created out of entire disks or unformatted partitions. Select the “Create software RAID (“MD”)” button to open the creation dialog.
The server installer supports creating devices with RAID level 0, 1, 5, 6 or 10. It does not allow customising other options such as metadata format or RAID10 layout at this time. See the [Linux RAID documentation](https://raid.wiki.kernel.org/index.php/Linux_Raid) for more details.
A software RAID device can be formatted and mounted directly, can be partitioned into several partitions, or even be used as part of another RAID device or LVM volume group.
## Logical Volume Manager (LVM)

The LVM is a system of managing logical volumes, or filesystems, that is much more advanced and flexible than the traditional method of partitioning a disk into one or more segments and formatting that partition with a filesystem. It can be used to combine several disks into one larger pool of storage but it offers advantages even in a single disk system, such as snapshots and easy resizing of logical volumes.
As with RAID, a LVM volume group can be created out of entire disks or unformatted partitions. Select the “Create LVM volume group” button to open the creation dialog.
Once a volume group has been created, it can be divided into named logical volumes which can then be formatted and mounted. It generally makes sense to leave some space in the volume group for storage of snapshots and creation of more logical volumes as needed.
The server installer does not supported configuring any of the many, many options that LVM supports when creating volume groups and logical volumes.
## Selecting boot devices

On all architectures other than s390x, the bootloader needs to be installed to a disk in such a way that the system firmware can find it on boot. By default, the first device to have a partition created on it is selected as a boot device but this can be changed later.
On amd64 and arm64 systems, multiple disks can be selected as boot devices, which means a system can be configured so that it will continue to boot after a failure of any one drive (assuming the root filesystem is placed on a RAID). The bootloader will be installed to each of these drives, and the operating system configured to install new versions of GRUB to each drive as it is updated.
amd64 systems use GRUB as the bootloader. amd64 systems can boot in either UEFI or legacy (sometimes called “BIOS”) mode (many systems can be configured to boot in either mode) and the bootloader is located completely differently in the two modes.
In legacy mode, the bootloader is read from the first “sector” of a hard drive (exactly which hard drive is up to the system firmware, which can usually be configured in a vendor-specific way). The installer will write GRUB to the start of all disks selected as a boot devices. As GRUB does not entirely fit in one sector, a small unformatted partition is needed at the start of the disk, which will automatically be created when a disk is selected as a boot device (a disk with an existing GPT partition table can only be used as a boot device if it has this partition).
In UEFI mode, the bootloader loaded from a “EFI System Partition” (ESP), which is a partition with a particular type GUID. The installer automatically creates a 512MiB ESP on a disk when it is selected as a boot device and will install GRUB there (a disk with an existing partition table can only be used as a boot device if it has an ESP – bootloaders for multiple operating systems can be installed into a single ESP). UEFI defines a standard way to configure the way in which the operating system is chosen on boot, and the installer uses this to configure the system to boot the just-installed operating system. One of the ESPs must be mounted at `/boot/efi`.
Supported arm64 servers boot using UEFI, and are configured the same way as an UEFI-booting amd64 system.
ppc64el systems also load their bootloader (Petitboot, a small linux kernel) from a “PReP” partition with a special flag, so in most ways they are similar to a UEFI system. The installer only supports one PReP partition at this time.
## Limitations and workarounds
Currently, the installer cannot *edit* partition tables. You can use existing partitions or reformat a drive entirely but you cannot, for example, remove a large partition and replace it with two smaller ones.
The installer allows the creation of LVM volume groups and logical volumes and MD raid devices, but does not allow tweaking of the parameters – for example, all logical volumes are linear and all MD raid devices use the default metadata format (1.2).
These limits can both be worked around in the same way: drop to a shell and use the usual shell commands to edit the partition table or create the LV or RAID with desired parameters, and then select these partitions or devices as mount points in the installer. Any changes you make while the installer is running but before altering the storage configuration will reflected in the installer.
The installer cannot yet configure iSCSI mounts, ZFS at all, or btrfs subvolumes.
# 📚 How to Mount NFS Storage on Linux (with Proper Permissions)
## Purpose
Mount a remote NFS share on a Linux server for use by **Docker containers**, ensuring stable operation, correct permissions, and automatic remounting.
---
## 1. Install NFS Client on the Server
```bash
sudo apt update
sudo apt install nfs-common -y
```
---
## 2. Create a Local Mount Directory
Create a local directory where the NFS share will be mounted:
```bash
sudo mkdir -p /srv/nfs-mount
sudo chown $(whoami):$(whoami) /srv/nfs-mount
```
> *(You can replace `/srv/nfs-mount` with your preferred path.)*
---
## 3. Mount the NFS Share (Manual Test)
Example:
```bash
sudo mount -t nfs4 192.168.100.11:/mnt/hdd-storage/my-nfs-share /srv/nfs-mount
```
- `nfs4`: Use NFS version 4 for better performance and locking.
- `proto=tcp`: Reliable transport protocol.
- `hard`: Wait for server recovery instead of failing immediately.
- `timeo=600`: Timeout setting for NFS operations.
- `retrans=2`: Retry failed operations twice.
- `sec=sys`: Default authentication method.
- `_netdev`: Ensure mount occurs only after network is ready.
---
## 4. Verify That the Mount Worked
```bash
mount | grep nfs
```
You should see output like:
```text
192.168.100.11:/mnt/hdd-storage/my-nfs-share on /srv/nfs-mount type nfs4 (...)
```
---
## 5. Make the Mount Persistent (Auto-Mount on Boot)
Edit your `/etc/fstab` file:
```bash
sudo nano /etc/fstab
```
Add the following line at the bottom:
```text
192.168.100.11:/mnt/hdd-storage/my-nfs-share /srv/nfs-mount nfs4 rw,relatime,hard,proto=tcp,timeo=600,retrans=2,sec=sys,_netdev 0 0
```
Save and exit (`Ctrl+O`, `Enter`, `Ctrl+X`).
---
## 6. Test the fstab Entry Without Rebooting
```bash
sudo mount -a
```
**No errors = success! ✅**
---
## 7. Using the NFS Mount with Docker
When running your containers, bind-mount the NFS storage into the container:
```bash
docker run -d \
--name my-container \
-v /srv/nfs-mount:/app/data \
my-docker-image
```
This will allow your Docker containers to directly access the NFS storage.
---
# ✅ Summary
- **Use NFSv4** (`nfs4`) whenever possible.
- **Always** include `_netdev` in your `/etc/fstab` entries.
- **Use `hard` mounts** to protect container file operations during NFS issues.
- **Bind-mount** NFS paths carefully into containers.
- **Avoid** using NFS for database storage unless network latency is extremely low.
---
## 🛠️ Useful Commands
- Check NFS mounts: `mount | grep nfs`
- Manual remount all: `sudo mount -a`
- Test connectivity: `ping nfs-server-ip`
---
# 🦠 Additional Notes
- If the NFS server reboots, containers **may pause** temporarily.
- If using `docker-compose.yml`, you can map volumes to `/srv/nfs-mount`.
- For production, consider creating a **systemd mount unit** for better recovery behavior.
# How to delete a folder with contents on ubuntu cli
To delete a folder and its contents in Ubuntu 23.04 using the command line interface (CLI), you can use the `rm` command with the `-r` (recursive) option. Be very careful when using the `rm` command, as it will permanently delete files and folders.
Here's the basic syntax:
`rm -r /path/to/your/folder`
`rm -ri /path/to/your/folder`