# Tutorials

Tutorials in performing certain configurations

# Rancher-SAML-ADFS (Authentik)

## What is Rancher[​](https://goauthentik.io/integrations/services/rancher/#what-is-rancher "Direct link to What is Rancher")

> An enterprise platform for managing Kubernetes Everywhere Rancher is a platform built to address the needs of the DevOps teams deploying applications with Kubernetes, and the IT staff responsible for delivering an enterprise-critical service.
> 
> \-- [https://rancher.com/products/rancher](https://rancher.com/products/rancher)

## Preparation[​](https://goauthentik.io/integrations/services/rancher/#preparation "Direct link to Preparation")

The following placeholders will be used:

- `rancher.company` is the FQDN of the Rancher install.
- `authentik.company` is the FQDN of the authentik install.

Under *Customization* -&gt; *Property Mappings*, *create a* *SAML Property Mapping*. Give it a name like "SAML Rancher User ID". Set the SAML name to `rancherUidUsername` and the expression to the following

```
return f"{user.pk}-{user.username}"

```

<div class="language-python codeBlockContainer_Ckt0 theme-code-block" id="bkmrk-"><div class="codeBlockContent_biex"><div class="buttonGroup__atx"><button aria-label="Copy code to clipboard" class="clean-btn" title="Copy" type="button"><svg class="copyButtonIcon_y97N" viewbox="0 0 24 24"></svg><svg class="copyButtonSuccessIcon_LjdS" viewbox="0 0 24 24"></svg></button>  
</div></div></div>Create an application in authentik. Set the Launch URL to `https://rancher.company`, as Rancher does not currently support IdP-initiated logins.

Create a SAML provider with the following parameters:

- ACS URL: `https://rancher.company/v1-saml/adfs/saml/acs`
- Audience: `https://rancher.company/v1-saml/adfs/saml/metadata`
- Issuer: `authentik`
- Service Provider Binding: `Post`
- Property mappings: Select all default mappings and the mapping you've created above.
- Signing Certificate: Select the authentik self-signed certificate.

You can of course use a custom signing certificate, and adjust durations.

## Rancher[​](https://goauthentik.io/integrations/services/rancher/#rancher "Direct link to Rancher")

In Rancher, navigate to *Global* -&gt; *Security* -&gt; *Authentication*, and select ADFS.

Fill in the fields

- Display Name Field: `http://schemas.xmlsoap.org/ws/2005/05/identity/claims/name`
- User Name Field: `http://schemas.goauthentik.io/2021/02/saml/username`
- UID Field: `rancherUidUsername`
- Groups Field: `http://schemas.xmlsoap.org/claims/Group`

For the private key and certificate, you can either generate a new pair (in authentik, navigate to *Identity &amp; Cryptography* -&gt; *Certificates* and select Generate), or use an existing pair.

Copy the metadata from authentik, and paste it in the metadata field.

Click on save to test the authentication.

![](https://goauthentik.io/assets/images/rancher-f02ae6fd4286551b6a052d80fabbaa61.png)

# Organizr LDAP Setup (Authentik)

<header id="bkmrk-organizr"></header><span class="badge badge--secondary">Support level: Community</span>

## What is organizr[​](https://goauthentik.io/integrations/services/organizr/#what-is-organizr "Direct link to What is organizr")

> Organizr allows you to setup "Tabs" that will be loaded all in one webpage.
> 
> \-- [https://github.com/causefx/Organizr](https://github.com/causefx/Organizr)

This integration leverages authentik's LDAP for the identity provider to achieve an SSO experience. See [ldap provider generic setup](https://goauthentik.io/docs/providers/ldap/generic_setup) for setting up the LDAP provider.

## Preparation[​](https://goauthentik.io/integrations/services/organizr/#preparation "Direct link to Preparation")

The following placeholders will be used:

- `organizr.company` is the FQDN of the Service install.
- `authentik.company` is the FQDN of the authentik install.

Create a new user account *(or reuse an existing)* for organizr to use for LDAP bind under *Directory* -&gt; *Users* -&gt; *Create*, in this example called `ldapservice`.

Note the DN of this user will be `cn=ldapservice,ou=users,dc=ldap,dc=goauthentik,dc=io`

<p class="callout info">*Optionally*, create a new group like `organizr users` to scope access to the organizr application.</p>

## Authentik Configuration[​](https://goauthentik.io/integrations/services/organizr/#authentik-configuration "Direct link to authentik Configuration")

1. Create a new Proxy Provider for `https://organizr.company` ![](https://goauthentik.io/assets/images/organizr1-b1ef217babbce02ddddc22a8c32ebda6.png) *Optionally*, add the regular expression to allow api calls in the advanced protocol settings. ![](https://goauthentik.io/assets/images/organizr2-d280f1ddb23fa548df44ed29c4bc1d39.png)
2. Create a new Application for the `https://organizr.company` Provider. ![](https://goauthentik.io/assets/images/organizr3-9421eebe818e0fd54c3b0f66f8ebaed3.png)  
      
    <p class="callout info">TIP  
    *Optionally*, bind the group to control access to the organizr to the application. </p>
3. <p class="callout info">![](https://goauthentik.io/assets/images/organizr4-3a2635f55a9df6ce3e587af7fd6c218e.png)</p>

![](https://goauthentik.io/assets/images/organizr5-b8a1743daff42f30b84ab3b051e916d9.png) ::: 3. Add the Application to the authentik Embedded Outpost.

## organizr Configuration[​](https://goauthentik.io/integrations/services/organizr/#organizr-configuration "Direct link to organizr Configuration")

<p class="callout warning">CAUTION  
Ensure any local usernames/email addresses in organizr do not conflict with usernames/email addresses in authentik.</p>

1. Enable Auth Proxy in organizr *system settings* -&gt; *main* -&gt; *Auth Proxy*

Auth Proxy Header Name: `X-authentik-username` Auth Proxy Whitelist: *your network subnet in CIDR notation IE* `10.0.0.0/8` Auth Proxy Header Name for Email: `X-authentik-email` Logout URL: `/outpost.goauthentik.io/sign_out` ![](https://goauthentik.io/assets/images/organizr6-a4fb29e0896bfe7f64c88cb1c9546c22.png)

2. Setup Authentication in organizr *system settings* -&gt; *main* -&gt; *Authentication*

Authentication Type: `Organizr DB + Backend` Authentication Backend: `Ldap` Host Address: `<LDAP Outpost IP address:port>` Host Base DN: `dc=ldap,dc=goauthentik,dc=io` Account Prefix: `cn=` Account Suffix: `,ou=users,dc=ldap,dc=goauthentik,dc=io` Bind Username: `cn=ldapservice,ou=users,dc=ldap,dc=goauthentik,dc=io` Bind Password: `<LDAP bind account password>` LDAP Backend Type: `OpenLDAP` ![](https://goauthentik.io/assets/images/organizr7-a95d978bd21069853ff57f4510e5e982.png)

<p class="callout info">INFO  
Access for authentik users is managed locally within organizr under *User Management*. By default, new users are assigned the `User` group.</p>

<p class="callout success"><span style="background-color: rgb(255, 255, 255); color: rgb(68, 68, 68);">`TIP`  
</span>Consider front-ending your application with a [forward auth provider](https://goauthentik.io/docs/providers/proxy/forward_auth) for an SSO experience.</p>

<div class="theme-admonition theme-admonition-tip admonition_xJq3 alert alert--success" id="bkmrk-tip"></div>

# LDAP Provider Generic Setup (Authentik)

<header id="bkmrk-generic-setup"></header>### Create User/Group[​](https://goauthentik.io/docs/providers/ldap/generic_setup#create-usergroup "Direct link to Create User/Group")

1. Create a new user account to bind with under *Directory* -&gt; *Users* -&gt; *Create*, in this example called `ldapservice`.
    
    Note the DN of this user will be `cn=ldapservice,ou=users,dc=ldap,dc=goauthentik,dc=io`
2. Create a new group for LDAP searches. In this example `ldapsearch`. Add the `ldapservice` user to this new group.NFO

<p class="callout info">Note: The `default-authentication-flow` validates MFA by default, and currently everything but SMS-based devices are supported by LDAP. If you plan to use only dedicated service accounts to bind to LDAP, or don't use SMS-based authenticators, then you can use the default flow and skip the extra steps below and continue at [Create LDAP Provider](https://goauthentik.io/docs/providers/ldap/generic_setup#create-ldap-provider)</p>

### LDAP Flow[​](https://goauthentik.io/docs/providers/ldap/generic_setup#ldap-flow "Direct link to LDAP Flow")

#### Create Custom Stages[​](https://goauthentik.io/docs/providers/ldap/generic_setup#create-custom-stages "Direct link to Create Custom Stages")

1. Create a new identification stage. *Flows &amp; Stage* -&gt; *Stages* -&gt; *Create* ![](https://goauthentik.io/assets/images/general_setup1-28b081e6970d26d4c2bf089c6db0c572.png)
2. Name it something meaningful like `ldap-identification-stage`. Select User fields Username and Email (and UPN if it is relevant to your setup). ![](https://goauthentik.io/assets/images/general_setup2-aedc0968da698af2d004996d6bf32172.png)
3. Create a new password stage. *Flows &amp; Stage* -&gt; *Stages* -&gt; *Create* ![](https://goauthentik.io/assets/images/general_setup3-23a6d9635092816513b8bedcf5827ddb.png)
4. Name it something meaningful like `ldap-authentication-password`. Leave the defaults for Backends. ![](https://goauthentik.io/assets/images/general_setup4-9f6514bc905e1c7fa252313c83b443e6.png)
5. Create a new user login stage. *Flows &amp; Stage* -&gt; *Stages* -&gt; *Create* ![](https://goauthentik.io/assets/images/general_setup5-b9e688db2f3f23b57cdd23ab3ce74182.png)
6. Name it something meaningful like `ldap-authentication-login`. ![](https://goauthentik.io/assets/images/general_setup6-a39cb7f17b1e677695ad7ac20659fc36.png)

#### Create Custom Flow[​](https://goauthentik.io/docs/providers/ldap/generic_setup#create-custom-flow "Direct link to Create Custom Flow")

1. Create a new authentication flow under *Flows &amp; Stage* -&gt; *Flows* -&gt; *Create*, and name it something meaningful like `ldap-authentication-flow` ![](https://goauthentik.io/assets/images/general_setup7-5d28d5df6b1b2e69952919bfe30779b5.png)
2. Click the newly created flow and choose *Stage Bindings*. ![](https://goauthentik.io/assets/images/general_setup8-514c7914c49400ee061d0a0df8e2b9f5.png)
3. Click `Bind Stage` choose `ldap-identification-stage` and set the order to `10`. ![](https://goauthentik.io/assets/images/general_setup9-6a04b5c7c774b548fdd3dcdb887a155f.png)
4. Click `Bind Stage` choose `ldap-authentication-login` and set the order to `30`. ![](https://goauthentik.io/assets/images/general_setup11-efd91bc25673f7df384b6d60de33f085.png)
5. Edit the `ldap-identification-stage`. ![](https://goauthentik.io/assets/images/general_setup12-25cc9fcea6654935c3587b21922b77fd.png)
6. Change the Password stage to `ldap-authentication-password`. ![](https://goauthentik.io/assets/images/general_setup13-a5006f341fdab49f32894d50e769a9c7.png)

### Create LDAP Provider[​](https://goauthentik.io/docs/providers/ldap/generic_setup#create-ldap-provider "Direct link to Create LDAP Provider")

1. Create the LDAP Provider under *Applications* -&gt; *Providers* -&gt; *Create*. ![](https://goauthentik.io/assets/images/general_setup14-9c2a270903b5bf88b693884c22d32c96.png)
2. Name is something meaningful like `LDAP`, bind the custom flow created previously (or the default flow, depending on setup) and specify the search group created earlier. ![](https://goauthentik.io/assets/images/general_setup15-3935cd6f3c497e436edacb53bec095e1.png)

### Create LDAP Application[​](https://goauthentik.io/docs/providers/ldap/generic_setup#create-ldap-application "Direct link to Create LDAP Application")

1. Create the LDAP Application under *Applications* -&gt; *Applications* -&gt; *Create* and name it something meaningful like `LDAP`. Choose the provider created in the previous step. ![](https://goauthentik.io/assets/images/general_setup16-1c57654a5ad05b12d3a21fd58e0e8350.png)

### Create LDAP Outpost[​](https://goauthentik.io/docs/providers/ldap/generic_setup#create-ldap-outpost "Direct link to Create LDAP Outpost")

1. Create (or update) the LDAP Outpost under *Applications* -&gt; *Outposts* -&gt; *Create*. Set the Type to `LDAP` and choose the `LDAP` application created in the previous step. ![](https://goauthentik.io/assets/images/general_setup17-1a8524a769f4f4d24e59522be62ea6cb.png)  
    <p class="callout info">INFO  
    The LDAP Outpost selects different providers based on their Base DN. Adding multiple providers with the same Base DN will result in inconsistent access</p>

### ldapsearch Test[​](https://goauthentik.io/docs/providers/ldap/generic_setup#ldapsearch-test "Direct link to ldapsearch Test")

Test connectivity by using ldapsearch.

<p class="callout info">INFO  
ldapsearch can be installed on Linux system with these commands  
</p>

```
sudo apt-get install ldap-utils -y # Debian-based systems
sudo yum install openldap-clients -y # CentOS-based systems

```

```
ldapsearch \
  -x \
  -h <LDAP Outpost IP address> \
  -p 389 \ # Production should use SSL 636
  -D 'cn=ldapservice,ou=users,DC=ldap,DC=goauthentik,DC=io' \
  -w '<ldapuserpassword>' \
  -b 'DC=ldap,DC=goauthentik,DC=io' \
  '(objectClass=user)'
```

<div class="theme-admonition theme-admonition-info admonition_xJq3 alert alert--info" id="bkmrk-"><div class="admonitionContent_BuS1"><div class="codeBlockContainer_Ckt0 theme-code-block"><div class="codeBlockContent_biex"><div class="buttonGroup__atx"><button aria-label="Copy code to clipboard" class="clean-btn" title="Copy" type="button"><svg class="copyButtonIcon_y97N" viewbox="0 0 24 24"></svg><svg class="copyButtonSuccessIcon_LjdS" viewbox="0 0 24 24"></svg></button>  
</div></div></div></div></div><div class="theme-admonition theme-admonition-info admonition_xJq3 alert alert--info" id="bkmrk-nfo"><div class="admonitionContent_BuS1"><div class="codeBlockContainer_Ckt0 theme-code-block"><div class="codeBlockContent_biex"><div class="theme-admonition theme-admonition-info admonition_xJq3 alert alert--info"><div class="admonitionHeading_Gvgb">  
</div><div class="admonitionHeading_Gvgb">INFO This query will log the first successful attempt in an event in the *Events* -&gt; *Logs* area, further successful logins from the same user are not logged as they are cached in the outpost.</div></div></div></div></div></div><div class="admonitionHeading_Gvgb" id="bkmrk--1"></div><div class="admonitionHeading_Gvgb" id="bkmrk--2"></div><div class="admonitionHeading_Gvgb" id="bkmrk--3"></div><div class="admonitionHeading_Gvgb" id="bkmrk-manual-outpost-deplo"><header>
# Manual Outpost deployment in docker-compose

</header></div>To deploy an outpost with docker-compose, use this snippet in your docker-compose file.

You can also run the outpost in a separate docker-compose project, you just have to ensure that the outpost container can reach your application container.

### Proxy outpost[​](https://goauthentik.io/docs/outposts/manual-deploy-docker-compose#proxy-outpost "Direct link to Proxy outpost")

```
version: "3.5"

services:
    authentik_proxy:
        image: ghcr.io/goauthentik/proxy
        # Optionally specify which networks the container should be
        # might be needed to reach the core authentik server
        # networks:
        #   - foo
        ports:
            - 9000:9000
            - 9443:9443
        environment:
            AUTHENTIK_HOST: https://your-authentik.tld
            AUTHENTIK_INSECURE: "false"
            AUTHENTIK_TOKEN: token-generated-by-authentik
            # Starting with 2021.9, you can optionally set this too
            # when authentik_host for internal communication doesn't match the public URL
            # AUTHENTIK_HOST_BROWSER: https://external-domain.tld

```

<div class="admonitionHeading_Gvgb" id="bkmrk--4"><div class="language-yaml codeBlockContainer_Ckt0 theme-code-block"><div class="codeBlockContent_biex"><div class="buttonGroup__atx"><button aria-label="Copy code to clipboard" class="clean-btn" title="Copy" type="button"><svg class="copyButtonIcon_y97N" viewbox="0 0 24 24"></svg><svg class="copyButtonSuccessIcon_LjdS" viewbox="0 0 24 24"></svg></button>  
</div></div></div></div>### LDAP outpost[​](https://goauthentik.io/docs/outposts/manual-deploy-docker-compose#ldap-outpost "Direct link to LDAP outpost")

```
version: "3.5"

services:
    authentik_ldap:
        image: ghcr.io/goauthentik/ldap
        # Optionally specify which networks the container should be
        # might be needed to reach the core authentik server
        # networks:
        #   - foo
        ports:
            - 389:3389
            - 636:6636
        environment:
            AUTHENTIK_HOST: https://your-authentik.tld
            AUTHENTIK_INSECURE: "false"
            AUTHENTIK_TOKEN: token-generated-by-authentik
```

# Steps to configure SAML 2.0 SSO with Microsoft Active Directory Federation Services

<div class="support-faqs__products products" id="bkmrk-products%3A%C2%A0%C2%A0%C2%A0learn"><span class="product__subtitle">PRODUCTS: </span>[Learn](https://www.ispringsolutions.com/support/learn)</div><span class="cursive">Note:</span> ADFS 2.0 on Windows Server 2008 r2 or ADFS 3.0 on Windows Server 2012 / 2012 r2)

SAML 2.0 single sign-on (SSO) supports integration with [Microsoft Active Directory Federation Services](https://docs.microsoft.com/en-us/windows-server/identity/active-directory-federation-services) (ADFS) 3.0.

Requirements

<div class="support-faqs__text support-faqs__text-block" id="bkmrk-a-fully-installed-an">- A fully installed and configured ADFS service.
- A server running Microsoft Server 2008r2 or 2012/2012r2
- An SSL certificate to sign your ADFS login page and the thumbprint of that certificate

</div>In this example we are using <span class="emphasis">ADFS 2.0</span> on <span class="emphasis">Windows Server 2008 R2</span>. On Windows Server 2012 the steps will be the same except for the installation, because you install AD FS role via the server manager, not via the installation package as on Windows 2008 server r2.

## Step 1. AD FS Management

Login in to your AD FS server and launch the ADFS Management Console via the shortcut in Control Panel\\Administrative Tools.

![](https://lh3.googleusercontent.com/txyVmpwGv__tSTGJwXYyz0yC82ytijIjSb4t7TwX5aj2V7PBfMQHxioflnVrcd2zqsxe_DCaLQ3rsJMBsv1erQR9aFIRqDhL8G9x2Q1MFc5Gu3iKLfJ2Q2wBOQ6-0DUE1vbajQKM)

## Step 2. Check AD FS settings

Right-click on <span class="emphasis">Service</span> and sel ect <span class="emphasis">Edit Federation Service Properties...</span>

![](https://lh3.googleusercontent.com/vpNhOmi5zA7XXr4zymN9Z2U4N5FQ5qsIaRdfJlknxBk8uXBO9wYo_mC3WsG9XQTJb6O4Z7eMNRwPlr_51L8tJosX4Mq44ioveAOuQxHW-S03mpi4HyJYuufE9qM6g5SiYPv7omFx)

Confirm that the General settings match your DNS entries and certificate names. Make a note with the Federation Service Identifier, since that is used in the iSpring Learn SAML 2.0 configuration settings.

![](https://lh5.googleusercontent.com/1sY5XuJ0_hrWRWv07Qgv4f6mznJNfcQAYm-QLkN49QtLoExMMAmvhoD3SdVgo9KN9DjG92zjt3vjiWaKVjZxH3pPNHIfLhRBlAQ8HOLMg6l6uG6jN1-dEbjqlaotW1WU_dafDnQP)

## Step 3. Token-Signing certificate

<div class="support-faqs__text support-faqs__text-block" id="bkmrk-browse-to-the-certif">1. Browse to the certificates.
2. Right-click on the certificate and sel ect <span class="emphasis">View Certificate</span>.
3. Go to the <span class="emphasis">Details </span>tab.
4. Find the <span class="emphasis">Thumbprint </span>field and copy the contents of this field to the Windows clipboard.
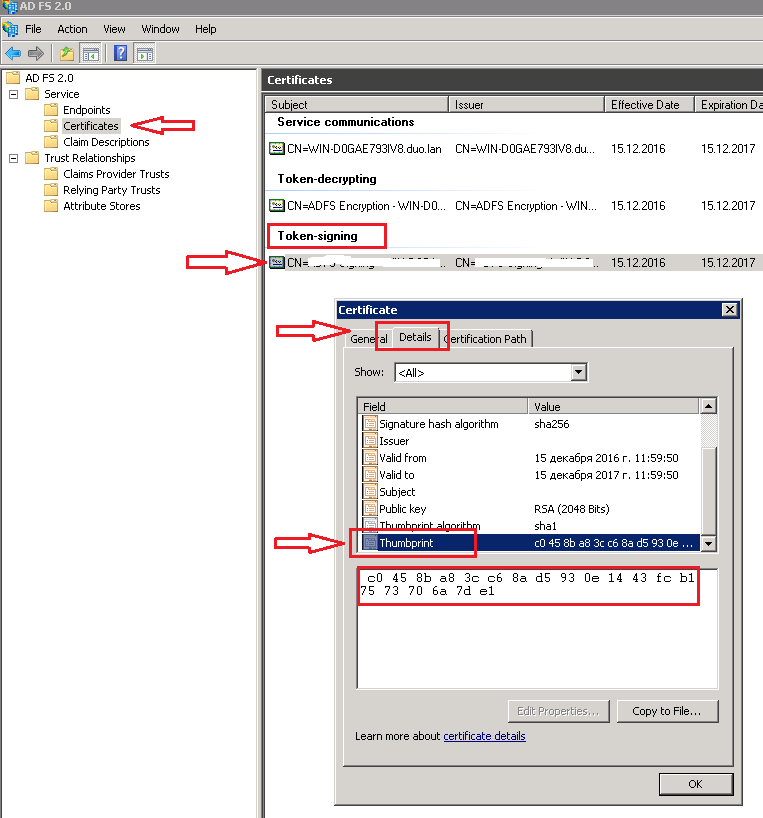
</div>![](https://lh5.googleusercontent.com/RWYwuaq5guXjKsQRWl50CwbHAbzlSJh2QVh-T9xA5xKBVihAiVxMs3YCTJ_xcGv7XzqWnqLGXOkponiAJjjcXb_IIUFKbmBoTbW1X2ZCP2fF3N1P2fWAgSsLlbNar3IsvGYOsqEe)

## Step 4. Learn Settings

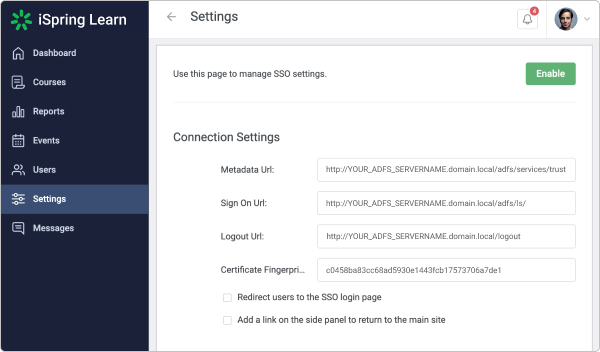
<div class="support-faqs__text support-faqs__text-block" id="bkmrk-log-in-into-your-isp">1. Log in into your iSpring Learn account and go to the SSO settings via this link: [https://YourAccоuntURL.ispringlearn.com/settings/sso](https://xn--youraccunturl-o7k.ispringlearn.com/settings/sso)
2. Ins ert your Thumbprint into the <span class="emphasis">Certificate Fingerprint field</span> and remove all spaces between characters.
3. Enter your data to the <span class="emphasis">Metadata URL</span>, <span class="emphasis">Sign ON URL</span> and <span class="emphasis">Logout URL</span> fields.

</div>![SAML01.png](https://www.ispringsolutions.com/upload/medialibrary/819/Group%2070.png "SAML01.png")

## Step 5. ADFS Relying Party Configuration

Go to the <span class="emphasis">ADFS Management console</span> and select <span class="emphasis">Relying Party Trusts</span>, right-click on it and select Add Relying Party Trust…

![](https://lh3.googleusercontent.com/DWe2TCjpUD-9mwb9YE-Yi_3VQvvLo6w5S4K9Tqo5iu3ytTrfMkakrv2THOkYo9HFrYZJMUyGxQCOOha-7EbJ_m01BApEktCKSvK8qKblvO3YjO_rn0xJkqEARD3Ejm6wUJq5f9wG)

Select <span class="emphasis">Next</span> On the Welcome Screen of the wizard, and on the <span class="emphasis">Select Data Source</span> step, select the last option: <span class="emphasis">Enter data about the relying party manually</span>.

![](https://lh4.googleusercontent.com/FedR8yJMFy79Wm7ZOapfx8-RgWO8Syz-VFPk5VezbDvw_urdX2UCWCFEakA7sMeQsRcVARsoJKANp8gKd0W4xFGCV1spuY-WMwoPl2-cWUVJu4ZK0laxej3G87m7a6ZFJumLTd6B)

On the next screen, enter a <span class="emphasis">Display name</span> that you will recognize in the future.

![](https://lh6.googleusercontent.com/gHTy1NaSaFcC9tAVCwq4nrI2YFD9YJQ8j_BVccexWw2E6wWMG9kkBI4su3Mf_kGmhhPf5lkCm-8p5W6i-L6119hROkAYqN6VzBELMM7SnVLx7f6VL_rf-Ew73Jrxr0ZGvy5V9bXa)

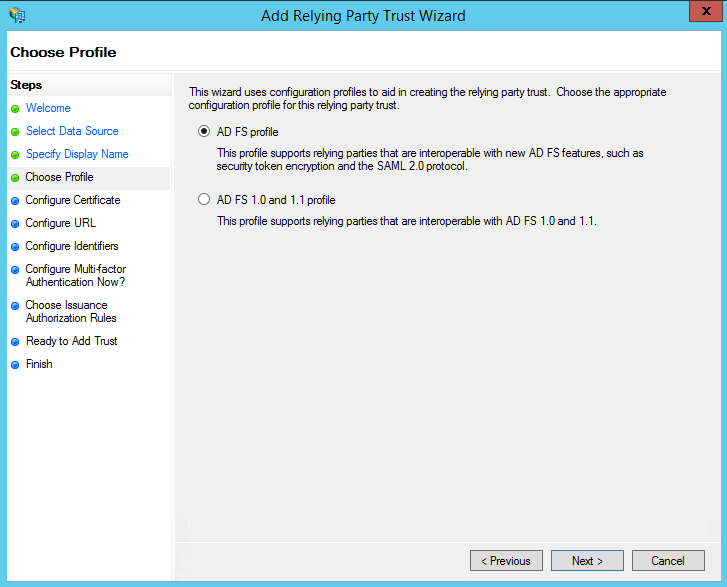
Next, select <span class="emphasis">AD FS profile</span>:

![](https://lh5.googleusercontent.com/phGZye3RG4RuFv7kujBnkKtD75sg-YOU4hPlQHv--3weu7qnzB2QgwYSJ5a0vEWititNIzz_WbNDbojReboku0G12BXh4ZTJjl2w2hq2jNxipm6M6DCDVmI31FRvbEYr4IVMLR1v)

Leave the default values:

![](https://lh3.googleusercontent.com/E2twaBJWzoKspzzxkn-26XSsvalo8wAL3ayJYM3fVtszGyegf2o4-729bwV7jzammYv6Az1Ew2Mj--G3Kw4NZo0OkMXGD_OIpz2SfPgeRvb1axp1g81p48cGyUrMjxYJAye53kJ8)

On the next screen, check the box labeled: <span class="emphasis">Enable support for the SAML 2.0 WebSSO protocol</span>. The service URL will be: [https://YourAccоuntURL.ispringlearn.com/module.php/saml/sp/saml2-acs.php/default-sp](https://xn--youraccunturl-o7k.ispringlearn.com/module.php/saml/sp/saml2-acs.php/default-sp)

![](https://lh6.googleusercontent.com/eJxJWt1KAQ5E7ldDZmtzrdiFB4icMGUHoVL5pDbAwO98o8CgHPIBOF73CHPQ6H1Cm7HuPbN4z-ZLf3Qt_ygNTiEvKumyN2JzJ023bHvXOfQFhapElpWZ0m7-Az1uVxsUtVAr6xNP)

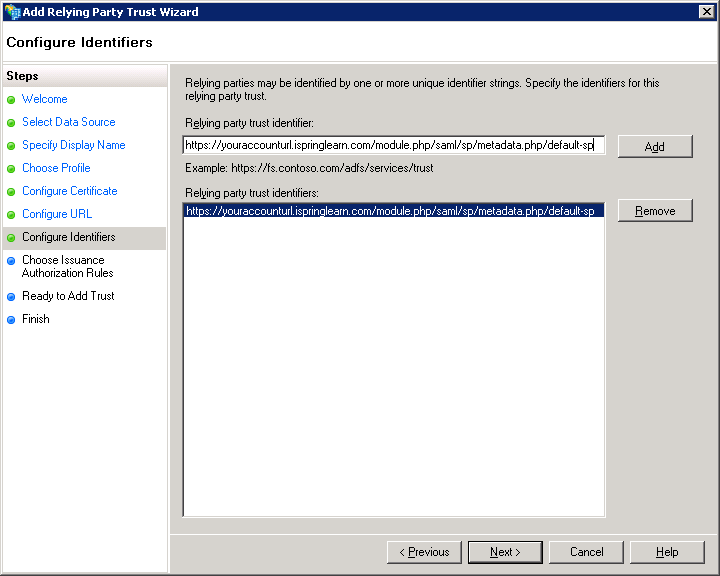
Click <span class="emphasis">Next</span>. Add Relying party trust identifier: [https://YourAccоuntURL.ispringlearn.com/module.php/saml/sp/metadata.php/default-sp](https://xn--youraccunturl-o7k.ispringlearn.com/module.php/saml/sp/metadata.php/default-sp)
![](https://lh5.googleusercontent.com/X1S7UllJ3QhuitOZkPPDzm9GvR_oh0MZafS1VP4cMpGRNfmg8TVDzDePguMRDbQ61VwLaHMK6B2UuYIX_s4xln0Yh756RcU8-x86y9ADBVkNqQdMyuUJPGG2Wo6VvSvgvVLOeGuV)

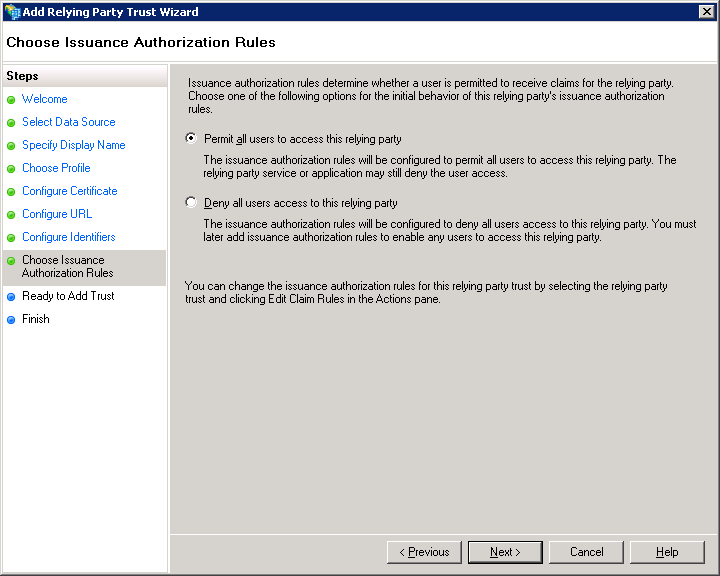
Choose <span class="emphasis">Permit all users to access this relying party</span>.

![](https://lh6.googleusercontent.com/_Dgqb5gnSjLRvtQKuIQ38K9wkVb97WYKFZXIiQb6OFAzlChmaFRNlH5H3J-YNS5h8j8it6BHfHADt88WfhCoUS3Keoz7lF0yxle5Q5eLgrZiW-zIn44xTj8Bq91ZqZCbZRet3fmw)

On the next step, just click <span class="emphasis">Next</span>.

![](https://lh3.googleusercontent.com/AX0Y9Y9a0Al-EQAgUkmNTSC-tTxJXVe0K1G2fBf9_ZofD5PPBD9wltrEo1A6Av-SvpJwQ_bUibkawPZSjL-YMmJcr99dAafyLG5mzpjLHLf8aM8wSx2kIy-fgsjmaa9FXPJo3pji)

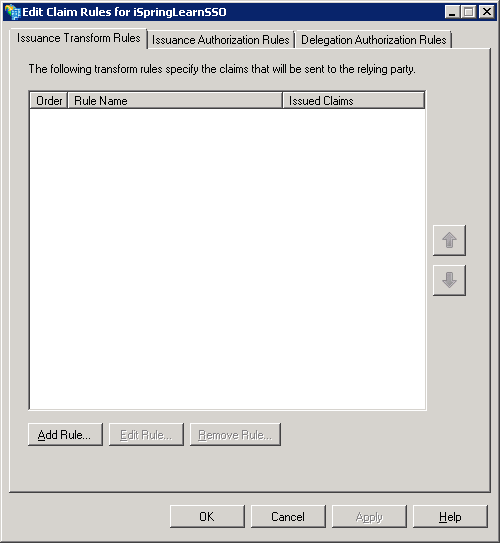
On the final screen, check the box <span class="emphasis">Open the Edit Claim Rules dialog</span> and use the <span class="emphasis">Close </span>button to exit.

![](https://lh3.googleusercontent.com/ZS3_FXPmR5XFVIL4PE_wc5XczVkdUAtV17oG6Ed3qghwAdibKNFwmA8pISzu0ZUDoEvST2PA4NDgK_wLCb_T0fAe9ljGu7371dU6pl98sPStlZ8XXfB7cH1rH_1hY8w__O2lR6s1)

## Step 6. Creating Claims Rules

<div class="support-faqs__text support-faqs__text-block" id="bkmrk-add-the-first-rule-s">1. Add the first rule
    
    ![](https://lh4.googleusercontent.com/ZUjVMXbGp0OoUkrJbpP90Tbgdx0vhmO6okP5lNz5kHXPxFqZ8zXCP22BK-mP0oYJKT3e0q4T1Al7pVMXfVh0yWS4JjLAxPNtZTBPvFl0ehW3i_Rp5s3unX6l1FgmhHdIXBtLRp-t)
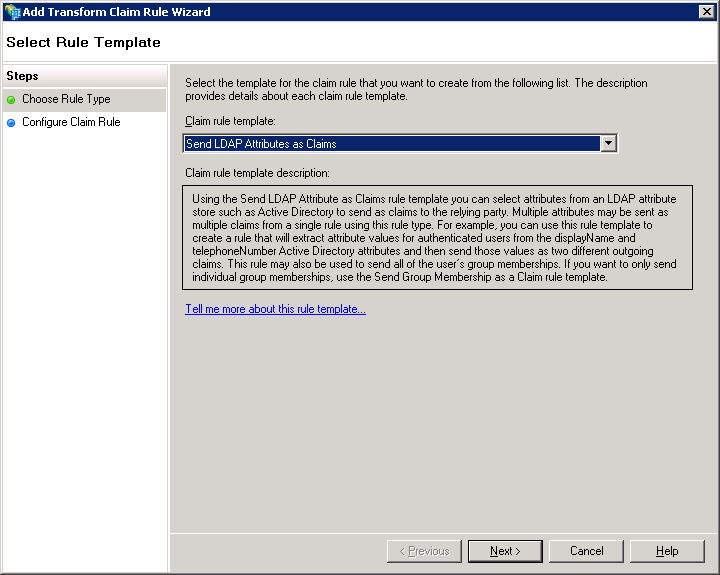
2. Select <span class="emphasis">Send LDAP Attributes as Claims</span>
    
    ![](https://lh4.googleusercontent.com/PfGJ2OSpACIm1nBtinVxH-hRr2IX7JsiG8V0wOASvZzD_5ohgTa5uQk3jFRwr9V8KcsIBSwBpNGBniGTAZppjLKzdoeX9TfiI-1EsSh1Od-J0GQJZ16GS_wdTNtNxmN9guIpXqFX)
3. On the next screen, specify your Claim Rule, for Example <span class="emphasis">E-mail to Learn</span>, using <span class="emphasis">Active Directory </span>as your attribute store, and do the following:
    
    
    - Fr om the <span class="emphasis">LDAP Attribute</span> column, select <span class="emphasis">E-Mail Addresses</span>
    - Fr om the <span class="emphasis">Outgoing Claim Type</span>, enter “<span class="emphasis">email</span>”
        
        ![](https://lh5.googleusercontent.com/cbshGH1pmCu-u_um9H9JSU9MicGTn1jaoESRcZbqGhYy_wDAWT5TLi-7xjBvnhtoZx7NVxYAiKfRP75JDHqsvbz14xdlMOY-lKqJjFPAunIzvprsw_CKyYmx0Xl4r15ybkBcqS8C)
    - Click on <span class="emphasis">Finish</span> or <span class="emphasis">OK</span> to save the new rule
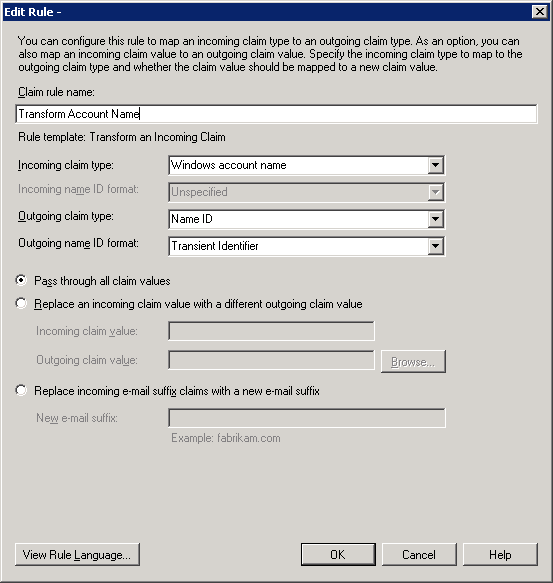
4. After that, add the second rule and select <span class="emphasis">Transform an Incoming Claim</span> as the template
    
    ![](https://lh6.googleusercontent.com/Vldhqs282322jhhTUzugw7MZQzkKPrypE-UkoNmWx-D0X3cnlLQS2M6KVa82ORZ8ZFkPR9MjRRSmOUplUmKUoH7LFghGgLxAdzi0R3dibaaLAqKPHMktsl0mag69UfHzr7UoGN40)
    
    
    - Give your Claim Rule a title, for example, <span class="emphasis">Transform Account Name</span>
    - Select <span class="emphasis">Windows account name</span> as the <span class="emphasis">Incoming Claim Type</span>
    - Under <span class="emphasis">Outgoing Claim Type</span>, select <span class="emphasis">Name ID</span>
    - Under <span class="emphasis">Outgoing Name ID Format</span>, select <span class="emphasis">Transient Identifier</span>
    - Leave the default rule <span class="emphasis">Pass through all claim values</span>  
        ![](https://lh6.googleusercontent.com/J22FEWcG11f_f7Wta7PB0GepLEwafkUvUNuori6HE5SqEZqqiNS0HuTJ56PUaV-WiSsyUVHVAPops4QYROwUdRdl-cRofcp5sJByXNGIzySzB8Gx8ExjE_LGBZ9A-ZGEUr24XeBJ)
5. Finally, click on <span class="emphasis">OK</span> to create the claim rule, and then <span class="emphasis">OK</span> again to finish creating rules.

</div>## Step 7. Adjusting the Trust Settings

Some settings on your Relying Party Trust will need to be adjusted. To access these settings, select <span class="emphasis">Properties </span>from the <span class="emphasis">Actions </span>sidebar on the right while you have the <span class="emphasis">Relying Party Trust</span> selected.

<div class="support-faqs__text support-faqs__text-block" id="bkmrk-under-the%C2%A0advanced%C2%A0t">- Under the <span class="emphasis">Advanced </span>tab, make sure that the selection is <span class="emphasis">SHA-1</span>
    
    ![](https://lh3.googleusercontent.com/gNd4s8hFJrd4hzspladUgmtg60Q9bna6nn0O0q5TpNfkdwMr0dCftiWCFgT1mMPwQOg4BNuWQ8cMWYooUqIzaBwuiHiqLHxfF5ilVPUQVg9GQtekM2Wu5TuSYZMyZ6N-0tAnLp9x)
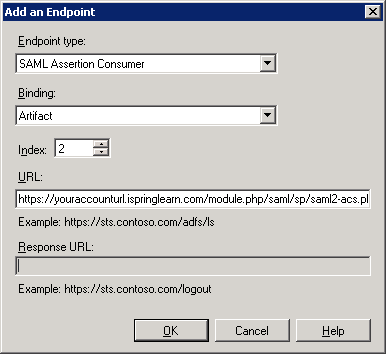
- Under the <span class="emphasis">Endpoints</span> tab, click <span class="emphasis">ADD </span>to add a new endpoint
- For the <span class="emphasis">Endpoint type</span>, select <span class="emphasis">SAML Assertion Consumer</span>
- For the <span class="emphasis">Binding</span>, choose <span class="emphasis">Artifact </span>with <span class="emphasis">Index 2</span>
- The <span class="emphasis">URL field</span> should look like this: [https://YourAccоuntURL.ispringlearn.com/module.php/saml/sp/saml2-acs.php/default-sp](https://xn--youraccunturl-o7k.ispringlearn.com/module.php/saml/sp/saml2-acs.php/default-sp)
- Leave the <span class="emphasis">Response URL</span> blank and click on OK
    
    ![](https://lh4.googleusercontent.com/gsGicTEDLYbI9F0K7iJIIWm_jmnD4rYS8dQeJDEM3ncvix3uMW4v1mWmEb5FKKkC3JKwNAFs9HfLpYDHUo-RzGwnbswTEZGyZ_0Yg_39NaI1cH-aCWozn9grLsyZ4iaX562BQM-X)
- Click <span class="emphasis">ADD </span>one more time
- For the <span class="emphasis">Endpoint type</span>, sele ct <span class="emphasis">SAML Logout</span>
- For the <span class="emphasis">Binding</span>, choose <span class="emphasis">POST</span>
- The <span class="emphasis">URL field</span> should look like this: [https://YОUR\_ADFS\_SERVERNAME.domail.local/adfs/ls/?wa=wsignout1.0](https://xn--yur_adfs_servername-qwp.domail.local/adfs/ls/?wa=wsignout1.0)
- Leave the <span class="emphasis">Response URL</span> blank and click on OK![](https://lh6.googleusercontent.com/gf1gpP3TETi2aIqvn79UxX2UY5Y8lxXS6bneJEpQMkBBKEAOq998XfDnZXm6Kd4FNgCBWknm-wEm1BAe6SHleOJwGXEsWvTEeiTSkePX2FH1yI0YKjcpK365zJ6045pfiXjwtvXk)

</div>## Step 8. Logging

Go to your SSO login page: [https://YourAccоuntURL.ispringlearn.com/sso/login](https://xn--youraccunturl-o7k.ispringlearn.com/sso/login) and enter your credentials.

Related Articles

- [Integrating iSpring Learn with your system: User Management and Single Sign On](https://www.ispringsolutions.com/articles/integration-of-ispring-learn-with-your-system)
- [SAML Technology for SSO](https://www.ispringsolutions.com/articles/saml-technology-for-sso "SAML Technology for SSO")
- [iSpring Learn SSO with Azure AD + SAML](https://www.ispringsolutions.com/articles/ispring-learn-sso-with-azure-ad-saml)

# iSpring Learn SSO with Azure AD + SAML

#   


<div class="support-faqs__products products" id="bkmrk-products%3A%C2%A0%C2%A0%C2%A0learn"><span class="product__subtitle">PRODUCTS: </span>[Learn](https://www.ispringsolutions.com/support/learn)</div>Azure Active Directory (Azure AD) is a part of the Microsoft Azure cloud service that makes it possible to enjoy SSO (Single sign-on) without employing on-prem AD FS (Active Directory Federated Services). It is basically a cloud alternative to Microsoft Active Directory. In this scenario, there is no need to maintain an on-premise infrastructure, the process of setting it up is rather easy, and it works with most cloud-based services.

## Requirements

A Microsoft Azure account with Azure AD Premium activated.

## How to set up Azure AD  


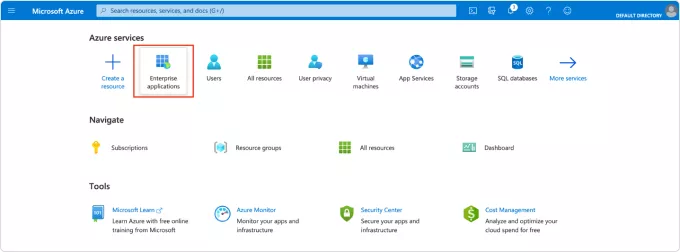
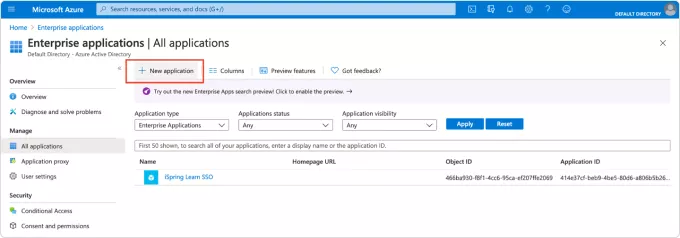
<div class="support-faqs__text support-faqs__text-block" id="bkmrk-go-to-the-microsoft-">1. Go to the Microsoft Azure Home Page. From the Azure services menu, select <span data-old-style="font-weight: 700;">Enterprise</span> <span data-old-style="font-weight: 700;">applications</span>.
    
    ![01.png](https://www.ispringsolutions.com/upload/resize_cache/webp/upload/medialibrary/1ec/1ec2de2e2e4c96d3884515e75994828c.webp "01.png")
2. Select <span data-old-style="font-weight: 700;">New application</span>.  
    ![02.png](https://www.ispringsolutions.com/upload/resize_cache/webp/upload/medialibrary/60c/60cf81a0ca52f822e647171e8dc52eac.webp "02.png")
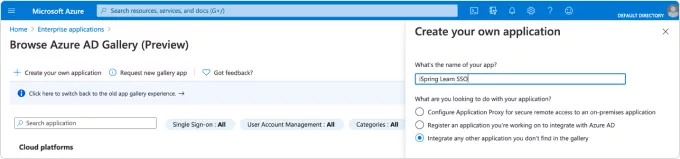
3. Select **Create your own application**.
    
    ![03.png](https://www.ispringsolutions.com/upload/resize_cache/webp/upload/medialibrary/747/7476f7b36e0418c26748ee9c95be29a7.webp "03.png")
    
    In the right-side menu that appears, enter the name for the application, such as iSpring Learn SSO.  
    ![04.png](https://www.ispringsolutions.com/upload/resize_cache/webp/upload/medialibrary/dc6/dc65126931e7b463c333647932b02b3a.webp "04.png")
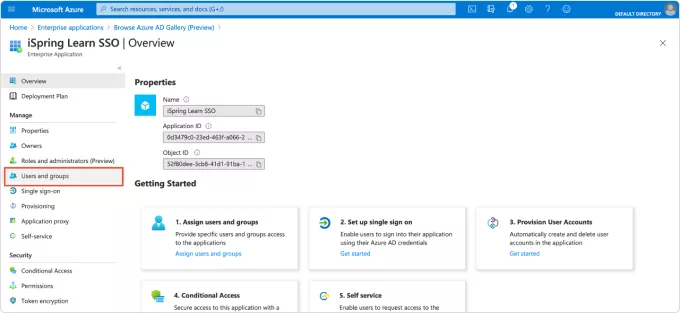
4. Click <span data-old-style="font-weight: 700;">Create</span> and wait until the application is added to your library. You will then be redirected to the Overview page.
    
    In the sidebar menu, select<span data-old-style="font-weight: 700;"> Users and groups</span>. There, you can add all the users who should be able to log into their iSpring Learn account using SSO.  
    ![05.png](https://www.ispringsolutions.com/upload/resize_cache/webp/upload/medialibrary/bbd/bbd3ddb96ab65e8d2bc48c4c1237017e.webp "05.png")
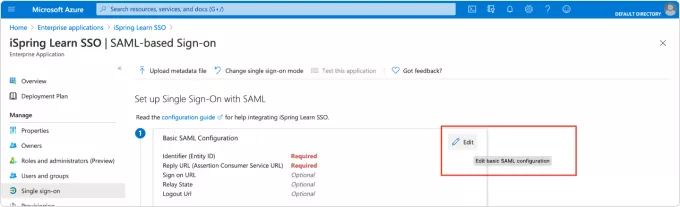
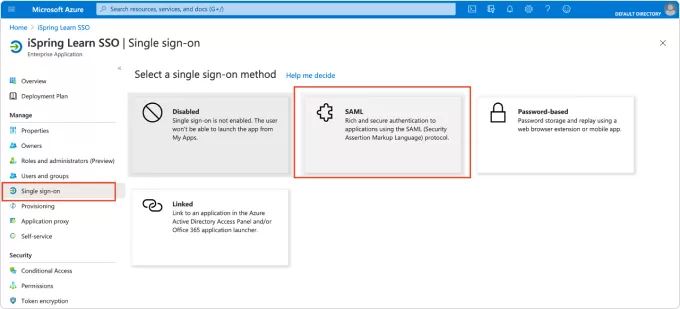
5. In the sidebar menu, select **Single sign-on**. Then, select **SAML for SAML-based SSO**.  
    ![06.png](https://www.ispringsolutions.com/upload/resize_cache/webp/upload/medialibrary/73c/73ca1b8cdb9eae5fb6982e1a50bef6fd.webp "06.png")
    
    Set up Single Sign-On with SAML. Here’s how:  
    First, select <span data-old-style="font-weight: 700;">Edit</span>, to open the right-side menu.  
    ![07.png](https://www.ispringsolutions.com/upload/resize_cache/webp/upload/medialibrary/c2b/c2bb103aa99a1b930d195aeb417fa4a2.webp "07.png")

</div>In the right-side menu, fill out Identifier (Entity ID), Reply URL, and Relay state as shown in the table below, where ‘\_\_\_\_\_’ is the first part of the URL of your iSpring Learn account. Pay attention to the domain for your iSpring Learn account: it is either .com or .eu.

<div class="support-faqs__text support-faqs__text-block" id="bkmrk-identifier%28entity-id"><div class="support-faqs__table-wrapper"><table><tbody><tr><td>Identifier  
(Entity ID)

</td><td>[https://\_\_\_\_\_.ispringlearn.com/module.php/saml/sp/metadata.php/default-sp](https://_____.ispringlearn.com/module.php/saml/sp/metadata.php/default-sp)

</td></tr><tr><td>Reply URL

</td><td>[https://\_\_\_\_\_.ispringlearn.com/module.php/saml/sp/saml2-acs.php/default-sp](https://_____.ispringlearn.com/module.php/saml/sp/saml2-acs.php/default-sp)

</td></tr><tr><td>Relay state

</td><td>[https://\_\_\_\_\_.ispringlearn.com/sso/login](https://_____.ispringlearn.com/sso/login)

</td></tr></tbody></table>

</div></div>![08.png](https://www.ispringsolutions.com/upload/resize_cache/webp/upload/medialibrary/785/785e07606f7c4c19b09f44077d674f4a.webp "08.png")

Save the changes.

<div class="support-faqs__text support-faqs__text-block" id="bkmrk-second%2C-select%C2%A0-edit">1. Second, select

**Edit** 1. to edit User Attributes and Claims.
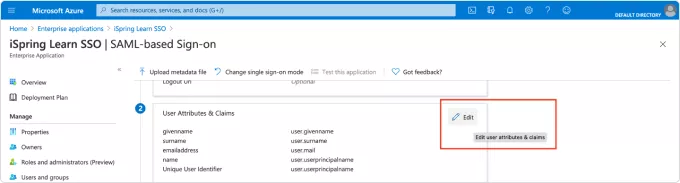
  
  
![09.png](https://www.ispringsolutions.com/upload/resize_cache/webp/upload/medialibrary/ae1/ae1b69ca88d2cd44ac2584d96616dd5a.webp "09.png")</div>The first claim in the list is the Required claim. Its claim name is Unique User Identifier (Name ID) and its Value is user.mail. It is there by default. Leave it as it is.  
The additional claims are those used by iSpring Learn to sync the data about your users and fill out their user profiles in iSpring Learn. The information will be updated in iSpring Learn each time you log in.

<div class="support-faqs__text support-faqs__text-block" id="bkmrk-since-ispring-learn-">1. Since iSpring Learn requires each user to have a login, this is the required claim. We also strongly recommend using email so your users get notifications from the system about new courses assigned, coming deadlines, and scheduled meetings and webinars. The rest of the claims are optional.

  
</div><div class="support-faqs__text support-faqs__text-block" id="bkmrk-delete-the-preset-cl">1. Delete the preset claim names and values and add your own. You can use your own names for the claims while you select values from the available list. To simplify the process, we recommend using the same claim name as the value. The only exception is user.login, where we use user.mail, thus making the login correspond with the email. Use the table below for the correct claim names and their values.

</div><div class="support-faqs__text support-faqs__text-block" id="bkmrk-claim-name-value-use"><div class="support-faqs__table-wrapper"><table><tbody><tr><td>**Claim Name**

</td><td>**Value**

</td></tr><tr><td>user.login

</td><td>user.mail

</td></tr><tr><td>user.mail

</td><td>user.mail

</td></tr><tr><td>user.surname </td><td>user.surname

</td></tr><tr><td>user.givenname

</td><td>user.givenname

</td></tr><tr><td>user.jobtitle

</td><td>user.jobtitle

</td></tr></tbody></table>

</div>1. Only the Name and the Source Attribute fields need to be changed. Leave the rest empty.

  
![11.png](https://www.ispringsolutions.com/upload/resize_cache/webp/upload/medialibrary/4d8/4d874f8ecc06489ab321cc7ca1c2c661.webp "11.png")1. When you are done, you should see the list of all the claims you want your iSpring Learn account to be in sync with.

  
![10.png](https://www.ispringsolutions.com/upload/resize_cache/webp/upload/medialibrary/062/06262edee6bd446935506c6df1b5d17a.webp "10.png")</div>Note that you won’t be able to sync the user’s country and department.

<div class="support-faqs__text support-faqs__text-block" id="bkmrk-return-to-the-previo">1. Return to the previous page to configure the third step: the certificate. Select **Add a certificate** to open the menu on the right side of the screen and select **New Certificate**.  
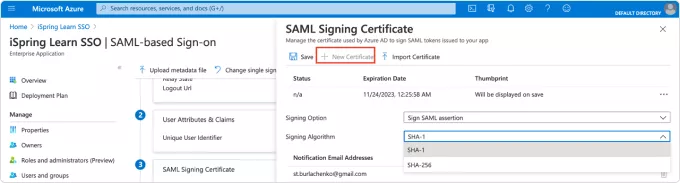
    ![12.png](https://www.ispringsolutions.com/upload/resize_cache/webp/upload/medialibrary/720/720df9aadd9c86c3fc77a9a1560d7bab.webp "12.png")For **Signing Option**, select **Sign SAML assertion**. For **Signing Algorithm**, select **SHA-1**. Select **Save** for the certificate to be generated and the thumbprint to be displayed. You will need the thumbprint when you configure the connection settings in iSpring Learn. Close the menu on the right side of the screen to return to configuring the fourth step: iSpring Learn SSO.
    
    The data from this step should be used in the Connection Settings of your iSpring Learn account. ## How to set up iSpring Learn  


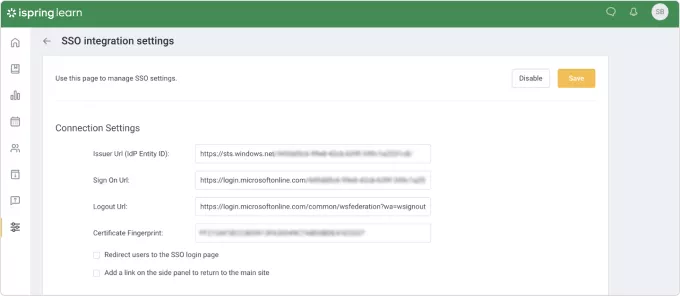
    1. Log into your iSpring Learn account and go to [https://\_\_\_\_\_.ispringlearn.com/settings/sso](https://_____.ispringlearn.com/settings/sso)
    2. In <span data-old-style="font-weight: 700;">Connection Settings</span>, fill in the fields with the information from Azure.
    
    <div class="support-faqs__table-wrapper"><table><tbody><tr><td>**iSpring Learn name**
    
    </td><td> **Azure name**
    
    </td></tr><tr><td> Issue URL (IdP Entity ID)
    
    </td><td> Azure AD Identifier
    
    </td></tr><tr><td> Sign-on URL
    
    </td><td> Login URL
    
    </td></tr><tr><td> Logout URL
    
    </td><td> Logout URL
    
    </td></tr><tr><td> Certificate Fingerprint
    
    </td><td> Thumbprint
    
    </td></tr></tbody></table>
    
    </div>![13.png](https://www.ispringsolutions.com/upload/resize_cache/webp/upload/medialibrary/a20/a20f32961cdc1747eae00e746a49f729.webp "13.png")
    
    If you have selected the **Redirect users** **to the SSO login page**, the user will be automatically redirected to the Azure login page when they open iSpring Learn. If they are already logged in there, they will see their main page with the courses that have been assigned.
    
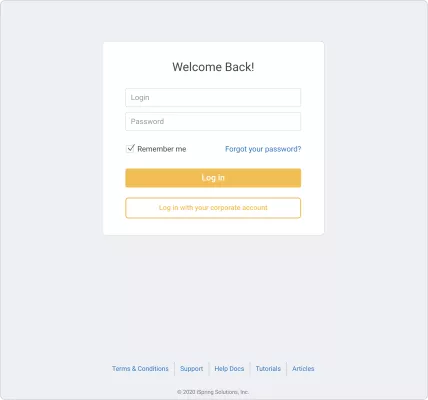
    If this option is not selected, upon opening iSpring Learn, the user will see the default login screen with an additional option to use a corporate account to log into the account.   
    We recommend keeping this option deselected initially for the sake of testing the connection and to avoid being locked out of your iSpring Learn account. If this happens for some reason, you can use [https://\_\_\_\_.ispringlearn.com/login?no\_sso](https://____.ispringlearn.com/login?no_sso) to bypass SSO.   
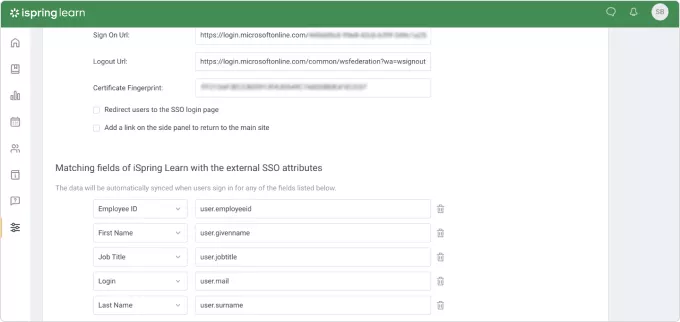
    Proceed to <span data-old-style="font-weight: 700;">Matching fields of iSpring Learn with the external SSO attributes</span> and use the claims you created in the second step of the Azure Set up Single Sign-On with SAML page.
    
    ![14.png](https://www.ispringsolutions.com/upload/resize_cache/webp/upload/medialibrary/147/1475721189c59a24dbfe1a05503d4e42.webp "14.png")
    
    When done, scroll up and click **Save**.  
      
    You can now test the connection.
    
    ![15.png](https://www.ispringsolutions.com/upload/resize_cache/webp/upload/medialibrary/650/650b75877bfd5d5041d01a8383aac9a2.webp "15.png")
    
    If something is not clear or additional questions arise, don’t hesitate to contact us at <support@ispring.com> and we’ll do our best to assist you.

</div>Related Articles

- [SAML Technology for SSO](https://www.ispringsolutions.com/articles/saml-technology-for-sso "SAML Technology for SSO")
- [Integrating iSpring Learn with your system: User Management and Single Sign On](https://www.ispringsolutions.com/articles/integration-of-ispring-learn-with-your-system)
- [How to upload SCORM courses to ...](https://www.ispringsolutions.com/articles/add-scorm-course-into-learnworlds-lms "How to upload SCORM courses to LearnWorlds LMS")

# Setting-up Azure Entra with Classlink

##### <span style="color: #2e5395; letter-spacing: -.1pt;">Notes</span>

This is an all or none type of configuration. Once enabled all users of the domain will be redirected to Launchpad for authentication in all Microsoft applications. Users previously Authenticated to Office 365/Entra<span style="letter-spacing: -.4pt;"> </span>ID<span style="letter-spacing: -.4pt;"> </span>(Azure<span style="letter-spacing: -.4pt;"> </span>AD)<span style="letter-spacing: -.4pt;"> </span>may<span style="letter-spacing: -.4pt;"> </span>need<span style="letter-spacing: -.4pt;"> </span>to<span style="letter-spacing: -.4pt;"> </span>reauthenticate<span style="letter-spacing: -.4pt;"> </span>their<span style="letter-spacing: -.4pt;"> </span>desktop<span style="letter-spacing: -.4pt;"> </span>applications.<span style="letter-spacing: -.4pt;"> </span>Office365<span style="letter-spacing: -.4pt;"> </span>Administrator accounts will not be affected by this workflow.

### <span style="color: #2e5395; letter-spacing: -.1pt;">Prerequisites</span>

- Authenticate<span style="letter-spacing: -.45pt;"> </span>to<span style="letter-spacing: -.35pt;"> </span>LaunchPad<span style="letter-spacing: -.35pt;"> </span>with<span style="letter-spacing: -.35pt;"> </span>AD<span style="letter-spacing: -.35pt;"> </span>(technically<span style="letter-spacing: -.3pt;"> </span>could<span style="letter-spacing: -.35pt;"> </span>be<span style="letter-spacing: -.35pt;"> </span>Google<span style="letter-spacing: -.35pt;"> </span>as<span style="letter-spacing: -.35pt;"> </span>well<span style="letter-spacing: -.35pt;"> </span>but<span style="letter-spacing: -.3pt;"> </span><span style="letter-spacing: -.1pt;">unlikely)</span>
    - - District’s<span style="letter-spacing: -.55pt;"> </span>Azure<span style="letter-spacing: -.4pt;"> </span>user<span style="letter-spacing: -.45pt;"> </span>profile<span style="letter-spacing: -.4pt;"> </span>**must<span style="letter-spacing: -.45pt;"> </span>**contain<span style="letter-spacing: -.4pt;"> </span>an<span style="letter-spacing: -.4pt;"> </span><span style="letter-spacing: -.1pt;">ImmutableI</span><span style="font: 7.0pt 'Times New Roman';"> </span>
        - If<span style="letter-spacing: -.3pt;"> </span>the<span style="letter-spacing: -.3pt;"> </span>district<span style="letter-spacing: -.3pt;"> </span>uses<span style="letter-spacing: -.25pt;"> </span>Azure<span style="letter-spacing: -.3pt;"> </span>AD<span style="letter-spacing: -.3pt;"> </span>Connect,<span style="letter-spacing: -.3pt;"> </span>it’s<span style="letter-spacing: -.25pt;"> </span><span style="letter-spacing: -.1pt;">handled</span>
        - If<span style="letter-spacing: -.6pt;"> </span>the<span style="letter-spacing: -.5pt;"> </span>district<span style="letter-spacing: -.5pt;"> </span>enters<span style="letter-spacing: -.5pt;"> </span>users<span style="letter-spacing: -.5pt;"> </span>manually,<span style="letter-spacing: -.5pt;"> </span>it’s<span style="letter-spacing: -.45pt;"> </span><span style="letter-spacing: -.1pt;">handled</span>
        - If<span style="letter-spacing: -.35pt;"> </span>the<span style="letter-spacing: -.25pt;"> </span>district<span style="letter-spacing: -.25pt;"> </span>uses<span style="letter-spacing: -.25pt;"> </span>OneSync<span style="letter-spacing: -.25pt;"> </span>for<span style="letter-spacing: -.25pt;"> </span>Azure,<span style="letter-spacing: -.25pt;"> </span>it<span style="letter-spacing: -.25pt;"> </span>can<span style="letter-spacing: -.25pt;"> </span>be<span style="letter-spacing: -.25pt;"> </span>handled<span style="letter-spacing: -.25pt;"> </span>in<span style="letter-spacing: -.25pt;"> </span>the<span style="letter-spacing: -.2pt;"> </span><span style="letter-spacing: -.1pt;">configuration</span>
- Add<span style="letter-spacing: -.5pt;"> </span>Verified<span style="letter-spacing: -.4pt;"> </span>Domain<span style="letter-spacing: -.4pt;"> </span>to<span style="letter-spacing: -.35pt;"> </span>Entra<span style="letter-spacing: -.4pt;"> </span>ID<span style="letter-spacing: -.4pt;"> </span>(Azure<span style="letter-spacing: -.35pt;"> </span><span style="letter-spacing: -.25pt;">AD)</span>
    - <span style="font: 7.0pt 'Times New Roman';"> </span>Do<span style="letter-spacing: -.25pt;"> </span>not<span style="letter-spacing: -.2pt;"> </span>make<span style="letter-spacing: -.25pt;"> </span>it<span style="letter-spacing: -.2pt;"> </span><span style="letter-spacing: -.1pt;">primary.</span>
- Install<span style="letter-spacing: -.6pt;"> </span>MSOnline<span style="letter-spacing: -.6pt;"> </span>PowerShell<span style="letter-spacing: -.55pt;"> </span><span style="letter-spacing: -.1pt;">module </span>```
    Install-Module MSOnline
    ```
- Install<span style="letter-spacing: -.45pt;"> </span>Azure<span style="letter-spacing: -.35pt;"> </span>Active<span style="letter-spacing: -.35pt;"> </span>Directory<span style="letter-spacing: -.35pt;"> </span>Connect<span style="letter-spacing: -.35pt;"> </span>and<span style="letter-spacing: -.35pt;"> </span>configure<span style="letter-spacing: -.35pt;"> </span>it<span style="letter-spacing: -.35pt;"> </span>–<span style="letter-spacing: -.35pt;"> </span>Do<span style="letter-spacing: -.35pt;"> </span>not<span style="letter-spacing: -.35pt;"> </span>federate<span style="letter-spacing: -.35pt;"> </span>via<span style="letter-spacing: -.35pt;"> </span>this<span style="letter-spacing: -.3pt;"> </span><span style="letter-spacing: -.1pt;">method.</span>
- <span style="font-family: 'Arial',sans-serif; mso-fareast-font-family: Arial;"><span style="mso-list: Ignore;"><span style="font: 7.0pt 'Times New Roman';"> </span></span></span>Active<span style="letter-spacing: -.45pt;"> </span>Directory<span style="letter-spacing: -.35pt;"> </span>should<span style="letter-spacing: -.3pt;"> </span>be<span style="letter-spacing: -.35pt;"> </span>connected<span style="letter-spacing: -.3pt;"> </span>in<span style="letter-spacing: -.35pt;"> </span>launchpad<span style="letter-spacing: -.35pt;"> </span>under<span style="letter-spacing: -.3pt;"> </span>settings<span style="letter-spacing: -.35pt;"> </span>&gt;<span style="letter-spacing: -.3pt;"> </span>domain<span style="letter-spacing: -.35pt;"> </span>gear<span style="letter-spacing: -.3pt;"> </span><span style="letter-spacing: -.2pt;">icon</span>
- <span style="font-family: 'Arial',sans-serif; mso-fareast-font-family: Arial;"><span style="mso-list: Ignore;"><span style="font: 7.0pt 'Times New Roman';"> </span></span></span>Active<span style="letter-spacing: -.5pt;"> </span>Directory<span style="letter-spacing: -.4pt;"> </span>Groups<span style="letter-spacing: -.4pt;"> </span>should<span style="letter-spacing: -.4pt;"> </span>be<span style="letter-spacing: -.4pt;"> </span>imported<span style="letter-spacing: -.4pt;"> </span>into<span style="letter-spacing: -.35pt;"> </span><span style="letter-spacing: -.1pt;">launchpad</span>

##### <span style="color: #2e5395;">Step<span style="letter-spacing: -.35pt;"> </span><span style="letter-spacing: -.5pt;">1</span></span>

<span style="letter-spacing: -.05pt;"><span style="mso-list: Ignore;">1.<span style="font: 7.0pt 'Times New Roman';"> </span></span></span>In<span style="letter-spacing: -.3pt;"> </span>the<span style="letter-spacing: -.3pt;"> </span>Classlink<span style="letter-spacing: -.3pt;"> </span>tenant<span style="letter-spacing: -.3pt;"> </span>SAML<span style="letter-spacing: -.3pt;"> </span>Console,<span style="letter-spacing: -.3pt;"> </span>Create<span style="letter-spacing: -.3pt;"> </span>a<span style="letter-spacing: -.3pt;"> </span>new<span style="letter-spacing: -.3pt;"> </span>SAML<span style="letter-spacing: -.3pt;"> </span>configuration<span style="letter-spacing: -.3pt;"> </span>by<span style="letter-spacing: -.3pt;"> </span>copying<span style="letter-spacing: -.3pt;"> </span>existing<span style="letter-spacing: -.3pt;"> </span>and selecting “A New SAML App (template)”

<span style="letter-spacing: -.05pt;"><span style="mso-list: Ignore;">2.<span style="font: 7.0pt 'Times New Roman';"> </span></span></span>Configure<span style="letter-spacing: -.5pt;"> </span>the<span style="letter-spacing: -.45pt;"> </span>following<span style="letter-spacing: -.45pt;"> </span><span style="letter-spacing: -.1pt;">options.</span>

- <span style="letter-spacing: -.1pt;">Metadata</span><span style="letter-spacing: .05pt;"> </span><span style="letter-spacing: -.25pt;">URL</span>
    - <span style="font-family: 'Arial',sans-serif; mso-fareast-font-family: Arial; mso-font-width: 99%;"><span style="mso-list: Ignore;"><span style="font: 7.0pt 'Times New Roman';"> </span></span></span>[<u style="text-underline: #0462C1 thick;"><span style="color: #0462c1; letter-spacing: -.1pt;">https://nexus.microsoftonline-p.com/federationmetadata/saml20/federationme</span></u>](https://nexus.microsoftonline-p.com/federationmetadata/saml20/federationmetadata.xml)<span style="color: #0462c1; letter-spacing: -.1pt;"> </span>[<u style="text-underline: #0462C1 thick;"><span style="color: #0462c1; letter-spacing: -.1pt;">tadata.xml</span></u>](https://nexus.microsoftonline-p.com/federationmetadata/saml20/federationmetadata.xml)
- Loginurl<span style="letter-spacing: -.4pt;"> </span>with<span style="letter-spacing: -.3pt;"> </span>custom<span style="letter-spacing: -.3pt;"> </span>login,<span style="letter-spacing: -.3pt;"> </span>e.g.<span style="letter-spacing: -.25pt;"> </span><span style="letter-spacing: -.1pt;">https://launchpad.classlink.com/&lt;customurl&gt;</span>
- <span style="font-family: 'Courier New'; mso-fareast-font-family: 'Courier New';"><span style="mso-list: Ignore;"><span style="font: 7.0pt 'Times New Roman';"> </span></span></span><span style="letter-spacing: -.1pt;">Attribute</span><span style="letter-spacing: -.05pt;"> </span><span style="letter-spacing: -.1pt;">Mapping</span>
- <span style="font-family: 'Arial',sans-serif; mso-fareast-font-family: Arial; mso-font-width: 99%;"><span style="mso-list: Ignore;">▪<span style="font: 7.0pt 'Times New Roman';"> </span></span></span>Select<span style="letter-spacing: -.45pt;"> </span>“Custom<span style="letter-spacing: -.4pt;"> </span><span style="letter-spacing: -.1pt;">Attribute”</span>
    - - Change<span style="letter-spacing: -.35pt;"> </span>name<span style="letter-spacing: -.35pt;"> </span>of<span style="letter-spacing: -.3pt;"> </span>the<span style="letter-spacing: -.35pt;"> </span>custom<span style="letter-spacing: -.3pt;"> </span>attribute<span style="letter-spacing: -.35pt;"> </span>to<span style="letter-spacing: -.3pt;"> </span><span style="letter-spacing: -.1pt;">“IDPEmail”</span>
        - <span style="font-family: 'Arial',sans-serif; mso-fareast-font-family: Arial;"><span style="mso-list: Ignore;"><span style="font: 7.0pt 'Times New Roman';"> </span></span></span>Add<span style="letter-spacing: -.25pt;"> </span>{email}<span style="letter-spacing: -.25pt;"> </span>in<span style="letter-spacing: -.2pt;"> </span>the<span style="letter-spacing: -.25pt;"> </span>data<span style="letter-spacing: -.2pt;"> field</span>
- <span style="letter-spacing: -.1pt;">MetaOverrides</span>
    - <span style="font-family: 'Arial',sans-serif; mso-fareast-font-family: Arial; mso-font-width: 99%;"><span style="mso-list: Ignore;"><span style="font: 7.0pt 'Times New Roman';"> </span></span></span>Logout<span style="letter-spacing: -.25pt;"> </span>Service<span style="letter-spacing: -.25pt;"> </span>URL<span style="letter-spacing: -.25pt;"> </span><span style="letter-spacing: -.1pt;">(POST)</span>
        - - - <span style="font-family: 'Arial',sans-serif; mso-fareast-font-family: Arial;"><span style="mso-list: Ignore;"><span style="font: 7.0pt 'Times New Roman';"> </span></span></span><u style="text-underline: #0462C1 thick;"><span style="color: #0462c1; letter-spacing: -.1pt;">[https://login.microsoftonline.com/common/oauth2/logout](https://login.microsoftonline.com/common/oauth2/logout)</span></u>
    - NamedID<span style="letter-spacing: -.35pt;"> </span><span style="letter-spacing: -.1pt;">Format</span>
        - - - <span style="font-family: 'Arial',sans-serif; mso-fareast-font-family: Arial;"><span style="mso-list: Ignore;"><span style="font: 7.0pt 'Times New Roman';"> </span></span></span><span style="letter-spacing: -.1pt;">Persistent</span>
    - NameID<span style="letter-spacing: -.4pt;"> </span>Custom<span style="letter-spacing: -.4pt;"> </span><span style="letter-spacing: -.2pt;">Value</span>
        - - - <span style="letter-spacing: -.1pt;">{ldapguid:hexbase64}</span>
- <span style="font-family: 'Courier New'; mso-fareast-font-family: 'Courier New';"><span style="mso-list: Ignore;"><span style="font: 7.0pt 'Times New Roman';"> </span></span></span>Save<span style="letter-spacing: -.3pt;"> </span>or<span style="letter-spacing: -.25pt;"> </span><span style="letter-spacing: -.1pt;">Update</span>

##### <span style="color: #2e5395;">Step<span style="letter-spacing: -.35pt;"> </span><span style="letter-spacing: -.5pt;">2</span></span>

- <span style="font-family: 'Arial',sans-serif; mso-fareast-font-family: Arial;"><span style="mso-list: Ignore;"><span style="font: 7.0pt 'Times New Roman';"> </span></span></span>Copy<span style="letter-spacing: -.35pt;"> </span>the<span style="letter-spacing: -.35pt;"> </span>metadata<span style="letter-spacing: -.3pt;"> </span>URL<span style="letter-spacing: -.35pt;"> </span>and<span style="letter-spacing: -.3pt;"> </span>modify<span style="letter-spacing: -.35pt;"> </span>the<span style="letter-spacing: -.3pt;"> </span>PowerShell<span style="letter-spacing: -.35pt;"> </span>Script<span style="letter-spacing: -.3pt;"> </span><span style="letter-spacing: -.1pt;">below</span>
- <span style="font-family: 'Arial',sans-serif; mso-fareast-font-family: Arial;"><span style="mso-list: Ignore;"><span style="font: 7.0pt 'Times New Roman';"> </span></span></span>Use<span style="letter-spacing: -.4pt;"> </span>this<span style="letter-spacing: -.4pt;"> </span>PowerShell<span style="letter-spacing: -.4pt;"> </span>Script,<span style="letter-spacing: -.4pt;"> </span>change<span style="letter-spacing: -.4pt;"> </span>the<span style="letter-spacing: -.4pt;"> </span>file<span style="letter-spacing: -.4pt;"> </span>extension<span style="letter-spacing: -.4pt;"> </span>to<span style="letter-spacing: -.4pt;"> </span>“.ps1”<span style="letter-spacing: -.4pt;"> </span>after<span style="letter-spacing: -.4pt;"> </span>downloading<span style="letter-spacing: -.4pt;"> </span>-<span style="letter-spacing: -.4pt;"> </span>You<span style="letter-spacing: -.4pt;"> </span>may<span style="letter-spacing: -.4pt;"> </span>need to unblock the file and change your execution policy on the server 
    - <span style="font: 7.0pt 'Times New Roman';"> </span>[Google Drive](https://drive.google.com/file/d/1RygKi9I7PmLio6yL1EWihQbn3jerS68X/view?usp=drive_link)

<details id="bkmrk-azure-ad-powershell-"><summary>Azure AD PowerShell Code</summary>

```
<#
.SYNOPSIS
    Federate Microsoft Entra ID (Azure AD/Microsoft Online Services) to ClassLink for IdP Services.

    Change the <GUID> in the $idpMetadataUrl to be the GUID from your SAML console App.
    Change $DomainName to match your domain name that is going to be Federated
    Change the script extension to ".ps1"

    *NOTE: you may need to set the PowerShell Execution Policy to remote signed or bypass temporarily.

#>

Install-Module -Name MSOnline
Import-Module MSOnline

$idpMetadataUrl = "https://idp.classlink.com/sso/metadata/<GUID>"

$DomainName = "<your domain name>"
$metadataxml = [Xml](Invoke-WebRequest -Uri $idpMetadataUrl -ContentType "application/xml").content

$cert = -join $metadataxml.EntityDescriptor.IDPSSODescriptor.KeyDescriptor.KeyInfo.X509Data.X509Certificate.Split()
$issuerUri = $metadataxml.EntityDescriptor.entityID
$logOnUri = $metadataxml.EntityDescriptor.IDPSSODescriptor.SingleSignOnService | ? { $_.Binding.Contains('Redirect') } | % { $_.Location }
$LogOffUri = $metadataxml.EntityDescriptor.IDPSSODescriptor.SingleLogoutService | ? { $_.Binding.Contains('Redirect') } | % { $_.Location }
$brand = "ClassLink Identity"
Connect-MsolService
$DomainAuthParams = @{
    DomainName = $DomainName
    Authentication = "Federated"
    IssuerUri = $issuerUri
    FederationBrandName = $brand
    ActiveLogOnUri = $logOnUri
    PassiveLogOnUri = $logOnUri
    LogOffUri = $LogOffUri
    SigningCertificate = $cert
    PreferredAuthenticationProtocol = "SAMLP"
}

Set-MsolDomainAuthentication @DomainAuthParams
```

</details><p class="callout info"><span style="font-family: 'Courier New'; mso-fareast-font-family: 'Courier New';"><span style="mso-list: Ignore;"><span style="font: 7.0pt 'Times New Roman';"> </span></span></span>If<span style="letter-spacing: -.5pt;"> </span>you<span style="letter-spacing: -.35pt;"> </span>receive<span style="letter-spacing: -.4pt;"> </span>an<span style="letter-spacing: -.35pt;"> </span>error<span style="letter-spacing: -.35pt;"> </span>regarding<span style="letter-spacing: -.4pt;"> </span>scripts<span style="letter-spacing: -.35pt;"> </span>being<span style="letter-spacing: -.35pt;"> </span><span style="letter-spacing: -.1pt;">disabled </span>Open<span style="letter-spacing: -.5pt;"> </span>an<span style="letter-spacing: -.45pt;"> </span>elevated<span style="letter-spacing: -.5pt;"> </span>PowerShell<span style="letter-spacing: -.45pt;"> </span><span style="letter-spacing: -.1pt;">prompt </span><span style="letter-spacing: -.1pt;">Type</span> <span style="letter-spacing: -.1pt;">the</span><span style="letter-spacing: .1pt;"> </span><span style="letter-spacing: -.1pt;">following</span><span style="letter-spacing: -.1pt;">:  
</span><span style="letter-spacing: .1pt;"> </span>`<span style="letter-spacing: -.1pt;">set-executionpolicy</span><span style="letter-spacing: .15pt;"> </span><span style="letter-spacing: -.1pt;">remotesigned </span><span style="letter-spacing: -.1pt;">-force</span>`  
This will allow local PowerShell scripts to run  
</p>

<span style="font-family: 'Arial',sans-serif; mso-fareast-font-family: Arial;"><span style="mso-list: Ignore;">●<span style="font: 7.0pt 'Times New Roman';"> </span></span></span>If you use an account that is being federated (using the custom domain instead of an onmicrosoft.com domain) [<u style="text-underline: #0462C1 thick;"><span style="color: #0462c1;">https://portal.azure.com</span></u>](https://portal.azure.com/)<span style="color: #0462c1;"> </span>should redirect you to https://launchpad.classlink.com/&lt;customurl&gt;<span style="letter-spacing: -.4pt;"> </span>for<span style="letter-spacing: -.4pt;"> </span>login<span style="letter-spacing: -.4pt;"> </span>from<span style="letter-spacing: -.4pt;"> </span>now<span style="letter-spacing: -.4pt;"> </span>on,<span style="letter-spacing: -.4pt;"> </span>along<span style="letter-spacing: -.4pt;"> </span>with<span style="letter-spacing: -.4pt;"> </span>any<span style="letter-spacing: -.4pt;"> </span>other Microsoft Service

##### Step<span style="letter-spacing: -.3pt;"> </span><span style="letter-spacing: -.25pt;">3:</span>

<span style="font-family: 'Arial',sans-serif; mso-fareast-font-family: Arial;"><span style="mso-list: Ignore;">●<span style="font: 7.0pt 'Times New Roman';"> </span></span></span>Make<span style="letter-spacing: -.55pt;"> </span>sure<span style="letter-spacing: -.45pt;"> </span>you<span style="letter-spacing: -.45pt;"> </span>have<span style="letter-spacing: -.45pt;"> </span>break-glass<span style="letter-spacing: -.45pt;"> </span>accounts<span style="letter-spacing: -.45pt;"> </span>within<span style="letter-spacing: -.45pt;"> </span>Microsoft<span style="letter-spacing: -.45pt;"> </span>in<span style="letter-spacing: -.45pt;"> </span>case<span style="letter-spacing: -.45pt;"> </span>something<span style="letter-spacing: -.4pt;"> </span><span style="letter-spacing: -.1pt;">happens.</span>

<span style="font-family: 'Arial',sans-serif; mso-fareast-font-family: Arial;"><span style="mso-list: Ignore;">○<span style="font: 7.0pt 'Times New Roman';"> </span></span></span>[<u style="text-underline: #1154CC thick;"><span style="color: #1154cc; letter-spacing: -.1pt;">https://learn.microsoft.com/en-us/azure/active-directory/roles/security-emergency-acc</span></u>](https://learn.microsoft.com/en-us/azure/active-directory/roles/security-emergency-access)<span style="color: #1154cc; letter-spacing: -.1pt;"> </span>[<u style="text-underline: #1154CC thick;"><span style="color: #1154cc; letter-spacing: -.2pt;">ess</span></u>](https://learn.microsoft.com/en-us/azure/active-directory/roles/security-emergency-access)

### <span style="color: #2e5395;">Revert<span style="letter-spacing: -.55pt;"> </span>to<span style="letter-spacing: -.4pt;"> </span>Entra<span style="letter-spacing: -.4pt;"> </span>ID<span style="letter-spacing: -.45pt;"> </span>(Azure<span style="letter-spacing: -.4pt;"> </span>AD)<span style="letter-spacing: -.4pt;"> </span>Managed<span style="letter-spacing: -.4pt;"> </span><span style="letter-spacing: -.1pt;">Authentication</span></span>

Open<span style="letter-spacing: -.2pt;"> </span><span style="letter-spacing: -.1pt;">PowerShell</span>

1. Run<span style="letter-spacing: -.15pt;"> </span>the<span style="letter-spacing: -.15pt;"> </span><span style="letter-spacing: -.1pt;">command</span>
2. <span style="letter-spacing: -.1pt;">Connect-MsolService</span>

After<span style="letter-spacing: -.5pt;"> </span>authenticating<span style="letter-spacing: -.4pt;"> </span>to<span style="letter-spacing: -.35pt;"> </span>your<span style="letter-spacing: -.4pt;"> </span>Entra<span style="letter-spacing: -.4pt;"> </span>ID<span style="letter-spacing: -.35pt;"> </span>(Azure<span style="letter-spacing: -.4pt;"> </span>AD)<span style="letter-spacing: -.35pt;"> </span><span style="letter-spacing: -.1pt;">Tenant</span>

<span style="letter-spacing: -.05pt;"><span style="mso-list: Ignore;"><span style="font: 7.0pt 'Times New Roman';"> </span></span></span>Run<span style="letter-spacing: -.15pt;"> </span>the<span style="letter-spacing: -.15pt;"> </span><span style="letter-spacing: -.1pt;">command:</span>

```
  Set-MsolDomainAuthentication -authentication managed -domainName
<domainname>
```

<p class="callout info">Replace `<domainname>` with your domain you wish to remove federation</p>

# Classlink LTI v1.3  (OIDC) Details

<span style="font-size: 12.0pt; line-height: 107%; mso-fareast-font-family: 'Times New Roman'; mso-fareast-theme-font: minor-fareast;">Dear Vendor,</span>

<span style="font-size: 12.0pt; line-height: 107%; mso-fareast-font-family: 'Times New Roman'; mso-fareast-theme-font: minor-fareast;">Our school is going to add your app as an LTI v1.3 SSO app through ClassLink. Please provide me with the following information:</span>

<span style="font-size: 12.0pt; line-height: 107%; font-family: Symbol; mso-fareast-font-family: Symbol; mso-bidi-font-family: Symbol; color: black; mso-themecolor: text1;"><span style="mso-list: Ignore;">·<span style="font: 7.0pt 'Times New Roman';"> </span></span></span><span style="font-size: 12.0pt; line-height: 107%; mso-fareast-font-family: 'Times New Roman'; mso-fareast-theme-font: minor-fareast; color: black; mso-themecolor: text1;">ClientID (generated in the Partner Portal)</span>

<span style="font-size: 12.0pt; line-height: 107%; font-family: Symbol; mso-fareast-font-family: Symbol; mso-bidi-font-family: Symbol; color: black; mso-themecolor: text1;"><span style="mso-list: Ignore;">·<span style="font: 7.0pt 'Times New Roman';"> </span></span></span><span style="font-size: 12.0pt; line-height: 107%; mso-fareast-font-family: 'Times New Roman'; mso-fareast-theme-font: minor-fareast; color: black; mso-themecolor: text1;">OIDC Login Initiation URL</span>

<span style="font-size: 12.0pt; line-height: 107%; font-family: Symbol; mso-fareast-font-family: Symbol; mso-bidi-font-family: Symbol; color: black; mso-themecolor: text1;"><span style="mso-list: Ignore;">·<span style="font: 7.0pt 'Times New Roman';"> </span></span></span><span style="font-size: 12.0pt; line-height: 107%; mso-fareast-font-family: 'Times New Roman'; mso-fareast-theme-font: minor-fareast; color: black; mso-themecolor: text1;">Target Link URL</span>

<span style="font-size: 12.0pt; line-height: 107%; font-family: Symbol; mso-fareast-font-family: Symbol; mso-bidi-font-family: Symbol; color: black; mso-themecolor: text1;"><span style="mso-list: Ignore;">·<span style="font: 7.0pt 'Times New Roman';"> </span></span></span><span style="font-size: 12.0pt; line-height: 107%; mso-fareast-font-family: 'Times New Roman'; mso-fareast-theme-font: minor-fareast; color: black; mso-themecolor: text1;">LTI Message Type (default is LtiResourceLinkRequest)</span>

<span style="font-size: 12.0pt; line-height: 107%; font-family: Symbol; mso-fareast-font-family: Symbol; mso-bidi-font-family: Symbol; color: black; mso-themecolor: text1;"><span style="mso-list: Ignore;">·<span style="font: 7.0pt 'Times New Roman';"> </span></span></span><span style="font-size: 12.0pt; line-height: 107%; mso-fareast-font-family: 'Times New Roman'; mso-fareast-theme-font: minor-fareast; color: black; mso-themecolor: text1;">Person SourcedID </span>

<span style="font-size: 12.0pt; line-height: 107%; font-family: Symbol; mso-fareast-font-family: Symbol; mso-bidi-font-family: Symbol; color: black; mso-themecolor: text1;"><span style="mso-list: Ignore;">·<span style="font: 7.0pt 'Times New Roman';"> </span></span></span><span style="font-size: 12.0pt; line-height: 107%; mso-fareast-font-family: 'Times New Roman'; mso-fareast-theme-font: minor-fareast; color: black; mso-themecolor: text1;">Role </span>

<span style="font-size: 12.0pt; line-height: 107%; font-family: Symbol; mso-fareast-font-family: Symbol; mso-bidi-font-family: Symbol; color: black; mso-themecolor: text1;"><span style="mso-list: Ignore;">·<span style="font: 7.0pt 'Times New Roman';"> </span></span></span><span style="font-size: 12.0pt; line-height: 107%; mso-fareast-font-family: 'Times New Roman'; mso-fareast-theme-font: minor-fareast; color: black; mso-themecolor: text1;">With PII </span>

<span style="font-size: 12.0pt; line-height: 107%; font-family: Symbol; mso-fareast-font-family: Symbol; mso-bidi-font-family: Symbol; color: black; mso-themecolor: text1;"><span style="mso-list: Ignore;">·<span style="font: 7.0pt 'Times New Roman';"> </span></span></span><span style="font-size: 12.0pt; line-height: 107%; mso-fareast-font-family: 'Times New Roman'; mso-fareast-theme-font: minor-fareast; color: black; mso-themecolor: text1;">Any Input Fields that I would need</span>

<span style="font-size: 12.0pt; line-height: 107%; mso-fareast-font-family: 'Times New Roman'; mso-fareast-theme-font: minor-fareast;"> </span>

<span style="font-size: 12.0pt; line-height: 107%; mso-fareast-font-family: 'Times New Roman'; mso-fareast-theme-font: minor-fareast;">Here is information about our school system and ClassLink:</span>

<span style="font-size: 12.0pt; line-height: 107%; font-family: Symbol; mso-fareast-font-family: Symbol; mso-bidi-font-family: Symbol; color: black; mso-themecolor: text1;"><span style="mso-list: Ignore;">·<span style="font: 7.0pt 'Times New Roman';"> </span></span></span><span style="font-size: 12.0pt; line-height: 107%; mso-fareast-font-family: 'Times New Roman'; mso-fareast-theme-font: minor-fareast; color: black; mso-themecolor: text1;">The OpenID Connect (OIDC) discovery endpoint is </span>[<span style="font-size: 12.0pt; line-height: 107%; mso-fareast-font-family: 'Times New Roman'; mso-fareast-theme-font: minor-fareast;">https://launchpad.classlink.com/.well-known/openid-configuration</span>](https://launchpad.classlink.com/.well-known/openid-configuration)<span style="font-size: 12.0pt; line-height: 107%; mso-fareast-font-family: 'Times New Roman'; mso-fareast-theme-font: minor-fareast; color: black; mso-themecolor: text1;"><span style="mso-spacerun: yes;"> </span></span>

<span style="font-size: 12.0pt; line-height: 107%; font-family: Symbol; mso-fareast-font-family: Symbol; mso-bidi-font-family: Symbol; color: black; mso-themecolor: text1;"><span style="mso-list: Ignore;">·<span style="font: 7.0pt 'Times New Roman';"> </span></span></span><span style="font-size: 12.0pt; line-height: 107%; mso-fareast-font-family: 'Times New Roman'; mso-fareast-theme-font: minor-fareast; color: black; mso-themecolor: text1;">The OIDC discovery endpoint contains the following:</span>

<span style="font-size: 12.0pt; line-height: 107%; font-family: 'Courier New'; mso-fareast-font-family: 'Courier New'; color: black; mso-themecolor: text1;"><span style="mso-list: Ignore;">o<span style="font: 7.0pt 'Times New Roman';"> </span></span></span><span style="font-size: 12.0pt; line-height: 107%; mso-fareast-font-family: 'Times New Roman'; mso-fareast-theme-font: minor-fareast; color: black; mso-themecolor: text1;">Issuer ID: </span>[<span style="font-size: 12.0pt; line-height: 107%; mso-fareast-font-family: 'Times New Roman'; mso-fareast-theme-font: minor-fareast;">https://launchpad.classlink.com</span>](https://launchpad.classlink.com)

<span style="font-size: 12.0pt; line-height: 107%; font-family: 'Courier New'; mso-fareast-font-family: 'Courier New'; color: black; mso-themecolor: text1;"><span style="mso-list: Ignore;">o<span style="font: 7.0pt 'Times New Roman';"> </span></span></span><span style="font-size: 12.0pt; line-height: 107%; mso-fareast-font-family: 'Times New Roman'; mso-fareast-theme-font: minor-fareast; color: black; mso-themecolor: text1;">OIDC URL: </span>[<span style="font-size: 12.0pt; line-height: 107%; mso-fareast-font-family: 'Times New Roman'; mso-fareast-theme-font: minor-fareast;">https://launchpad.classlink/com/oauth2/v2/auth</span>](https://launchpad.classlink/com/oauth2/v2/auth)

<span style="font-size: 12.0pt; line-height: 107%; font-family: 'Courier New'; mso-fareast-font-family: 'Courier New'; color: black; mso-themecolor: text1;"><span style="mso-list: Ignore;">o<span style="font: 7.0pt 'Times New Roman';"> </span></span></span><span style="font-size: 12.0pt; line-height: 107%; mso-fareast-font-family: 'Times New Roman'; mso-fareast-theme-font: minor-fareast; color: black; mso-themecolor: text1;">JWKS URL: </span>[<span style="font-size: 12.0pt; line-height: 107%; mso-fareast-font-family: 'Times New Roman'; mso-fareast-theme-font: minor-fareast;">https://launchpad.classlink/com/oauth2/v2/jwks</span>](https://launchpad.classlink/com/oauth2/v2/jwks)

<span style="font-size: 12.0pt; line-height: 107%; font-family: Symbol; mso-fareast-font-family: Symbol; mso-bidi-font-family: Symbol; color: black; mso-themecolor: text1;"><span style="mso-list: Ignore;">·<span style="font: 7.0pt 'Times New Roman';"> </span></span></span><span style="font-size: 12.0pt; line-height: 107%; mso-fareast-font-family: 'Times New Roman'; mso-fareast-theme-font: minor-fareast; color: black; mso-themecolor: text1;">Our SchoolDeployment ID (Tenant ID) is </span><span style="font-size: 12.0pt; line-height: 107%; mso-fareast-font-family: 'Times New Roman'; mso-fareast-theme-font: minor-fareast; color: red;">xxxx</span><span style="font-size: 12.0pt; line-height: 107%; mso-fareast-font-family: 'Times New Roman'; mso-fareast-theme-font: minor-fareast; color: black; mso-themecolor: text1;">. (Not all vendors require a Deployment ID, but it's best to include it in case it is needed.)</span>

Thank you so much for your help with this,

Insert Your Name and Contact Information

# Disable MFA in EntraID (Azure AD)

<div id="bkmrk-1.-you-are-using-3rd">1. You are using 3rd party MFA which is ClassLink, is this correct?</div><div id="bkmrk-%C2%A0"> </div><div id="bkmrk-2.-you-want-to-disab">2. You want to disable the Microsoft MFA, or you do not wish your users to be asked for a Microsoft MFA, is this correct?</div><div id="bkmrk-%C2%A0-1"> </div><div id="bkmrk-%C2%A0-2"> </div><div id="bkmrk--if-yes-is-your-answ">-If yes is your answer the above information, disable the following: "Registration Campaign", "System-Preferred Multi-factor Authentication" and your tenants "Security Defaults".</div><div id="bkmrk-%C2%A0-3"> </div><div id="bkmrk-3.-to-disable-the-%22r">3. To disable the "Registration Campaign":  
 • Go to &gt; [https://portal.azure.com](https://portal.azure.com/) &gt;Microsoft Entra ID &gt;Manage &gt;Security &gt;Authentication Methods &gt;Registration Campaign &gt;switch the State from Enabled or Microsoft Managed to Disable.  
 </div><div id="bkmrk-4.-to-disable-the-%22s">4. To disable the "System-Preferred Multi-factor Authentication"  
 • Go to &gt; [https://portal.azure.com](https://portal.azure.com/) &gt;Microsoft Entra ID &gt;Manage &gt;Security &gt;Authentication Methods &gt;Settings &gt;System-Preferred Multi-factor Authentication &gt;switch the State from Enabled or Microsoft Managed to Disable.</div><div id="bkmrk-%C2%A0-4"> </div><div id="bkmrk-5.%C2%A0to-disable-the-%22s">5. To disable the "Security Defaults"</div><div id="bkmrk-%C2%A0-%C2%A0-%E2%80%A2-go-to-%3E%C2%A0https%3A"> • Go to &gt; [https://portal.azure.com](https://portal.azure.com/)​​​​​​<wbr>​ &gt;Microsoft Entra ID &gt;Manage &gt;Properties &gt;Manage Security Defaults &gt;switch from Enable to Disable.</wbr></div>