pfSense Firewall
Configuration and How-to's for pfSense Firewall
Basics
Basic Information on the pfSense Firewall
Accessing pfSense: SSH, Web Interface, and Serial Console
![]()
In this tutorial, we'll guide you through three methods of accessing your pfSense firewall: SSH, the web interface, and the serial console. We'll be using MobaXterm, a versatile remote computing tool, to simplify the process.
1. Accessing pfSense via SSH:
SSH allows secure remote access to your pfSense system's command-line interface. Here's how to do it:
-
Open MobaXterm on your computer.
-
Click on the "Session" button in the top-left corner.
-
In the "Session settings" window:
- Choose "SSH" as the protocol.
- Enter the IP address or DNS name of the pfSense firewall in the "Remote host" field.
- Set the "Port" to the SSH port (typically 22).
- Enter your pfSense username tied to the MSLS Partners AD Domain.
- Choose "Use private key" if applicable, or use "Password" and enter your password.
-
Click the "OK" button.
-
Double-click the SSH session in the main MobaXterm window to open the SSH terminal.
2. Accessing pfSense via Web Interface:
The web interface provides a graphical way to manage your pfSense settings. Follow these steps to access it:
-
Open a web browser on a computer connected to the local network.
-
Enter the IP address or DNS name of the pfSense firewall in the address bar. For example:
- IP address:
https://192.168.100.1:9443 - DNS name:
https://firewall-1.mslspartners.com:9443
- IP address:
-
If you encounter a security warning due to the SSL certificate, proceed to the site (or add an exception).
-
On the login page, enter your pfSense credentials:
- Username: Your MSLS Partners AD Domain username
- Password: Your corresponding password
-
Click "Login" to access the pfSense web interface.
3. Accessing pfSense via Serial Console:
The serial console is an important method for direct access to your pfSense system. Here's how to connect using MobaXterm:
-
Connect a serial cable between your computer and the pfSense serial console port.
-
Open MobaXterm on your computer.
-
Click on the "Session" button in the top-left corner.
-
In the "Session settings" window:
- Choose "Serial" as the protocol.
- Select the correct COM port corresponding to your serial connection.
- Set the "Baud rate" to 115200 (default for pfSense).
- Ensure "Data bits" is set to 8, "Parity" to None, and "Stop bits" to 1 (8N1).
-
Click the "OK" button.
-
Double-click the serial session in the main MobaXterm window to open the console.
That's it! You now know how to access pfSense using SSH, the web interface, and the serial console using MobaXterm. These methods offer you different levels of access and control for managing your pfSense firewall.
Remember to use the appropriate credentials and settings based on your pfSense configuration. If you encounter any issues, please reach out for assistance.
VPN
How-to's and Configuration guides for pfSense VPN
OpenVPN Site-to-Site Configuration Example with SSL/TLS
OpenVPN Site-to-Site Configuration Example with SSL/TLS
A site-to-site connection using SSL/TLS in client/server mode is convenient for managing a large number of remote sites connecting back to a central site in a hub-and-spoke fashion.
Example Configuration Overview
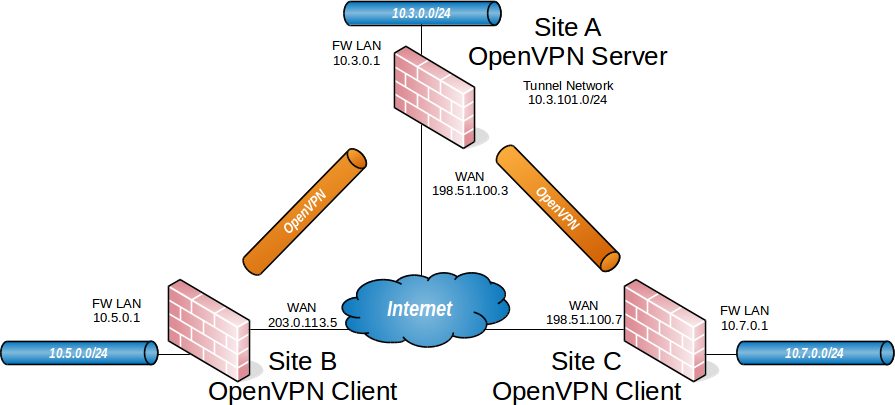
OpenVPN Example Site-to-Site SSL/TLS Network
When configuring a site-to-site OpenVPN connection using SSL/TLS one firewall will be the server and the others will be clients.
Tip
Usually the main location will be the server and the remote offices will act as clients, though if one location has a static IP address and more bandwidth than the main office that may be a more desirable location for the server.
This style of VPN requires a dedicated subnet for the OpenVPN interconnection between networks in addition to the subnets on both ends. Figure OpenVPN Example Site-to-Site SSL/TLS Network shows a depiction of this layout, using 10.3.101.0/24 as the IPv4 VPN Tunnel Network. This can be any subnet so long as it does not overlap another subnet currently in use on the network.
OpenVPN allocates IP addresses the same way it does for remote access clients. When using a Topology style of subnet, each client obtains one IP address in a common subnet. When using a Topology style of net30, each connecting client gets a /30 subnet to interconnect itself with the server.
See also
The subnet topology style uses address space more efficiently and has less quirks with its behavior in general, but certain very old clients may not be compatible. See Topology for more details.
The following sections describe how to configure the server and client sides of the connection.
Example Configuration Settings
|
Site A - Server |
|
|---|---|
|
Name |
Austin Office |
|
WAN Address |
198.51.100.3 |
|
LAN Subnet |
10.3.0.0/24 |
|
LAN Address |
10.3.0.1 |
|
CA Name |
S2SCA |
|
Cert CN |
serverA |
|
Tunnel Net |
10.3.101.0/24 |
|
Site B - Client |
|
|---|---|
|
Name |
London Office |
|
Cert CN |
clientB |
|
WAN Address |
203.0.113.5 |
|
LAN Subnet |
10.5.0.0/24 |
|
LAN Address |
10.5.0.1 |
|
Site C - Client |
|
|---|---|
|
Name |
Colorado Office |
|
Cert CN |
clientC |
|
WAN Address |
198.51.100.7 |
|
LAN Subnet |
10.7.0.0/24 |
|
LAN Address |
10.7.0.1 |
Configuring SSL/TLS Server Side
The server requires two items to reach the networks behind each client:
-
A
routeto tell the operating system that OpenVPN knows about a remote network -
An internal route (
iroute) in an OpenVPN Client-Specific Override to tell OpenVPN how to route that subnet to a specific client certificate
More detail on this will follow in the example.
See also
Create Certificate Structure
The first step is to create a certificate structure for this VPN.
This example uses the names listed in Example Configuration Settings – The CA is named S2SCA, the Server CN is named serverA, and the clients are clientB and clientC.
See also
Create a Certificate Authority
Create a CA unique to this VPN:
Create a Server Certificate
Create a server certificate signed by the VPN CA:
Create User Certificates
Create user certificates for each remote site signed by the VPN CA.
Repeat this process for every client (e.g. clientC and any future clients).
Export Certificates
The next task is to export the certificates and keys which the client requires when connecting to the OpenVPN server.
-
Navigate to System > Cert Manager, CAs tab
-
Click
 on the row for the CA to export its certificate
 -
Navigate to System > Cert Manager, Certificates tab
-
Click
on the row for each client certificate to export the certificates -
Click
 on the row for each client certificate to export the private key for the client certificates.
Warning
Do not export the CA key, server certificate, or server key. The client does not need these and copying them unnecessarily significantly weakens the security of the VPN.
Configure the OpenVPN Server Instance
-
Navigate to VPN > OpenVPN, Servers tab
-
Click
 Add to create a new server
 -
Fill in the fields as described below, with everything else left at defaults.
Use values appropriate for this network, or the defaults if unsure.
See also
See Server Configuration Options for details on each of these options.
- Description
-
Enter text to describe the connection, e.g.
Site-to-Site VPN. - Server Mode
-
Peer to Peer (SSL/TLS)
- DCO (Plus Only)
-
Check this box to activate the OpenVPN Data Channel Offload (DCO) feature for the server if desired.
See also
See OpenVPN Data Channel Offload (DCO) for additional information.
- Device Mode
-
tun
- Protocol
-
UDP on IPv4 only
- Interface
-
WAN
- Local Port
-
1194 - TLS Configuration
-
Check the Use a TLS Key box to enable TLS authentication which provides protection for the tunnel control channel.
Leave Automatically generate a TLS Key checked so the firewall will generate a new key automatically the first time this entry is saved.
- Peer Certificate Authority
-
Select the CA created at the beginning of this process (
S2SCA) - Peer Certificate Revocation List
-
Select a CRL for the CA, if one exists.
- Server Certificate
-
Select the server certificate created at the beginning of this process (
serverA) - IPv4 Tunnel Network
-
Enter the chosen tunnel network,
10.3.101.0/24 - IPv4 Local Network(s)
-
Enter the LAN subnets for all sites including the server:
10.3.0.0/24, 10.5.0.0/24, 10.7.0.0/24Note
If there are more networks on the server side that clients need to reach, such as networks reachable via static routes, other VPNs, and so on, add them as additional entries in the IPv4 Local Network box.
- IPv4 Remote Network(s)
-
Enter only the client LAN subnets:
10.5.0.0/24, 10.7.0.0/24 - Inactive
-
0to disable disconnecting idle clients, so that site-to-site connections can stay up indefinitely.
-
Click Save.
-
Click
 to edit the new server instance
 -
Find the TLS Authentication box
-
Select all of the text inside
-
Copy the text to the clipboard
-
Save this to a file or paste it into a text editor such as Notepad temporarily
Create Client-Specific Overrides
Now add Client Specific Overrides for each client site. These tie a client subnet to a particular certificate so that OpenVPN can properly route a subnet to the correct site.
-
Navigate to VPN > OpenVPN, Client Specific Overrides tab
-
Click
to add a new override -
Fill in the fields on this screen as follows:
- Common Name
-
Enter the CN of the first client site. In this example, that is
clientB. - IPv4 Remote Network/s
-
The clientB LAN subnet,
10.5.0.0/24.Note
This field sets up the internal route (
iroute)
-
Click Save
Add an override for the second site, adjusting the Common Name and IPv4 Remote Network to match. In the example for site C, these values would be clientC and 10.7.0.0/24 respectively.
See also
Firewall Rules
External Traffic (WAN)
Next, add a firewall rule for the WAN interface which allows access to the OpenVPN server.
-
Navigate to Firewall > Rules, WAN tab
-
Click
 Add to create a new rule at the top of the list
 -
Set the options as follows:
- Protocol
-
UDP
- Source
-
any (since multiple sites must connect)
Tip
For extra security, if the clients have static IP addresses, create an alias containing these addresses, then set it as the source on this rule.
- Destination
-
WAN Address
- Destination port
-
1194 - Description
-
OpenVPN Multi-Site VPN
-
Click Save
-
Click Apply Changes
Tunneled Traffic
Now add a rule to the OpenVPN tab to pass traffic over the VPN from the Client-side LAN to the Server-side LAN. This can be an “Allow all” style rule or a set of stricter rules. This example allows all traffic using this rule:
-
Navigate to Firewall > Rules, OpenVPN tab
-
Click
Add to create a new rule at the top of the list -
Set the options as follows:
- Protocol
-
any
- Source
-
any
Tip
For extra security, create an alias containing only the remote hosts or subnets which must initiate contact with hosts on the sever LAN, then use that alias as the source on this rule.
- Destination
-
any
Tip
For extra security, create an alias containing only the local hosts or subnets on the server LAN which must accept connections from remote hosts across the VPN, then use that alias as the destination on this rule.
- Description
-
Allow all on OpenVPN
-
Click Save
-
Click Apply Changes
That completes the server setup, next, now move on to configure the clients.
Configuring SSL/TLS Client Side
Import CA and Certificate
On the client, import the CA certificate along with the client certificate and key for that site. This is the same CA and client certificate created earlier in this document.
See also
Import these items at System > Cert Manager.
First import the CA:
Next, import the client certificate:
Repeat these steps on each client firewall.
Configure the OpenVPN Client Instance
After importing the certificates, create the OpenVPN client:
-
Navigate to VPN > OpenVPN, Client tab
-
Click
Add to create a new client -
Fill in the fields as follows, with everything else left at defaults:
See also
See Client Configuration Options for details on each of these options.
- Description
-
Text to describe the connection (e.g.
Site A VPN) - Server Mode
-
Peer to Peer (SSL/TLS)
- DCO (Plus Only)
-
Check this box to activate the OpenVPN Data Channel Offload (DCO) feature for the client if desired.
See also
See OpenVPN Data Channel Offload (DCO) for additional information.
- Device Mode
-
tun
- Protocol
-
UDP on IPv4 only
- Interface
-
WAN
- Server host or address
-
The public IP address or hostname of the OpenVPN server (
198.51.100.3in this example) - Server Port
-
1194 - Enable authentication of TLS packets
-
Checked
- Automatically generate a shared TLS authentication key
-
Unchecked
- TLS Key
-
Paste in the TLS key copied from the server instance
- Peer Certificate Authority
-
The CA imported at the beginning of this process
- Client Certificate
-
The client certificate imported at the beginning of this process
-
Click Save
Note
With remote access PKI configurations such as this example, routes and other configuration options are typically pushed from the server and thus not present in the client configuration. If the client side must reach additional networks, configure them in the server settings or a client-specific override as Local Networks.
Firewall Rules
This next step is optional depending on whether or not hosts on the server network or other client sites need to initiate contact with hosts on the client network. If the other sites do not need to initiate contact with this client, then no action is necessary.
If the other sites needs to initiate contact, then this traffic requires a firewall rule on the OpenVPN tab on the client firewall to allow traffic from other VPN sites to reach the Client-side LAN. An “Allow all” style rule is OK in some cases, but a set of stricter rules is the best practice.
This example allows all traffic:
-
Navigate to Firewall > Rules, OpenVPN tab
-
Click
Add to create a new rule at the top of the list -
Set the options as follows:
- Protocol
-
any
- Source
-
any
Tip
For extra security, create an alias containing only the remote hosts or subnets which must initiate contact with hosts on the client LAN, then use that alias as the source on this rule.
- Destination
-
any
Tip
For extra security, create an alias containing only the local hosts or subnets on the client LAN which must accept connections from remote hosts across the VPN, then use that alias as the destination on this rule.
- Description
-
Allow all on OpenVPN
-
Click Save
-
Click Apply Changes
Testing the Connection
The configuration is now complete. The OpenVPN client instance automatically starts when created, so it should already be attempting to connect at this point and if the configuration is correct, it will be connected.
Try to ping across to the remote end LAN to verify connectivity.
OpenVPN Remote Access Configuration Example
The OpenVPN wizard on pfSense® software is a convenient way to setup a remote access VPN for mobile clients. The wizard configures all of the necessary prerequisites for an OpenVPN remote access server:
-
An authentication source (Local, RADIUS server, or LDAP server)
-
A certificate authority (CA)
-
A server certificate
-
An OpenVPN server instance
At the end of the wizard the firewall will have a fully functioning sever, ready to accept connections from users. This server configuration can then be altered as needed.
This document uses an example setup to aide in explaining the options available in the wizard.
See also
Before Starting The Wizard
Before starting the wizard, plan the design of the VPN.
Determine an IP addressing scheme
The OpenVPN server requires a dedicated subnet for communication between the server and the OpenVPN clients. This is the Tunnel Network in the server configuration. The server uses the first address in this subnet for itself to act as a gateway and it allocates IP addresses within this subnet to clients.
When selecting internal subnets for a single location, ideally choose subnets which can be CIDR summarized with other internal subnets. This example uses 10.3.0.0/24 for LAN and 10.3.201.0/24 for the remote access OpenVPN server. These two networks can be summarized with 10.3.0.0/16, which makes routing easier to manage.
See also
Example Network
Figure OpenVPN Example Remote Access Network shows a depiction of this example deployment.
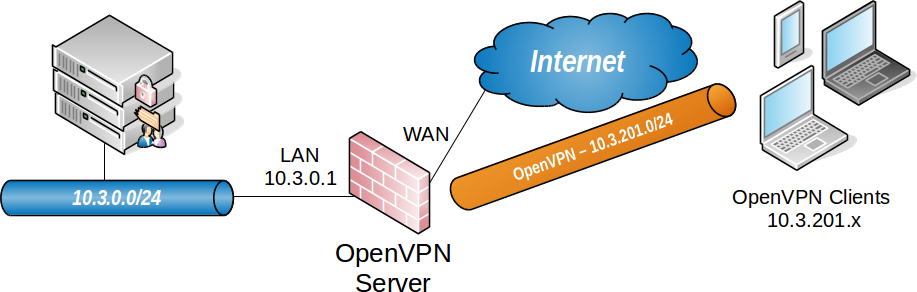
OpenVPN Example Remote Access Network
|
Remote Access Server |
|
|---|---|
|
WAN Address |
198.51.100.3 |
|
LAN Subnet |
10.3.0.0/24 |
|
LAN Address |
10.3.0.1 |
|
Tunnel Net |
10.3.201.0/24 |
OpenVPN Wizard Walkthrough
To start the OpenVPN Remote Access Server Setup wizard:
The GUI presents the first step of the wizard automatically
Note
The option for OpenVPN Data Channel Offload (DCO) is not included in this wizard. To use DCO on this server, run the wizard first then after completing the wizard, edit the server instance and enable the DCO option.
Choose Authentication Type
On the first screen of the wizard, select the authentication backend server type. The choices available for Type of Server are Local User Access, LDAP, and RADIUS.
See also
- Local User Access
-
Manage the users, passwords, and certificates using the User Manager on this firewall.
Sets the server mode to Remote Access (SSL/TLS + User Auth) which requires user authentication as well as per-user certificates.
Local User Access easily handles per-user certificates, managed completely in the GUI. This is much more secure, but depending on the number of users which will access the service, may be less convenient than using a central authentication system.
- LDAP / RADIUS
-
If the network has an existing authentication system already in place, such as Active Directory, pick LDAP or RADIUS depending on which method that system accepts.
LDAP and RADIUS both set the server mode to Remote Access (User Auth), which does not require per-user certificates.
Note
The server mode can be adjusted later to require certificates, but administrators must manually create per-user certificates for LDAP or RADIUS users.
Click  Next to continue.
For Local User Access, the wizard skips the LDAP and RADIUS configuration steps.
For LDAP or RADIUS the wizard will present appropriate authentication server configuration options next. This example uses Local User Access, but this document discusses the other options for completeness.
Choosing an LDAP Server
If the user manager configuration on this firewall contains one or more LDAP servers, the wizard offers these LDAP servers as options it can use for this VPN.
Click Add new LDAP server to create a different LDAP server entry.
Click Next to continue using the server selected in the LDAP Servers list.
If the firewall configuration does not contain any LDAP servers, the wizard skips this step.
See also
Adding an LDAP Server
If the user manager configuration on this firewall does not contain an LDAP server, or if the user chose to create a new LDAP server, the wizard presents a screen to define a new server.
The values for the options on this screen depend on the specific LDAP directory configuration and structure. For guidance, consult the LDAP server administrator, software vendor, or documentation.
Note
The details of LDAP servers are covered in LDAP Authentication Servers.
This document omits some detail since the options are discussed in-depth by that other section.
The wizard offers the following LDAP authentication server parameters:
- Name
-
Descriptive name for this LDAP server, for reference.
- Hostname or IP address
-
The hostname or IP address of the LDAP server.
If the firewall will contact this server using an encrypted method, this value must match the contents of the LDAP server certificate.
- Port
-
The port on which the LDAP server is listening for requests.
The default port is
389for standard TCP connections and636for SSL. - Transport
-
Sets the method the firewall will use when performing LDAP queries to the server.
- Standard TCP
-
Unencrypted connections using plain TCP.
- STARTTLS Encrypted
-
Connects to the standard TCP port and then attempts to negotiate TLS encryption.
- SSL/TLS Encrypted
-
Secure connections using TLS encryption.
A standard TCP connection is typically sufficient for initial testing, and potentially for local servers or those only accessible over secure connections. If the server is remote or crosses any untrusted network links, an encrypted method is essential. Using an encrypted method is always the best practice, but may not always be viable.
Warning
When the firewall uses an encrypted method to contact the LDAP server, the Hostname or IP address above must match a value in the LDAP server certificate.
- Peer Certificate Authority
-
To use SSL/TLS or STARTTLS transports, the firewall must trust the CA of the LDAP server. This can be accomplished by any of the following methods:
-
Import the CA into the certificate manager and select it from the list in this option.
-
Import the CA into the certificate manager with the Trust Store option set, which adds the imported CA into the list of CAs which the firewall trusts globally. Then select global from this list.
-
If the LDAP server certificate is signed by a globally trusted CA, such as Let’s Encrypt, then select global.
-
- Search Scope Level
-
Selects how deep the firewall will search in the LDAP directory, One Level or Entire Subtree.
In almost all cases, Entire Subtree is the correct choice.
- Search Scope Base DN
-
The distinguished name (DN) upon which the firewall bases its search. For example
DC=example,DC=com. - Authentication Containers
-
These values specify where the directory stores user data. For example,
CN=Users;DC=example. - LDAP Bind User DN
-
If the LDAP server requires authenticated binds when performing queries, this field sets the distinguished name the firewall uses for this bind action.
If this is blank the firewall performs an anonymous bind without credentials.
- LDAP Bind Password
-
The password for authenticated binds. The firewall only uses this value if LDAP Bind User DN has a value.
- User Naming Attribute
-
Varies depending on the LDAP directory software and structure.
Typically
cnfor OpenLDAP and Novell eDirectory, andsamAccountNamefor Microsoft Active Directory. - Group Naming Attribute
-
Varies depending on the LDAP directory software and structure, but is most typically
cn. - Member Naming Attribute
-
Varies depending on the LDAP directory software and structure.
Typically
memberon OpenLDAP,memberOfon Microsoft Active Directory, anduniqueMemberon Novell eDirectory.
See also
LDAP Authentication Servers explains the remaining options in detail, and when a server may require them.
Click Add new server to continue.
Choosing a RADIUS Server
If the user manager configuration on this firewall contains one or more RADIUS servers, the wizard offers these RADIUS servers as options it can use for this VPN.
Click Add new RADIUS server to create a different RADIUS server entry.
Click Next to continue using the server selected in the RADIUS Servers list.
If the firewall configuration does not contain any RADIUS servers, the wizard skips this step.
See also
Adding a RADIUS Server
If the user manager configuration on this firewall does not contain a RADIUS server, or if the user chose to create a new RADIUS server, the wizard presents a screen to define a new server.
The values for the options on this screen depend on the specific RADIUS configuration and structure. For guidance, consult the RADIUS server administrator, software vendor, or documentation.
Note
The details of RADIUS servers are covered in RADIUS Authentication Servers.
This document omits some detail since the options are discussed in-depth by that other section.
The wizard offers the following RADIUS authentication server parameters:
- Name
-
Descriptive name for this RADIUS server, for reference.
- Hostname or IP address
-
The hostname or IP address of the RADIUS server.
- Authentication Port
-
Port used by the RADIUS server for accepting authentication requests, typically
1812. - Shared Secret
-
The password the RADIUS server expects from this firewall when it submits authentication requests (e.g. password on the NAS entry.)
Click Add new server to continue.
Choosing a Certificate Authority
If the certificate manager configuration on this firewall contains one or more certificate authorities, the wizard offers these CA entries as options it can use for this VPN.
Click Add new CA to create a different certificate authority.
Click Next to continue using the certificate authority selected in the Certificate authority list.
If the firewall configuration does not contain any CA entries, the wizard skips this step.
See also
Creating a Certificate Authority
If the certificate manager configuration on this firewall does not contain a CA, or if the user chose to create a new CA, the wizard presents a screen to define a new CA.
See also
For more information on creating and managing CAs, see Certificate Authority Management.
This document omits some detail since the options are discussed in-depth by that other section.
The firewall uses this entry as a root CA which can sign server and user certificates. Clients can use this CA to validate the server, and the server can use this CA to validate clients. Because this CA is self-signed, only clients which are supplied with a copy of this CA certificate will trust other certificates signed by this CA.
The wizard offers the following CA parameters:
- Descriptive Name
-
ExampleCoCAA name for reference to identify this certificate. This is the same as Common Name field for other certificates.
Note
Although this field can technically contain spaces, the best practice is to conform the contents of this field to the format allowed for fully qualified domain names.
Some clients have issues handling entries with spaces properly.
- Key Length
-
2048Size of the CA private key which the wizard will generate.
Larger keys offer increased security but larger keys are generally slower to use.
- Lifetime
-
3650The time, in days, for which this CA will remain valid.
For a self-signed CA such as this, the default of
3650is acceptable, which is approximately 10 years.
The remaining fields are optional but define additional identifying data for the CA “subject”/distinguished name. For small deployments this may not matter much, but for larger organizations with CA entries at multiple sites, this can help ensure each CA is easily identifiable.
- Country Code
-
US(Optional) Two-letter ISO country code (e.g. US, AU, CA).
ExampleCo is located in the United States which has an ISO country code of
US.To locate an appropriate ISO code for other countries, use the ISO Online Browsing Platform site.
- State or Province
-
Texas(Optional) Full unabbreviated State or Province name (e.g. Texas, Indiana, California).
ExampleCo is located in
Texas. - City
-
Austin(Optional) City or other Locality name (e.g. Austin, Indianapolis, Toronto).
ExampleCo headquarters is in
Austin. - Organization
-
ExampleCo(Optional) Organization name, often the Company or Group name.
Warning
Do not use any special characters in this field, not even punctuation such as a period or comma.
Click Add new CA finish the CA creation process.
Choosing a Server Certificate
If the certificate manager configuration on this firewall contains one or more certificates, the wizard offers these certificate entries as options it can use for this VPN.
Click Add new Certificate to create a different certificate.
Click Next to continue using the certificate selected in the Certificate list.
If the firewall configuration does not contain any certificate entries, the wizard skips this step.
See also
Adding a Server Certificate
If the certificate manager configuration on this firewall does not contain a certificate, or if the user chose to create a new certificate, the wizard presents a screen to define a new server certificate.
See also
For more information on creating and managing certificates, see Certificate Management.
This document omits some detail since the options are discussed in-depth by that other section.
This server certificate verifies the identity of the server to the clients. The CA set in the previous wizard steps will sign this certificate. In most cases, as with this example, the server certificate uses the same information from the previous step and the wizard pre-fills the form automatically.
- Descriptive Name
-
vpn.example.comThis is the common name (CN) field of the server certificate and the firewall also uses this name to reference the certificate.
The best practice is to set this to the fully qualified hostname of the firewall.
Note
Although this field can technically contain spaces, the best practice is to conform the contents of this field to the format allowed for fully qualified domain names.
Some clients have issues handling entries with spaces properly.
- Key Length
-
2048Size of the CA private key which the wizard will generate.
Larger keys offer increased security but larger keys are generally slower to use.
- Lifetime
-
398The time in days that this certificate will be valid. The best practice is to set this to
398days or less.Note
Some current operating systems and software limit server certificates to a maximum lifetime of
398days for security reasons. Clients on these platforms may reject a server certificate with a longer lifetime.
The remaining fields are optional but define additional identifying data for the server certificate “subject”/distinguished name. For small deployments this may not matter much, but for larger organizations with many server certificates, this can help ensure each certificate is easily identifiable.
- Country Code
-
US(Optional) Two-letter ISO country code (e.g. US, AU, CA).
ExampleCo is located in the United States which has an ISO country code of
US.To locate an appropriate ISO code for other countries, use the ISO Online Browsing Platform site.
- State or Province
-
Texas(Optional) Full unabbreviated State or Province name (e.g. Texas, Indiana, California).
ExampleCo is located in
Texas. - City
-
Austin(Optional) City or other Locality name (e.g. Austin, Indianapolis, Toronto).
ExampleCo headquarters is in
Austin. - Organization
-
ExampleCo(Optional) Organization name, often the Company or Group name.
Warning
Do not use any special characters in this field, not even punctuation such as a period or comma.
Click Create New Certificate to continue.
Configuring OpenVPN Server Settings
The options on this step of the wizard configure each aspect of how the OpenVPN server itself behave as well as options the server will pass on to clients.
See also
The options presented here are the same as those in Server Configuration Options. Refer to that section for details.
Because the options are covered in detail in that section, this document only mentions the settings used by this example.
General OpenVPN Server Information
These options control how the OpenVPN instance operates.
- Interface
-
WAN
- Protocol
-
UDP on IPv4 Only
- Local Port
-
1194The wizard suggests the first unused port number starting with port
1194. If there is an existing OpenVPN server on that port, use a different port number. - Description
-
ExampleCo Mobile VPN Clients
Cryptographic Settings
These options control how the server encrypts and authenticates traffic in the tunnel.
- TLS Authentication
-
Check Enable authentication of TLS packets
Using TLS authentication is the best practice.
- Generate TLS Key
-
Check Automatically generate a shared TLS authentication key
- TLS Shared Key
-
Blank
The wizard disables this field when Automatically generate a shared TLS authentication key is checked.
- DH Parameters Length
-
2048
This value is a good balance of speed and strength.
- Data Encryption Negotiation
-
Checked
This allows the server to automatically negotiate encryption settings with clients.
Note
Disabling this option is deprecated, but still present on this version for compatibility.
- Data Encryption Algorithms
-
AES-256-GCM, AES-128-GCM, and CHACHA20-POLY1305
The best practice is to use the default suggested values as noted above.
- Fallback Data Encryption Algorithm
-
AES-256-CBC
This algorithm is used when negotiation fails, for example with a client that is too old to support negotiation.
- Auth Digest Algorithm
-
SHA256 (256-bit)
Tunnel Settings
These options control how the server routes traffic from remote clients.
- Tunnel Network
-
10.3.201.0/24This is the tunnel network from the table at the start of this example (OpenVPN Remote Access Server Settings).
- Redirect Gateway
-
Unchecked
For this example, The VPN will only carry traffic destined for subnets at the main office.
- Local Network
-
10.3.0.0/24This is the server-side LAN subnet from the table at the start of this example (OpenVPN Remote Access Server Settings).
- Concurrent Connections
-
Blank
This example does not limit the number of clients which can connect at the same time.
- Allow Compression
-
Refuse any non-stub compression (Most secure)
The best practice is to disable compression for security reasons.
- Compression
-
Disable Compression [Omit Preference]
The best practice is to disable compression for security reasons.
- Type-of-Service
-
Unchecked
There is no traffic on this example VPN which requires prioritization/QoS.
- Inter-Client Communication
-
Unchecked
The clients on this VPN have no need to connect to other VPN client hosts.
- Duplicate Connections
-
Unchecked
This example uses unique certificates for every client and does not allow multiple connections per client.
Client Settings
These options control specific settings the server pushes to clients when they establish a connection.
- Dynamic IP
-
Checked
The clients connect from all over the country and unknown mobile networks and their IP addresses are likely to change without notice.
- Topology
-
Subnet
The method the server uses to assign IP addresses to clients.
- DNS Default Domain
-
example.comThe domain name used by ExampleCo.
- DNS Servers
-
10.3.0.5A list of internal DNS servers. ExampleCo has a Windows Active Directory Domain Controller which is configured to act as a DNS server at
10.3.0.5. - NTP Servers
-
10.3.0.6A dedicated local NTP server exists at
10.3.0.6. - Advanced
-
Blank
At this time no additional tweaks are necessary.
Click Next to continue.
Firewall Rule Configuration
By default the firewall blocks all traffic from connecting to VPNs or passing over VPN tunnels. This step of the wizard adds firewall rules automatically to allow traffic to connect to the VPN and also so connected clients can pass traffic over the VPN.
- Traffic from clients to server
-
Checked
When checked, the wizard adds a firewall rule on the chosen interface outside of the tunnel where the server is listening (e.g. WAN) which allows VPN clients to connect. The rule created by this option allows all clients from any source IP address to connect by default.
Since clients in this example are connecting from all over the country, the rule created by the wizard for this option is ideal.
Tip
To allow connections from a limited set of IP addresses or subnets, either make a custom rule or check this box and alter the rule it creates.
- Traffic from clients through VPN tunnel
-
Checked
This setting allows all traffic to cross inside the OpenVPN tunnel. This is desirable for this example.
Click Next to continue.
Finishing the Wizard
Click Finish to complete the wizard.
At this point, the firewall now contains a full OpenVPN remote access server configuration which is ready for client connections.
From here, the next steps are to add users and configure client devices.
If this setup requires adjustments to the automatically generated firewall rules, make them now.
Verifying the Setup
Look at firewall rules (WAN and OpenVPN tabs)
-
WAN tab rule should pass from any to the OpenVPN port on the WAN address

-
OpenVPN tab rule should allow all traffic from any/to any

Adjustments
Numerous settings are not present in the wizard but might be a better fit for certain deployments than the defaults chosen by the wizard.
Server Mode
The OpenVPN Server Mode allows selecting a choice between requiring Certificates, User Authentication, or both. The wizard defaults to Remote Access (SSL/TLS + User Auth) when using local users and Remote Access (User Auth) for RADIUS and LDAP. The possible values for this choice and their advantages are:
- Remote Access (SSL/TLS + User Auth)
-
-
Requires both certificates and username/password
-
Each user has a unique client configuration which includes their personal certificate and key
-
Most secure as there are multiple factors of authentication (TLS Key and Certificate that the user has, and the username/password they know)
-
- Remote Access (SSL/TLS)
-
-
Certificates only, no authentication
-
Each user has a unique client configuration which includes their personal certificate and key
-
Useful if clients should not be prompted to enter a username and password
-
Less secure as it relies only on something the user has (TLS key and certificate)
-
- Remote Access (User Auth)
-
-
Authentication only, no certificates
-
Useful if the clients cannot have individual certificates
-
Commonly used for external authentication (RADIUS, LDAP)
-
All clients can use the same exported client configuration and/or software package
-
Less secure as it relies on a shared TLS key plus only something the user knows (Username/password)
-
OpenVPN Data Channel Offload (DCO)
OpenVPN Data Channel Offload (DCO), a pfSense® Plus exclusive feature, can potentially increase performance of OpenVPN well beyond the capabilities of traditional OpenVPN connections.
Note
OpenVPN DCO is generally stable but still under development.
OpenVPN DCO has been successful in many scenarios in lab and production environments, but there is still a small potential for instability or undesirable behavior.
Some OpenVPN features and use cases are not compatible with DCO. See Limitations for a list of known DCO limitations.
If a problem occurs with DCO, start a thread on the Netgate Forum to discuss and diagnose the issue.
Certificate Revocation
Compromised certificates can be revoked by a Certificate Revocation List (CRL). CRL entries are managed at System > Cert Manager on the Certificate Revocation tab. Create a new CRL, add the certificate to it, and then select that CRL on the OpenVPN server settings.
See also: Certificate Revocation List Management
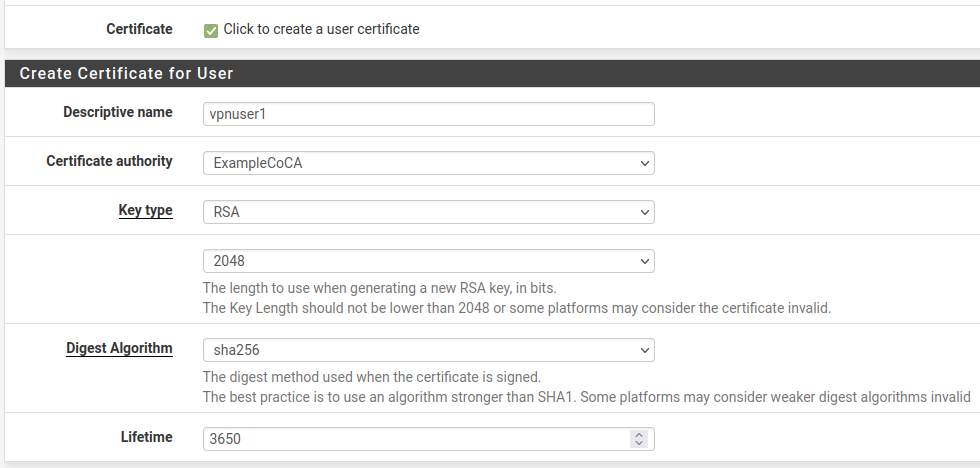
Adding a User with a Certificate
If the server mode includes local user authentication, a user must be exist in the user manager for each client which will connect to the VPN.
See also
This is a simplified version of the process. For more detail, see:
-
Navigate to System > User Manager
-
Click
To add a user -
Fill in the settings as follows:
- Username
-
The username for this client.
- Password/Confirm password
-
The password for this client.
- Click to create a user certificate
-
Checked
- Descriptive Name
-
Same value as the Username
- Certificate Authority
-
The CA used by the OpenVPN server.
-
Click Save
OpenVPN Client Export Package
The OpenVPN Client Export Package can export client configurations formatted for a wide variety of platforms. It can also export a pre-packaged Windows installer executable which includes the configuration bundled inside for a painless client installation.
See also
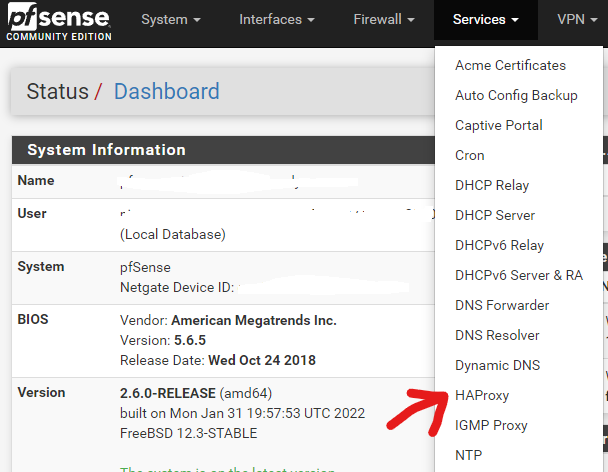
HaProxy
T-RMM-PFSense-HAProxy-config
Assumes fully configured public DNS or DDNS, and a functional PFSense installation with existing valid wildcard SSL certificate available. Adjust hostnames, IPs, etc to suit the environment.
Do NOT disable nginx proxy on the T-RMM instance. This assumes that it's in place and functional.
- HAProxy installation
- Firewall configuration
- HAProxy backend configuration
- Shared HTTP to HTTPS redirect frontend
- Shared HTTPS frontend
- T-RMM frontend
HAProxy installation
Go to System > Package Manager
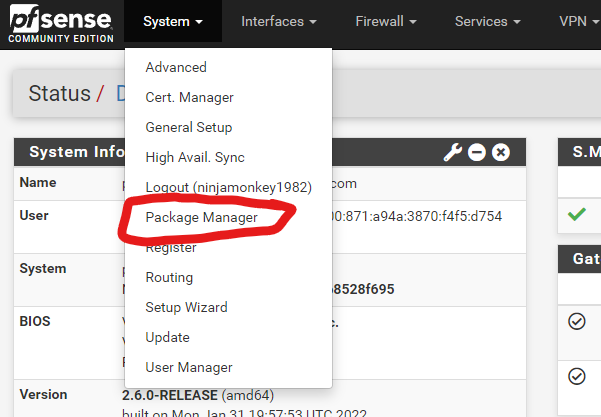
Select Available Packages
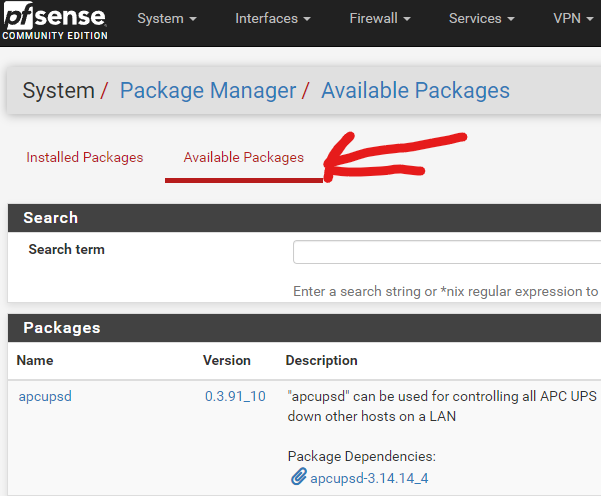
Find and install haproxy-devel

Firewall configuration
Go to Firewall > Rules
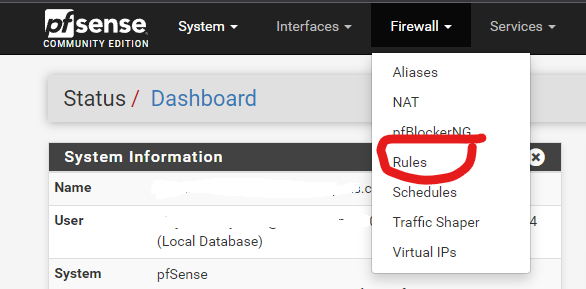
Select the WAN tab
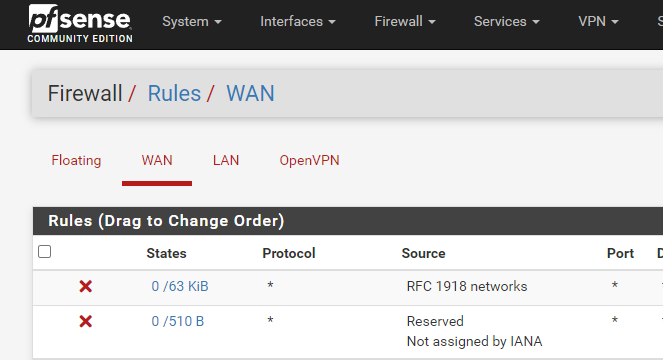
Add the following two rules to the bottom of the list, nothing else should be using ports 80 and 443:

HTTP rule:
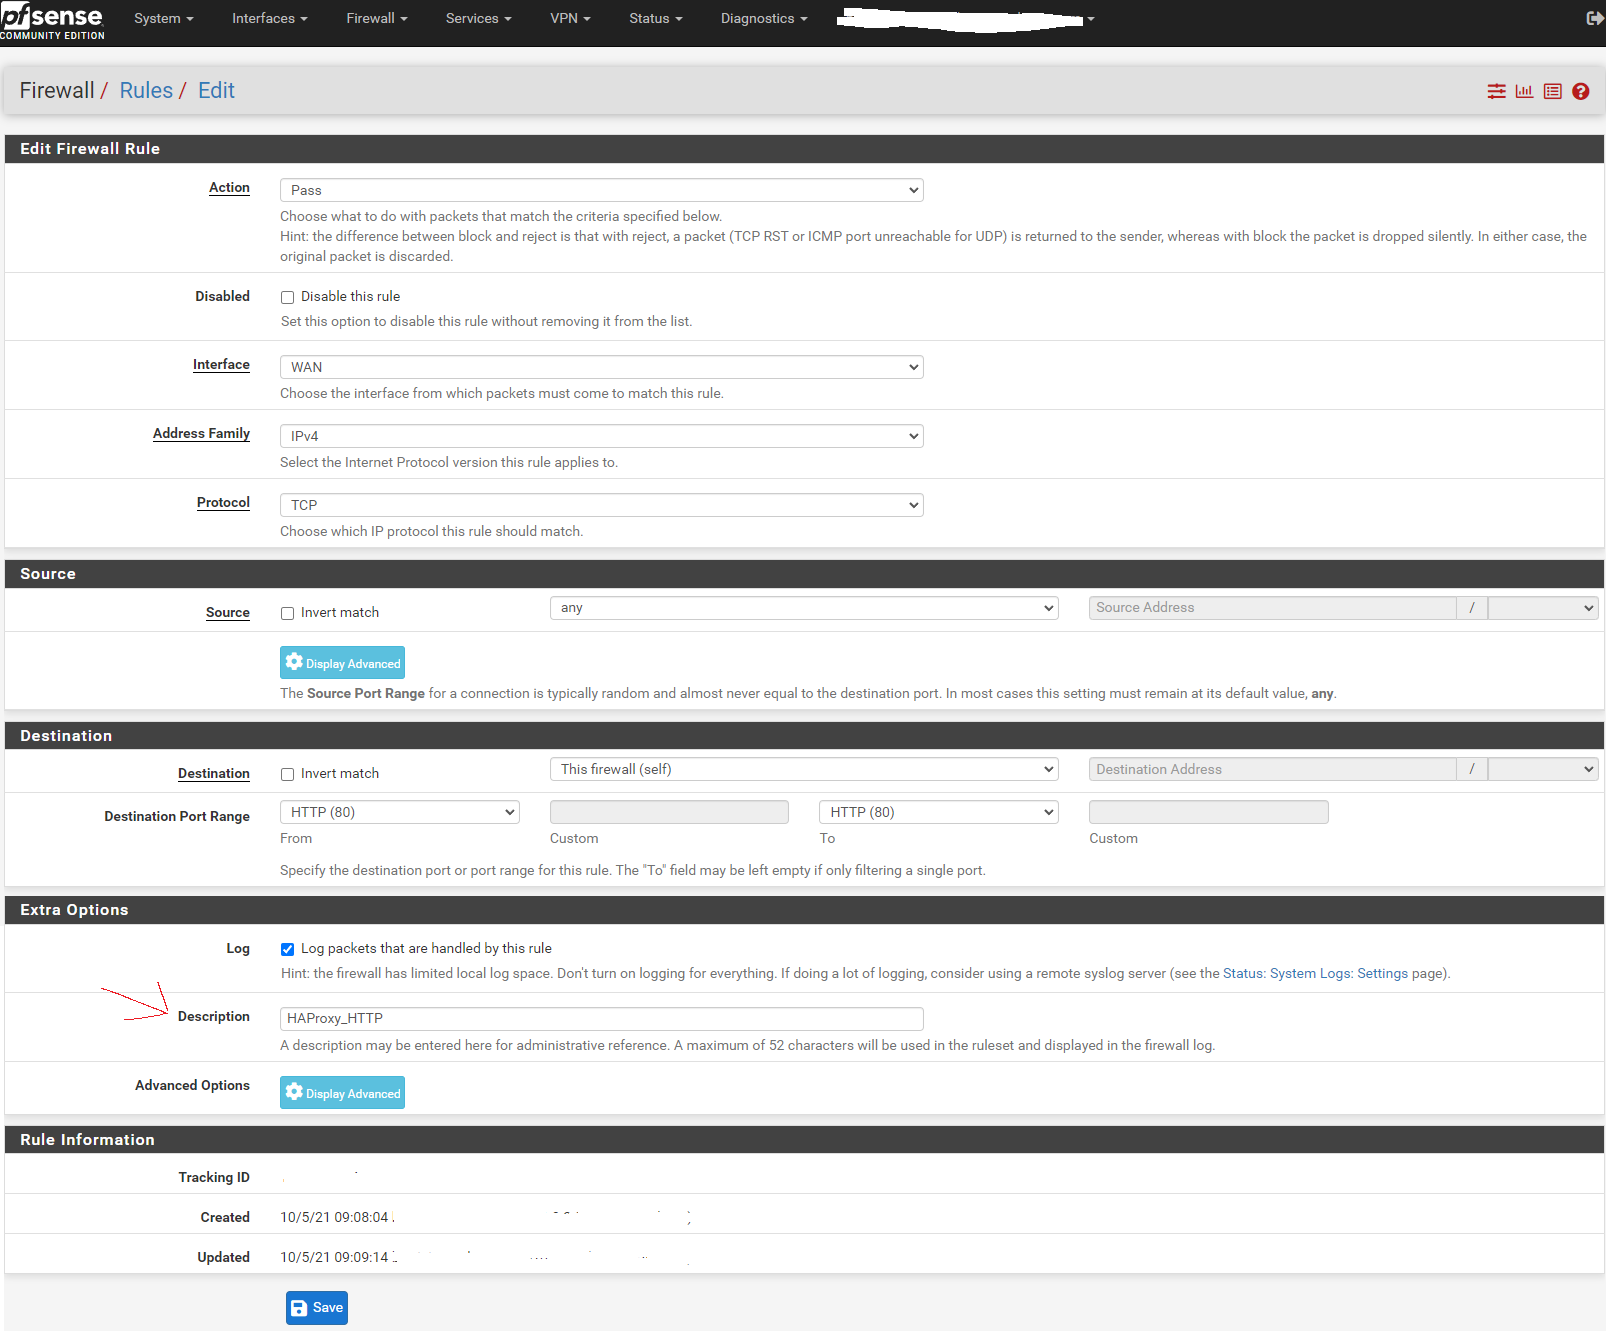
Create a duplicate rule, changing the port to 443 and the description for HTTPS
Enable the new rules.
HAProxy backend configuration
Go to Services > HAProxy
Leave the Settings tab alone for now and skip to the Backend tab:
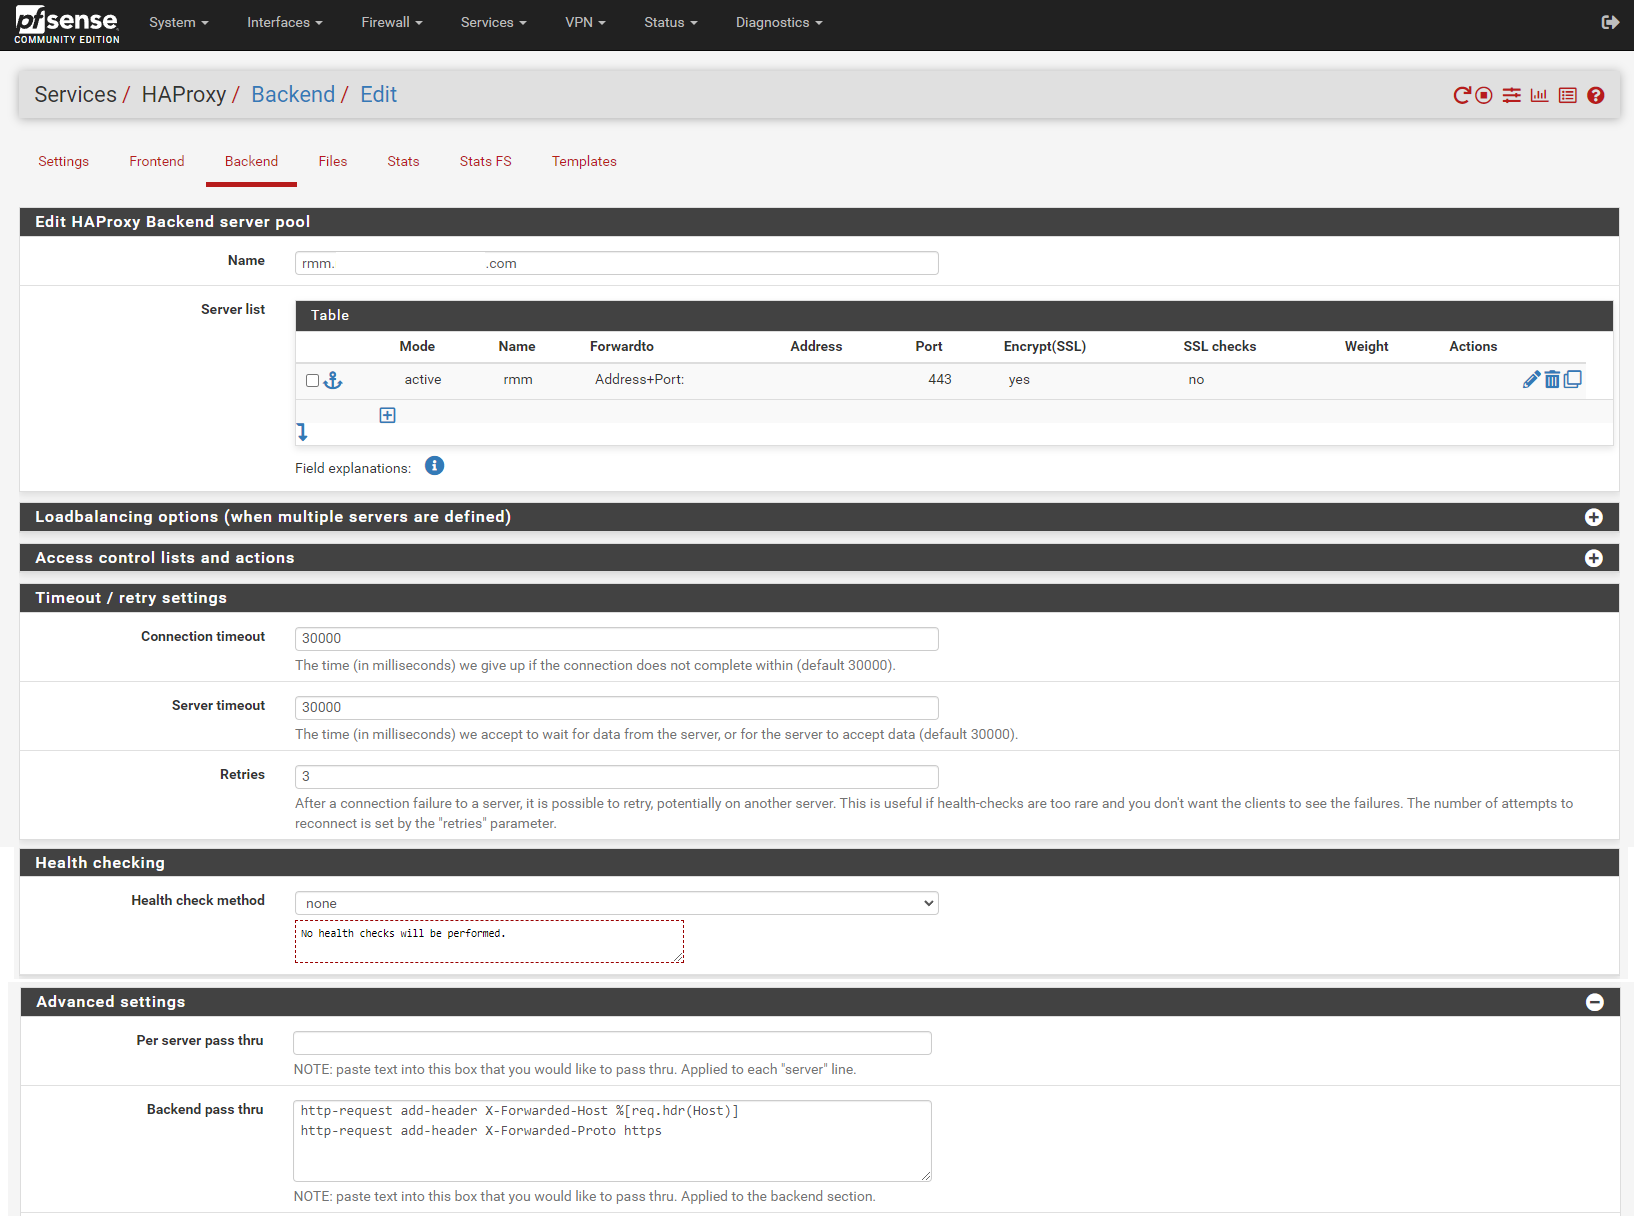
Add backend for rmm. Enter the rmm FQDN (eg, rmm.example.com) into the box titled Name, then click the down arrow in the Server list panel to add a server definition.
Enter the rmm for the server in the Name box, enter the internal IP address of the server, 443 (or other appropriate port) for the Port, and check the Encrypt(SSL) box.
In the Timeout / retry settings section, enter 30000 in Connection timeout and Server timeout.
In the Health checking section, set Health check method to none.
In the Advanced settings section, enter the following in the Backend pass thru box:
http-request add-header X-Forwarded-Host %[req.hdr(Host)]
http-request add-header X-Forwarded-Proto https
Scroll down, save, and apply changes when asked.

Copy the rmm backend. Change the Name entry to match the mesh FQDN (eg, mesh.example.com).
Change the Name for the server to mesh.
In the Timeout / retry settings section, change the entries in Connection timeout and Server timeout to 15000.
In the Advanced settings section, add the following in the Backend pass thru box:
timeout tunnel 15000Scroll down, save, and apply changes when asked.
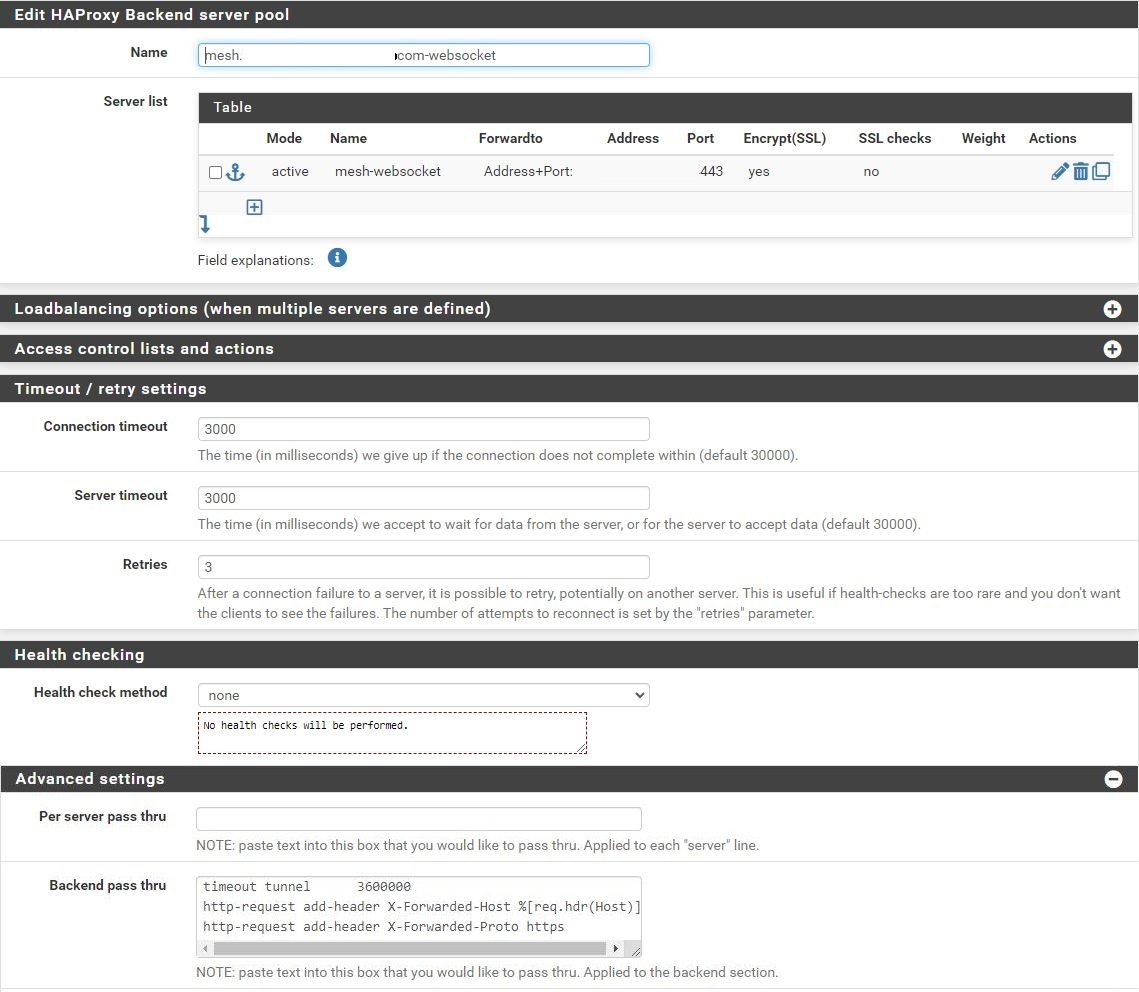
Copy the mesh backend. Change the Name entry to match the mesh FQDN-websockets (eg, mesh.example.com-websockets).
Change the Name for the server to mesh-websockets.
In the Timeout / retry settings section, change the entries in Connection timeout and Server timeout to 3000.
In the Advanced settings section, change the timeout tunnel entry in the Backend pass thru box to 3600000.
Scroll down, save, and apply changes when asked.
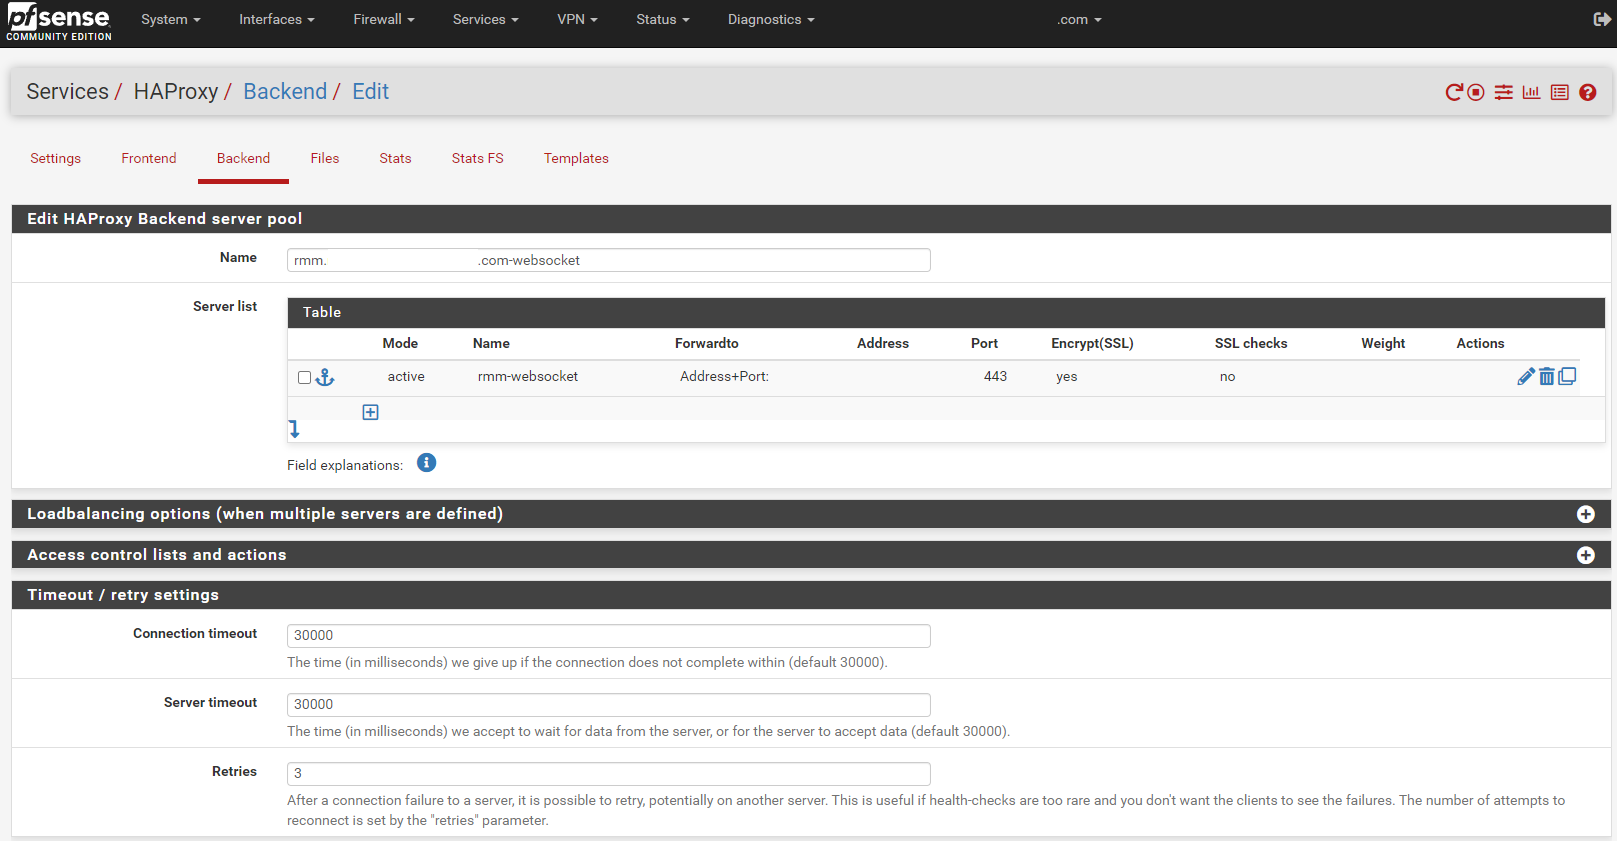
Copy the mesh-websockets backend. Change the Name entry to match the rmm FQDN-websocket (eg, rmm.example.com-websocket).
Change the Name for the server to rmm-websocket.
In the Timeout / retry settings section, change the entries in Connection timeout and Server timeout to 30000.
Scroll down, save, and apply changes when asked.
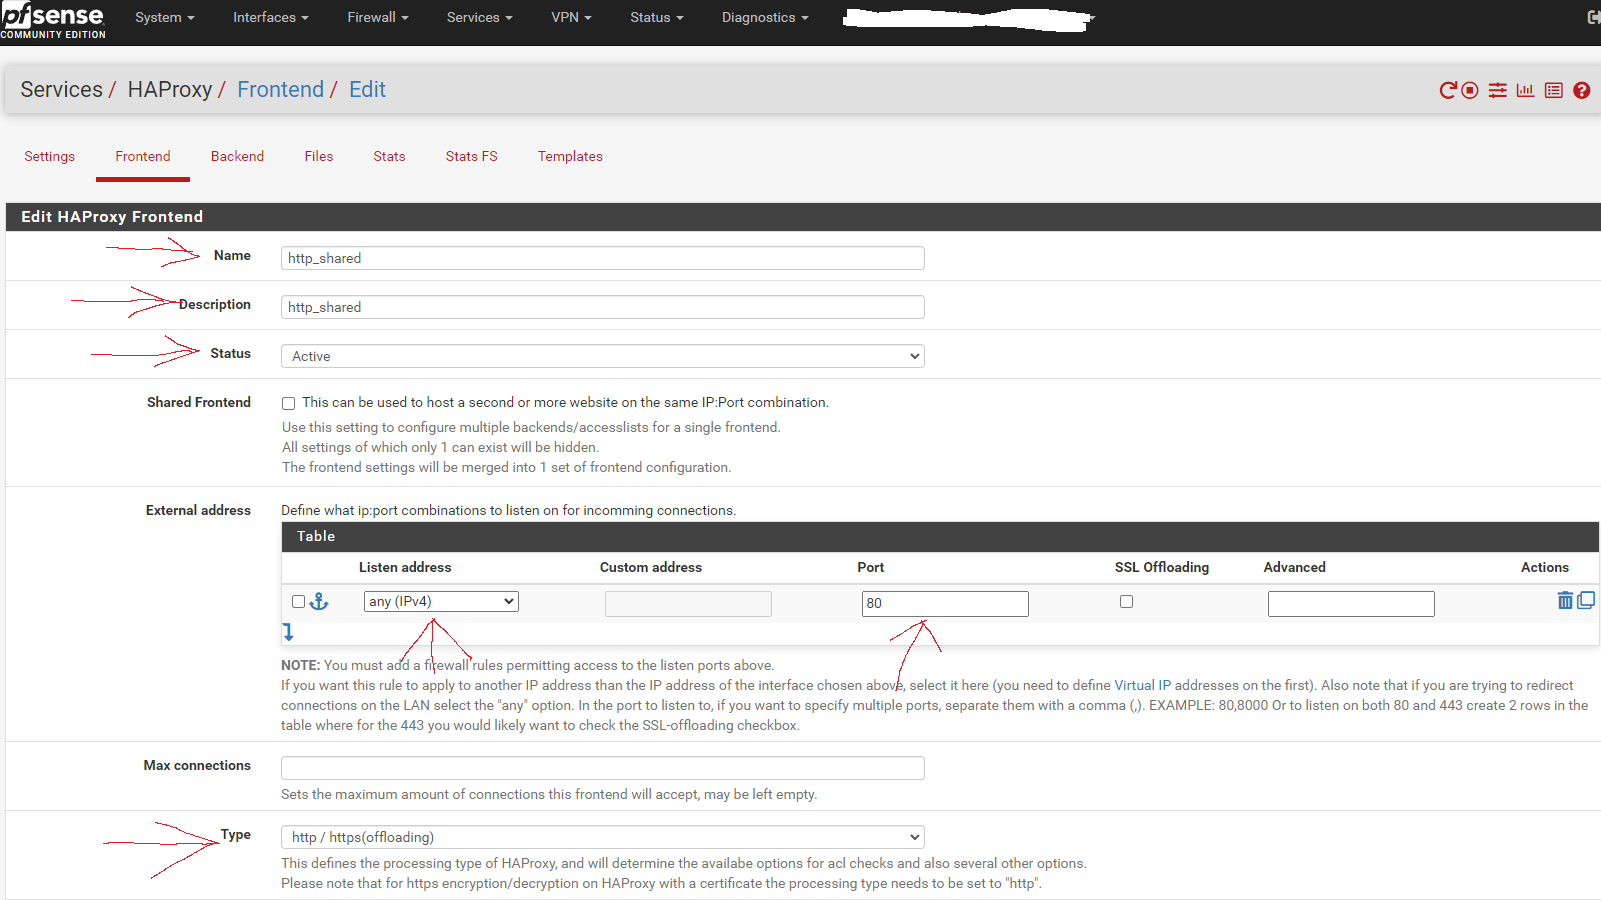
Shared HTTP to HTTPS redirect frontend
Now go to the Frontend tab. Click the button to add a new frontend.
Fill in the entries as shown in the screen capture below:
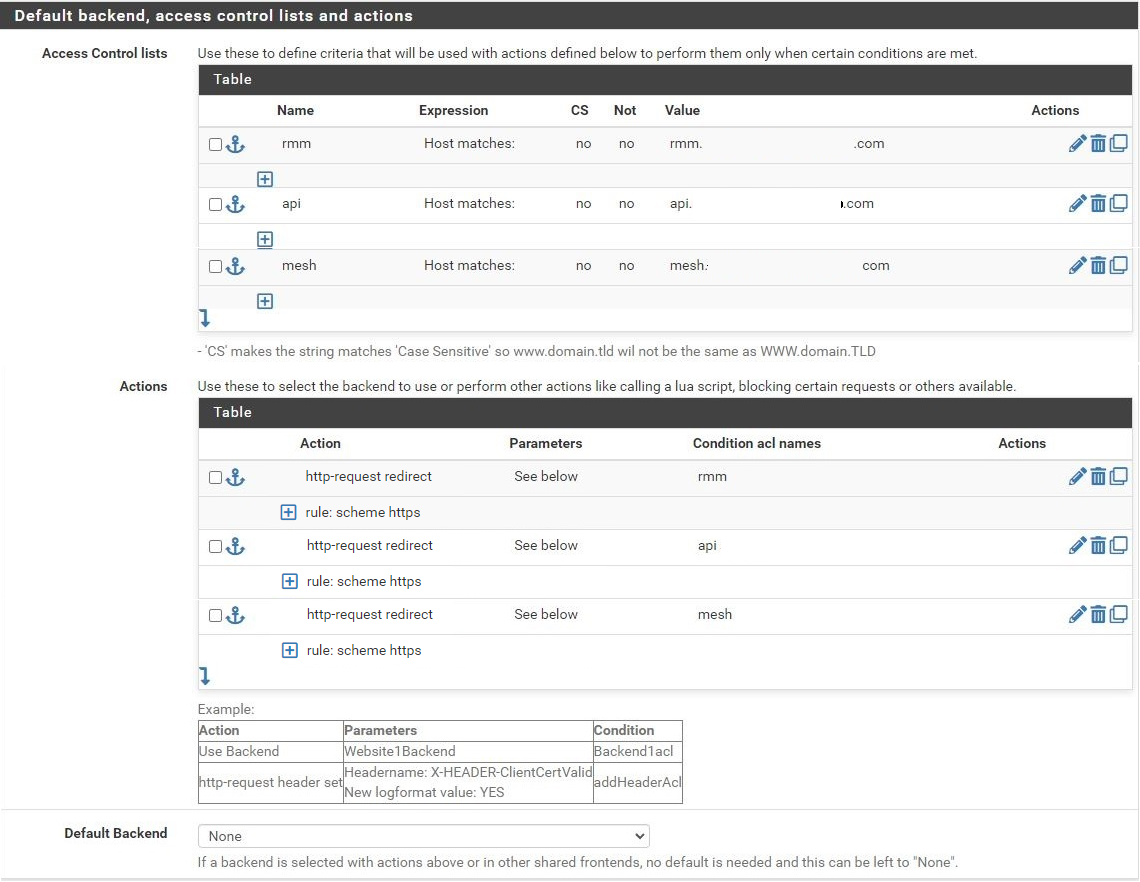
Scroll to the section titled "Default backend, access control lists and actions" and in the Action Control lists area click the down arrow to create a new acl. Enter rmm in the Name field, change the Expression to Host matches, and enter the FQDN for rmm into the Value field (eg, rmm.example.com).
Copy the rmm acl. Change the Name to api, and the Value field to the FQDN for api into the Value field (eg, api.example.com).
Copy the api acl. Change the Name to mesh, and the Value field to the FQDN for mesh into the Value field (eg, mesh.example.com).
Scroll down to the Actions area of the section and click the down arrow to create a new action. In the Action field, select http-request redirect, enter scheme https into the rule field, and enter rmm into the Condition acl names field.
Copy the action you just created, and change the Condition acl name to api.
Repeat this again, and change the Condition acl name to mesh.
Scroll down and select None for the Default Backend.
Scroll down to the Advanced settings section. Tick the Use "forwardfor" option box, select http-server-close for Use "httpclose" option, and add/copy-paste
http-request add-header X-Real-IP %[src]to the Advanced pass thru text box.
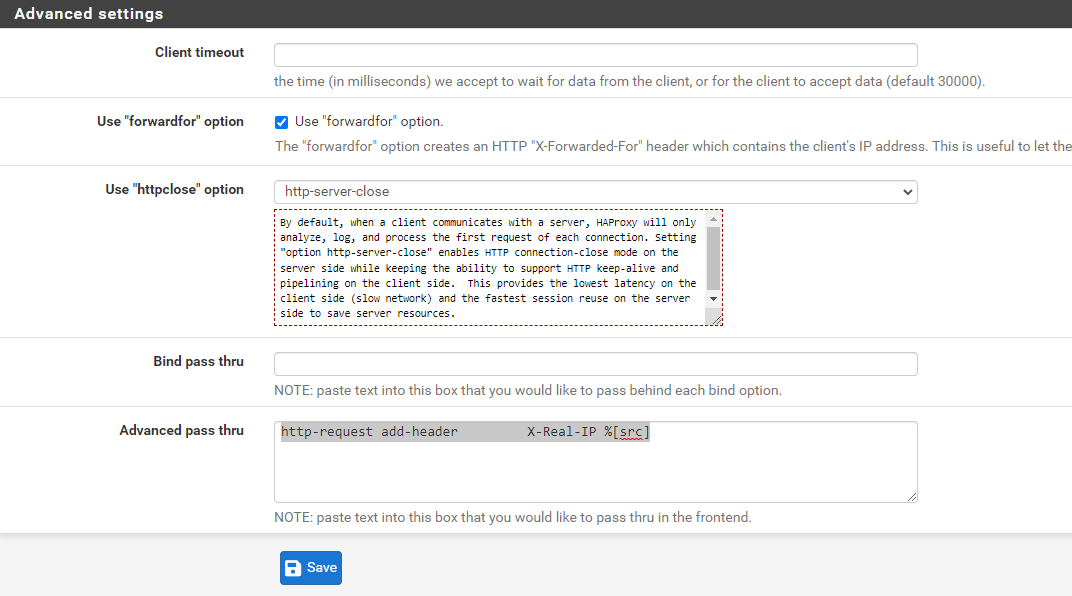
Save and apply changes.
Shared HTTPS frontend
Fill in the entries as shown in the screen capture below:
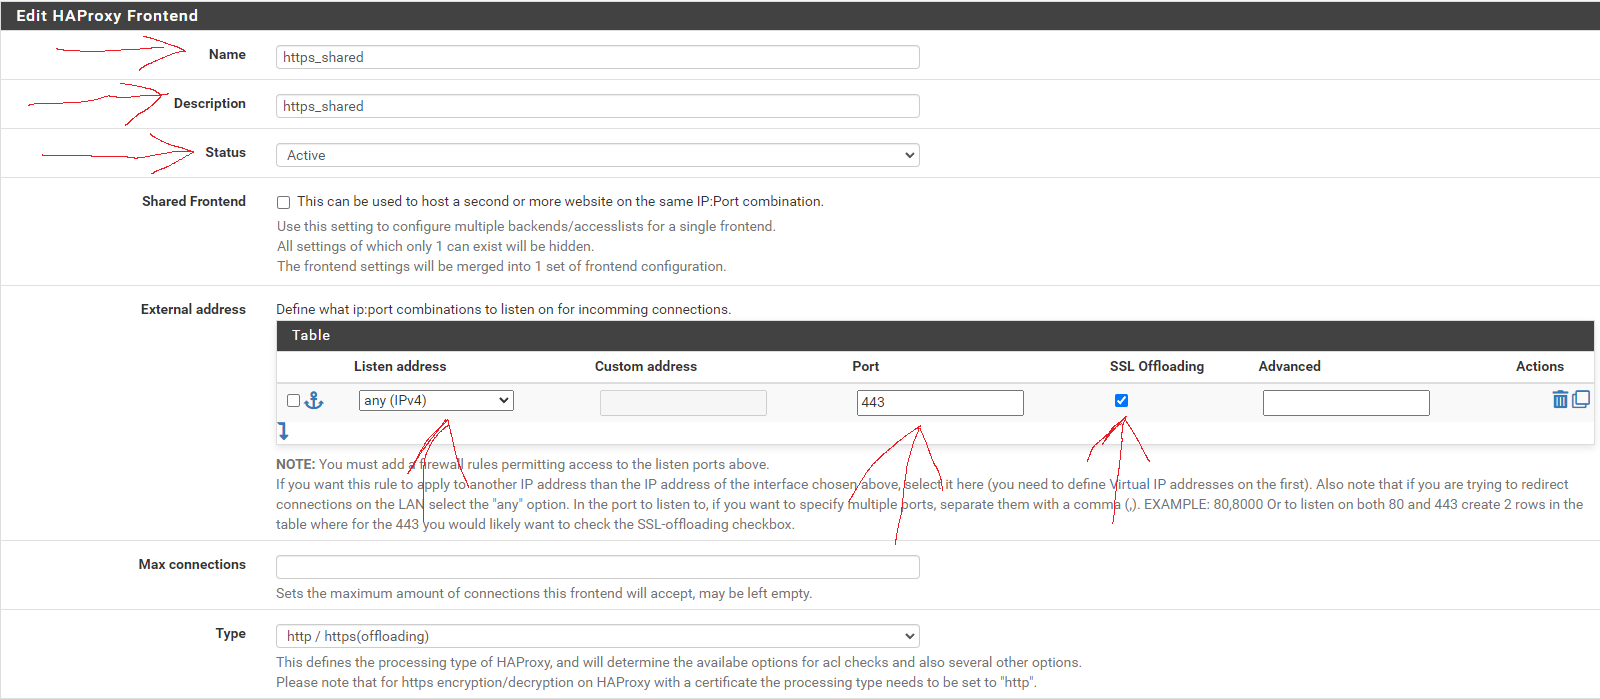
No entries are necessary in the Default backend, access control lists and actions section, just make sure to set the Default Backend to None.
As before, scroll down to the Advanced settings section, tick the Use "forwardfor" option box, select http-server-close for Use "httpclose" option, and add/copy-paste
http-request add-header X-Real-IP %[src]to the Advanced pass thru text box.
Next, scroll down to the SSL Offloading section. In the Certificate area, select the wildcard certificate for the domain and tick the box to Add ACL for certificate Subject Alternative Names.
In the OCSP area, tick the option box.
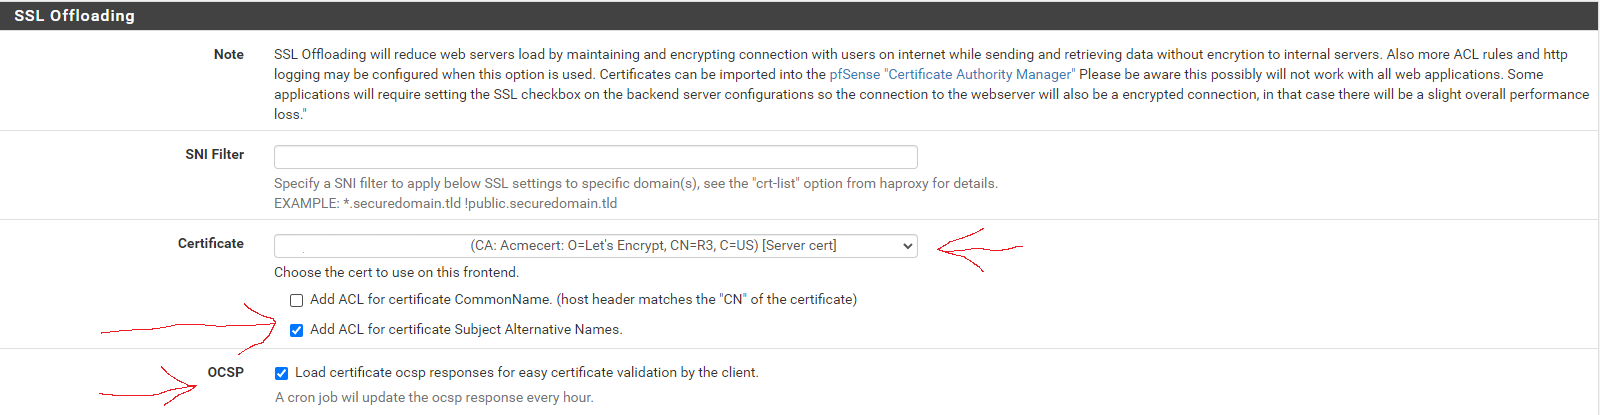
Save and apply changes.
T-RMM frontend
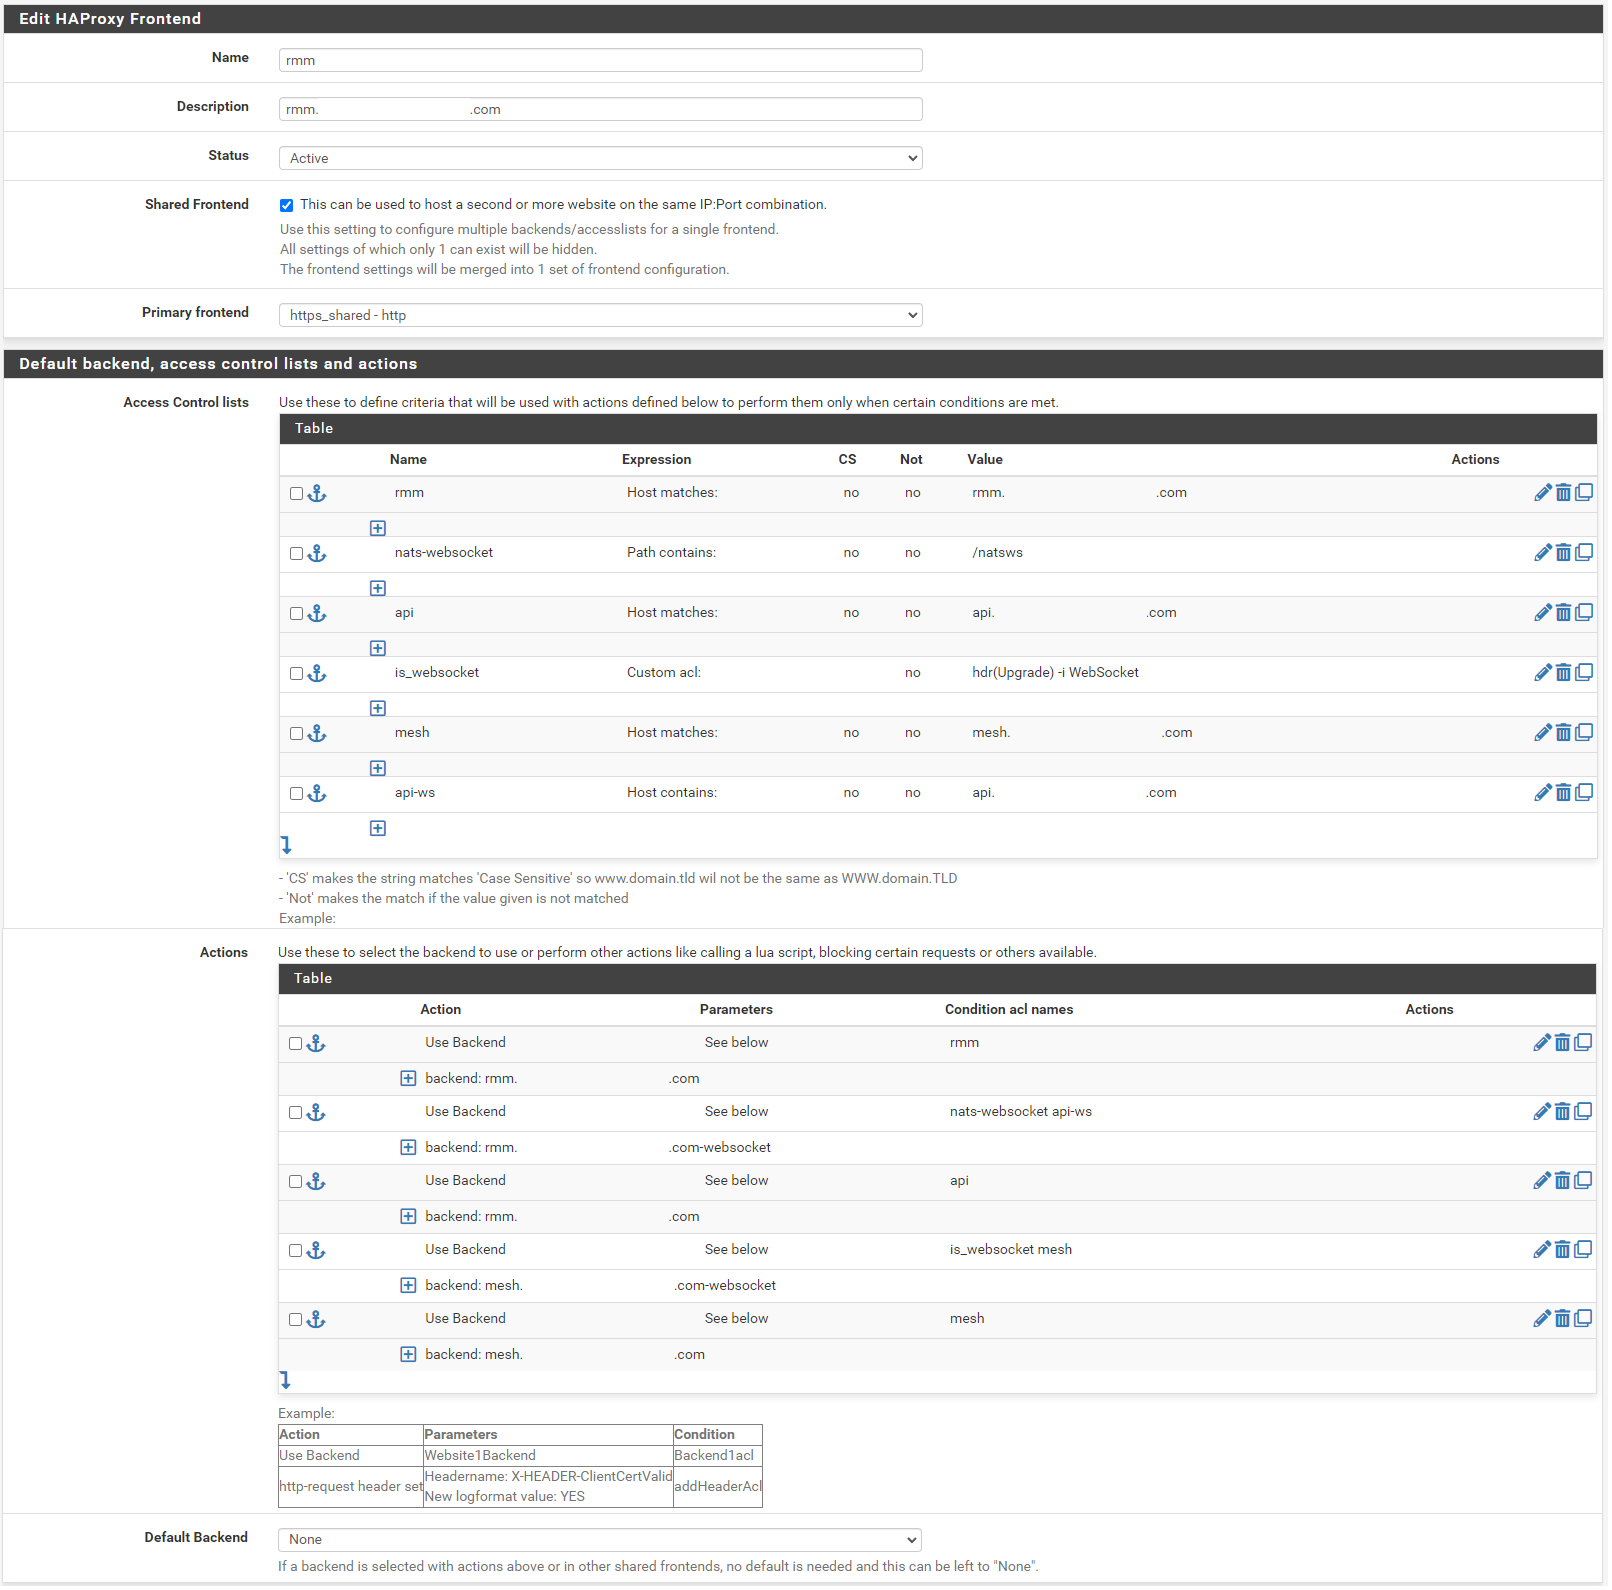
Action order matters!!!
In the Name field, enter t-rmm. In the Description field, enter the rmm FQDN (eg, rmm.example.com). Set the Status to active, tick the Shared Frontend box, and select https_shared - http as the Primary frontend.
Scroll to the section titled "Default backend, access control lists and actions" and in the Action Control lists area click the down arrow to create a new acl. Enter rmm in the Name field, change the Expression to Host matches, and enter the FQDN for rmm into the Value field (eg, rmm.example.com).
Add a new acl. Change the Name to nats-websocket, set the Expression to Path contains, and enter /natsws as the Value.
Copy the rmm acl. Change the Name to api, and the Value field to the FQDN for api into the Value field (eg, api.example.com).
Add a new acl. Change the Expression to Custom acl: , in the Name field enter is_websocket , and in the Value field enter hdr(Upgrade) -i WebSocket .
Copy the api acl. Change the Name to mesh, and the Value field to the FQDN for mesh into the Value field (eg, mesh.example.com).
Copy the api acl. Change the Name to api-ws, set the Expression to Host contains, and the Value field to the FQDN for api into the Value field (eg, api.example.com).
Scroll down to the Actions area of the section and click the down arrow to create a new action. In the Action field, select Use Backend, select the rmm backend you created earlier, and enter rmm into the Condition acl names field.
Copy the rmm action you just created, change the Condition acl name to nats-websocket api-ws, and change the backend to the rmm-websocket backend (eg, rmm.example.com-websocket).
Copy the initial rmm action you created, and change the Condition acl name to api.
Create a new action. In the Action field, select Use Backend, select the mesh websockets backend, and enter is_websocket mesh into the Condition acl names field.
Copy the api action, select the mesh backend, and change the Condition acl name to mesh.
Scroll down and select None for the Default Backend.
Save and apply changes.
The websites/services should now be available internally and externally at the configured URLs, with SSL encryption, and automatic HTTP to HTTPS forwarding.
How to Configure HAProxy for Docker-based Nextcloud AIO
Purpose
Configure HAProxy on pfSense to terminate SSL and securely reverse-proxy public HTTPS traffic to an internal Docker Nextcloud AIO server behind your firewall.
1. HAProxy Package Installation on pfSense
On pfSense, go to:
- System → Package Manager → Available Packages
- Search for HAProxy and install
haproxy(not haproxy-devel unless needed).
2. Create SSL Certificate (or Import)
In pfSense:
- System → Certificate Manager → Certificates
- Import or create an SSL certificate for your domain (example:
nextcloud.mydomain.com).
3. HAProxy Settings
Go to Services → HAProxy and configure:
Global Settings
- Enable HAProxy
- Set the SSL/TLS cipher suite to "Intermediate" (recommended for compatibility and security)
Frontend (Public Side)
Name: frontend-https Bind address: WAN Address (or "any") Port: 443 Type: SSL Offloading (HTTPS) SSL Certificate: [Select imported Let's Encrypt or custom cert] Actions:
- Condition: Match on
Host Header=nextcloud.mydomain.com - Action: Use Backend:
backend-nextcloud
Optional:
- Add another frontend to redirect port 80 to 443 if you want forced HTTPS
4. HAProxy Backend (Internal Docker Host)
Name: backend-nextcloud Mode: HTTP (or HTTPS if you terminate SSL at the container) Server list: Name: nextcloud-docker Address: 192.168.100.19 Port: 11000 Health Check Method: HTTP-OPTIONS Important Backend Options:
- Check "Use HTTP/1.1"
- Forward host headers (preserve client IP)
- Add header X-Forwarded-Proto: https
5. Nextcloud Trusted Proxy Configuration
On the Nextcloud server, we modified the trusted proxies:
sudo docker exec -it nextcloud-aio-nextcloud bash cd /var/www/html/config nano config.php Add or verify these lines inside config.php:
'trusted_proxies' => ['192.168.100.1'], 'overwritehost' => 'nextcloud.mydomain.com', 'overwriteprotocol' => 'https', 'overwrite.cli.url' => 'https://nextcloud.mydomain.com', Note: Replace
192.168.100.1with your pfSense LAN IP if different.
6. Restart Docker Nextcloud Container
docker restart nextcloud-aio-nextcloud ✅ Summary
- pfSense HAProxy listens on WAN 443 (HTTPS)
- SSL terminated at pfSense, traffic forwarded to Docker Nextcloud Apache 11000
- Client IP preserved using X-Forwarded-For headers
- Nextcloud properly recognizes reverse proxy and HTTPS URL
🛠️ Additional Notes
- HAProxy + pfSense reduces public attack surface on your Docker server
- Remember to update SSL certificates if using Let's Encrypt (can be automated)
- Use Health Checks to monitor Nextcloud availability
- Backup your pfSense HAProxy config after working setup