# VPN
How-to's and Configuration guides for pfSense VPN
# OpenVPN Site-to-Site Configuration Example with SSL/TLS
# OpenVPN Site-to-Site Configuration Example with SSL/TLS
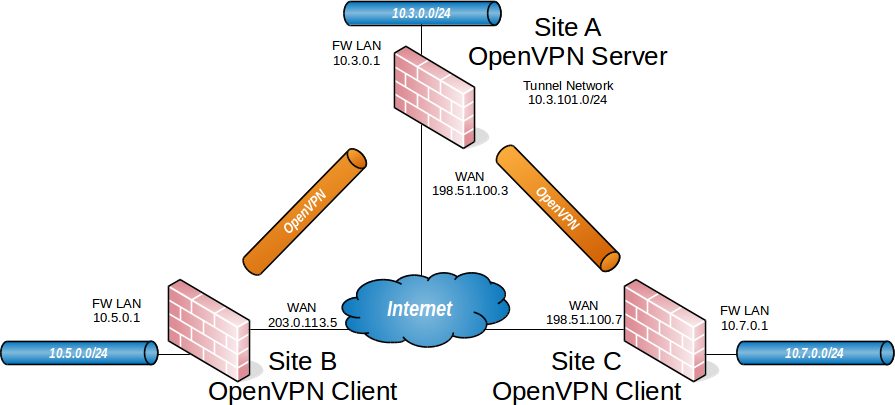
A site-to-site connection using **SSL/TLS** in client/server mode is convenient for managing a large number of remote sites connecting back to a central site in a hub-and-spoke fashion.
## Example Configuration Overview
## Example Configuration Settings
OpenVPN Endpoint Settings - Site A - Server| Site A - Server
|
|---|
| Name
| Austin Office
|
| WAN Address
| 198.51.100.3
|
| LAN Subnet
| 10.3.0.0/24
|
| LAN Address
| 10.3.0.1
|
| CA Name
| S2SCA
|
| Cert CN
| serverA
|
| Tunnel Net
| 10.3.101.0/24
|
OpenVPN Endpoint Settings - Site B - Client| Site B - Client
|
|---|
| Name
| London Office
|
| Cert CN
| clientB
|
| WAN Address
| 203.0.113.5
|
| LAN Subnet
| 10.5.0.0/24
|
| LAN Address
| 10.5.0.1
|
OpenVPN Endpoint Settings - Site C - Client| Site C - Client
|
|---|
| Name
| Colorado Office
|
| Cert CN
| clientC
|
| WAN Address
| 198.51.100.7
|
| LAN Subnet
| 10.7.0.0/24
|
| LAN Address
| 10.7.0.1
|
- A `route` to tell the operating system that OpenVPN knows about a remote network
- An internal route (`iroute`) in an OpenVPN Client-Specific Override to tell OpenVPN how to route that subnet to a specific client certificate
More detail on this will follow in the example.
See also
- [Client Specific Overrides](https://docs.netgate.com/pfsense/en/latest/vpn/openvpn/configure-overrides.html)
- [Troubleshooting OpenVPN Internal Routing (iroute)](https://docs.netgate.com/pfsense/en/latest/troubleshooting/openvpn-iroute.html#troubleshooting-openvpn-iroute)
- [Tunnel Settings](https://docs.netgate.com/pfsense/en/latest/vpn/openvpn/configure-server-tunnel.html)
- Navigate to **System > Cert Manager**, **CAs** tab
- Click **Add** to create a new a CA
- Enter the settings as follows:
- Descriptive Name
- `S2SCA`
- Method
- *Create an internal Certificate Authority*
- Randomize Serial
- *Checked*
- Key Type
- *RSA*, *2048* (or higher)
- Digest Algorithm
- *sha256* (or higher)
- Lifetime (days)
- `3650`
- Common Name
- `S2SCA`
- Subject Component Fields
- The remaining fields are optional, but can be set to reflect the location of the CA.
- Click **Save**
- Navigate to **System > Cert Manager**, **Certificates** tab
- Click **Add** to create a new certificate
- Enter the settings as follows:
- Method
- *Create an internal Certificate*
- Descriptive Name
- `serverA`
- Certificate Authority
- *S2SCA*
- Key Type
- *RSA*, *2048* (or higher)
- Digest Algorithm
- *sha256* (or higher)
- Lifetime (days)
- `398`
Note
Some current operating systems and software limit server certificates to a maximum lifetime of `398` days for security reasons. Clients on these platforms may reject a server certificate with a longer lifetime.
- Common Name
- `serverA`
- Subject Component Fields
- The fields contain data copied from the CA and are optional, but can be set to reflect the location of the server.
- Certificate Type
- *Server Certificate*
Warning
This setting is critical, do not forget to set this value.
- Alternative Names
- Optional extra entries, if needed, which specify alternate ways to identify the server. This can be left blank if the certificate will only be used by OpenVPN. Otherwise, add fields with additional information such as alternate hostnames, static IP addresses, and so on which are relevant to this server.
- Click **Save**
- Navigate to **System > Cert Manager**, **Certificates** tab
- Click **Add** to create a new certificate
- Enter the settings as follows:
- Method
- *Create an internal Certificate*
- Descriptive Name
- `clientB`
- Certificate Authority
- *S2SCA*
- Key Type
- *RSA*, *2048* (or higher)
- Digest Algorithm
- *sha256* (or higher)
- Lifetime (days)
- `3650`
- Common Name
- `clientB`
- Subject Component Fields
- The fields contain data copied from the CA and are optional, but can be set to reflect the location of the client.
- Certificate Type
- *User Certificate*
Warning
This setting is critical, do not forget to set this value.
- Alternative Names
- Optional extra entries which specify alternate ways to identify the client. These can be left blank if the certificate will only be used by OpenVPN. Otherwise, add fields with additional information such as alternate hostnames, static IP addresses, and so on which are relevant to this client.
- Click **Save**
- Navigate to **System > Cert Manager**, **CAs** tab
- Click  on the row for the CA to export its certificate
- Navigate to **System > Cert Manager**, **Certificates** tab
- Click  on the row for each client certificate to export the certificates
- Click  on the row for each client certificate to export the private key for the client certificates.
- Navigate to **VPN > OpenVPN**, **Servers** tab
- Click  **Add** to create a new server
- Fill in the fields as described below, with everything else left at defaults.
Use values appropriate for this network, or the defaults if unsure.
See also
See [
Server Configuration Options](https://docs.netgate.com/pfsense/en/latest/vpn/openvpn/configure-server.html) for details on each of these options.
- Description
- Enter text to describe the connection, e.g. `Site-to-Site VPN`.
- Server Mode
- *Peer to Peer (SSL/TLS)*
- DCO (Plus Only)
- Check this box to activate the [OpenVPN Data Channel Offload (DCO)](https://docs.netgate.com/pfsense/en/latest/vpn/openvpn/dco.html#openvpn-dco) feature for the server if desired.
See also
See [OpenVPN Data Channel Offload (DCO)](https://docs.netgate.com/pfsense/en/latest/vpn/openvpn/dco.html#openvpn-dco) for additional information.
- Device Mode
- *tun*
- Protocol
- *UDP on IPv4 only*
- Interface
- *WAN*
- Local Port
- `1194`
- TLS Configuration
- Check the **Use a TLS Key** box to enable TLS authentication which provides protection for the tunnel control channel.
Leave **Automatically generate a TLS Key** checked so the firewall will generate a new key automatically the first time this entry is saved.
- Peer Certificate Authority
- Select the CA created at the beginning of this process (`S2SCA`)
- Peer Certificate Revocation List
- Select a CRL for the CA, if one exists.
- Server Certificate
- Select the server certificate created at the beginning of this process (`serverA`)
- IPv4 Tunnel Network
- Enter the chosen tunnel network, `10.3.101.0/24`
- IPv4 Local Network(s)
- Enter the LAN subnets for all sites including the server: `10.3.0.0/24, 10.5.0.0/24, 10.7.0.0/24`
Note
If there are more networks on the server side that clients need to reach, such as networks reachable via static routes, other VPNs, and so on, add them as additional entries in the **IPv4 Local Network** box.
- IPv4 Remote Network(s)
- Enter **only** the client LAN subnets: `10.5.0.0/24, 10.7.0.0/24`
- Inactive
- `0` to disable disconnecting idle clients, so that site-to-site connections can stay up indefinitely.
- Click Save.
- Click  to edit the new server instance
- Find the **TLS Authentication** box
- Select all of the text inside
- Copy the text to the clipboard
- Save this to a file or paste it into a text editor such as Notepad temporarily
- Navigate to **VPN > OpenVPN**, **Client Specific Overrides** tab
- Click  to add a new override
- Fill in the fields on this screen as follows:
- Common Name
- Enter the CN of the first client site. In this example, that is `clientB`.
- IPv4 Remote Network/s
- The clientB LAN subnet, `10.5.0.0/24`.
Note
This field sets up the internal route (`iroute`)
- Click **Save**
- [Client Specific Overrides](https://docs.netgate.com/pfsense/en/latest/vpn/openvpn/configure-overrides.html)
- [Troubleshooting OpenVPN Internal Routing (iroute)](https://docs.netgate.com/pfsense/en/latest/troubleshooting/openvpn-iroute.html#troubleshooting-openvpn-iroute)
- [Tunnel Settings](https://docs.netgate.com/pfsense/en/latest/vpn/openvpn/configure-server-tunnel.html)
- Navigate to **Firewall > Rules**, **WAN** tab
- Click  **Add** to create a new rule at the top of the list
- Set the options as follows:
- Protocol
- *UDP*
- Source
- *any* (since multiple sites must connect)
Tip
For extra security, if the clients have static IP addresses, create an alias containing these addresses, then set it as the source on this rule.
- Destination
- *WAN Address*
- Destination port
- `1194`
- Description
- `OpenVPN Multi-Site VPN`
- Click **Save**
- Click **Apply Changes**
- Navigate to **Firewall > Rules**, **OpenVPN** tab
- Click  **Add** to create a new rule at the top of the list
- Set the options as follows:
- Protocol
- *any*
- Source
- *any*
Tip
For extra security, create an alias containing only the remote hosts or subnets which must initiate contact with hosts on the sever LAN, then use that alias as the source on this rule.
- Destination
- *any*
Tip
For extra security, create an alias containing only the local hosts or subnets on the server LAN which must accept connections from remote hosts across the VPN, then use that alias as the destination on this rule.
- Description
- `Allow all on OpenVPN`
- Click **Save**
- Click **Apply Changes**
- Navigate to **System > Cert Manager**, **CAs** tab
- Click **Add** to create a new certificate authority
- Enter the settings as follows:
- Descriptive Name
- `S2SCA`
- Method
- *Import an existing Certificate Authority*
- Certificate Data
- Open the CA certificate file in a text editor on the client PC, select all of the text, and copy it to the clipboard. Then paste it into this field.
- Click **Save**
- Navigate to **System > Cert Manager**, **Certificates** tab
- Click **Add** to create a new certificate
- Enter the settings as follows:
- Method
- *Import an existing Certificate*
- Descriptive Name
- `clientB VPN Certificate`
- Certificate Type
- *X.509 (PEM)*
- Certificate Data
- Open the client certificate file in a text editor on the client PC, select all of the text, and copy it to the clipboard. Then paste it into this field.
- Private Key Data
- Open the client certificate private key in a text editor on the client PC, select all of the text, and copy it to the clipboard. Then paste it into this field.
- Click **Save**
- Navigate to **VPN > OpenVPN**, **Client** tab
- Click  **Add** to create a new client
- Fill in the fields as follows, with everything else left at defaults:
See also
See [
Client Configuration Options](https://docs.netgate.com/pfsense/en/latest/vpn/openvpn/configure-client.html) for details on each of these options.
- Description
- Text to describe the connection (e.g. `Site A VPN`)
- Server Mode
- *Peer to Peer (SSL/TLS)*
- DCO (Plus Only)
- Check this box to activate the [OpenVPN Data Channel Offload (DCO)](https://docs.netgate.com/pfsense/en/latest/vpn/openvpn/dco.html#openvpn-dco) feature for the client if desired.
See also
See [OpenVPN Data Channel Offload (DCO)](https://docs.netgate.com/pfsense/en/latest/vpn/openvpn/dco.html#openvpn-dco) for additional information.
- Device Mode
- *tun*
- Protocol
- *UDP on IPv4 only*
- Interface
- *WAN*
- Server host or address
- The public IP address or hostname of the OpenVPN server (`198.51.100.3` in this example)
- Server Port
- `1194`
- Enable authentication of TLS packets
- *Checked*
- Automatically generate a shared TLS authentication key
- Unchecked
- TLS Key
- Paste in the TLS key copied from the server instance
- Peer Certificate Authority
- The CA imported at the beginning of this process
- Client Certificate
- The client certificate imported at the beginning of this process
- Click Save
- Navigate to **Firewall > Rules**, **OpenVPN** tab
- Click  **Add** to create a new rule at the top of the list
- Set the options as follows:
- Protocol
- *any*
- Source
- *any*
Tip
For extra security, create an alias containing only the remote hosts or subnets which must initiate contact with hosts on the client LAN, then use that alias as the source on this rule.
- Destination
- *any*
Tip
For extra security, create an alias containing only the local hosts or subnets on the client LAN which must accept connections from remote hosts across the VPN, then use that alias as the destination on this rule.
- Description
- `Allow all on OpenVPN`
- Click **Save**
- Click **Apply Changes**
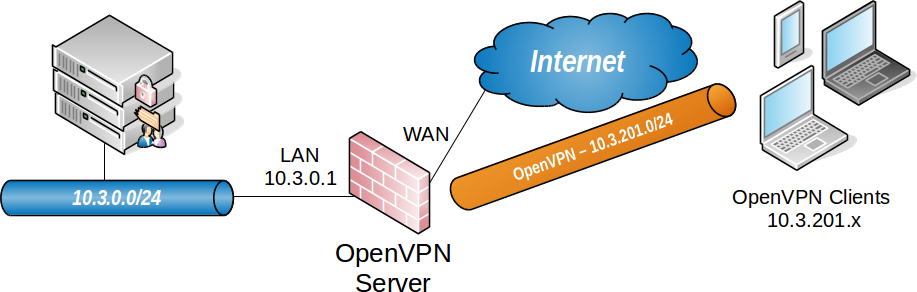
OpenVPN Remote Access Server Settings| Remote Access Server
|
|---|
| WAN Address
| 198.51.100.3
|
| LAN Subnet
| 10.3.0.0/24
|
| LAN Address
| 10.3.0.1
|
| Tunnel Net
| 10.3.201.0/24
|
- Navigate to **VPN > OpenVPN**
- Click the **Wizards** tab
The GUI presents the first step of the wizard automatically
Note
The option for [OpenVPN Data Channel Offload (DCO)](https://docs.netgate.com/pfsense/en/latest/vpn/openvpn/dco.html#openvpn-dco) is not included in this wizard. To use DCO on this server, run the wizard first then after completing the wizard, edit the server instance and enable the DCO option.
### Choose Authentication Type
On the first screen of the wizard, select the authentication backend server type. The choices available for **Type of Server** are *Local User Access*, *LDAP*, and *RADIUS*.
See also
[Authentication Servers](https://docs.netgate.com/pfsense/en/latest/usermanager/authentication-servers.html)
- Local User Access
- Manage the users, passwords, and certificates using the [User Manager](https://docs.netgate.com/pfsense/en/latest/usermanager/index.html) on this firewall.
Sets the server mode to *Remote Access (SSL/TLS + User Auth)* which requires user authentication as well as per-user certificates.
*Local User Access* easily handles per-user certificates, managed completely in the GUI. This is much more secure, but depending on the number of users which will access the service, may be less convenient than using a central authentication system.
- LDAP / RADIUS
- If the network has an existing authentication system already in place, such as Active Directory, pick *LDAP* or *RADIUS* depending on which method that system accepts.
*LDAP* and *RADIUS* both set the server mode to *Remote Access (User Auth)*, which does not require per-user certificates.
Note
The server mode can be adjusted later to require certificates, but administrators must manually create per-user certificates for *LDAP* or *RADIUS* users.
- Name
- Descriptive name for this LDAP server, for reference.
- Hostname or IP address
- The hostname or IP address of the LDAP server.
If the firewall will contact this server using an encrypted method, this value must match the contents of the LDAP server certificate.
- Port
- The port on which the LDAP server is listening for requests.
The default port is `389` for standard TCP connections and `636` for SSL.
- Transport
- Sets the method the firewall will use when performing LDAP queries to the server.
- Standard TCP
- Unencrypted connections using plain TCP.
- STARTTLS Encrypted
- Connects to the standard TCP port and then attempts to negotiate TLS encryption.
- SSL/TLS Encrypted
- Secure connections using TLS encryption.
A standard TCP connection is typically sufficient for initial testing, and potentially for local servers or those only accessible over secure connections. If the server is remote or crosses any untrusted network links, an encrypted method is essential. Using an encrypted method is always the best practice, but may not always be viable.
Warning
When the firewall uses an encrypted method to contact the LDAP server, the **Hostname or IP address** above must match a value in the LDAP server certificate.
- Peer Certificate Authority
- To use SSL/TLS or STARTTLS transports, the firewall must trust the CA of the LDAP server. This can be accomplished by any of the following methods:
- Import the CA into the certificate manager and select it from the list in this option.
- Import the CA into the certificate manager with the **Trust Store** option set, which adds the imported CA into the list of CAs which the firewall trusts globally. Then select *global* from this list.
- If the LDAP server certificate is signed by a globally trusted CA, such as Let’s Encrypt, then select *global*.
- Search Scope Level
- Selects how deep the firewall will search in the LDAP directory, *One Level* or *Entire Subtree*.
In almost all cases, *Entire Subtree* is the correct choice.
- Search Scope Base DN
- The distinguished name (DN) upon which the firewall bases its search. For example `DC=example,DC=com`.
- Authentication Containers
- These values specify where the directory stores user data. For example, `CN=Users;DC=example`.
- LDAP Bind User DN
- If the LDAP server requires authenticated binds when performing queries, this field sets the distinguished name the firewall uses for this bind action.
If this is blank the firewall performs an anonymous bind without credentials.
- LDAP Bind Password
- The password for authenticated binds. The firewall only uses this value if **LDAP Bind User DN** has a value.
- User Naming Attribute
- Varies depending on the LDAP directory software and structure.
Typically `cn` for OpenLDAP and Novell eDirectory, and `samAccountName` for Microsoft Active Directory.
- Group Naming Attribute
- Varies depending on the LDAP directory software and structure, but is most typically `cn`.
- Member Naming Attribute
- Varies depending on the LDAP directory software and structure.
Typically `member` on OpenLDAP, `memberOf` on Microsoft Active Directory, and `uniqueMember` on Novell eDirectory.
- Name
- Descriptive name for this RADIUS server, for reference.
- Hostname or IP address
- The hostname or IP address of the RADIUS server.
- Authentication Port
- Port used by the RADIUS server for accepting authentication requests, typically `1812`.
- Shared Secret
- The password the RADIUS server expects from this firewall when it submits authentication requests (e.g. password on the NAS entry.)
- Descriptive Name
- `ExampleCoCA`
A name for reference to identify this certificate. This is the same as **Common Name** field for other certificates.
Note
Although this field can technically contain spaces, the best practice is to conform the contents of this field to the format allowed for fully qualified domain names.
Some clients have issues handling entries with spaces properly.
- Key Length
- `2048`
Size of the CA private key which the wizard will generate.
Larger keys offer increased security but larger keys are generally slower to use.
- Lifetime
- `3650`
The time, in days, for which this CA will remain valid.
For a self-signed CA such as this, the default of `3650` is acceptable, which is approximately 10 years.
- Country Code
- `US`
(Optional) Two-letter ISO country code (e.g. US, AU, CA).
ExampleCo is located in the United States which has an ISO country code of `US`.
To locate an appropriate ISO code for other countries, use the [ISO Online Browsing Platform](https://www.iso.org/obp/ui/#search) site.
- State or Province
- `Texas`
(Optional) Full unabbreviated State or Province name (e.g. Texas, Indiana, California).
ExampleCo is located in `Texas`.
- City
- `Austin`
(Optional) City or other Locality name (e.g. Austin, Indianapolis, Toronto).
ExampleCo headquarters is in `Austin`.
- Organization
- `ExampleCo`
(Optional) Organization name, often the Company or Group name.
Warning
Do not use any special characters in this field, not even punctuation such as a period or comma.
- Descriptive Name
- `vpn.example.com`
This is the common name (CN) field of the server certificate and the firewall also uses this name to reference the certificate.
The best practice is to set this to the fully qualified hostname of the firewall.
Note
Although this field can technically contain spaces, the best practice is to conform the contents of this field to the format allowed for fully qualified domain names.
Some clients have issues handling entries with spaces properly.
- Key Length
- `2048`
Size of the CA private key which the wizard will generate.
Larger keys offer increased security but larger keys are generally slower to use.
- Lifetime
- `398`
The time in days that this certificate will be valid. The best practice is to set this to `398` days or less.
Note
Some current operating systems and software limit server certificates to a maximum lifetime of `398` days for security reasons. Clients on these platforms may reject a server certificate with a longer lifetime.
- Country Code
- `US`
(Optional) Two-letter ISO country code (e.g. US, AU, CA).
ExampleCo is located in the United States which has an ISO country code of `US`.
To locate an appropriate ISO code for other countries, use the [ISO Online Browsing Platform](https://www.iso.org/obp/ui/#search) site.
- State or Province
- `Texas`
(Optional) Full unabbreviated State or Province name (e.g. Texas, Indiana, California).
ExampleCo is located in `Texas`.
- City
- `Austin`
(Optional) City or other Locality name (e.g. Austin, Indianapolis, Toronto).
ExampleCo headquarters is in `Austin`.
- Organization
- `ExampleCo`
(Optional) Organization name, often the Company or Group name.
Warning
Do not use any special characters in this field, not even punctuation such as a period or comma.
- Interface
- *WAN*
- Protocol
- *UDP on IPv4 Only*
- Local Port
- `1194`
The wizard suggests the first unused port number starting with port `1194`. If there is an existing OpenVPN server on that port, use a different port number.
- Description
- `ExampleCo Mobile VPN Clients`
- TLS Authentication
- Check **Enable authentication of TLS packets**
Using TLS authentication is the best practice.
- Generate TLS Key
- Check **Automatically generate a shared TLS authentication key**
- TLS Shared Key
- Blank
The wizard disables this field when **Automatically generate a shared TLS authentication key** is checked.
- DH Parameters Length
- *2048*
This value is a good balance of speed and strength.
- Data Encryption Negotiation
- *Checked*
This allows the server to automatically negotiate encryption settings with clients.
Note
Disabling this option is deprecated, but still present on this version for compatibility.
- Data Encryption Algorithms
- *AES-256-GCM*, *AES-128-GCM*, and *CHACHA20-POLY1305*
The best practice is to use the default suggested values as noted above.
- Fallback Data Encryption Algorithm
- *AES-256-CBC*
This algorithm is used when negotiation fails, for example with a client that is too old to support negotiation.
- Auth Digest Algorithm
- *SHA256 (256-bit)*
- Tunnel Network
- `10.3.201.0/24`
This is the tunnel network from the table at the start of this example ([OpenVPN Remote Access Server Settings](https://docs.netgate.com/pfsense/en/latest/recipes/openvpn-ra.html#table-openvpn-ra-server-settings)).
- Redirect Gateway
- *Unchecked*
For this example, The VPN will only carry traffic destined for subnets at the main office.
- Local Network
- `10.3.0.0/24`
This is the server-side LAN subnet from the table at the start of this example ([OpenVPN Remote Access Server Settings](https://docs.netgate.com/pfsense/en/latest/recipes/openvpn-ra.html#table-openvpn-ra-server-settings)).
- Concurrent Connections
- Blank
This example does not limit the number of clients which can connect at the same time.
- Allow Compression
- *Refuse any non-stub compression (Most secure)*
The best practice is to disable compression for security reasons.
- Compression
- *Disable Compression \[Omit Preference\]*
The best practice is to disable compression for security reasons.
- Type-of-Service
- *Unchecked*
There is no traffic on this example VPN which requires prioritization/QoS.
- Inter-Client Communication
- *Unchecked*
The clients on this VPN have no need to connect to other VPN client hosts.
- Duplicate Connections
- *Unchecked*
This example uses unique certificates for every client and does not allow multiple connections per client.
- Dynamic IP
- *Checked*
The clients connect from all over the country and unknown mobile networks and their IP addresses are likely to change without notice.
- Topology
- *Subnet*
The method the server uses to assign IP addresses to clients.
- DNS Default Domain
- `example.com`
The domain name used by ExampleCo.
- DNS Servers
- `10.3.0.5`
A list of internal DNS servers. ExampleCo has a Windows Active Directory Domain Controller which is configured to act as a DNS server at `10.3.0.5`.
- NTP Servers
- `10.3.0.6`
A dedicated local NTP server exists at `10.3.0.6`.
- Advanced
- Blank
At this time no additional tweaks are necessary.
- Traffic from clients to server
- *Checked*
When checked, the wizard adds a firewall rule on the chosen interface outside of the tunnel where the server is listening (e.g. *WAN*) which allows VPN clients to connect. The rule created by this option allows all clients from any source IP address to connect by default.
Since clients in this example are connecting from all over the country, the rule created by the wizard for this option is ideal.
Tip
To allow connections from a limited set of IP addresses or subnets, either make a custom rule or check this box and alter the rule it creates.
- Traffic from clients through VPN tunnel
- *Checked*
This setting allows all traffic to cross inside the OpenVPN tunnel. This is desirable for this example.
- **WAN** tab rule should pass from any to the *OpenVPN* port on the *WAN address*

- **OpenVPN** tab rule should allow all traffic from any/to any

## Adjustments
Numerous settings are not present in the wizard but might be a better fit for certain deployments than the defaults chosen by the wizard.
### Server Mode
The OpenVPN **Server Mode** allows selecting a choice between requiring Certificates, User Authentication, or both. The wizard defaults to *Remote Access (SSL/TLS + User Auth)* when using local users and *Remote Access (User Auth)* for RADIUS and LDAP. The possible values for this choice and their advantages are:
- Remote Access (SSL/TLS + User Auth)
- - Requires both certificates **and** username/password
- Each user has a unique client configuration which includes their personal certificate and key
- Most secure as there are multiple factors of authentication (TLS Key and Certificate that the user has, and the username/password they know)
- Remote Access (SSL/TLS)
- - Certificates only, no authentication
- Each user has a unique client configuration which includes their personal certificate and key
- Useful if clients should not be prompted to enter a username and password
- Less secure as it relies only on something the user has (TLS key and certificate)
- Remote Access (User Auth)
- - Authentication only, no certificates
- Useful if the clients cannot have individual certificates
- Commonly used for external authentication (RADIUS, LDAP)
- All clients can use the same exported client configuration and/or software package
- Less secure as it relies on a shared TLS key plus only something the user knows (Username/password)
See also: [Certificate Revocation List Management](https://docs.netgate.com/pfsense/en/latest/certificates/crl.html)
## Adding a User with a Certificate
If the server mode includes local user authentication, a user must be exist in the user manager for each client which will connect to the VPN.
See also
This is a simplified version of the process. For more detail, see:
- [Adding OpenVPN Remote Access Users](https://docs.netgate.com/pfsense/en/latest/recipes/openvpn-ra-users.html)
- [Manage Local Users](https://docs.netgate.com/pfsense/en/latest/usermanager/users.html)
- [User Certificates](https://docs.netgate.com/pfsense/en/latest/certificates/certificate.html#certificates-certs-user)
- Navigate to **System > User Manager**
- Click  To add a user
- Fill in the settings as follows:
- Username
- The username for this client.
- Password/Confirm password
- The password for this client.
- Click to create a user certificate
- *Checked*
- Descriptive Name
- Same value as the **Username**
- Certificate Authority
- The CA used by the OpenVPN server.
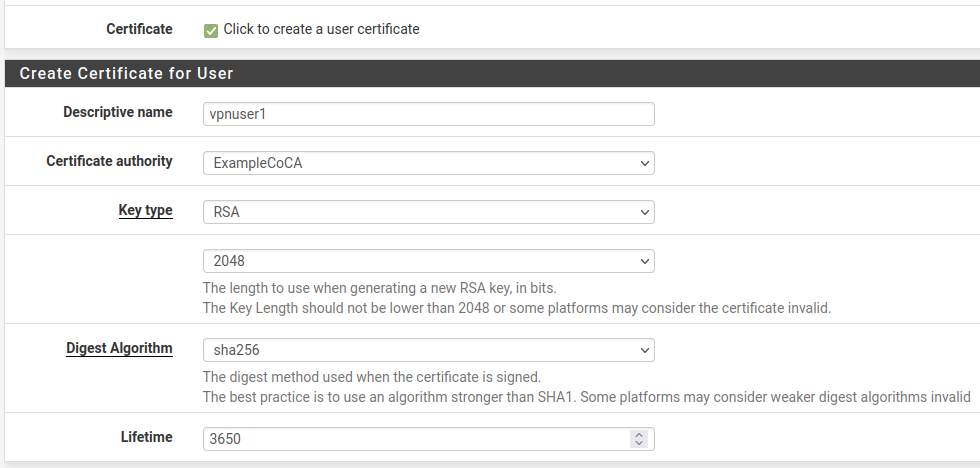
- Click **Save**