# HaProxy
# T-RMM-PFSense-HAProxy-config
#
> **Assumes fully configured public DNS or DDNS, and a functional PFSense installation with existing valid wildcard SSL certificate available. Adjust hostnames, IPs, etc to suit the environment.**
Do NOT disable nginx proxy on the T-RMM instance. This assumes that it's in place and functional.
###
- [HAProxy installation](#haproxy-installation-1 "#haproxy-installation-1")
- [Firewall configuration](#firewall-configuration-1 "#firewall-configuration-1")
- [HAProxy backend configuration](#haproxy-backend-configuration-1 "#haproxy-backend-configuration-1")
- [Shared HTTP to HTTPS redirect frontend](#shared-http-to-https-redirect-frontend-1 "#shared-http-to-https-redirect-frontend-1")
- [Shared HTTPS frontend](#shared-https-frontend-1 "#shared-https-frontend-1")
- [T-RMM frontend](#t-rmm-frontend-1 "#t-rmm-frontend-1")
#
### HAProxy installation
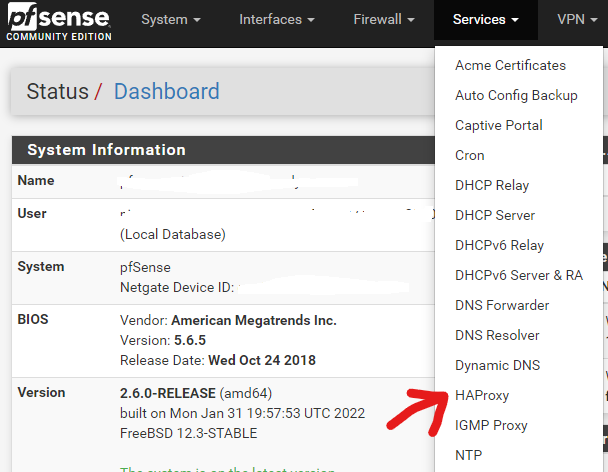
Go to System > Package Manager
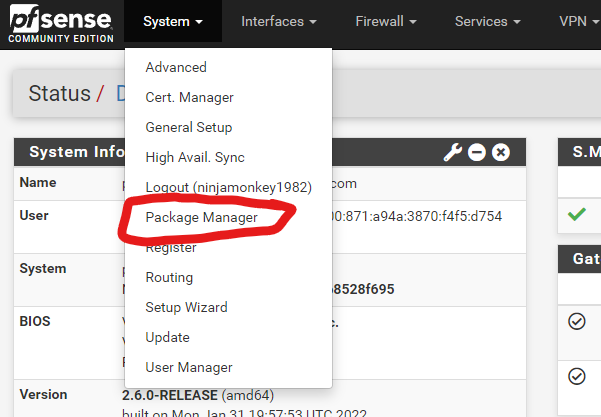Select Available Packages
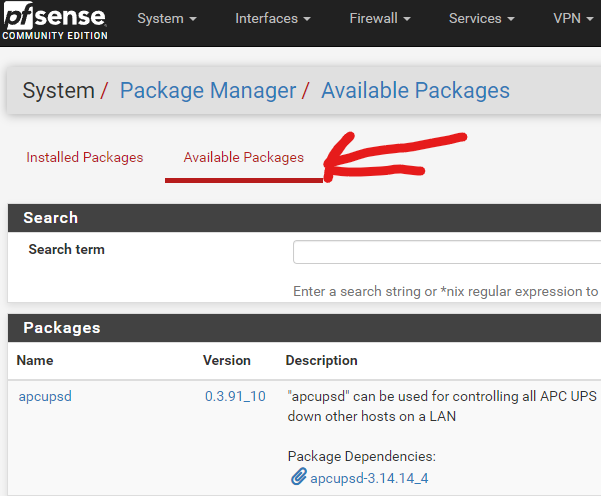Find and install haproxy-devel
Screenshot 2022-03-31 130322
#
### Firewall configuration
Go to Firewall > Rules
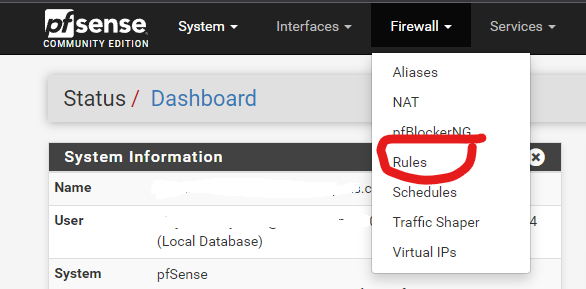Select the WAN tab
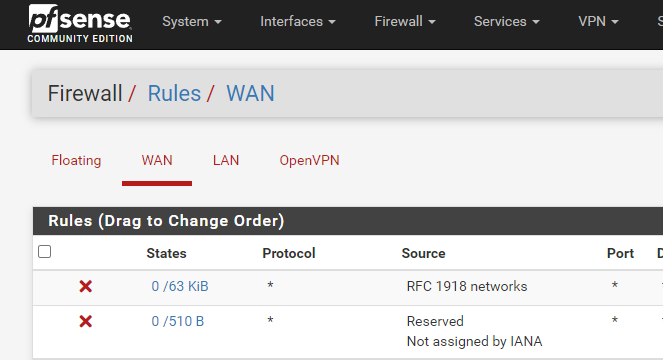Add the following two rules to the bottom of the list, nothing else should be using ports 80 and 443:
HTTP rule:
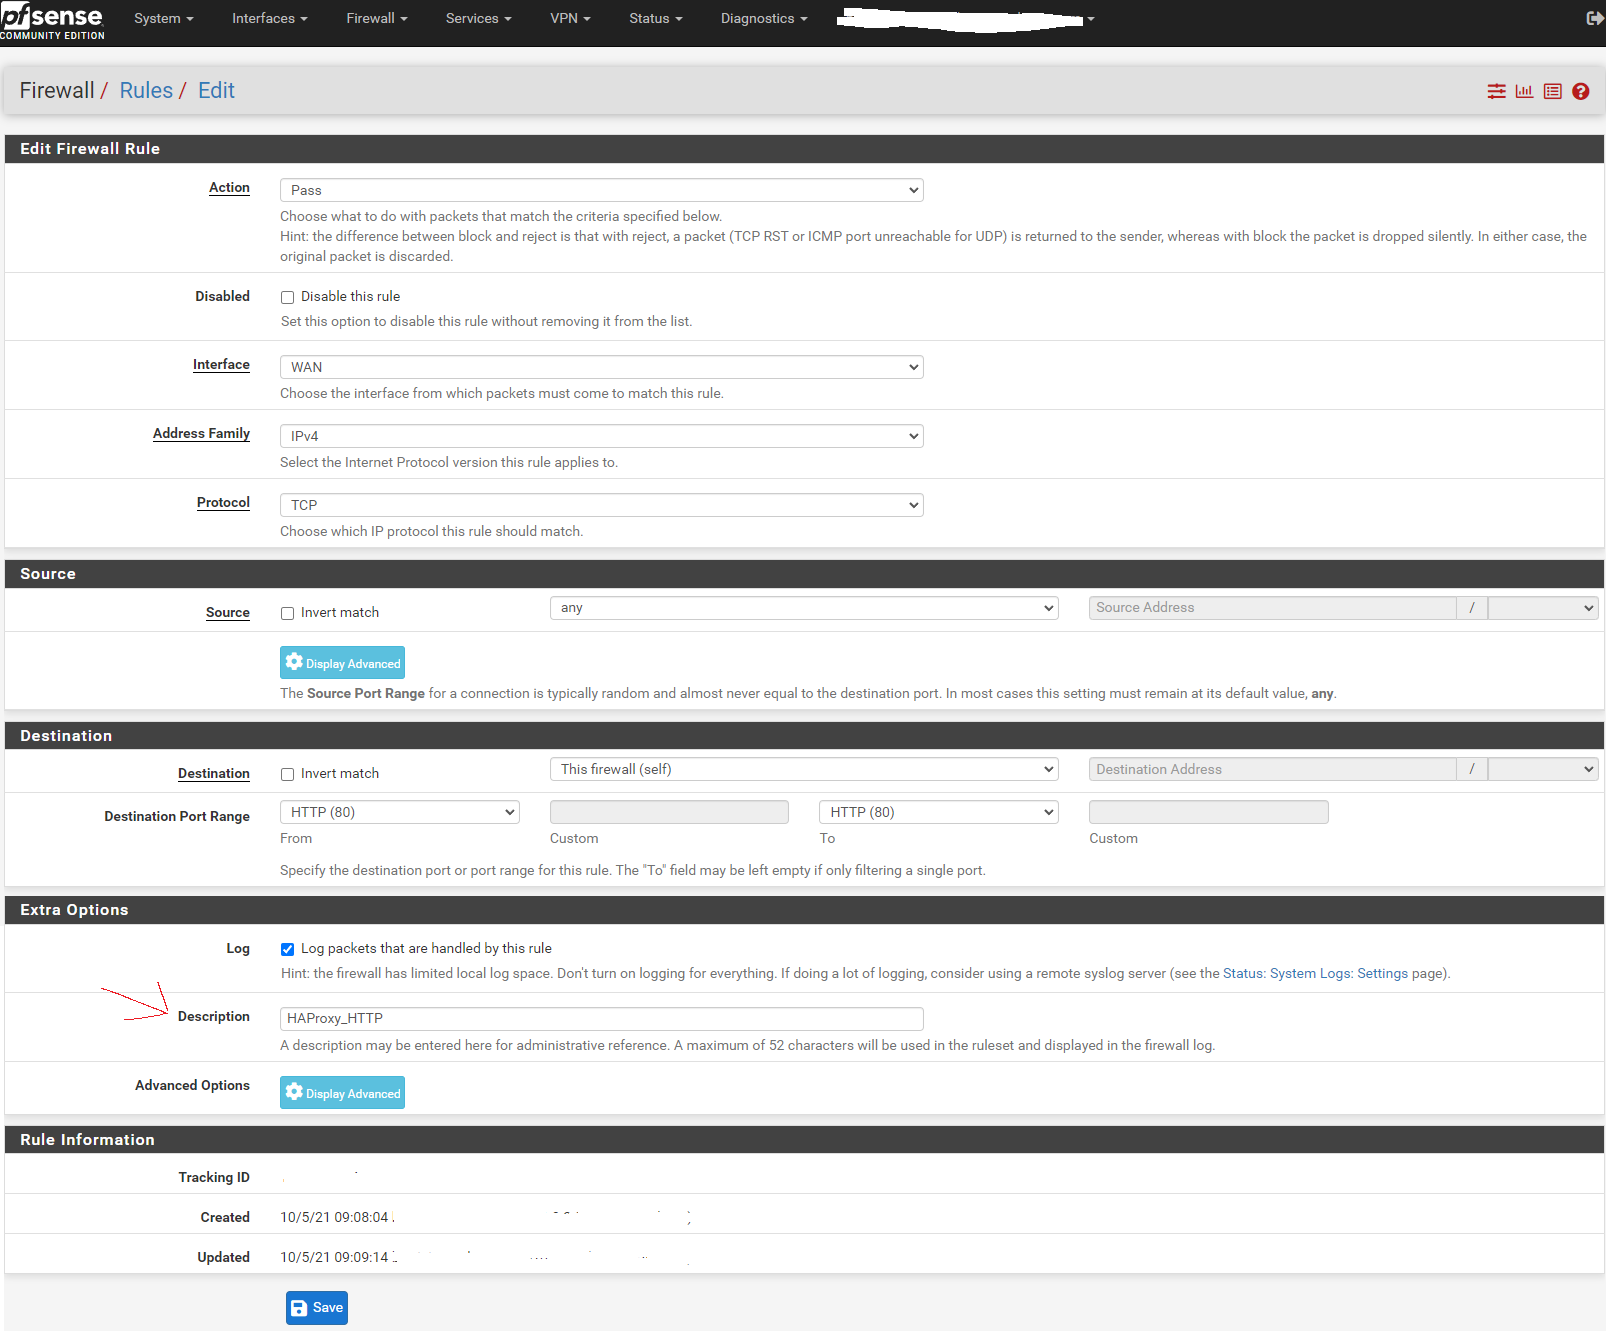Create a duplicate rule, changing the port to 443 and the description for HTTPS
Enable the new rules.
#
### HAProxy backend configuration
Go to Services > HAProxy
Leave the Settings tab alone for now and skip to the Backend tab:
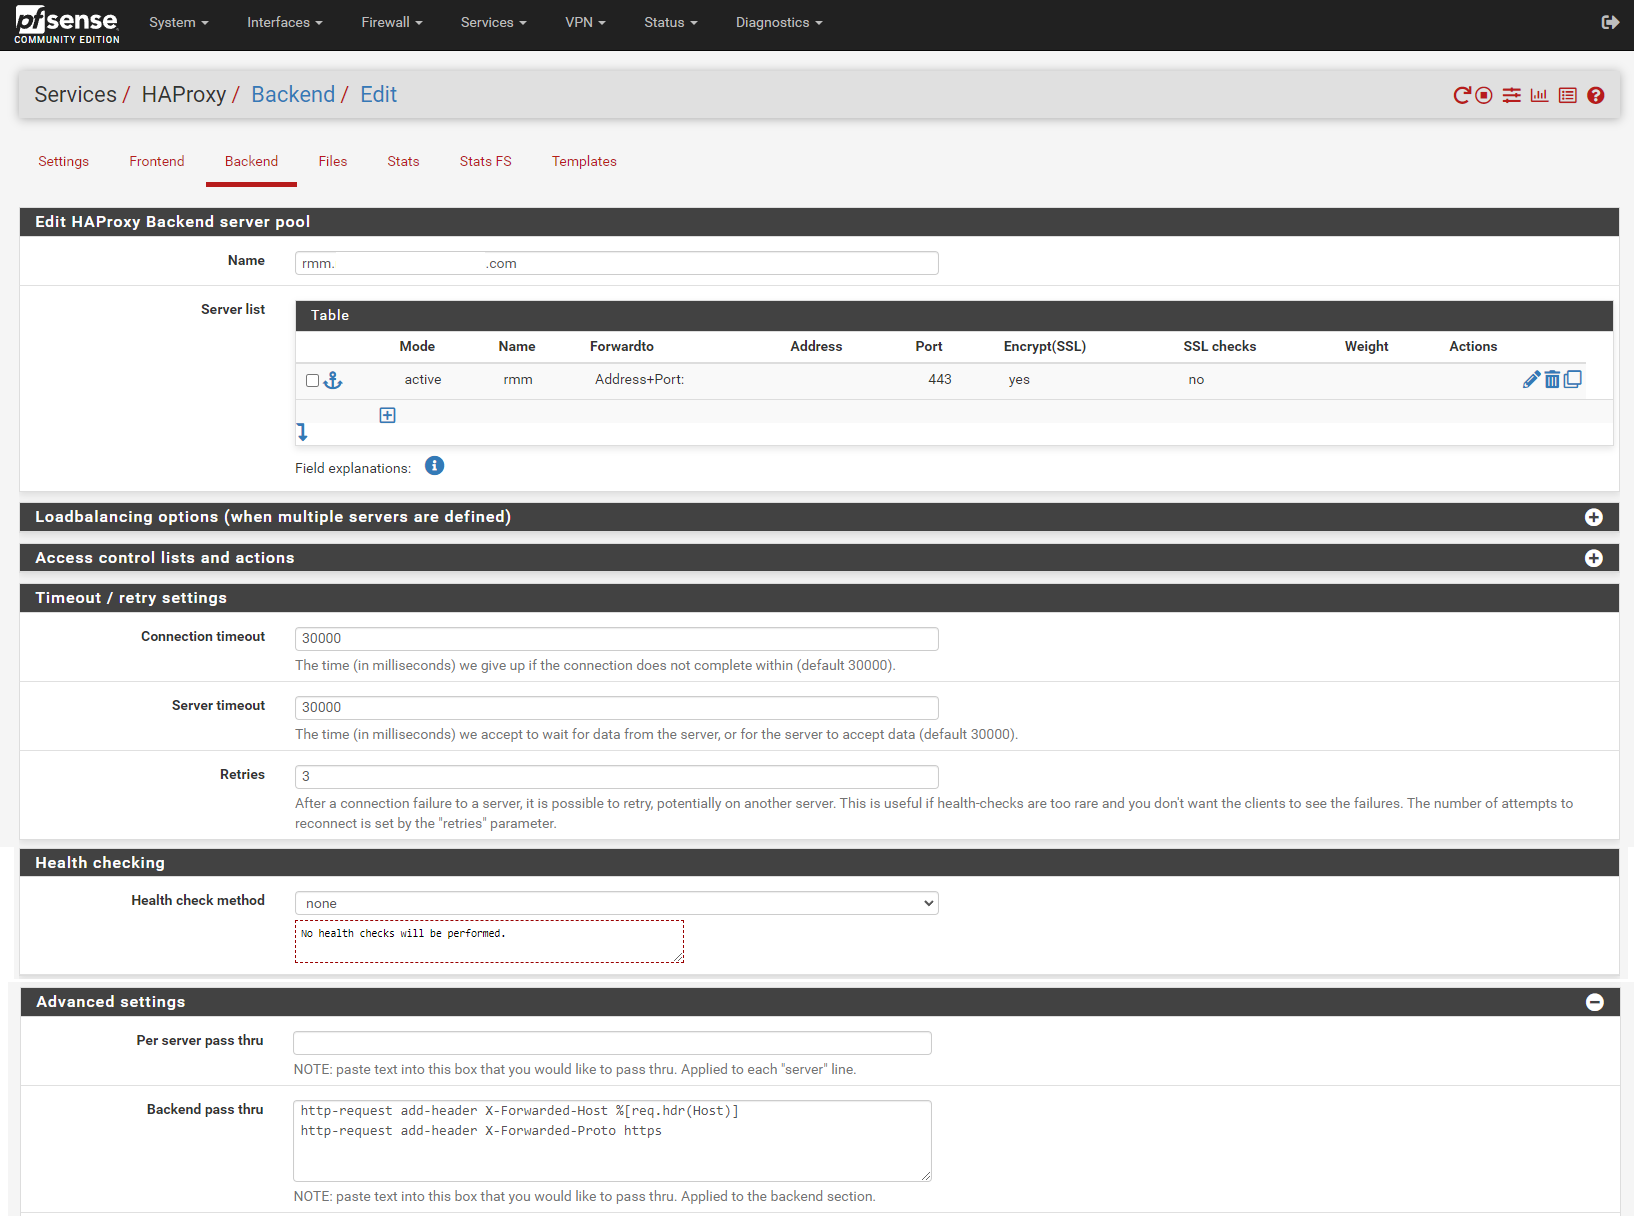Add backend for rmm. Enter the rmm FQDN (eg, rmm.example.com) into the box titled Name, then click the down arrow in the Server list panel to add a server definition.
Enter the rmm for the server in the Name box, enter the internal IP address of the server, 443 (or other appropriate port) for the Port, and check the Encrypt(SSL) box.
In the Timeout / retry settings section, enter 30000 in Connection timeout and Server timeout.
In the Health checking section, set Health check method to none.
In the Advanced settings section, enter the following in the Backend pass thru box:
```
http-request add-header X-Forwarded-Host %[req.hdr(Host)]
http-request add-header X-Forwarded-Proto https
```
Scroll down, save, and apply changes when asked.
Copy the rmm backend. Change the Name entry to match the mesh FQDN (eg, mesh.example.com).
Change the Name for the server to mesh.
In the Timeout / retry settings section, change the entries in Connection timeout and Server timeout to 15000.
In the Advanced settings section, add the following in the Backend pass thru box:
```
timeout tunnel 15000
```
Scroll down, save, and apply changes when asked.
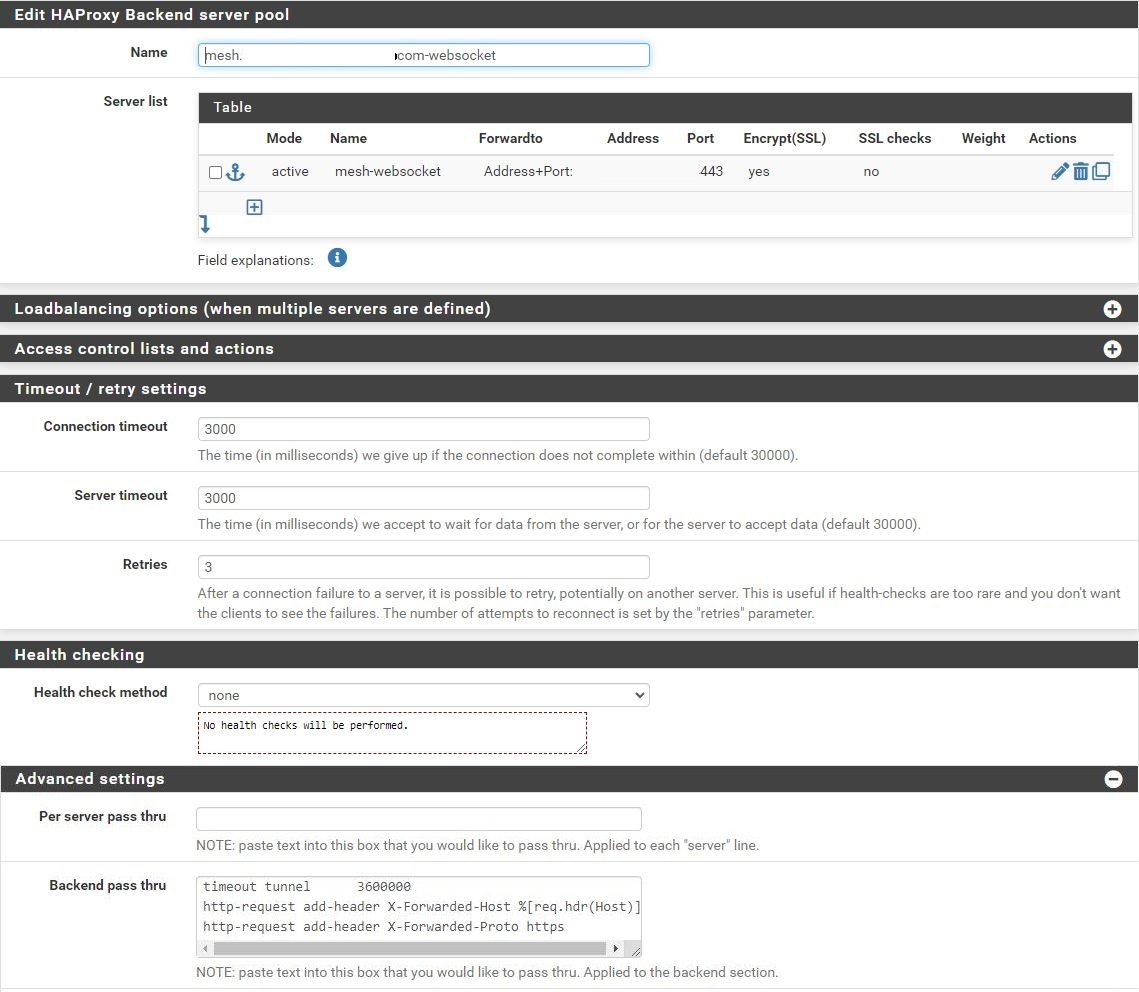Copy the mesh backend. Change the Name entry to match the mesh FQDN-websockets (eg, mesh.example.com-websockets).
Change the Name for the server to mesh-websockets.
In the Timeout / retry settings section, change the entries in Connection timeout and Server timeout to **3000**.
In the Advanced settings section, change the timeout tunnel entry in the Backend pass thru box to **3600000**.
Scroll down, save, and apply changes when asked.
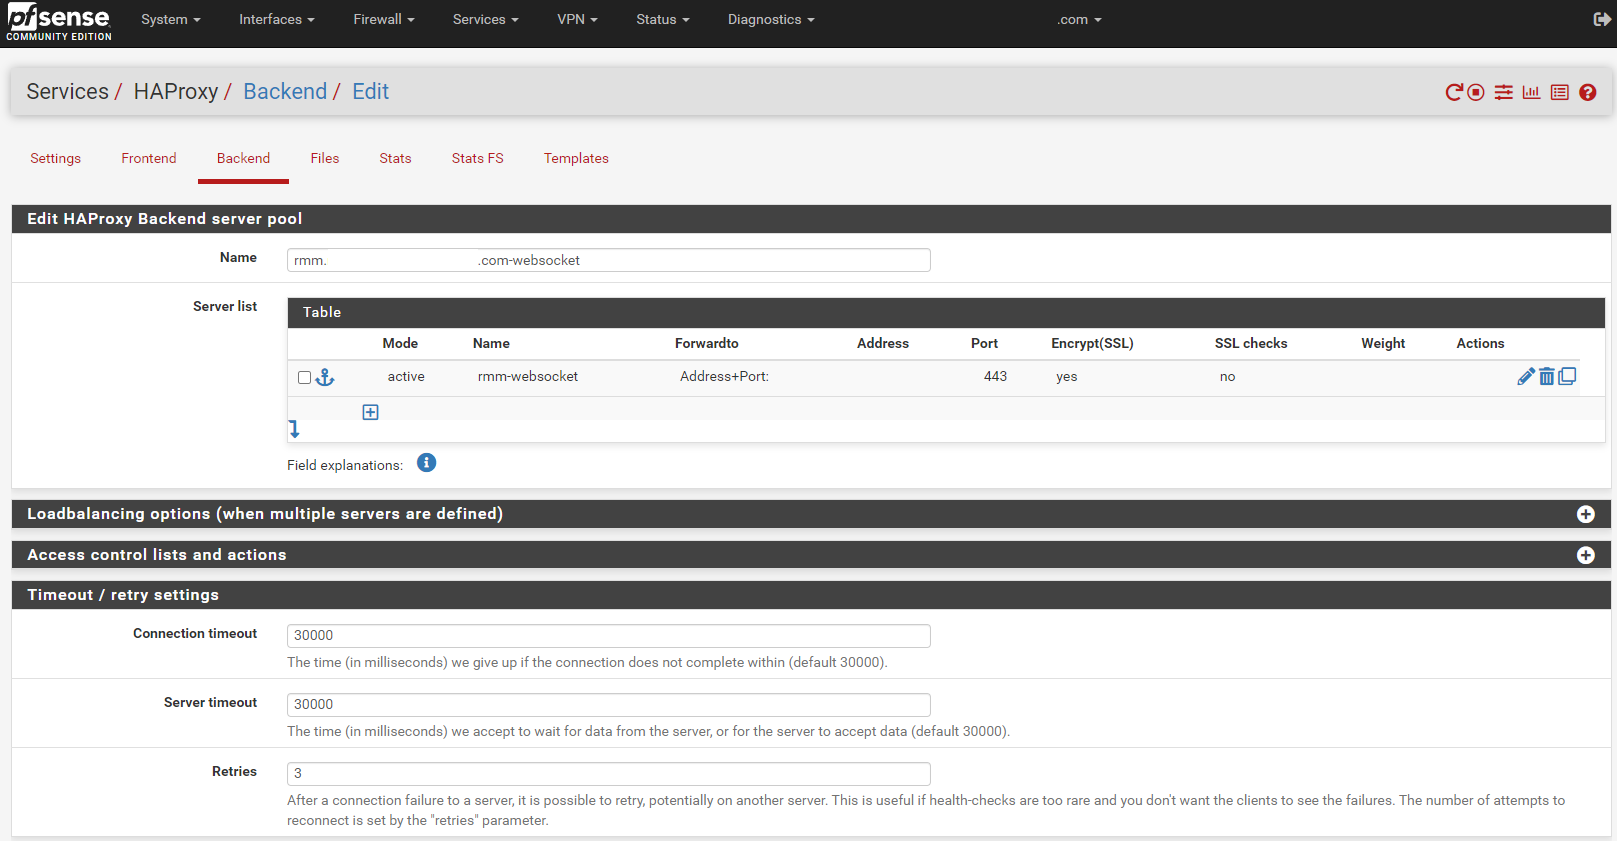Copy the mesh-websockets backend. Change the Name entry to match the rmm FQDN-websocket (eg, rmm.example.com-websocket).
Change the Name for the server to rmm-websocket.
In the Timeout / retry settings section, change the entries in Connection timeout and Server timeout to **30000**.
Scroll down, save, and apply changes when asked.
###
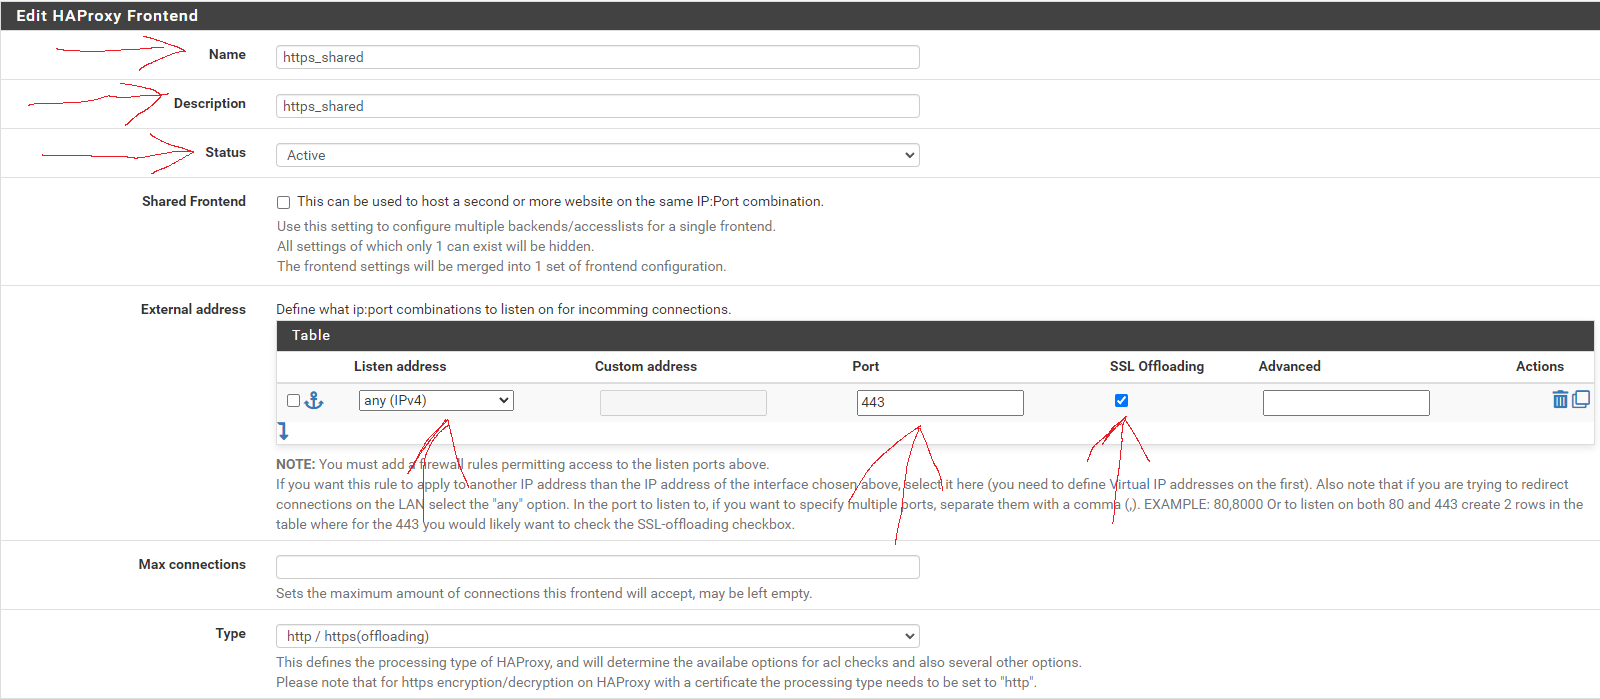
### Shared HTTP to HTTPS redirect frontend
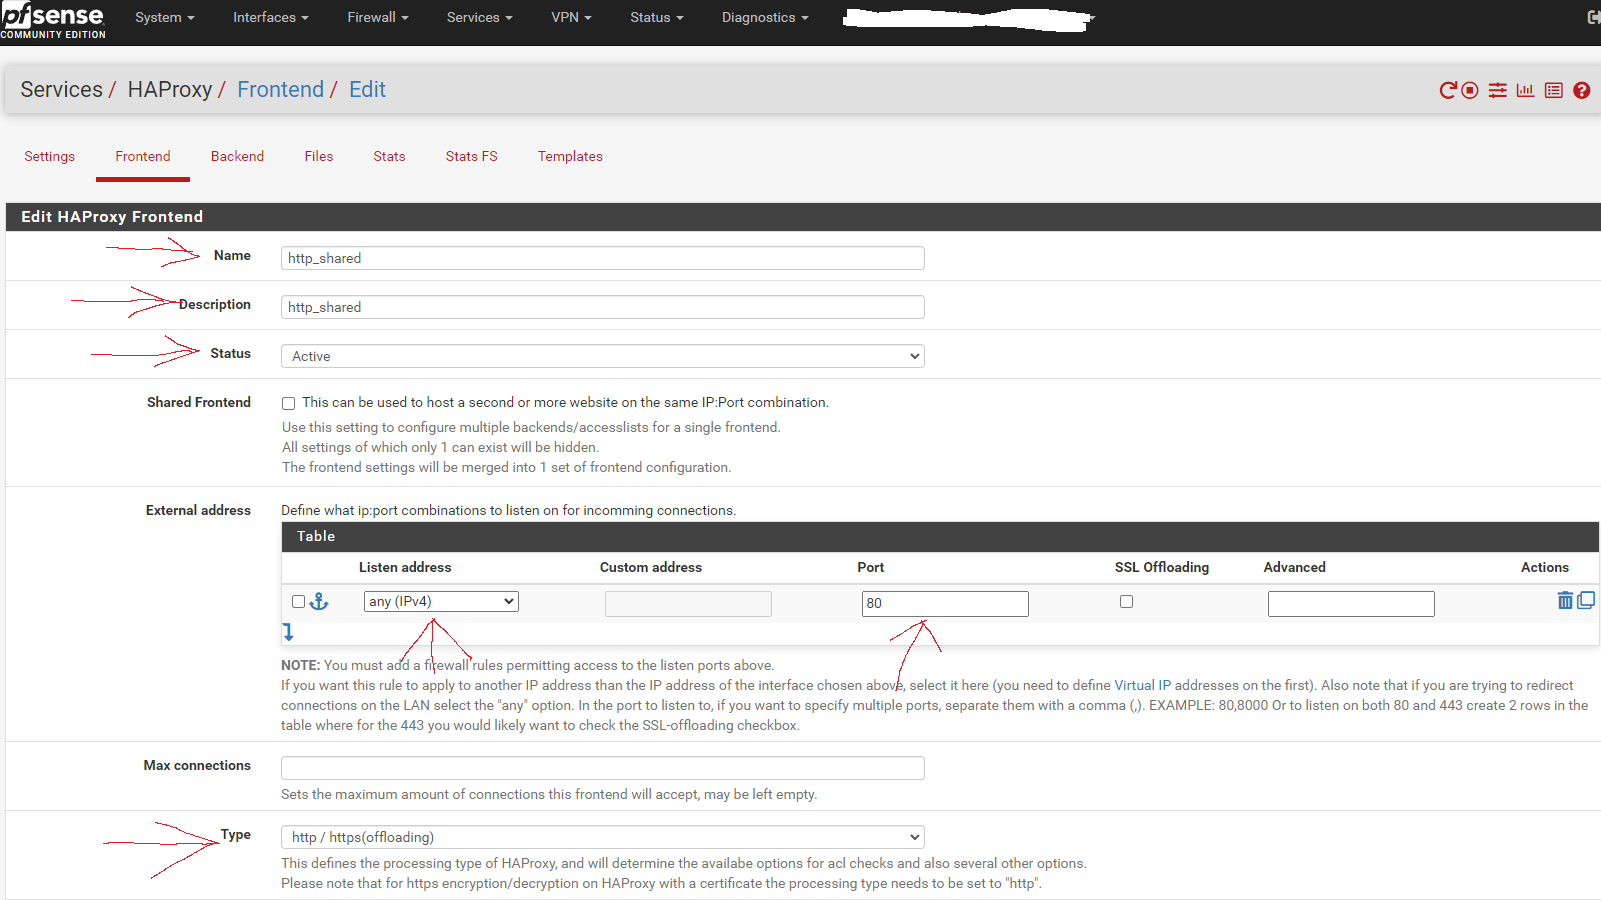
Now go to the Frontend tab. Click the button to add a new frontend.
This shared http frontend will redirect all configured entries to their HTTPS equivalent and allow SSL offloading, as well as both internal and external access to the sites/services via URL.
Fill in the entries as shown in the screen capture below:
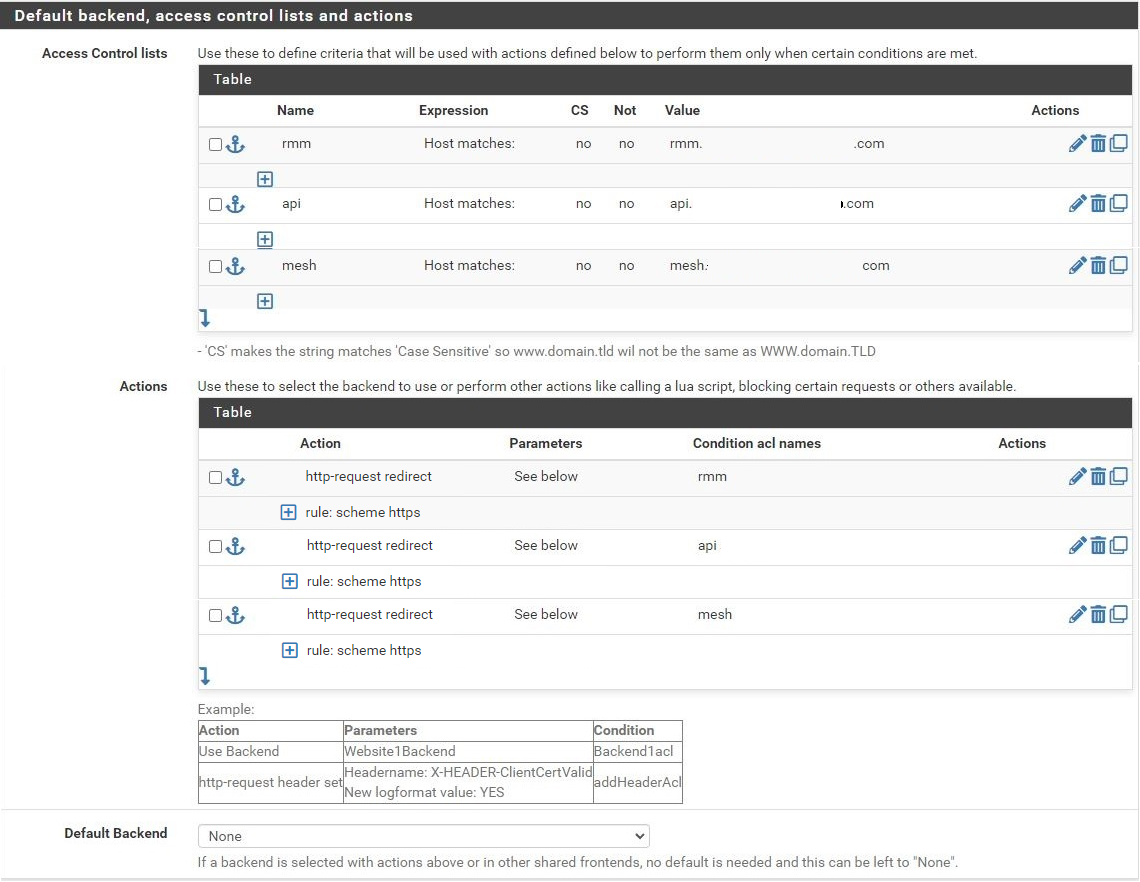
Scroll to the section titled "Default backend, access control lists and actions" and in the Action Control lists area click the down arrow to create a new acl. Enter **rmm** in the Name field, change the Expression to **Host matches**, and enter the FQDN for rmm into the Value field (eg, rmm.example.com).
Copy the rmm acl. Change the Name to **api**, and the Value field to the FQDN for api into the Value field (eg, api.example.com).
Copy the api acl. Change the Name to **mesh**, and the Value field to the FQDN for mesh into the Value field (eg, mesh.example.com).
Scroll down to the Actions area of the section and click the down arrow to create a new action. In the Action field, select **http-request redirect**, enter **scheme https** into the rule field, and enter **rmm** into the Condition acl names field.
Copy the action you just created, and change the Condition acl name to **api**.
Repeat this again, and change the Condition acl name to **mesh**.
Scroll down and select None for the Default Backend.
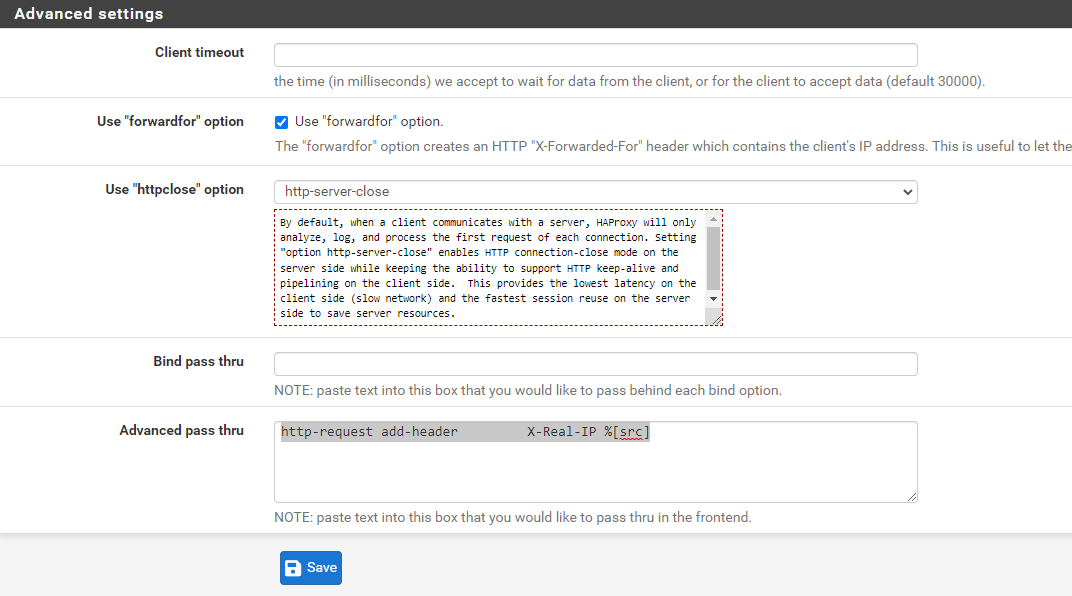
Scroll down to the Advanced settings section. Tick the **Use "forwardfor" option** box, select **http-server-close** for **Use "httpclose" option**, and add/copy-paste
```
http-request add-header X-Real-IP %[src]
```
to the Advanced pass thru text box.
Save and apply changes.
# Shared HTTPS frontend
Click the button to add a new frontend.
Fill in the entries as shown in the screen capture below:
No entries are necessary in the Default backend, access control lists and actions section, just make sure to set the Default Backend to None.
As before, scroll down to the Advanced settings section, tick the Use "forwardfor" option box, select http-server-close for Use "httpclose" option, and add/copy-paste
```
http-request add-header X-Real-IP %[src]
```
to the Advanced pass thru text box.
Next, scroll down to the SSL Offloading section. In the Certificate area, select the wildcard certificate for the domain and tick the box to Add ACL for certificate Subject Alternative Names.
In the OCSP area, tick the option box.
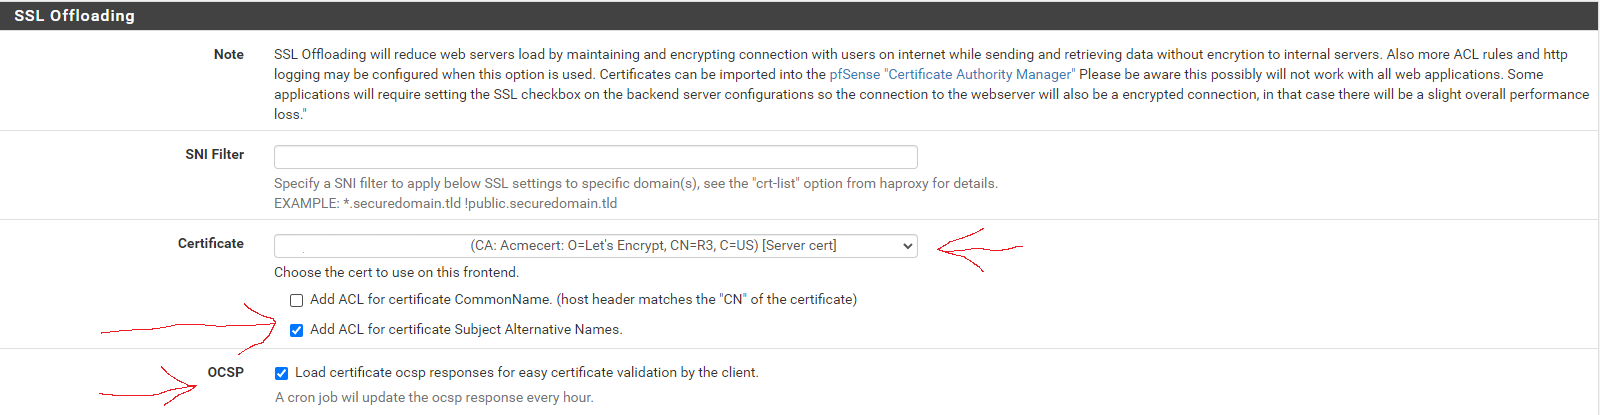Save and apply changes.
This shared HTTPS frontend will provide SSL offloading for ALL HTTPS frontends using it as a shared frontend, while allowing other ACLs and actions to be assigned to individual sub frontends independent from each other, as well as give a visual list of frontends/services that's easier to read than a long list of ACLs.
# T-RMM frontend
Click the button to add a new frontend.
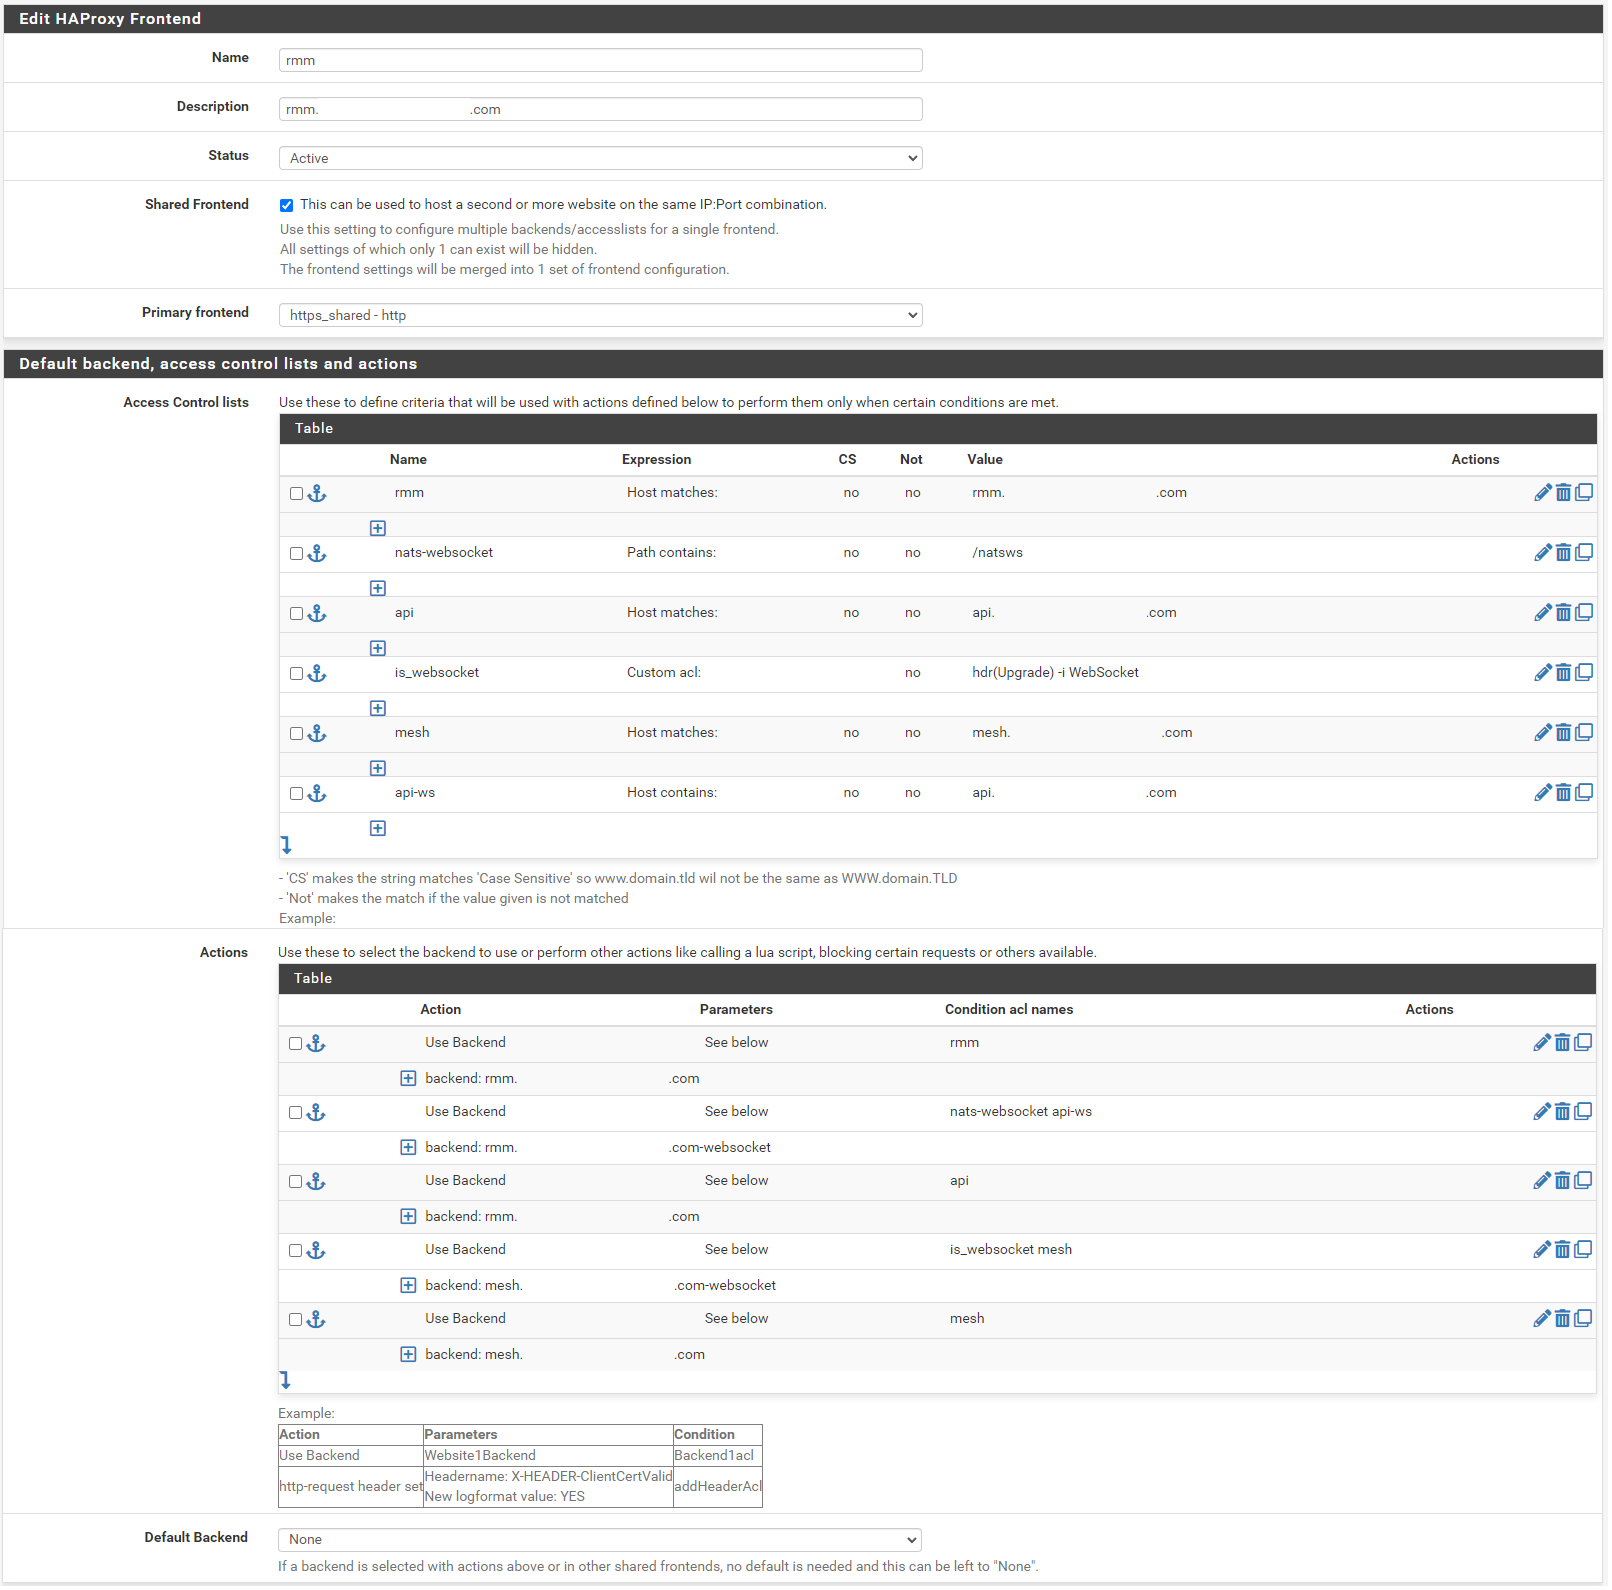### Action order matters!!!
In the Name field, enter **t-rmm**. In the Description field, enter the rmm FQDN (eg, rmm.example.com). Set the Status to active, tick the Shared Frontend box, and select **https\_shared - http** as the Primary frontend.
Scroll to the section titled "Default backend, access control lists and actions" and in the Action Control lists area click the down arrow to create a new acl. Enter **rmm** in the Name field, change the Expression to **Host matches**, and enter the FQDN for rmm into the Value field (eg, rmm.example.com).
Add a new acl. Change the Name to **nats-websocket**, set the Expression to **Path contains**, and enter **/natsws** as the Value.
Copy the rmm acl. Change the Name to **api**, and the Value field to the FQDN for api into the Value field (eg, api.example.com).
Add a new acl. Change the Expression to **Custom acl:** , in the Name field enter **is\_websocket** , and in the Value field enter **hdr(Upgrade) -i WebSocket** .
Copy the api acl. Change the Name to **mesh**, and the Value field to the FQDN for mesh into the Value field (eg, mesh.example.com).
Copy the api acl. Change the Name to **api-ws**, set the Expression to **Host contains**, and the Value field to the FQDN for api into the Value field (eg, api.example.com).
Scroll down to the Actions area of the section and click the down arrow to create a new action. In the Action field, select **Use Backend**, select the rmm backend you created earlier, and enter **rmm** into the Condition acl names field.
Copy the rmm action you just created, change the Condition acl name to **nats-websocket api-ws**, and change the backend to the rmm-websocket backend (eg, rmm.example.com-websocket).
Copy the initial rmm action you created, and change the Condition acl name to **api**.
Create a new action. In the Action field, select **Use Backend**, select the mesh websockets backend, and enter **is\_websocket mesh** into the Condition acl names field.
Copy the api action, select the mesh backend, and change the Condition acl name to **mesh**.
Scroll down and select None for the Default Backend.
Save and apply changes.
The websites/services should now be available internally and externally at the configured URLs, with SSL encryption, and automatic HTTP to HTTPS forwarding.
# How to Configure HAProxy for Docker-based Nextcloud AIO
## Purpose
Configure **HAProxy on pfSense** to terminate SSL and securely reverse-proxy public HTTPS traffic to an internal **Docker Nextcloud AIO server** behind your firewall.
---
## 1. HAProxy Package Installation on pfSense
On pfSense, go to:
- **System → Package Manager → Available Packages**
- Search for **HAProxy** and install `haproxy` (not haproxy-devel unless needed).
---
## 2. Create SSL Certificate (or Import)
In pfSense:
- **System → Certificate Manager → Certificates**
- Import or create an SSL certificate for your domain (example: `nextcloud.mydomain.com`).
---
## 3. HAProxy Settings
Go to **Services → HAProxy** and configure:
### Global Settings
- Enable HAProxy
- Set the SSL/TLS cipher suite to "Intermediate" (recommended for compatibility and security)
### Frontend (Public Side)
```
Name: frontend-https Bind address: WAN Address (or "any") Port: 443 Type: SSL Offloading (HTTPS) SSL Certificate: [Select imported Let's Encrypt or custom cert]
```
### Actions:
- **Condition:** Match on `Host Header` = `nextcloud.mydomain.com`
- **Action:** Use Backend: `backend-nextcloud`
### Optional:
- Add another frontend to redirect port 80 to 443 if you want forced HTTPS
---
## 4. HAProxy Backend (Internal Docker Host)
```
Name: backend-nextcloud Mode: HTTP (or HTTPS if you terminate SSL at the container) Server list: Name: nextcloud-docker Address: 192.168.100.19 Port: 11000 Health Check Method: HTTP-OPTIONS
```
### Important Backend Options:
- **Check "Use HTTP/1.1"**
- **Forward host headers (preserve client IP)**
- **Add header X-Forwarded-Proto: https**
---
## 5. Nextcloud Trusted Proxy Configuration
On the Nextcloud server, we modified the trusted proxies:
```
sudo docker exec -it nextcloud-aio-nextcloud bash cd /var/www/html/config nano config.php
```
Add or verify these lines inside `config.php`:
```
'trusted_proxies' => ['192.168.100.1'], 'overwritehost' => 'nextcloud.mydomain.com', 'overwriteprotocol' => 'https', 'overwrite.cli.url' => 'https://nextcloud.mydomain.com',
```
> *Note: Replace `192.168.100.1` with your pfSense LAN IP if different.*
---
## 6. Restart Docker Nextcloud Container
```
docker restart nextcloud-aio-nextcloud
```
---
## ✅ Summary
- pfSense HAProxy listens on WAN 443 (HTTPS)
- SSL terminated at pfSense, traffic forwarded to Docker Nextcloud Apache 11000
- Client IP preserved using X-Forwarded-For headers
- Nextcloud properly recognizes reverse proxy and HTTPS URL
---
## 🛠️ Additional Notes
- HAProxy + pfSense reduces public attack surface on your Docker server
- Remember to update SSL certificates if using Let's Encrypt (can be automated)
- Use Health Checks to monitor Nextcloud availability
- Backup your pfSense HAProxy config after working setup