Class Manager Features
Class Feed
Each class features a Class Feed which is a message forum for the teacher and students in the class. Administrators, Teachers, and students can post messages within the Class Feed in the Mosyle Class Manager for others to see. Only messages containing text can be sent.
Deleting Messages
Teachers can delete individual messages within the Class Feed as needed.
Enable or Disable Class Feed
Posting in the Class Feed can be enabled or disabled for student devices by the Mosyle Admin under My School > Preferences > Other Settings > General Preferences > Check or Uncheck "Allow students to post in the Class Feed". When this option is unchecked, students are unable to post in the Class Feed but can still view messages posted by Teachers or Administrators. The setting configured will apply to the entire account and all students/classes.
Starting a Class & Class Preferences
To access the features of Mosyle Class Manager, the teacher will need to first select the class. After selecting the class, the teacher can navigate between managing iOS/iPadOS devices or macOS devices using the dropdown menu at the top.
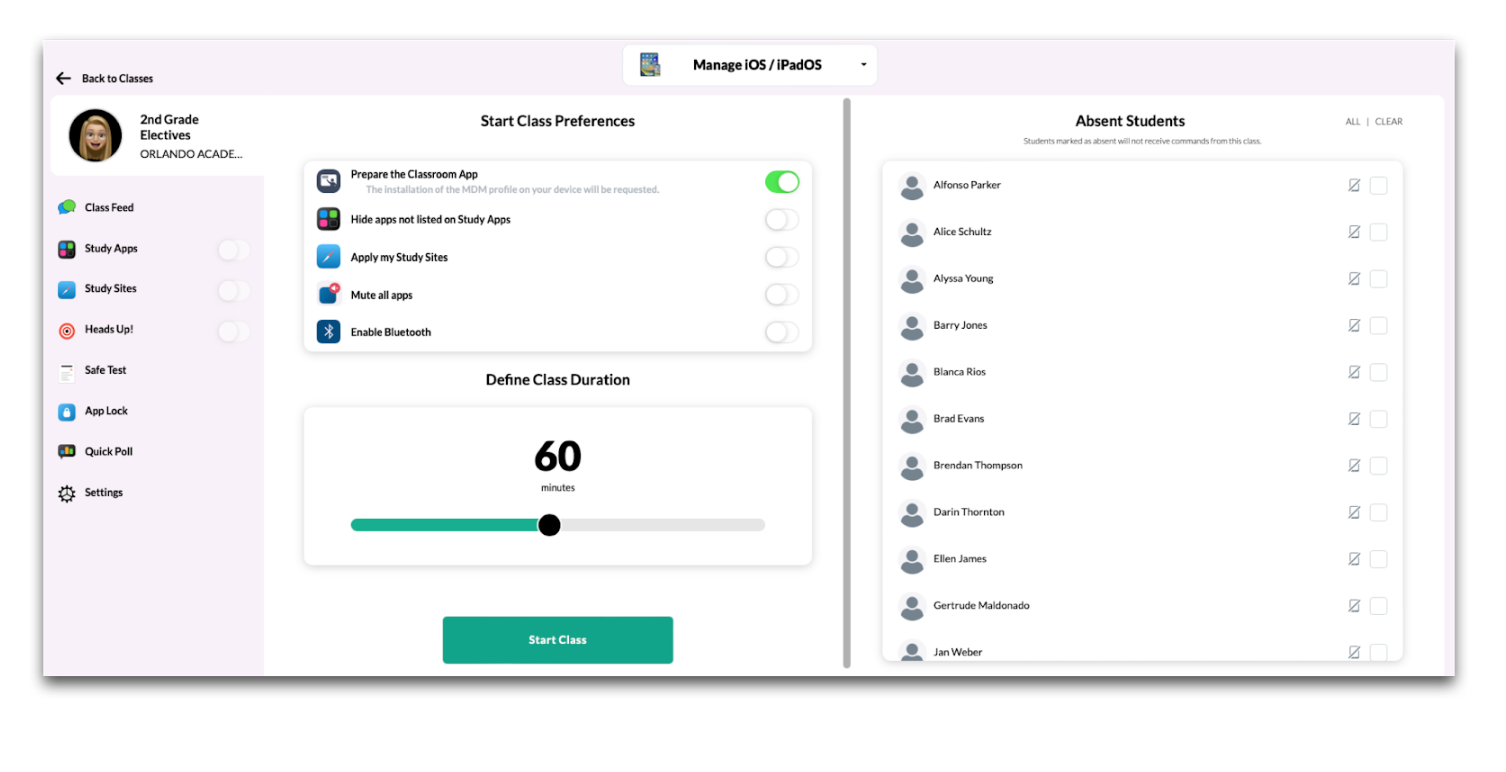
Students assigned to the class are listed on the right side. Any students that are absent should be selected so that commands initiated during the class session will not be sent to the student device. Since Class Manager commands are delivered over the network and do not require students to be within proximity of the teacher device, if a student is not present in class, their device will still be affected by commands if they are not marked "Absent".
The middle section allows teachers to define their Start Class Preferences, or preferences that will be applied immediately upon starting the class.
Prepare the Classroom App
Toggle on the option to ensure the Education Configuration profile is installed on all devices when starting the class. The Education Configuration profile is necessary to configure MDM-synced classes in Apple Classroom. If the Mosyle Administrator has configured settings to prevent the installation of the Education Configuration profile, it will not be installed, even if toggled on.
Administrators can configure the settings for the Education Configuration profile under:
- My School > Hierarchy > Locations > Check or uncheck the box for “Do not install the Education Profile for any students or teachers at this location. If the users belong to more than one location the education profile will not be installed for either location.”
- My School > Preferences > Other Settings > iOS/iPadOS and/or macOS > Check or uncheck the box for “Automatically install and update the Education Configuration profile for Apple Classroom app on all devices and allow teachers to use the Education Configuration profile during "Start Class" in Mosyle Class Manager.”
Hide apps not listed on Study Apps
Toggle on the option to immediately hide or block all applications installed on student devices that are not listed in the Study Apps list after clicking “Start Class”. On iOS and iPadOS devices, apps not selected in Study Apps will be hidden. On macOS devices, apps not selected in Study Apps will be unable to launch.
Apply my Study Sites
Toggle on the option to immediately block websites that are not specified in the Study Sites list after clicking “Start Class”. Study Sites utilizes a global proxy to only allow the sites listed. Since devices can only have one global proxy profile installed at a time, any other global proxy configured in the Web Filter management profile will be removed to install the configuration for Study Sites. When the class is over, the global proxy configured in the Web Filter management profile will be reinstalled.
If a specific global proxy is required on devices at all times, or if a DNS Proxy Extension is being utilized, its recommended Administrators remove the option for teachers to use Study Sites under My School > Preferences > Other Settings > iOS/iPadOS and macOS > Check the box "Do not allow teachers to use "Study Sites"" > Save.
Mute all apps (iOS & iPadOS only)
Toggle on the option to immediately mute application sounds after clicking "Start Class". This feature will also block app notifications.
Enable Bluetooth
Toggle on the option to immediately enable Bluetooth on devices after clicking "Start Class". On iOS and iPadOS devices, Bluetooth will be forced on and cannot be turned off. While enforced, students will be unable to pair new devices. On macOS devices, Bluetooth will be turned on.
Class Duration
Set the duration of the class to ensure student devices are automatically released from any restrictions at the end of class. Use the slider tool to set the duration of the class (in minutes). If necessary, the duration of the class can be increased by clicking “+10 min”, or the class can be ended before the expected time by clicking “End Class”.
Start Class
Click Start Class to apply any configured preferences. Students will be notified the class has begun. When the class has concluded, end the class by clicking "End Class" or use the toggle to turn the class "Off".
If starting a class where students are not assigned 1:1 to devices, teachers will be prompted to select a "Shared Device Group" to be used. Only Shared Device Groups in the same location as the teacher/class will be available. The location for the Shared Device Group can be modified under My School > Hierarchy > Shared Device Groups > Select the group > Edit.
After selecting the Shared Device Group, teachers can choose to automatically assign students to devices or allow students to self-assign by choosing their name/photo from the class roster data.
- Auto Assignment: Mosyle will randomly pair 1 student per 1 device enrolled in the selected Shared Device Group. Students will be able to identify which device they have been assigned to by viewing the lock screen where their name and photo (if uploaded) will be displayed. Teachers will be able to view which device each student is assigned within the Class Manager app as the device name will be displayed directly under each student's name.
- Roster: Mosyle will display all students' names and photos (if uploaded) on the lockscreen of each device enrolled in the Shared Device Group. From this view, each student can select their name or photo to login and complete the assignment of the shared devices.
Class View
Once a class is started, teachers can view information regarding student devices during the class. Options and features available per OS are listed below.
- Status
- Timeline (macOS)
- Live Screen (macOS)
- Screenshots (macOS)
- Absent
- Refresh Screen (iOS/iPadOS)
- Allow Camera & Block Camera (iOS/iPadOS)
iOS /iPadOS Class View
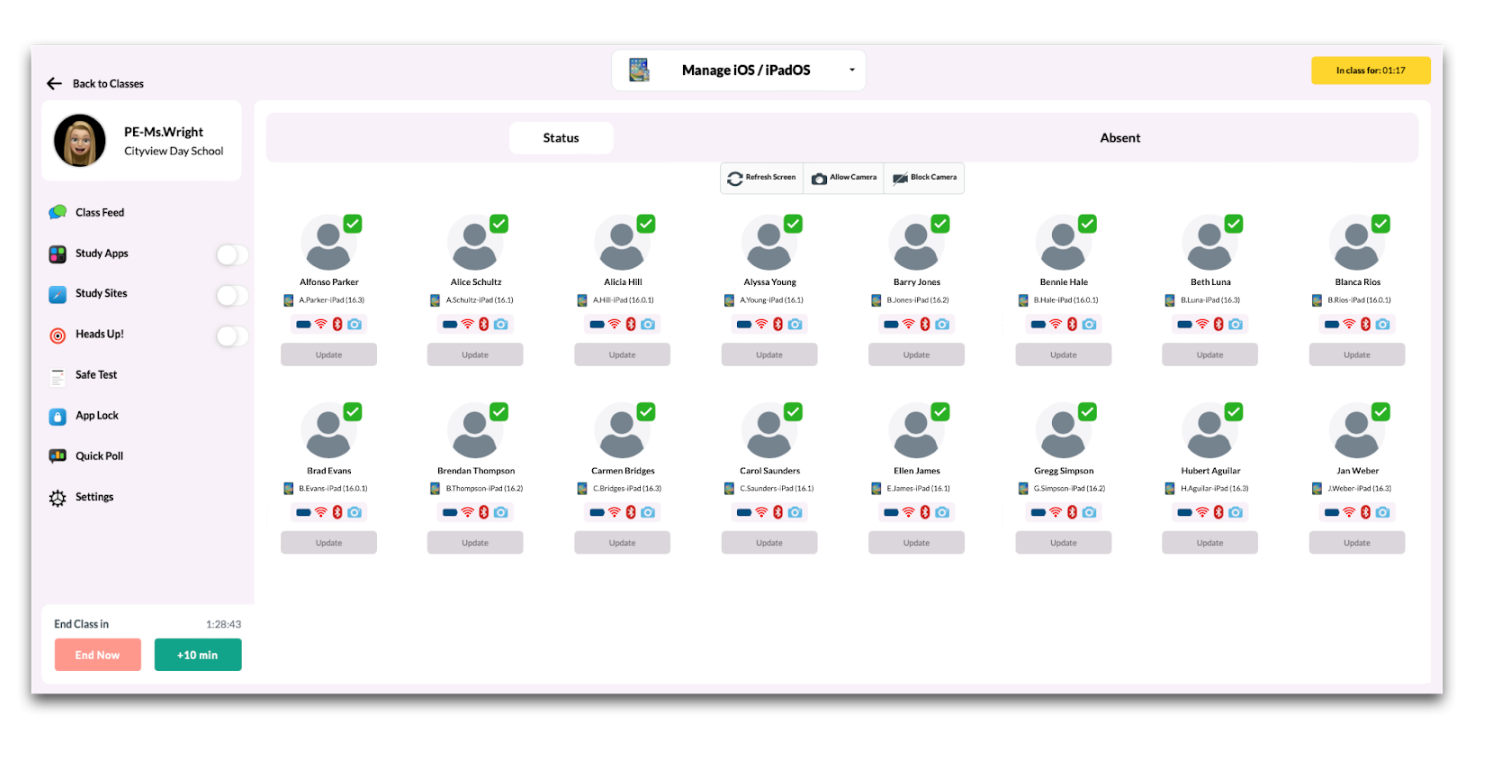
- Status
After the class is started, teachers will see a list of their students along with the name of the device assigned to the user. Additional information such as battery level, WiFi, Bluetooth status, and Camera access will be displayed. Teachers can click "Send Push" to call the device to the MDM to retrieve any pending commands. Click "Refresh Screen" to refresh the class roster view. - Absent
The Absent tab allows teachers to make any modifications to the list of students marked absent for class. This way if any students happen to be tardy, the teacher can remove them from the absent list so they are included in the class. - Allow Camera
Some Administrators apply a restriction to student devices which block the use of the Camera application. In this scenario, including the Camera app in Study Apps will not allow the use of the Camera app as the restrictions will take precedence. Teachers can temporarily allow the Camera to be used during class by clicking "Allow Camera" which will temporarily remove the Camera restriction. The restriction will be reapplied when the class ends or when teachers click "Block Camera". - Block Camera
Teachers can apply an additional restriction for the Camera application using the "Block Camera" option. This will prevent the use of the Camera in any/all applications on the device.
macOS Class View
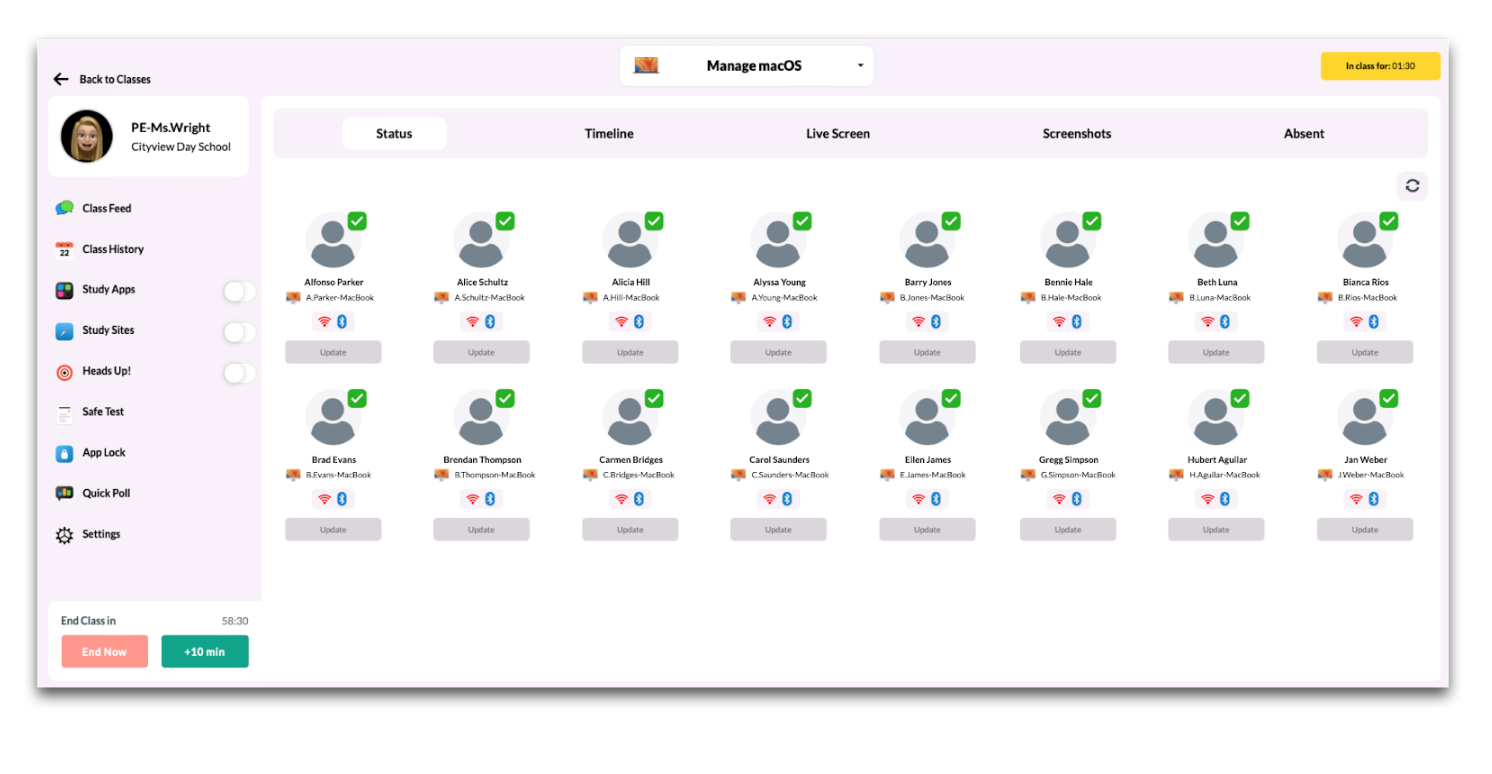
- Status
After the class has started, teachers will see a list of their students along with the name of the device assigned to the user. Additional information such as WiFi and Bluetooth status will be displayed, along with the option for the teacher to "Send Push" to call the device to the MDM to retrieve any pending commands. - Timeline (macOS only)
View a chronological timeline of student interactions with applications installed on the Mac. To the right of each student's name is a chart displaying the applications accessed during class and the duration each was open. Only the application that is present in the foreground on the Mac will be displayed. The Timeline is updated every 5 seconds.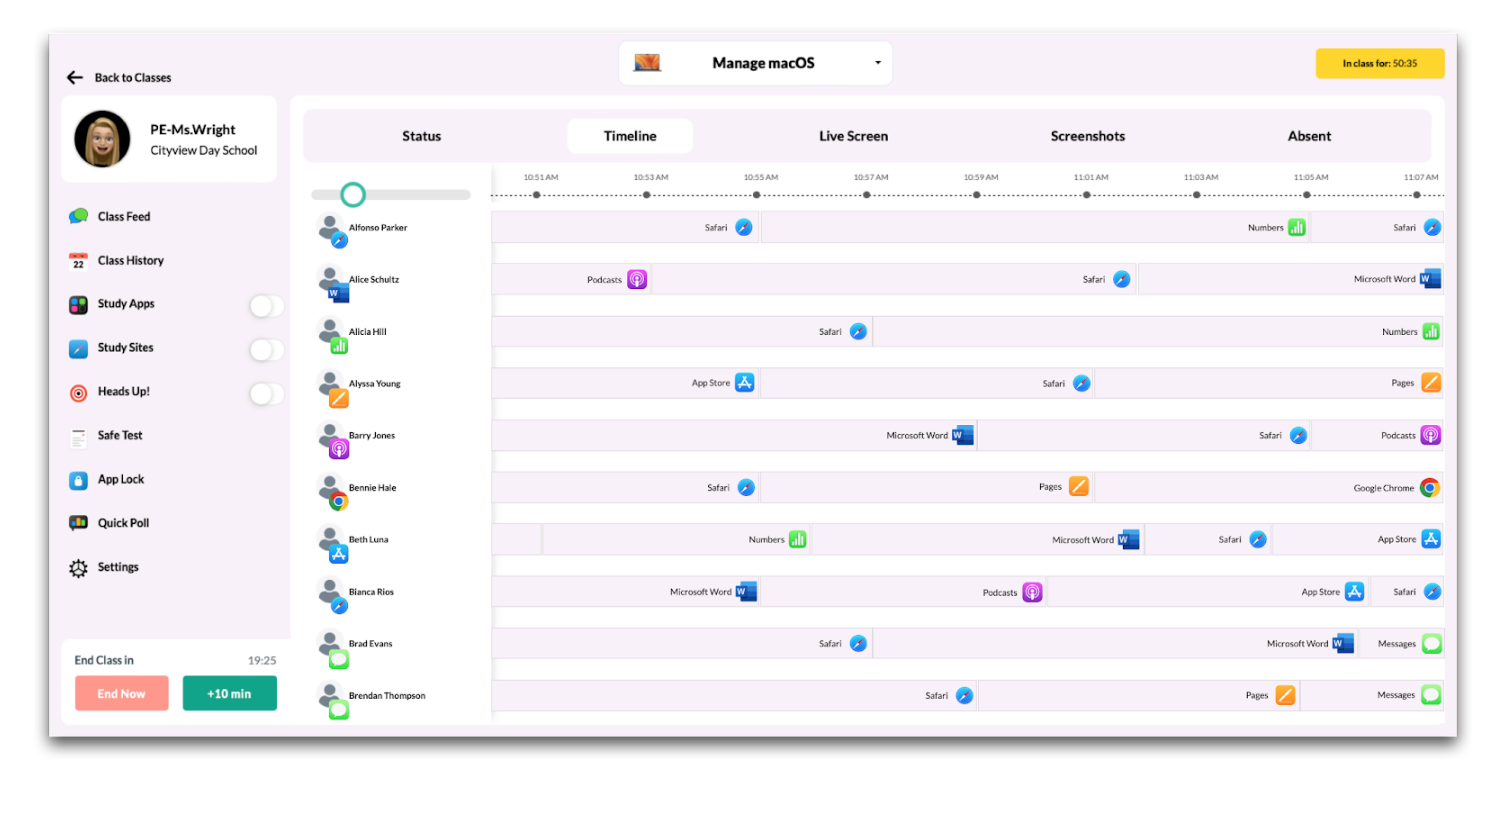
-
Live Screen (macOS only)
Teachers can view the screens of student devices in real time. Selecting this option will display the screens of all students at the same time. Live Screen requires student's grant Screen Capturing privacy permissions for the Mosyle Manager application.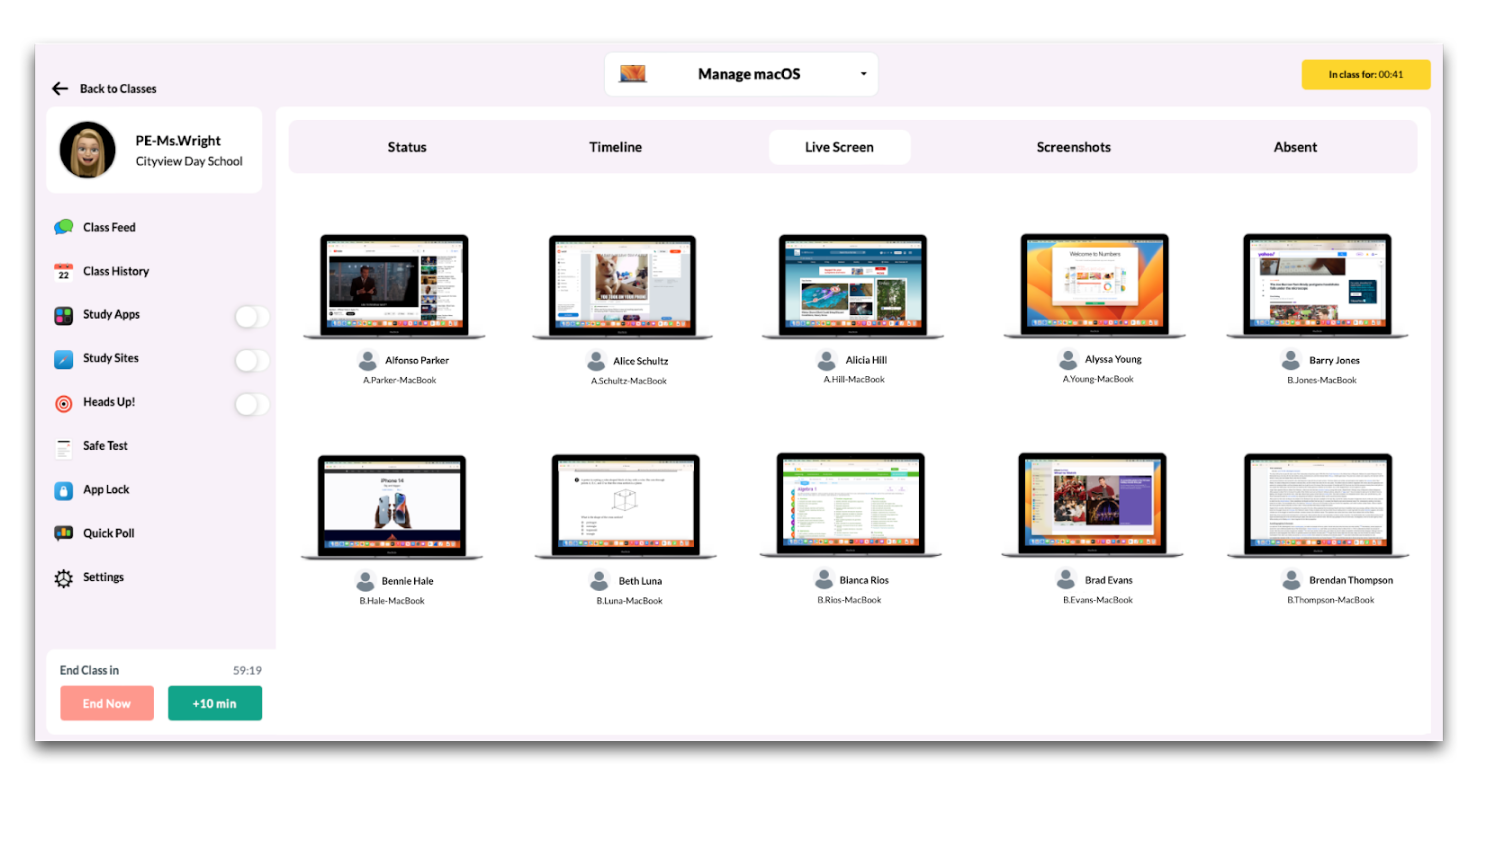 To view an individual student's screen, click the Mac icon. The student's screen will be displayed in an individual pop-up, from here teachers can take a screenshot of the screen or view it in full screen.
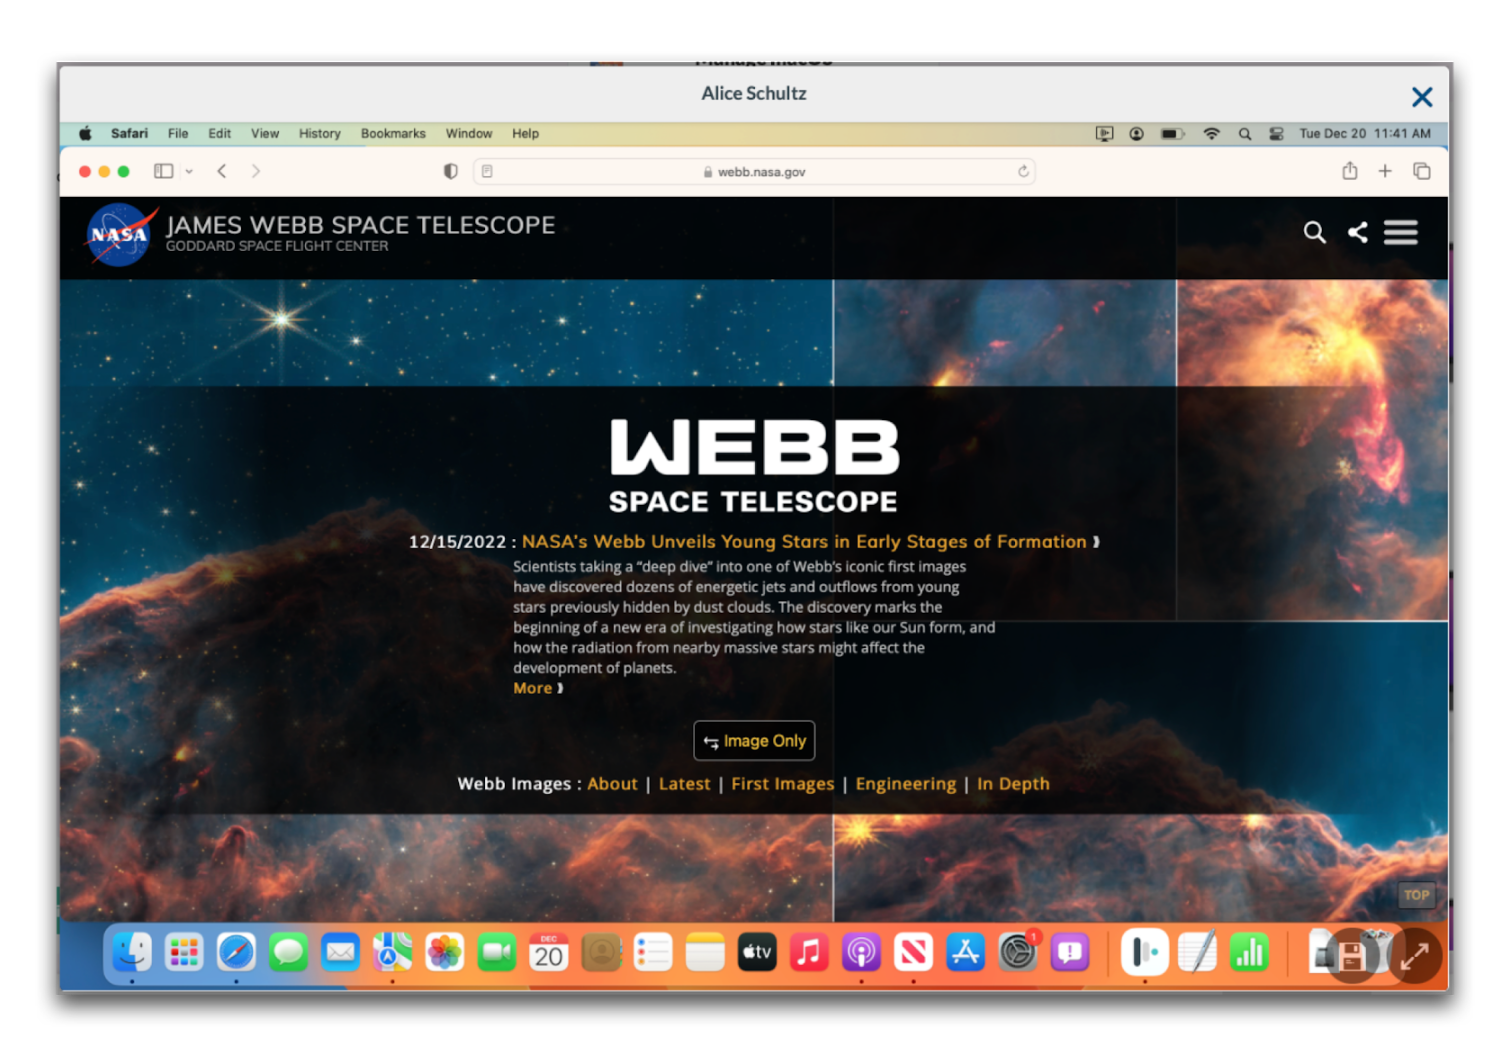
To take a screenshot or view in full screen:
- Click the Mac icon for the student device
- Click the Save icon at the bottom right of the screen or expand to see it in full screen
Any and all screenshots of student devices will be accessible to view in the Screenshots tab or in Class History.
- Screenshots (macOS only)
Screenshots of student screens while displayed through the Live Screen feature can be taken during class and viewed during the class session by clicking the Screenshots menu item. A history of all screenshots will be available by date under the Class History.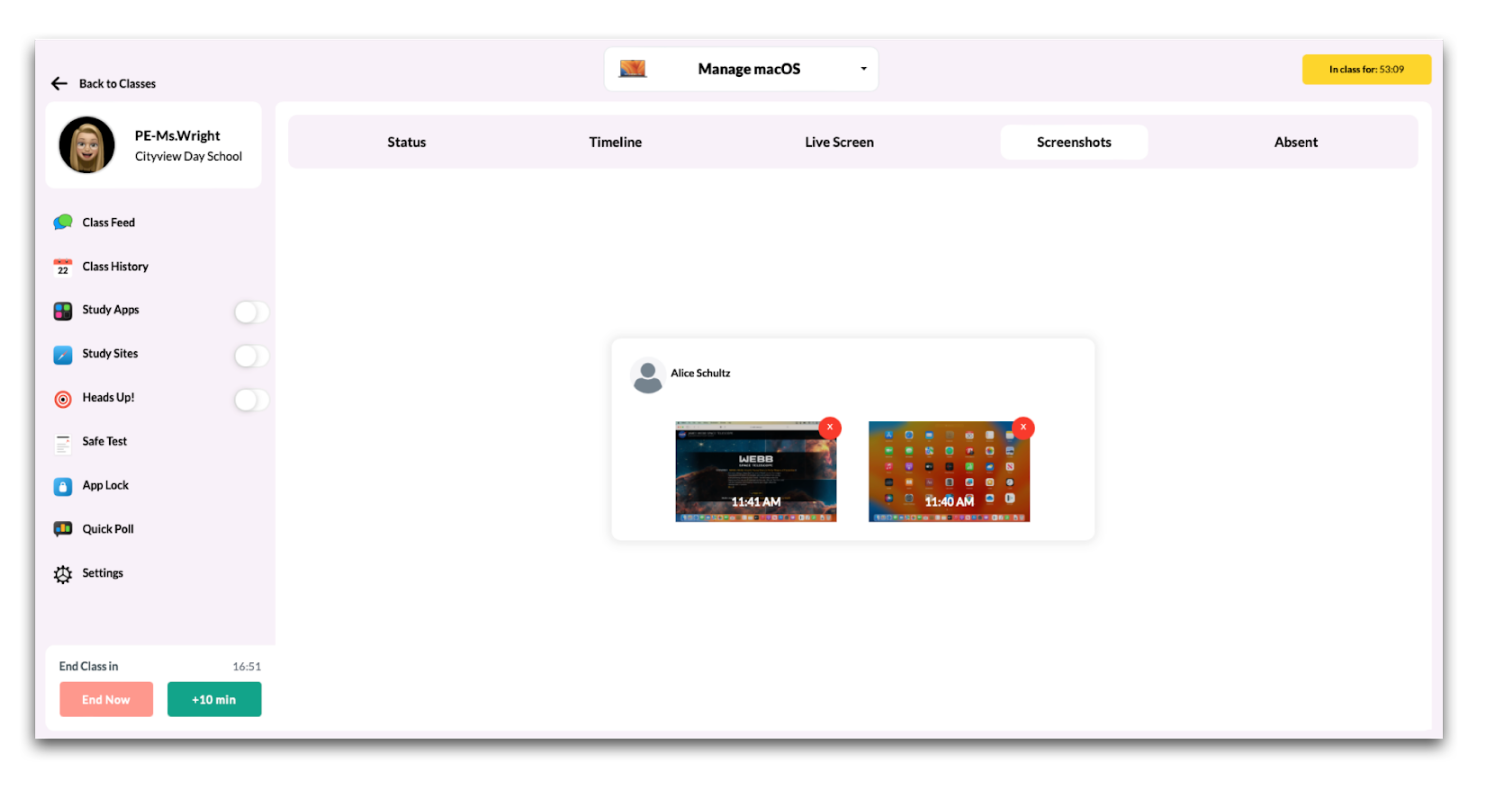
- Absent
The Absent tab allows teachers to make any modifications to the list of students marked absent for class. This way if any students happen to be tardy, the teacher can remove them from the absent list so they are included in the class.
Notes:
- Live Screen uses peer-to-peer communication and requires devices are on the same local network. Live Screen will not work if student devices are remote or on a different network than the teacher device.
- Communication is through the dynamic port range (~49k through 65k).
- For privacy purposes, the macOS will prompt students to allow screen capture permission for the Mosyle Manager app in order for teachers to view the screens. There is no way to bypass this prompt. Teachers can use the Apple Classroom application to view student screens without prompting for permission.
Study Apps
The Study Apps feature allows teachers to create a list of allowed apps for each class, allowing customization of app access based on the unique characteristics of each group of students. The Study Apps configuration will be applied to all students in the class.

When Study Apps is enabled, only the apps available in the list will be accessible. On iOS and iPadOS devices, apps not listed will be hidden. On macOS devices, apps not listed will not launch.
Notes:
- If a specific app is required on devices at all times, its recommended Administrators let teachers know to always include the app in their list of Study Apps. For example, an app used for a web filtering solution. If you need assistance, submit a Support Ticket and our team will be happy to help.
- Apps installed through Study Apps are not removed from devices when the class ends. To remove any apps installed through Study Apps, go to Management > Devices Overview > Select the devices > Remove all apps > Remove apps no longer assigned.
Access the Study Apps List
To access the list of Study apps, navigate to the Mosyle Class Manager > Select the class > Click Study Apps from the menu on the left side of the screen.
Add or Remove Apps in the Study Apps List
To add applications to the list of Study Apps, click the “Add application(s) to the list” button at the bottom of the screen. Teachers can search for applications available in the Apps and Books token, the App Store, or by searching a list of Native Apps. The availability of each list is dependent on the access permitted by the school's Mosyle Manager Admin, see additional information below.
After finding and selecting the application to add to the list of Study Apps, click the check mark in the upper right corner. Icons for any and all applications selected will be displayed in the list.
Turn on and Apply Study Apps
Once the list of Study Apps is created it can be turned on and applied to the student devices in the class. If there are no apps listed in Study Apps, all apps will be hidden on the devices with the exception of the Mosyle Manager and Settings app.
Apply the Study Apps list to classes after they have been started by toggling on the Study Apps option in the menu. Toggle off at any time to remove Study Apps.
Availability of Apps in Study Apps List
Administrators can configure the Mosyle account so that teachers are only able to select apps from the App Store, Apps and Books token, or both when creating a Study Apps list.
-
Access to Apps and Books token
Give teachers access to select apps from the Apps and Books token when creating a Study Apps list under Management > Applications > Apps and Books > Click Edit for the token > Check the box 'Allow teachers to use the licenses from this account to install applications from the "Study Apps" list when starting a class. All licenses will be assigned using the method "device based"'. The teacher will need to be associated with the same location(s) that is allowed access to the Apps and Books token to view and select apps.
By providing teachers with access to the Apps and Books token in Study Apps, by default, any apps that are selected in Study Apps that are not yet installed on student iOS and iPadOS devices will automatically be installed when the teacher turns on Study Apps.
-
Access to App Store apps
Give teachers access to select apps from the App Store when creating a Study Apps list under My School > Preferences > Other Settings > iOS/iPadOS > Check the box to "Allow teachers to search for Study Apps on the App Store" > Click Save.
Select whether or not the apps selected by teachers from the App Store will automatically be installed on iOS and iPadOS devices if not already installed when the teacher turns on Study Apps. Check the box "Install application(s) chosen in "Study Apps" automatically when selected from the App Store" to install apps selected. Uncheck the box to ensure the apps are not installed. When apps are installed from the App Store users will be prompted to enter their Apple ID and password.
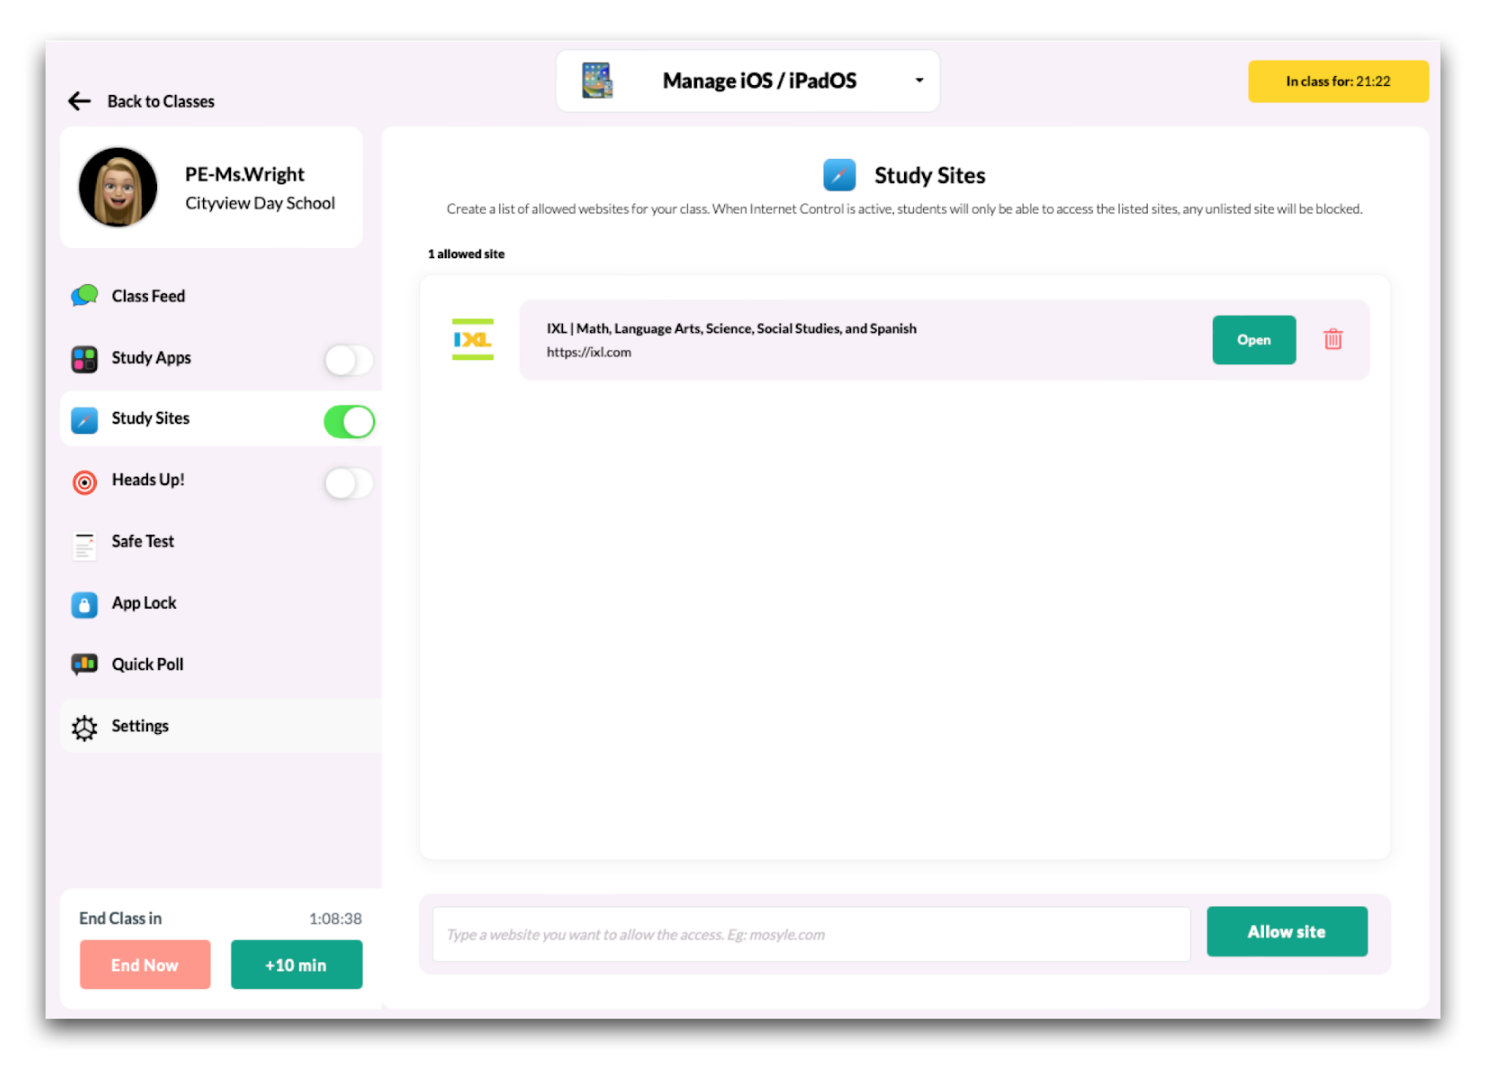
Study Sites
The Study Sites feature allows teachers to create a list of allowed websites for each class, allowing customization of website access based on the unique characteristics of each group of students. The Study Sites configuration will be applied to all students in the class.
When Study Sites is enabled, only the websites configured in the list will be accessible. Port 3180 is required for the use of Study Sites.
Notes:
- Study Sites utilizes a global proxy to only allow the sites listed. Since devices can only have one global proxy profile installed at a time, any other global proxy configured in the Web Filter management profile will be removed to install the configuration for Study Sites. When the class is over, the global proxy configured in the Web Filter management profile will be reinstalled.
- If a specific global proxy is required on devices at all times, or if a DNS Proxy Extension is being utilized, its recommended Administrators remove the option for teachers to use Study Sites under My School > Preferences > Other Settings > iOS/iPadOS and macOS > Check the box "Do not allow teachers to use "Study Sites"" > Save.
- The configuration of Study Sites can interrupt the use of apps if all domains and subdomains needed for the app are not listed and allowed in Study Sites.
- Mosyle, Google, and Apple domains will automatically be allowed to ensure proper communication between the MDM and devices.
Access the Study Sites List
To access the list of Study Sites, navigate to the Mosyle Class Manager > Select the class > Click Study Sites from the menu on the left side of the screen.
Add or Remove Apps in the Study Sites List
To create the list of Study Sites, select the class where the Study Sites will apply, then click Study Sites from the menu on the left side of the screen.
- To add websites to the list, type the website URL in the field at the bottom of the screen and click the “Allow domain” button. The domain will automatically be listed.
- To remove a domain, click the trashcan icon to the right of the domain to delete. Once all domains are added, they will be displayed as a list of all allowed websites.
Websites added to the list of Study Sites will be available to students in the Mosyle Manager app under “My Web Clips”. Clicking the link will navigate the students to the specified website.
Turn on and Apply Study Sites
Once the list of Study Sites is created it can be turned on and applied to the student devices in the class. If there are no websites listed in Study Sites, all websites will be blocked on the devices with the exception of Mosyle and Apple domains when Study Sites is turned on.
Apply the Study Sites list to classes after they have been started by toggling on the Study Sites option in the menu. Toggle off at any time to remove Study Sites.
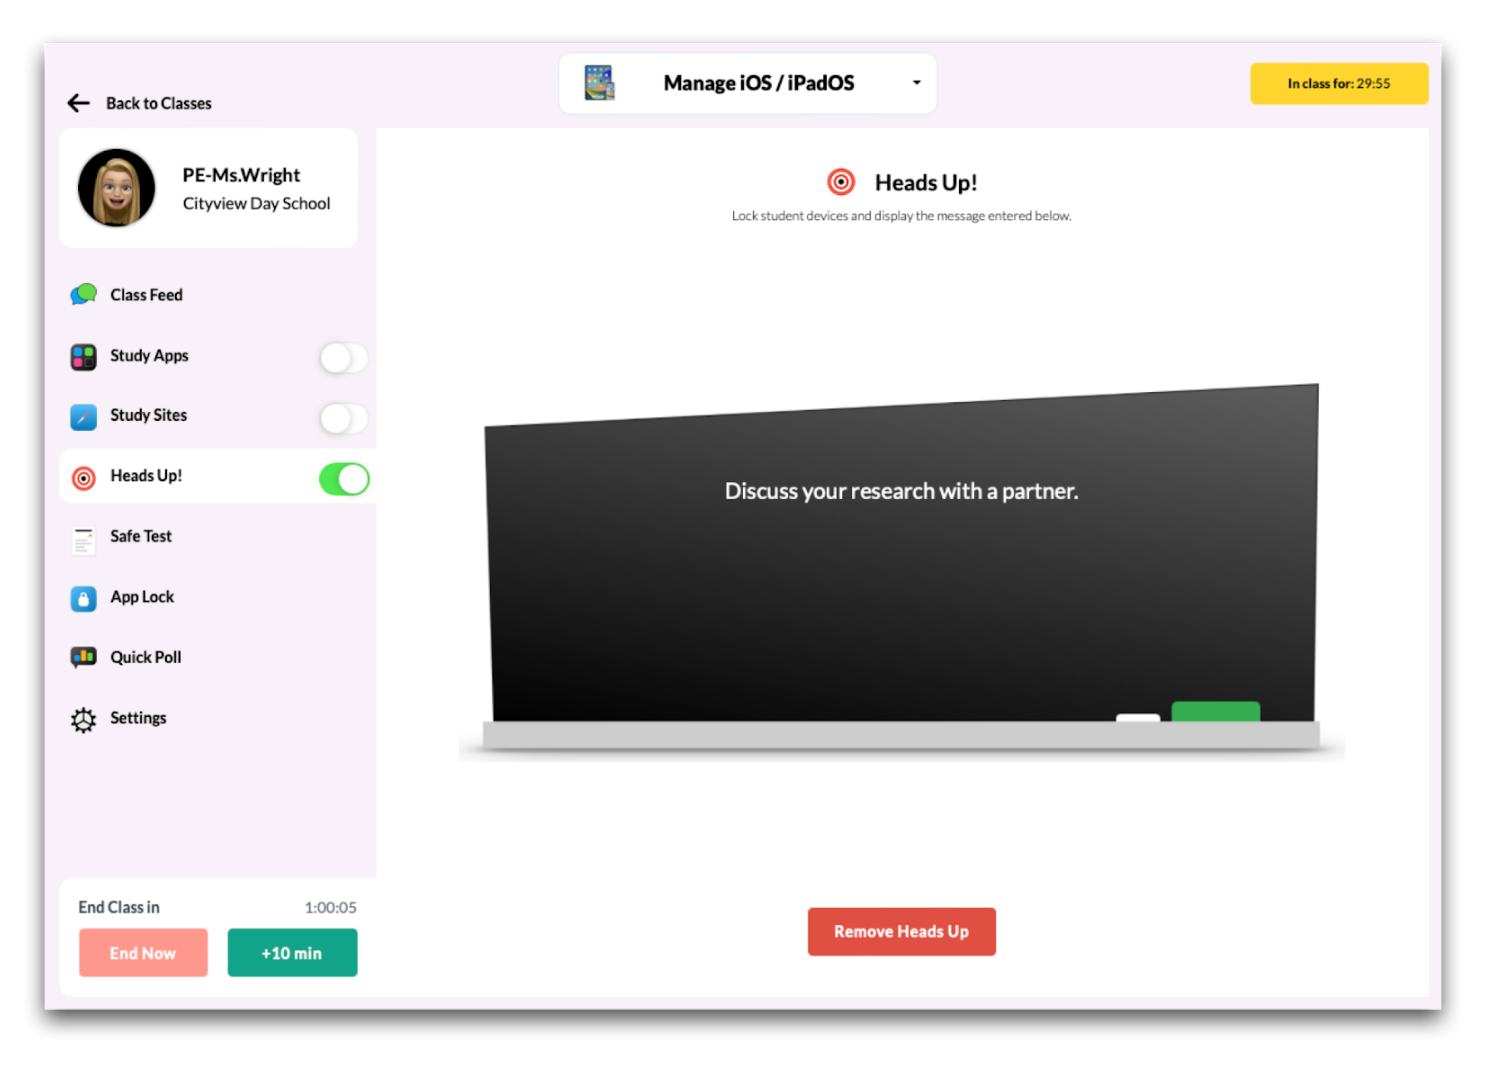
Heads Up
The Heads Up feature allows teachers to quickly disable/lock student devices to gain attention during a lesson or explanation. The Heads Up configuration will be applied to all students in the class when it is turned on.
Access Heads Up Configuration
To access the Heads Up configuration, navigate to the Mosyle Class Manager > Select the class > Click Heads Up! from the menu on the left side of the screen.
Customize the Heads Up Configuration
To customize the message in Heads Up, select the “Heads Up” option from the menu on the left. Next, click the text on the blackboard and type in the message to be displayed on student devices.
Turn on and Apply Heads Up
Heads Up can only be applied after a class has been started by toggling on Heads Up from the menu on the left side of the screen or by navigating to Heads Up and then clicking “Apply Heads Up”.
Heads Up can be turned off using one of the following methods:
- End the Class
- Use the toggle to turn the Heads Up feature “Off”
- Click “Remove Heads Up” button from the Heads Up screen
Safe Test
The Safe Test feature allows teachers to quickly lock student devices into a specific website, preventing students from navigating to other online resources or browsing the Internet. The Safe Test configuration will be applied to all students in the class when it is turned on.
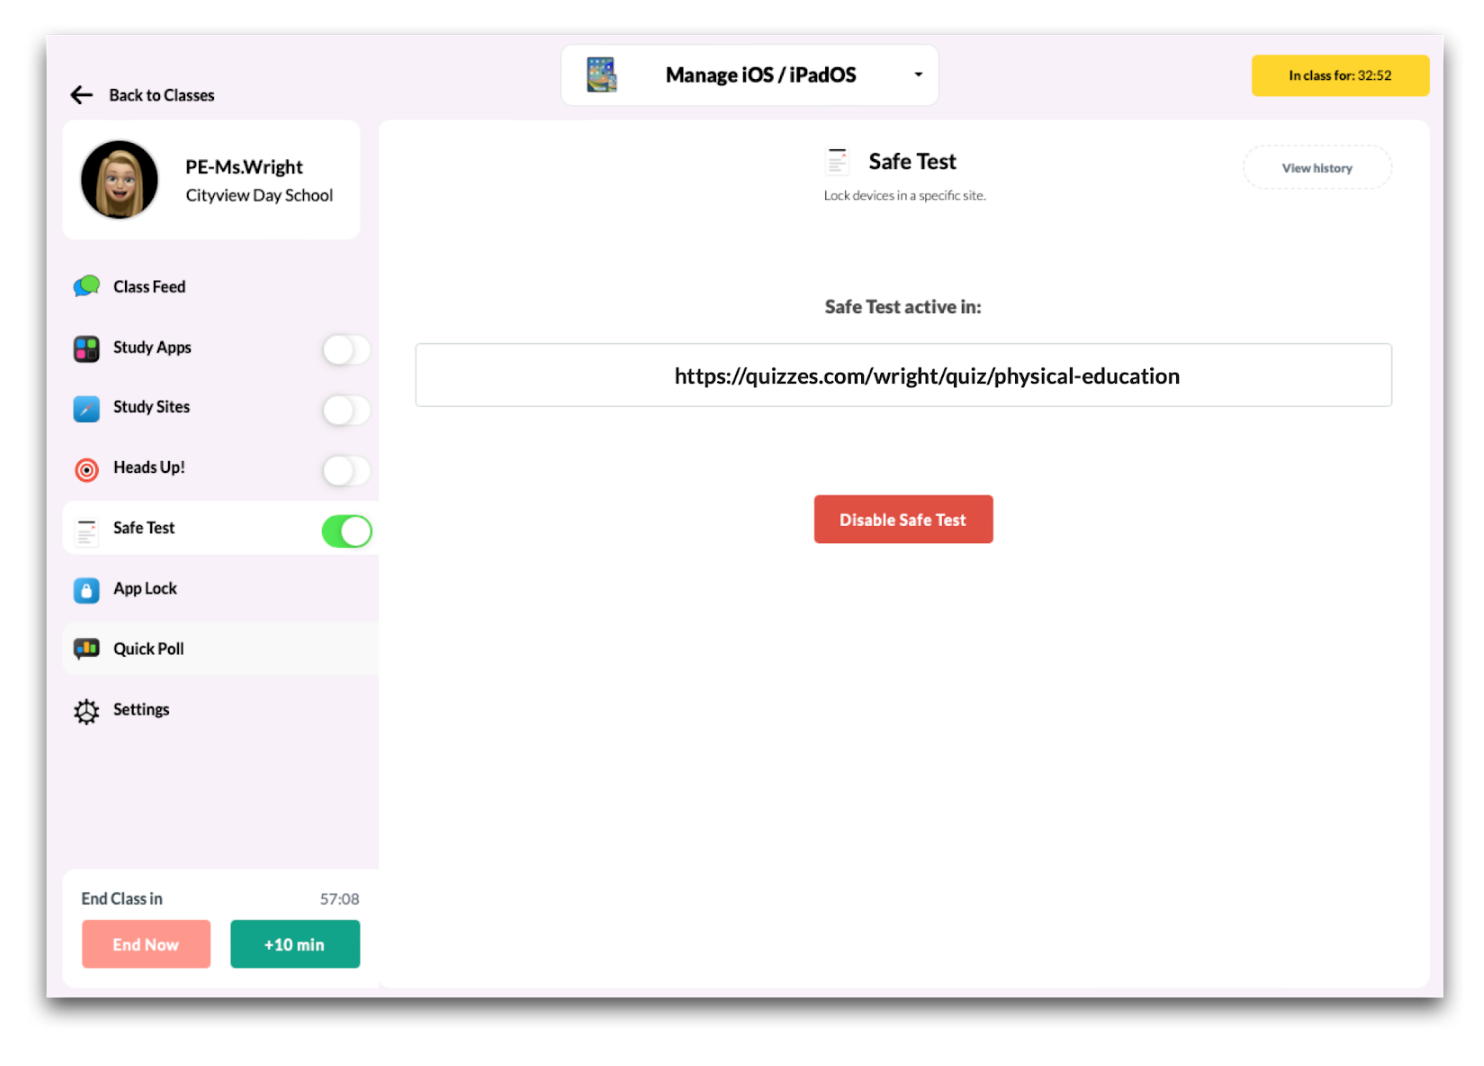
Access Safe Test Configuration
To access the Safe Test configuration, navigate to the Mosyle Class Manager > Select the class > Click Safe Test from the menu on the left side of the screen.
Update the Safe Test Configuration
To update the website in Safe Test, select the “Safe Test” option from the menu on the left. Next, click the field to enter the URL for the website that student devices will be locked into.
Turn on and Apply Safe Test
Safe Test can only be applied after a class has been started. Once the class has been started, click Safe Test from the menu on the left side of the screen. Enter the Locked URL or select the last locked URL and choose the duration for Safe Test. When finished, click Apply Safe Test.
Safe Test can be turned off using one of the following methods:
- End the Class
- Use the toggle to turn the Safe Test feature “Off”
- Click “Disable Safe Test” button from the Safe Test screen
View History
In addition to applying the Safe Test feature, you can view the history of websites entered in Safe Test as well as the date and time they were applied by clicking “View History”.
App Lock
The App Lock feature allows teachers to quickly lock student devices into a specific app, preventing students from navigating to other resources or applications. The App Lock configuration will be applied to all students in the class when it is turned on.
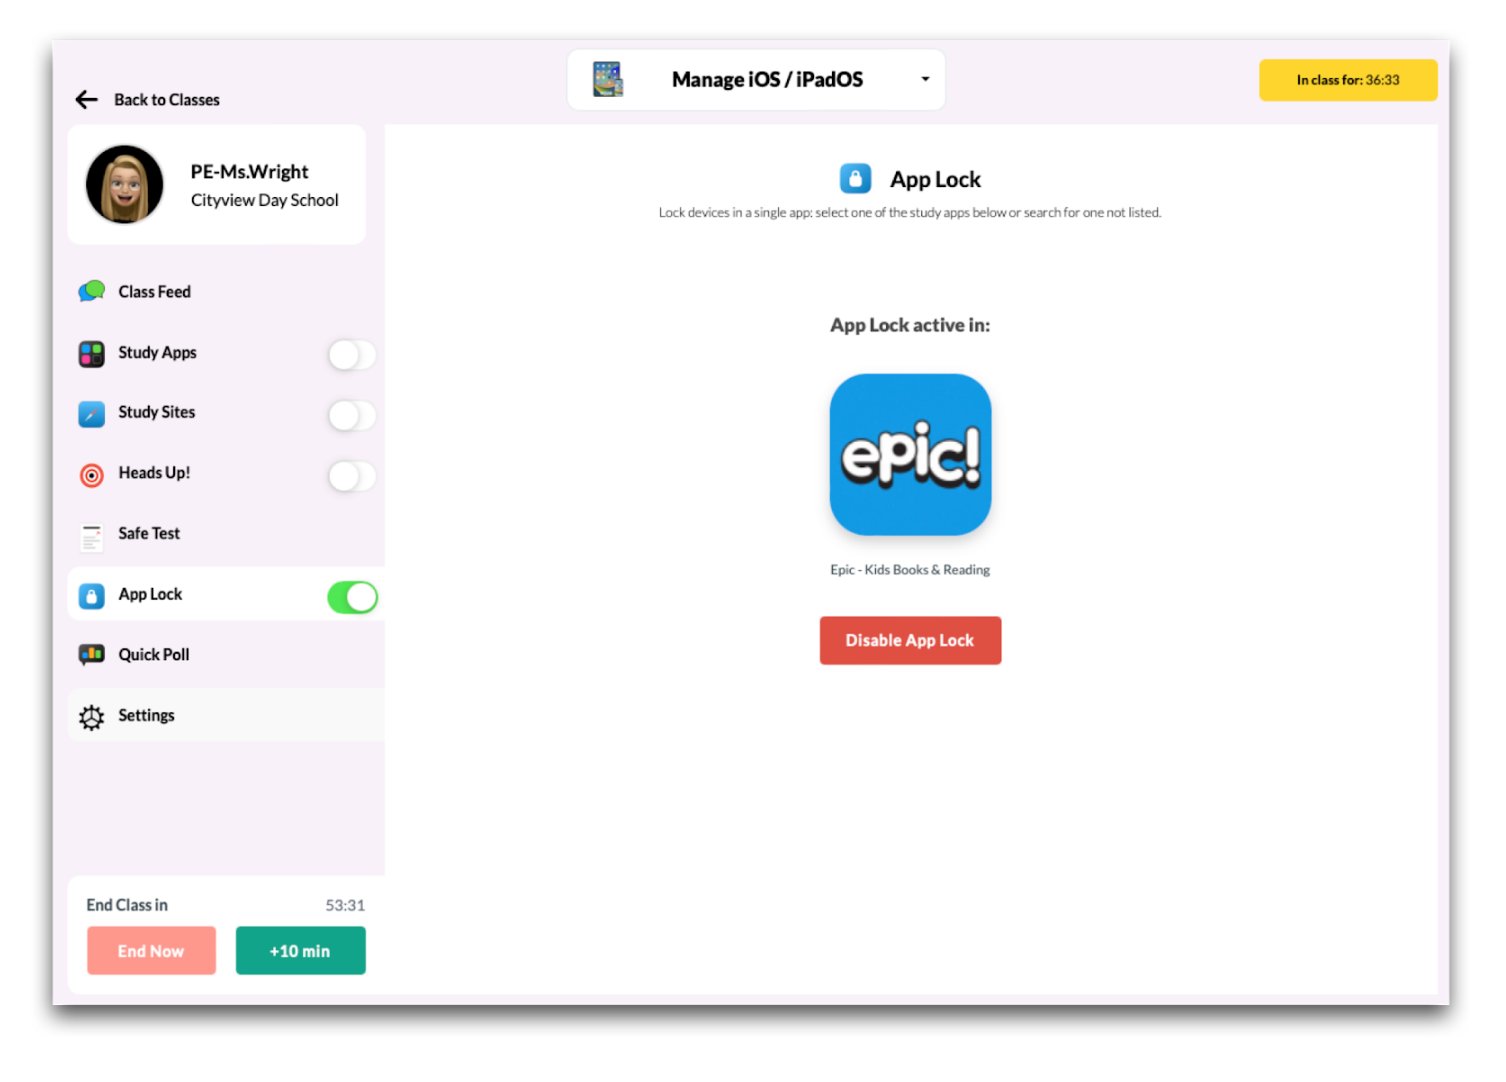
Access App Lock Configuration
To access the App Lock configuration, navigate to the Mosyle Class Manager > Select the class > Click App Lock from the menu on the left side of the screen.
Update the App Lock Configuration
To update the app selected in App Lock, select the “App Lock” option from the menu on the left. By default, all apps selected in Study Apps will be displayed in a list to provide the option for a quick selection. If the teacher would like to lock student devices into a different app, click Find App.
Turn on and Apply App Lock
App Lock can only be applied after a class has been started. Once the class has been started, click App Lock from the menu on the left side of the screen. Select the app and choose the duration for App Lock. When finished, click Apply App Lock.
App Lock can be turned off using one of the following methods:
- End the Class
- Use the toggle to turn the App Lock feature “Off”
- Click “Disable App Lock” button from the App Lock screen
Quick Poll
The Quick Poll feature allows teachers to quickly survey students to receive feedback and/or instantly view the level of student understanding. The Quick Poll configuration will be applied to all students in the class when it is turned on.
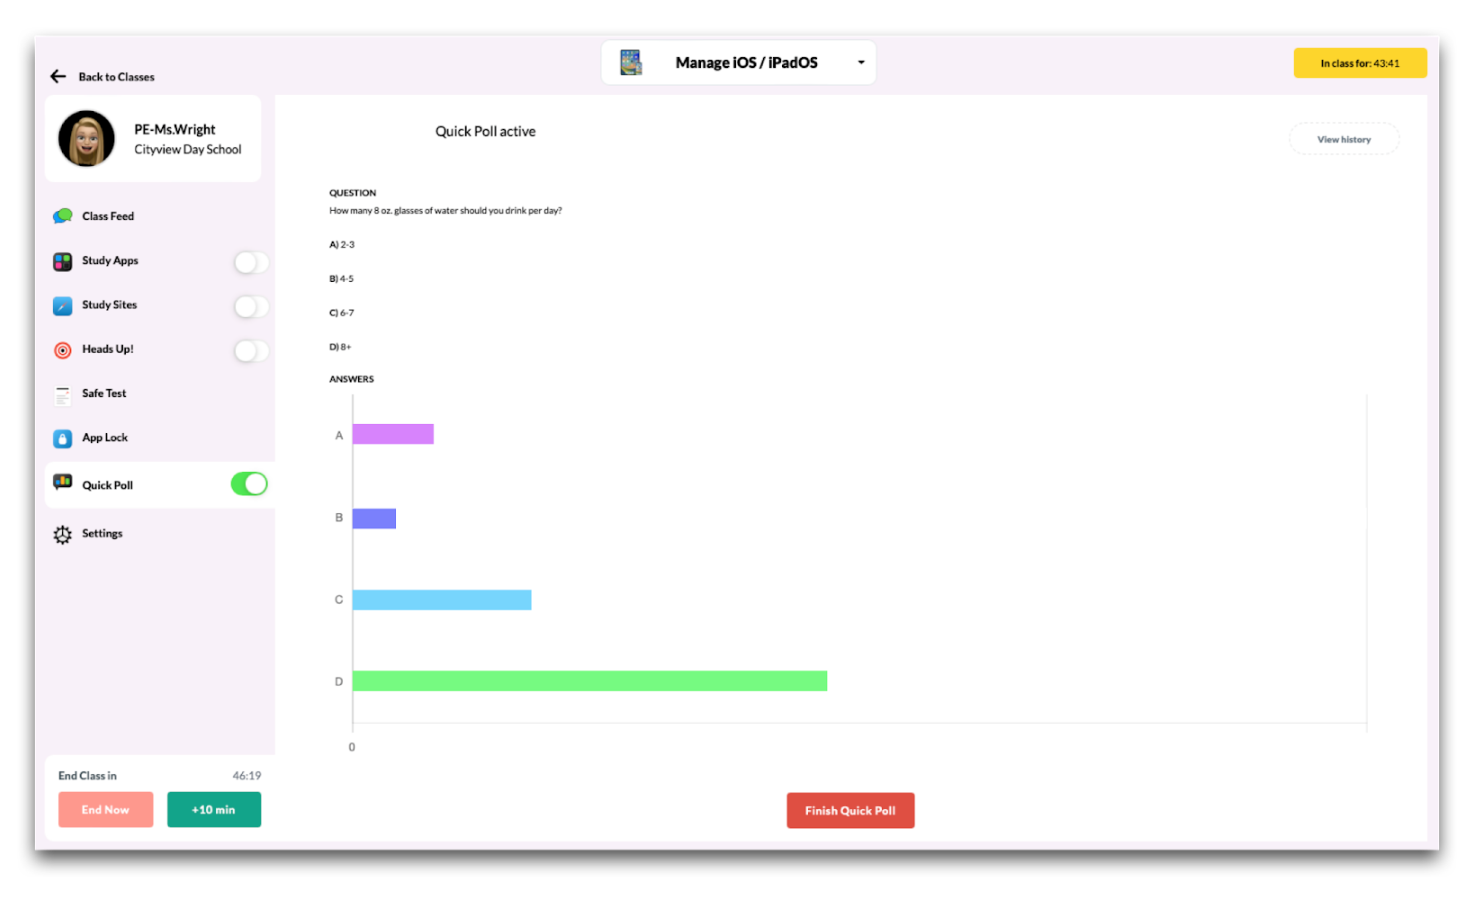
Access Quick Poll
To access Quick Poll, navigate to the Mosyle Class Manager > Select the class > Click Quick Poll from the menu on the left side of the screen.
Create a Quick Poll
To create a Quick Poll, select the “Quick Poll” option from the menu on the left. Enter the question that will be presented to students and choose whether the response should be a Short Answer or Multiple Choice. If Multiple Choice, enter the available options. If additional multiple choice options are needed, click the button “Add more options”.
Turn on and Apply Quick Poll
Quick Poll can only be applied after a class has been started. Once the class has been started, click Quick Poll from the menu on the left side of the screen. Enter the question, select the response type, and choose the duration for the Quick Poll. When finished, click Apply Quick Poll.
After the Quick Poll is applied, student devices will be locked into the Mosyle Manager application until they provide a response to the Quick Poll or until the class ends. Teachers will be directed to a screen that will show students responses in real-time.
Quick Poll can be turned off using one of the following methods:
- End the Class
- Use the toggle to turn the Quick Poll feature “Off”
- Click “Finish Quick Poll” button from the Quick Poll screen
View History
In addition to applying the Quick Poll feature, you can view the history of polls delivered, the date and time in which they were delivered, as well as student responses by clicking “View History”.
Class Manager Settings
Teachers can access Settings for each class by going to Class Manager > Select a class > Settings from the menu on the left. Some available options that can be configured include:
Class Nickname
Personalize the name of the class. The class will be displayed with the nickname in the Class Manager app and in the Apple Classroom app.
Request Apps
Mosyle Administrators can allow teachers to request applications to be deployed to their student devices under My School > Preferences > Other Settings > iOS/iPadOS > Check or Uncheck the box "Allow teachers to send app requests to administrators". When finished, click Save.
Teachers can request applications by going to Class Manager > Select the class > Click Request Apps from the menu on the left side of the Manage iOS/iPadOS screen. Search for apps from the App Store to add to the request. After selecting the apps to add, choose the class(es) the apps should be deployed. When finished, click Save.
Administrators will receive the request in the Alerts area of the Mosyle Web Panel. Configure to receive the Alert by email under Management > Alerts > Click Config for Alerts via email.