Users & Hierarchy
Users & Hierarchy
Purpose
As mentioned previously, importing users, grade levels, and/or classes allows for devices to be assigned to their corresponding users and for configurations and profiles to be customized based on the device user. While importing users, grade levels, and/or classes is not required, we've found it facilitates ease of device management for Administrators.
Use the Apple School Manager or Active Directory integrations to import user data into Mosyle. Additional options such as a Spreadsheet import or use of the Mosyle API integration are also available.
Once User data is imported into Mosyle, it can be found under My School > Users. Locations, Grade Levels, Courses, and Shared Device Groups can be found under My School > Hierarchy.
Resources
Recommended resources
- Access to a Mosyle Education account
- User account with Administrator or User privileges in Apple School Manager or Active Directory
Locations, Grade Levels, Courses, and Shared Device Groups
All management profiles are assigned based on the Hierarchy configured in Mosyle, starting with Locations. Using this Hierarchy, you can assign management profiles as broadly as you would like (ex: All current & future devices) or as granularly as you would like (ex: A specific student device from a specific location). Additionally, Mosyle Admin users can be created that only have access to specific locations; and, access to Apple School Manager, Apps and Books, and Active Directory integrations can be configured based on Locations to ensure devices, users, and content remains organized as needed.
Hierarchy
Locations can be created manually, imported using a spreadsheet, imported from Apple School Manager or Active Directory. Once Locations have been created, you will be able to assign access for integrations such as Apps and Books token and Apple School Manager based on the locations. You are also presented with the option to create Location assigned Administrators. Additionally, you'll be able to view any profiles assigned to each location as needed.
Grade Levels can be created manually, imported using a spreadsheet, or imported from Apple School Manager or Active Directory. After creating Grade Levels, you'll be able to view what grades are assigned to various locations within your account, the students assigned, and any grade level based profiles.
Courses and Classes can be created manually, imported using a spreadsheet, or imported from Apple School Manager or Active Directory. Assigning students to classes will allow teachers to take advantage of the Mosyle Class Manager, as well as automatically configure the teacher devices with admin-created classes for the Apple Classroom app.
Profile Assignment
Management profile assignment always begins with the Location, from here you can filter by grade levels, classes, shared carts/groups, and individual users. Assignments in Mosyle can be completed in the following way:
- All current and future devices - this will include all devices enrolled in the account regardless of the assignment and/or Location
- All current and future devices from Specific Locations - this will include all devices enrolled in the account that are assigned to a User or Shared Cart/Group associated with the selected Devices in Limbo can belong to all Locations depending on your configured Preferences.
-
Specific Users or Devices - with this option you'll start by selecting the Locations to filter the assignment. Once the Locations are selected, you can choose from the following assignment options.
- Users: All Current & Future Students/Teachers/Staff/Admin; Specific Class Periods; Specific Grade Levels; Specific Users
- Shared Devices: All Current & Future Shared Devices; Specific Carts/Groups; Specific devices
- Limbo Devices: All Current & Future Limbo Devices; Specific devices
- Dynamic Device Groups
- Security Groups: automatic groups created from Device Scout and Detection & Removal
Academic Year
The Academic Year tool was designed to help Administrators clean and update data imported from Apple School Manager or Active Directory for the new school year. Using the Academic Year tool, student data will be updated to reflect new grade levels and courses/classes while automatically updating all Management profiles assigned and installed.
To access and update data for the new school year, follow the steps below:
- Make sure all data (including courses/classes) is updated in ASM and/or AD
- Go to My School > Hierarchy
- Click Academic Year
- Click Start and choose the integration
- Follow the onscreen prompts
- Once the data is synced, a preview of any/all changes will be displayed
- If all looks ok, click Start Integration
The Academic Year area also provides tools to clean up data in your Mosyle account, including:
- Export current hierarchy
- Delete grade levels without students assigned
- Delete class periods without students assigned
- Delete courses without class periods
- Delete students without grade levels and class periods assigned
- Delete teachers without class periods
User Types & Permissions
There are multiple types of users available in Mosyle Education and can be viewed and accessed under My School > Users:
- Students: this user will not have access to manage any devices and/or users
- Teachers: this user will only have access to manage the student devices within their assigned classes
- Staff: this user will not have access to manage any devices and/or users
- Location Leader: this user will have access to users and devices associated with the individual location(s) they are assigned and will only be able to view profiles that are assigned only to users/devices associated with their location. To allow Location Leaders to view profiles assigned to other devices/users, you can check the box for “Allow Location Leaders to view this profile”. Note: they will only be able to view and not edit the configuration.
- Primary Leader or Leader: this user will have full access within their Mosyle Education instance, to manage all devices enrolled and all users registered within the account
Students and Staff can be imported using one of the methods mentioned earlier and do not have access to the Mosyle MDM web panel. Teachers can also be imported using the methods mentioned, but will have access to only the Class Manager portion of the Mosyle MDM web panel. For security purposes, Location Leaders and Leaders are required to be manually created.
When creating Leaders, you can choose the type of Leader account to be created, either a Location Leader or Leader. Location Leaders will only be able to manage the users and device groups that are assigned to their location and will have limited visibility to the rest of the school or district users and devices.
Under the Advanced Options area, additional settings can be configured for the Leader user accounts:
- Remove all restrictive profiles when the user logs in: This will trigger the removal of restrictive profiles, such as Restrictions or Allowed/Blocked app profiles, on any device the Leader user logs in to the Mosyle Manager application. Doing this will allow the Administrator full access to the device to troubleshoot in any way necessary.
-
Limit User Permissions: Create roles with specified permissions to limit the Leader's access to certain areas of the Mosyle MDM. When selecting permissions for the roles, choose from: View, Create, Update, and Delete permissions.
- View: Leaders with “View” permissions can only see the profile or area within the platform and cannot make any changes, updates, or delete. This includes sending any commands to devices via the Devices Overview area or Device Information.
- Create: Leaders with “Create” permissions can see already created profiles and areas within the platform, as well as create new profiles/users/groups if needed. Users with this permission cannot edit/update or delete any already created profiles/users/groups.
- Update: Leaders with “Update” permissions can see already created profiles and areas within the platform, as well as update existing profiles/users/groups if needed. Users with this permission will be able to send any/all commands via the Devices Overview and Device Info area.
- Delete: Leaders with “Delete” permissions can see already created profiles and areas within the platform, as well as delete any existing profiles/users/groups if needed.
User Roles and Permissions can be updated at any time as needed by clicking a specific Administrator > Advanced Options > Click “Select” under Limit User Permissions > Edit for the role to be edited. Choose and update the permissions and click Save. Save the Administrator. Once saved, the permissions will be updated for any other Administrators/Leaders with that same role.
User Security Settings
Administrator users can login to Mosyle MDM via the Mosyle web panel and teachers can login to the Mosyle Class Manager at https://myschool.mosyle.com. By default, each session is limited to 15 minutes unless selecting the “Keep me logged in” option. If the “Keep me logged in” option is not checked when accessing the account, users will be logged out after 15 minutes. When clicking the “Keep me logged in” option, the session duration will depend on what is configured in the Admin Authentication Policies under My School > Preferences > Other Settings > Admin Authentication Policy.
By default, students and staff are not required to have a password and will be automatically logged in to the Mosyle Manager application when the device is assigned. If the school or district would like to enforce students and staff to have a password when logging into the Mosyle Manager application, use the Single Sign-On configuration for the iOS/iPadOS and/or macOS application under My School > Preferences > Single Sign-On.
Admin Authentication Policy
Access to the Mosyle MDM web panel should be handled with caution, and access should be provided on a need-only basis. In addition to providing access to only those who absolutely need access, Authentication policies can be configured to ensure extra security of the account.
To configure these policies, go to My School > Preferences > Other Settings > Admin Authentication Policy.
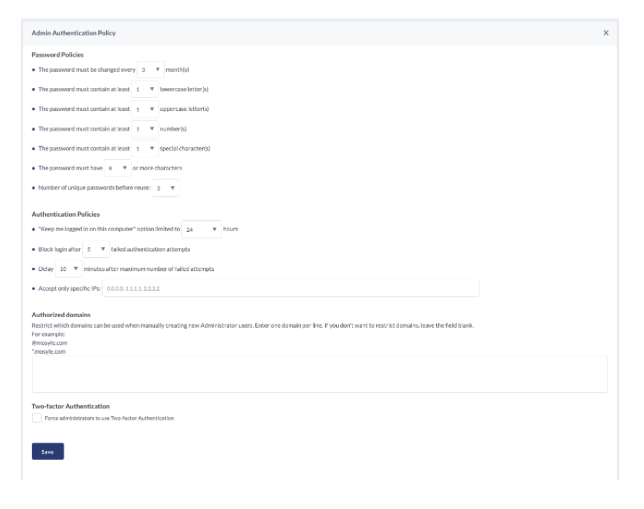
Password Policies
The password policies allow you to configure specifications on how the password should be handled when logging into the Mosyle web panel with an Administrator account. Options include how frequently the password should be changed, character requirements, and how many unique passwords must exist before one can be reused.
If Single Sign-On is configured to authenticate with the Identity Provider credentials when logging into the web panel, the Password Policies configured will be ignored as it is expected the Identity Provider configurations to supersede the configurations in Mosyle.
Authentication Policies
The authentication policies allow you to configure specifications regarding account and authentication access. Options include configuring the maximum session time, how many authentication attempts are allowed before login is blocked, time delay before a user can attempt to login again after so many failed attempts, and allow access from only specific IPs.
Within this area restrictions can be applied so that Administrator accounts can only be created for users with emails of a specific domain, and two factor authentication can be enforced for all Administrator accounts.
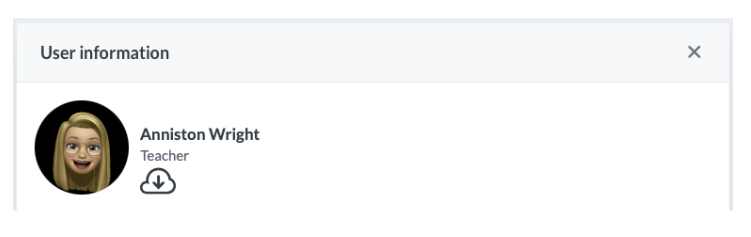
User Photos
If desired, user photos can be uploaded to the Mosyle MDM or students can be permitted to add their own photos. These photos will show within the Mosyle Manager application and in the Admin web panel.
To upload User Photos or configure it so students can add their own photos, go to My School > Users > Users Photos.
Device Assignment & User Authentication
Purpose
When enrolling devices into Mosyle Education, there are three models of assignment to choose from:
- Limbo: When enrolling a device into a Limbo state, the device is neither assigned to a User or a Shared Device Group. This allows for the device to potentially belong to all locations or no locations for purposes of receiving more generalized Management Profiles.
- 1:1: This option indicates the device will be enrolled and assigned to an individual end-user.
- Shared: When enrolling devices as Shared devices, they can be grouped together in Shared Device Groups. This is an easy way to organize a static group of devices. For iOS/iPadOS devices that will be designated as Shared, they can be either Mosyle Shared or Apple Shared iPad devices.
In order to scope configurations and profiles based on users or device groups, the Users and/or Shared Device Groups will need to be registered in Mosyle and devices will need to be assigned to their corresponding user or group. Device Assignment can be accomplished in multiple different ways using Mosyle MDM.
The ideal workflow when using Mosyle MDM is to automate the device assignment as much as possible to promote a hands-off deployment.
When a device isn't assigned to a specific user or shared device group, it is displayed as a “Limbo” device in Mosyle. Limbo devices can be configured by assigning configurations and profiles to all current and future devices and/or Limbo devices, rather than the user or shared device group.
Notes:
- Apple TVs are always enrolled as Limbo devices. For these devices, profiles and configurations will need to be assigned based on the device or dynamic device group.
- Devices enrolled using User Enrollment will be automatically assigned to the user based on the Managed Apple ID used to complete the enrollment.
Assigning Devices to Users
Configure Device Assignment Settings by going to My School > Users > Device Assignment. Here you can choose from the following:
- User Authentication Assignment: Configure device assignment behavior based on user authentication. Detailed information is included below.
- Random Automatic Assignment: Randomly pair an unassigned device with a selected user.
- Spreadsheet Assignment: Upload a spreadsheet with the device serial number and corresponding User ID to complete device assignment.
Devices can also be assigned to users manually at any time within the Mosyle MDM web console by viewing the Device Information or User Information.
-
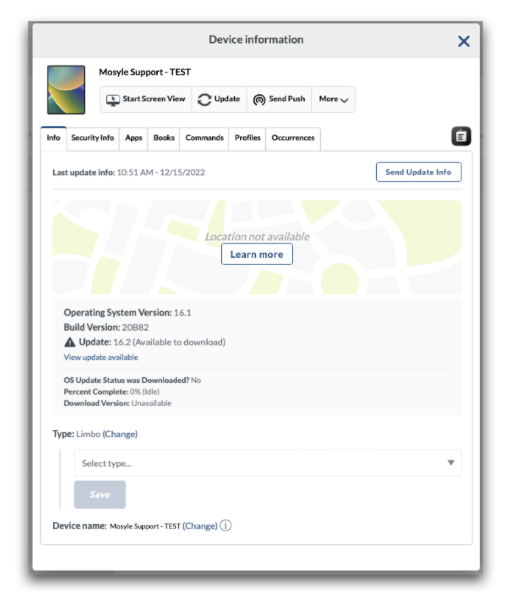
Device Info: When assigning a single device to a user, you can use the Device Info screen to complete the assignment. To do this, go to Management > Devices > Devices Overview > Click the device name to open the Device Info window. Next to Type, click Change and choose either 'Change to 1:1 (assign to student)', 'Change to 1:1 (assign to user)', or 'Change to shared' and select the user or Shared Device Group to assign the device.
-
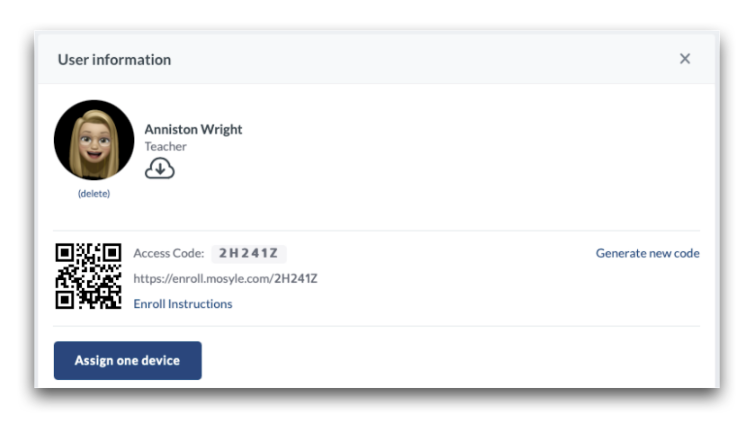
User Profile: When assigning a single device to a user, you can use the User Profile screen to complete the assignment. To do this, go to My School > Users > Find and select the user > Click Assign one Device > Select the device.
User Authentication Assignment
By default, when a user authenticates on a device, the device will be assigned to the user and remove the assignment of any other device of the same OS from the user. Administrators can modify or adjust this behavior within the User Authentication Assignment settings under My School > Users > Device Assignment.
The User Authentication Assignment settings offers three main options:
- Only auto-assign devices not already assigned to a user: This option will ensure that a user is assigned to the device in Mosyle when authenticating via the specified method ONLY if the device was not already assigned to a user. If the device was already assigned and another user logs in, the device will remain assigned to the original user.
- Auto-assign the device to the user: This option will ensure that a user is assigned to the device in Mosyle when authenticating via the specified method. Devices that are already assigned will change assignment when the new user authenticates and devices not already assigned will be assigned. When this option is configured, the assignment can be removed when a user logs out of the application.
- Do NOT auto-assign the device to the user: This option will prevent users from being assigned to a device when authenticating via the specified method.
Devices assigned to Shared Device Groups will never automatically be converted to 1:1 devices. When a user authenticates on a Shared Device, it will remain shared but will reflect the current user logged in so that any/all profiles assigned to the user can be applied.
Assignment Methods
Methods for assigning devices to end users via authentication include the following:
- Personalized enrollment URL: When devices are enrolled manually using the Safari URL, users can use their own personalized enrollment URL to complete the enrollment and assignment of the device. Find the user's enrollment URL under My School > Users > Click the User to view the enrollment URL.
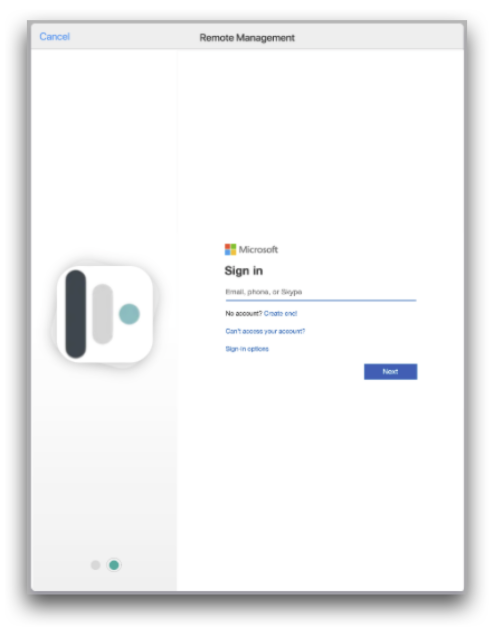
- Mosyle app login: Users can login to the Mosyle Manager app with their Mosyle access code, User ID, email address, or Single Sign-On credentials to complete the device assignment. To allow users to login to the Mosyle Manager app with their Single Sign-On credentials, configure Single Sign-On for the iOS/iPadOS and macOS apps under My School > Preferences > Single Sign-On./li>
- SSO Authentication during Automated Device Enrollment: Users can authenticate with their Single Sign-On credentials within the Custom Setup Assistant to complete the device assignment.
- Mac user account login: Users can login to their local user account on the Mac to complete device assignment if the local user account name is the same as their User ID in Mosyle.
- Mosyle Auth: Users can login to the Mac using their SSO credentials via Mosyle Auth to complete the device assignment.
In most cases, user authentication with their school or district Single Sign-On credentials is the preferred method due to the user familiarity with the credentials and ability to automate the assignment flow. Three frequently used methods for assigning devices to users are described below.
Completing Device Assignment during Automated Device Enrollment (iOS/iPadOS & macOS)
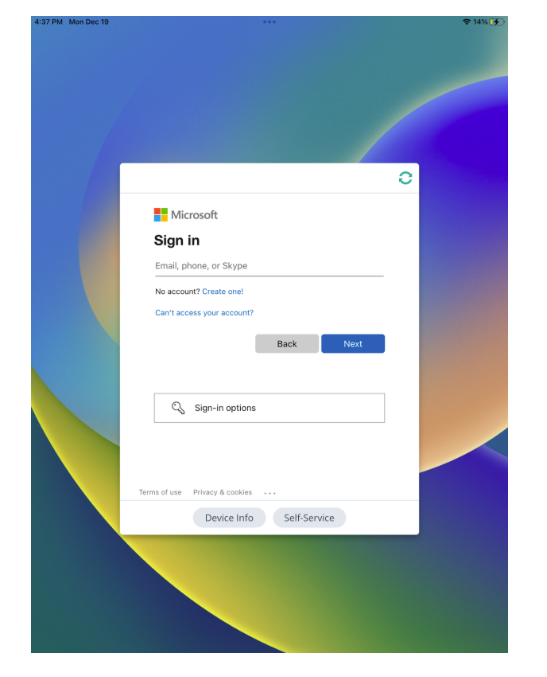
The Custom Setup Assistant is available within the Automated Device Enrollment profile which allows Administrators to prompt users during the enrollment to authenticate with either their Mosyle access code or their Single Sign-On credentials (Google, Azure, AD FS, or Active Directory). My School > Apple Basic Setup > Enrollment > Automated Device Enrollment > Customize Setup Assistant > Mosyle User Authentication or Single Sign-On Authentication. This option is available for both iOS/iPadOS and macOS devices allowing the enrollment flow to be consistent across all devices.
Configuring this option, users will be prompted to authenticate during the Automated Device Enrollment which will complete the device assignment. In order to complete the device assignment, the users must be imported and registered in Mosyle with the email address used to authenticate. This method of authentication and device assignment brings multiple benefits:
- Enrollment security considering only users within the Mosyle account will be able to successfully authenticate;
- Ability to rename devices during enrollment based on user information;
- Ability to pre-assign profiles and configurations to specific users, grade levels, or courses/classes which will be installed immediately upon enrollment;
- Ability to pre-fill local user account information on the Mac;
- Hands-off approach to device enrollment and assignment.
Completing Device Assignment using the Mosyle Manager app (iOS/iPadOS & macOS)
If the enrollment will be completed by the IT department, or use of the Custom Setup Assistant is not possible within the school or district, user authentication through the Mosyle application can complete the device assignment. With this method, the device will be enrolled and remain in limbo until a user logs in to the Mosyle Manager app to complete the device assignment.
By default, the Mosyle Manager application accepts login using the user's Mosyle access code, User ID, or email address. Admin users and Teachers will be required to enter their Mosyle password. Students and Staff users aren't required to have a password unless Single Sign-On authentication is configured.
Administrators can configure the Mosyle Manager application to accept login using Single Sign-On credentials such as Google, Azure, AD FS, or Active Directory by configuring the Single Sign-On profile under My School > Preferences > Single Sign-On > Login on Mosyle iOS app and/or Login on Mosyle macOS app.
Completing Device Assignment during macOS login
On Mac computers, device assignment can be completed based on the user logging in on the device.
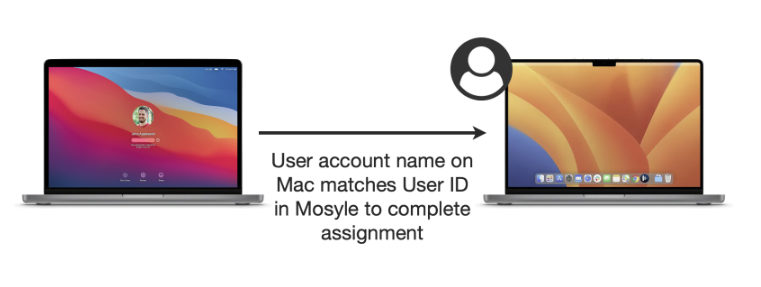
Mac user account login
When users login on the Mac, so long as the account name matches the User ID in Mosyle the device will be assigned to the user upon logging in on the Mac.
This assignment option can be used for devices that have been enrolled via Automated Device Enrollment or manually. When enrolled via Automated Device Enrollment, the user can be prompted to create the local user account with their User ID during the Setup Assistant and upon logging in, the device will be assigned to the user. If using the Terminal command to enroll via Automated Device Enrollment or manually enrolling a device, when logging in with an account on the Mac be sure the account name matches a User ID in Mosyle to complete the device assignment.
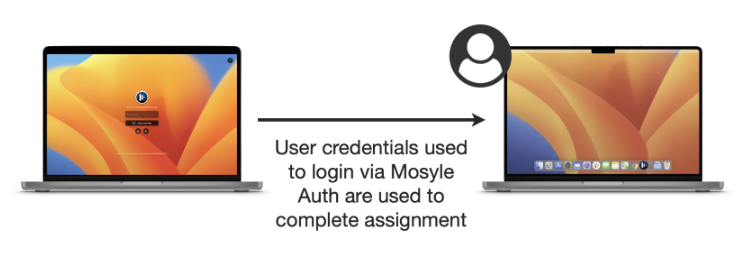
Mosyle Auth
Users logging into the Mac using Mosyle Auth will automatically complete the device assignment (depending on Device Assignment settings). This assignment option is useful for devices enrolled via Automated Device Enrollment where the local user account creation during the Setup Assistant is skipped. This way, the device will go through the enrollment and launch the Mosyle Auth login window. Upon logging in, the device will be assigned to the user.
Multiple Device Assignment
The default device assignment behavior in Mosyle follows a 1-to-1 model, therefore if the user logs in and/or is assigned to another device, they will be unassigned from the first device. However, we understand in some scenarios users may have more than 1 device assigned. Using the options and workflows listed below will ensure a previously assigned device will not be unassigned when the user authenticates on another device to complete the assignment.
The workflow used to assign multiple devices will depend on the planned deployment flow. A maximum of 10 devices per OS platform can be assigned to each user, in other words, up to 10 iOS/iPadOS and 10 macOS devices can be assigned to each user.
-
Automated Device Enrollment
If devices are enrolled using Automated Device Enrollment and users are authenticating during enrollment to complete the device assignment, multiple devices can be assigned upon enrollment by configuring the account Settings under My School > Preferences > Other Settings > General Preferences > Check the box 'Allow for multiple device assignment on enroll'.
-
Device Info and/or User Profile
Multiple devices can be assigned to a user through the Device Info screen by going to Management > Devices Overview > Click a device in Limbo to bring up the Device Info window > Next to 'Type', click Change and select 'Change to 1:1' and select the user to assign the device. If the user already has a device assigned, check the box: 'A 1:1 device is already assigned to this user. Check this box to keep the already assigned device and also assign the additional device you selected. The previous device WILL NOT be moved to Limbo.'
Assigning multiple devices to a user can also be completed directly in the User Profile by going to My School > Users > Find and select the user > Click Assign device to this user > Select the device.
-
API Integration
The 'assign_device' operation via the API can be used to assign multiple devices to users. If a device is already assigned to the user, the device assigned using the API will be in addition to the current device. Go to My School > Integrations > Mosyle API Integration for more information and documentation.
Assigning Devices to Shared Device Groups
If you need to create a group where devices will be entering or leaving the group based on some specific criteria, it's recommended to use Dynamic Device Groups found under the Management tab.
Assigning devices to a Shared Device Group can be completed using a few different methods in Mosyle. The method used will depend on the planned deployment flow. Methods for assigning devices to Shared Device Groups are similar to those used for 1:1 devices and are listed below.
Completing Assignment during Automated Device Enrollment
If you are enrolling devices using Automated Device Enrollment, you can complete the assignment during the enrollment using:
Completing Assignment using the Mosyle Manager app
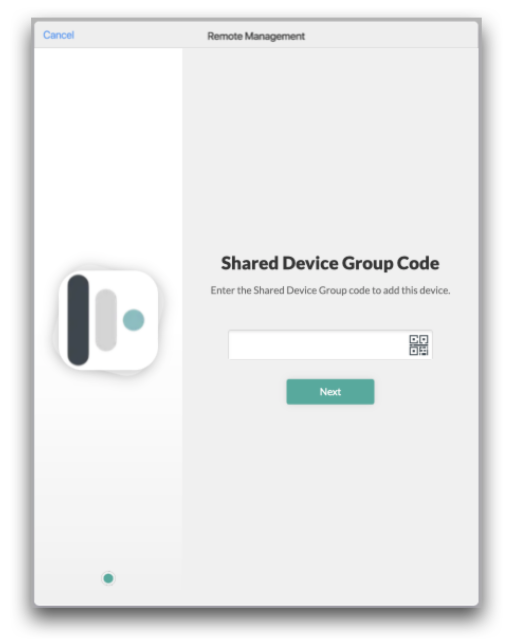
End-users can complete the device assignment by entering the Shared Device Group access code or scanning the QR code in the Mosyle application. In this scenario, devices will first be enrolled into Limbo. Once enrolled, users will launch the Mosyle app and scan the QR code, or enter the 6 digit access code for the Shared Device Group to complete the assignment.
Completing Assignment in the Mosyle Web Console
Mosyle Administrator users can complete the device assignment by logging into the Mosyle console and using:
- Spreadsheet: When assigning devices in bulk to the Shared Device Groups, you can use the Spreadsheet option. Go to Spreadsheet > Download the XLSX template for Shared Device Groups. Fill out the template with the shared group info and enter the serial numbers in the last column, comma-separated. When finished, upload the spreadsheet to complete the assignment.
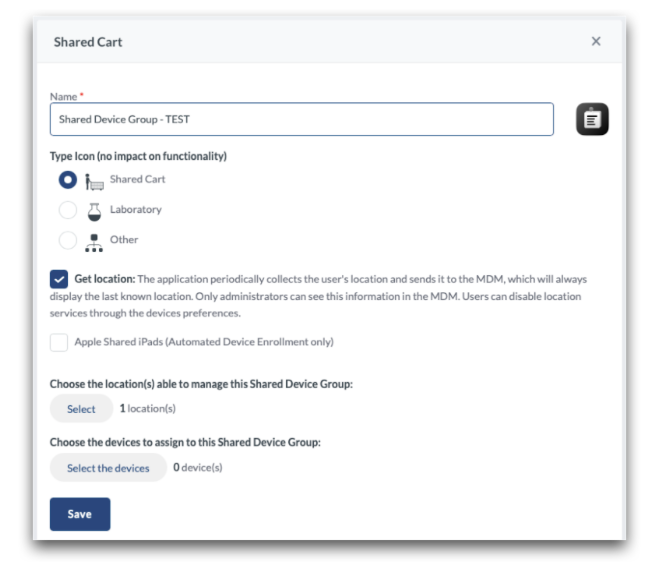
- Shared Device Groups: To assign devices to the group, go to My School > Hierarchy > Shared Device Groups > Click the Group > Edit > Select the devices to be added to the shared group.
Devices in Limbo
Devices in Limbo are devices that are not assigned to a User or a Shared Device Group. Devices in Limbo can be associated with all locations in the account, or specified to belong to only one location.
To configure Limbo devices to be assigned to all locations, go to My School > Preferences > Other Settings > General Preferences > Check the box "Limbo devices belong to all locations". Click Save.
To configure Limbo devices to be assigned to a specific location, you can specify the location in the Automated Device Enrollment profile, or modify the locations by going to Management > Devices Overview > Bulk by Import > Download the template for Update Location. Fill out the template and upload.
Devices can be changed to Limbo devices using the following methods:
- Deleting the user or Shared Device Group the device is assigned to;
- Management > Devices Overview > Select the devices > More dropdown: Change to Limbo;
- Management > Devices Overview > Device Info > Type: Change to limbo
Once a device is in Limbo, it can be assigned to any user or Shared Device Group as needed.