Mosyle OneK12 features
Mosyle Auth 2
Overview
Mosyle Auth 2 for macOS allows end users to login to the Mac with their organization credentials. Configure Mosyle Auth 2 so that users login on the Mac with their Google Workspace, Microsoft Azure AD, Active Directory (LDAP or AD FS), or On-Premise Active Directory credentials, and keep the passwords synced between the Mac local user account and SSO.
Users must exist in Mosyle in order to login on the Mac via Mosyle Auth. When using Google or Microsoft Azure AD, the user's email address registered in Mosyle must match the email address registered in the Identity Service. When using Active Directory (LDAP, AD FS, or OnPrem), the user ID registered in Mosyle must match the authentication query used when authenticating with LDAP/ADFS.
If enrolling devices via Automated Device Enrollment, configure the Automated Device Enrollment profile with the following settings: check the box to 'Allow Bootstrap Token (macOS 10.15+)', uncheck the box to 'Prompt user to create an account' so the local user account creation during the Setup Assistant will be skipped, and check the box to 'Create additional local admin during Setup Assistant'.
It's recommended to not configure some Passcode Policies settings through the MDM when using Mosyle Auth 2 as it could cause some unexpected side effects. Anywhere possible, the passcode requirements should be handled through the Identity Service rather than through the MDM policies. The following settings are recommended to be set as 'Do not configure this option' in the Passcode Policy profile:
- Allow simple value, Require alphanumeric value, Force Password Reset (10.13+)
- Minimum passcode length
- Minimum number of complex characters
- Maximum passcode age
- Passcode history
When users login through Mosyle Auth 2, a user account on the Mac will be created. All Mosyle Auth 2 user accounts are created as Mobile accounts to leverage the possibility of User Scope profiles and ensure the secure token is passed to each user if the Bootstrap Token is allowed. To skip all user account creation prompts, such as Data & Privacy, Apple ID, Touch ID, Siri, etc., configure the Login Window profile.
Mosyle Auth 2 supports the use of 2FA, including the 2FA with Security Keys. On macOS 13+, due to USB Restricted Mode, the Security Keys for 2FA will not be allowed unless the restriction to disable USB Restricted Mode is installed, or a user has first logged in to allow access to the Security Key.
To access Mosyle Auth 2, go to Management > Mosyle Auth 2.
Creating a Mosyle Auth 2 Profile
To create a Mosyle Auth 2 profile, go to Management > Mosyle Auth 2 > Add new profile. Profiles can be assigned to individual users or devices, as well as grade levels, classes, device groups, or any other assignment option.
Choose the identity provider and then select the usage model. Every Mosyle Auth 2 profile will include the following configuration options:
-
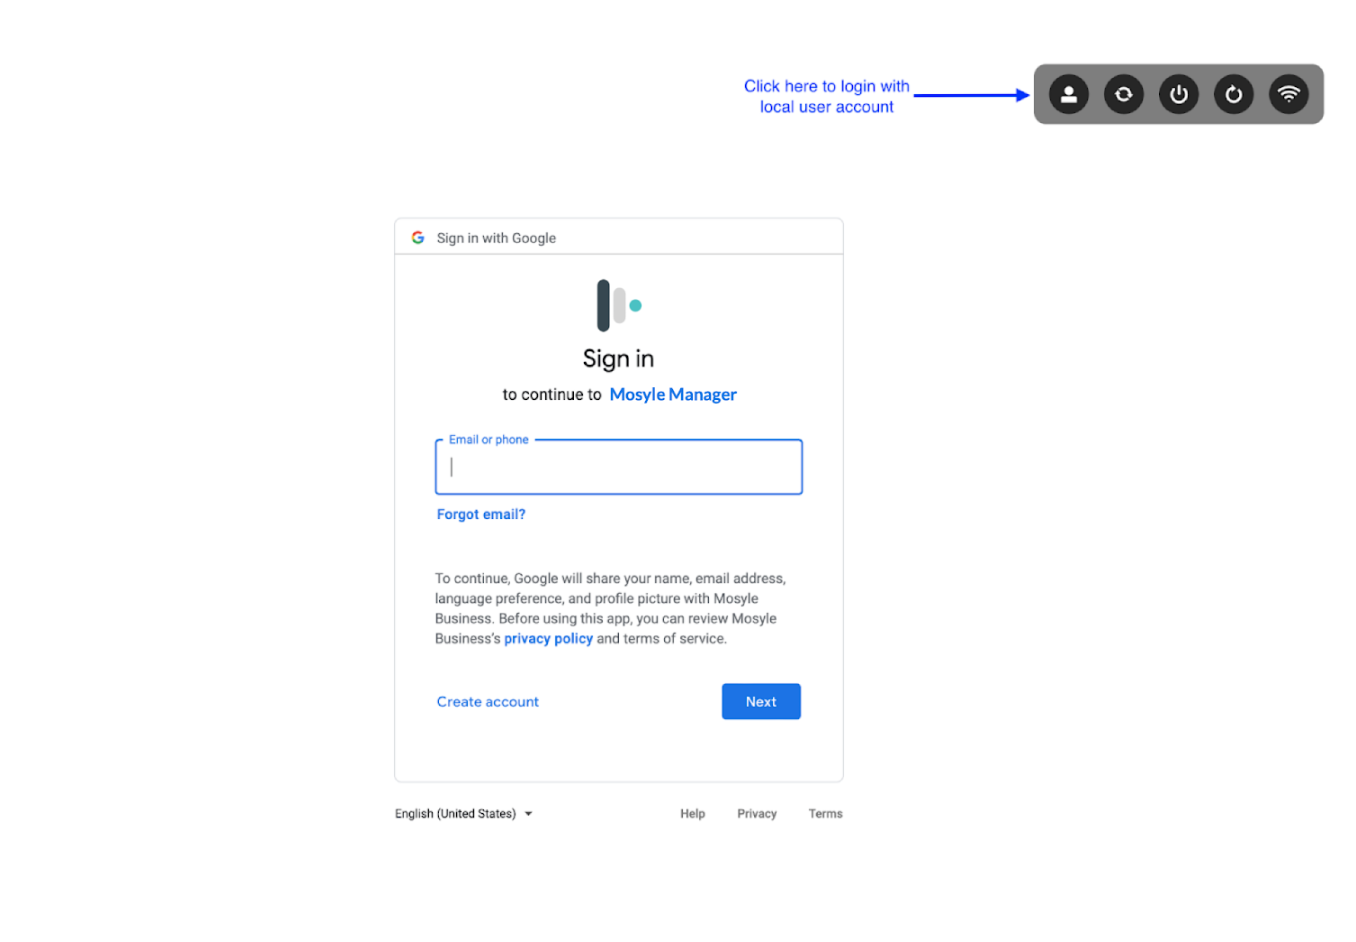
Do not allow Sign In with Local User: Force users to authenticate via Mosyle Auth in order to access the Mac. In order to authenticate via Mosyle Auth, the Mac must have a valid internet connection. If the Mac does not have an internet connection, the user will be unable to login. If this option is unchecked, users will be able to login using the local user login to access the Mac if there is no internet connection. When logging in locally, the user will need to click the icon of a person's silhouette and enter their user account name and password.
- Manage Pre-Existing Users: When selected, existing local user accounts will be converted to MDM managed user accounts, or mobile accounts. This will allow the users to receive User Scope profiles and automatically be granted a secure token upon login if the Bootstrap token is allowed.
-
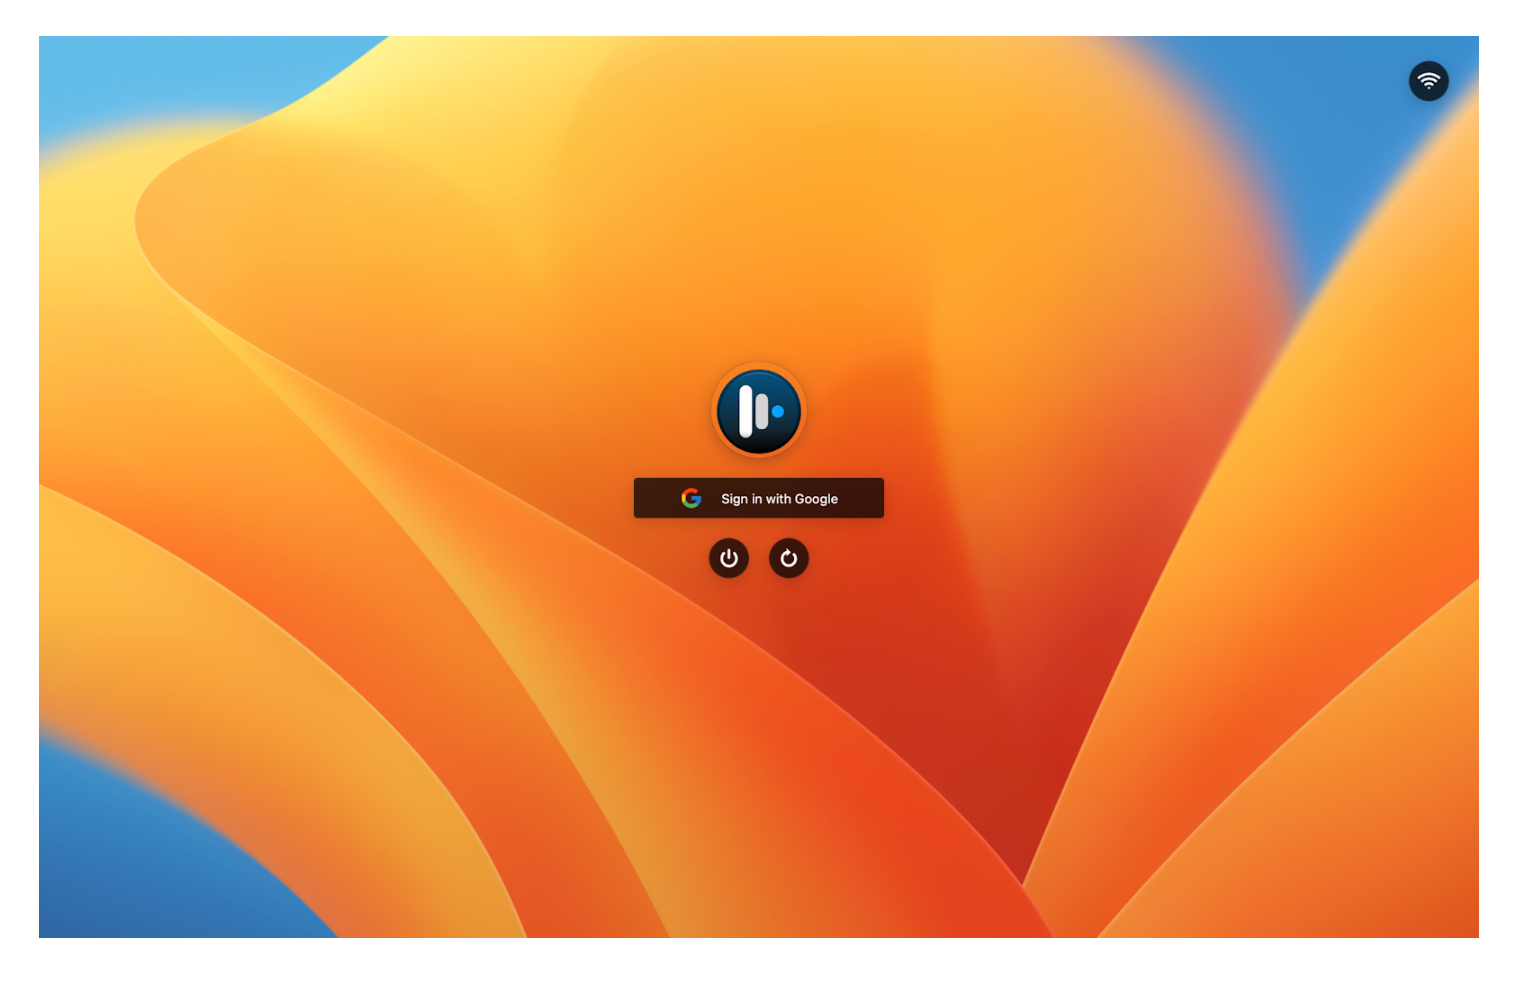
Show macOS Default Background: When selected, the default macOS background will show as the background for Mosyle Auth at the login window. If you prefer to customize the login window, leave the box unchecked and upload your customized image under Organization > Preferences > Other Settings > Login Screen Wallpaper.
- Allow users to enable FileVault: Check this option to grant a secure token to users created via Mosyle Auth 2 and allow users to reset their password locally on the Mac in the event it is forgotten. Choose from the following additional options:
- Use Automated Device Enrollment admin setup information: This will automatically use the Admin username and password configured in the Automatic Device Enrollment profile to grant the user created through Mosyle Auth 2 a secure token and/or reset the user's password. The DEP Admin must have a secure token in order for the user's password to be successfully reset. If the DEP Admin does not have a secure token, leave this unchecked and enter a SecureToken-enabled Admin account name/password.
- Update Preboot Volume: This option will update the Preboot Volume so that any/all Admin users created through Mosyle Auth 2 will be available to unlock the disk in Recovery Mode. If the Preboot Volume is not updated, only the Admin user who enabled FileVault will be available to unlock the disk when the device is in Recovery Mode. Standard users, by default, will not be able to unlock the disk when in Recovery Mode. If a Standard user enabled FileVault rather than an Admin user, the Mac will prompt to enter the Recovery Key to unlock the disk in Recovery Mode.
Configuring Mosyle Auth 2 for 1:1 devices
If devices are used solely by one, individual user it's recommended to use the 1:1 usage model with Mosyle Auth 2. This configuration ensures only the user assigned to the device will be able to authenticate and login to the Mac.
The device assignment will be completed when the user logs in via Mosyle Auth 2 based on the Device Assignment settings under My School > Users > Device Assignment > User Authentication Assignment. Be sure the option under the heading 'Assignment through Mosyle Auth' is configured with the following selection: Only auto-assign devices not already assigned to a user. Once the device is assigned to the user, no other user will be able to authenticate to login and access the Mac until it is unassigned.
When using Mosyle Auth in a 1:1 usage model, Administrators can define how the account will be created on the Mac. Mosyle will automatically determine if the device is considered a “New device” or a “Device already in use” based on any pre-existing user accounts on the Mac. Once a user authenticates via Mosyle Auth 2 on a brand new device and the user account is created on the Mac, it will then be recognized as a “Device already in use”.
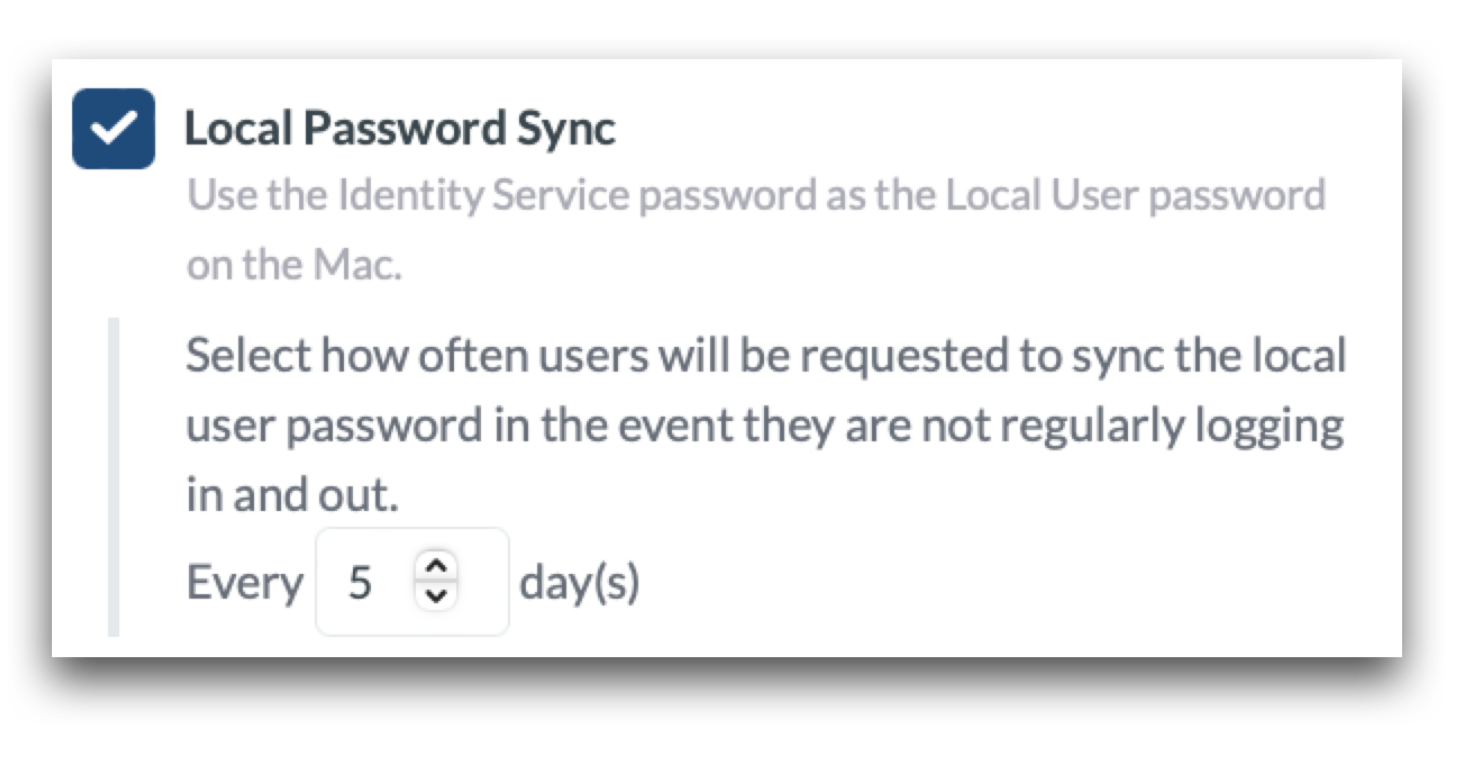
In all scenarios, Administrators have the ability to define the Local Password sync behavior. By default, Mosyle Auth will automatically compare the password used to authenticate during login with the saved password on the Mac. If the two passwords do not match, the user will be prompted to enter the password for the user account on the Mac, which is typically the previous IdP password, in order to update and sync the passwords. In the event users do not logout and login frequently, Administrators can define how often a user will be prompted to sync their password:
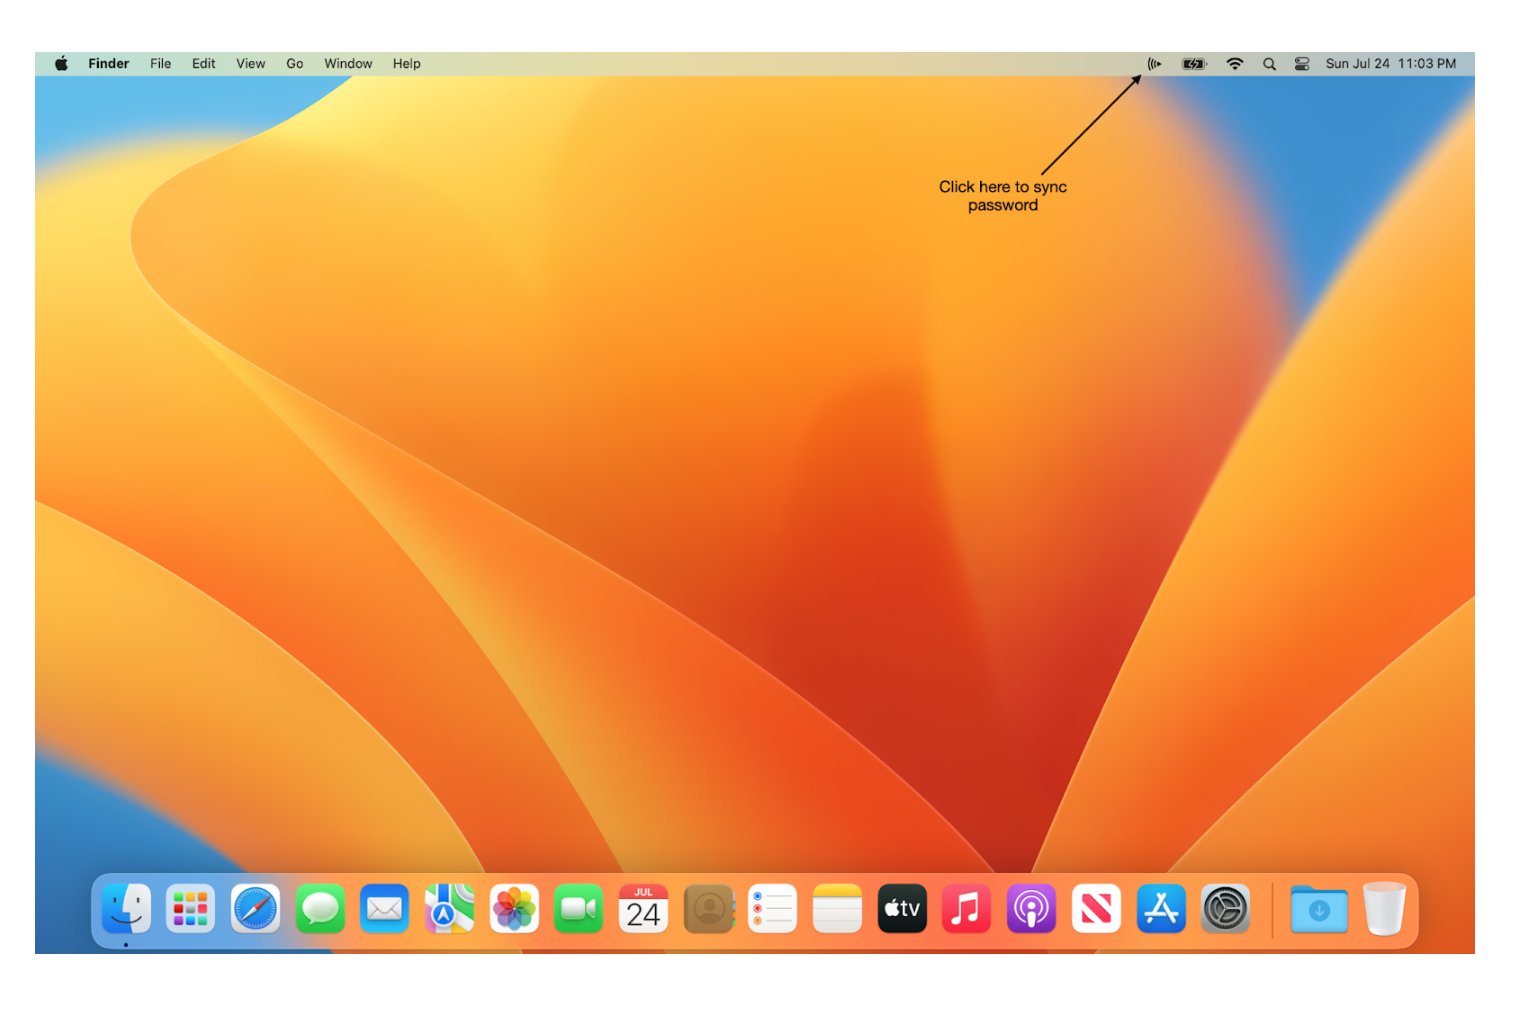
If a user updates or changes their IdP password, it is best practice to sync the password prior to logging out of the Mac. Users can do this by clicking the Mosyle Auth sync icon in the menu bar.
New Devices
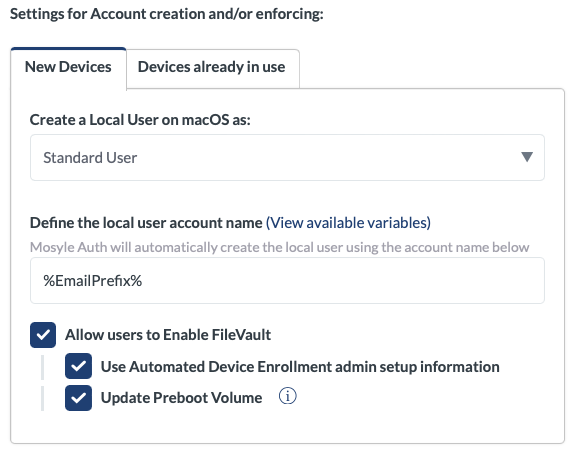
The new device workflow is typically an unboxed device that goes through Setup Assistant, and is configured with Mosyle Auth. The device will skip all prompts and land at the Mosyle Auth login window. The user logs in with their organization credentials such as Google, Azure, etc., their account is automatically created on the Mac (formatted as defined by the Mosyle Admin) and the device automatically assigned to the user. Moving forward, only that user is authorized to authenticate and login on that Mac.
In the Mosyle Auth profile, choose how to create the user account on the Mac when the user logs in:
- Standard user
- Admin user
- Check User Group to determine the User Type (On-Premises Active Directory Only)
- Create Local User based on Mosyle User Type (not available for On-Premises Active Directory)
- Use variables to configure the formatting for the local user account name
Devices already in use
For devices already in use, such as devices that are already set up and have been in use, it's understood that user accounts already exist on the device. Therefore, it is undesirable for Mosyle Auth to create a new user account on the Mac. In order to avoid the creation of a new user account on the Mac, configure the “Devices already in use” tab.
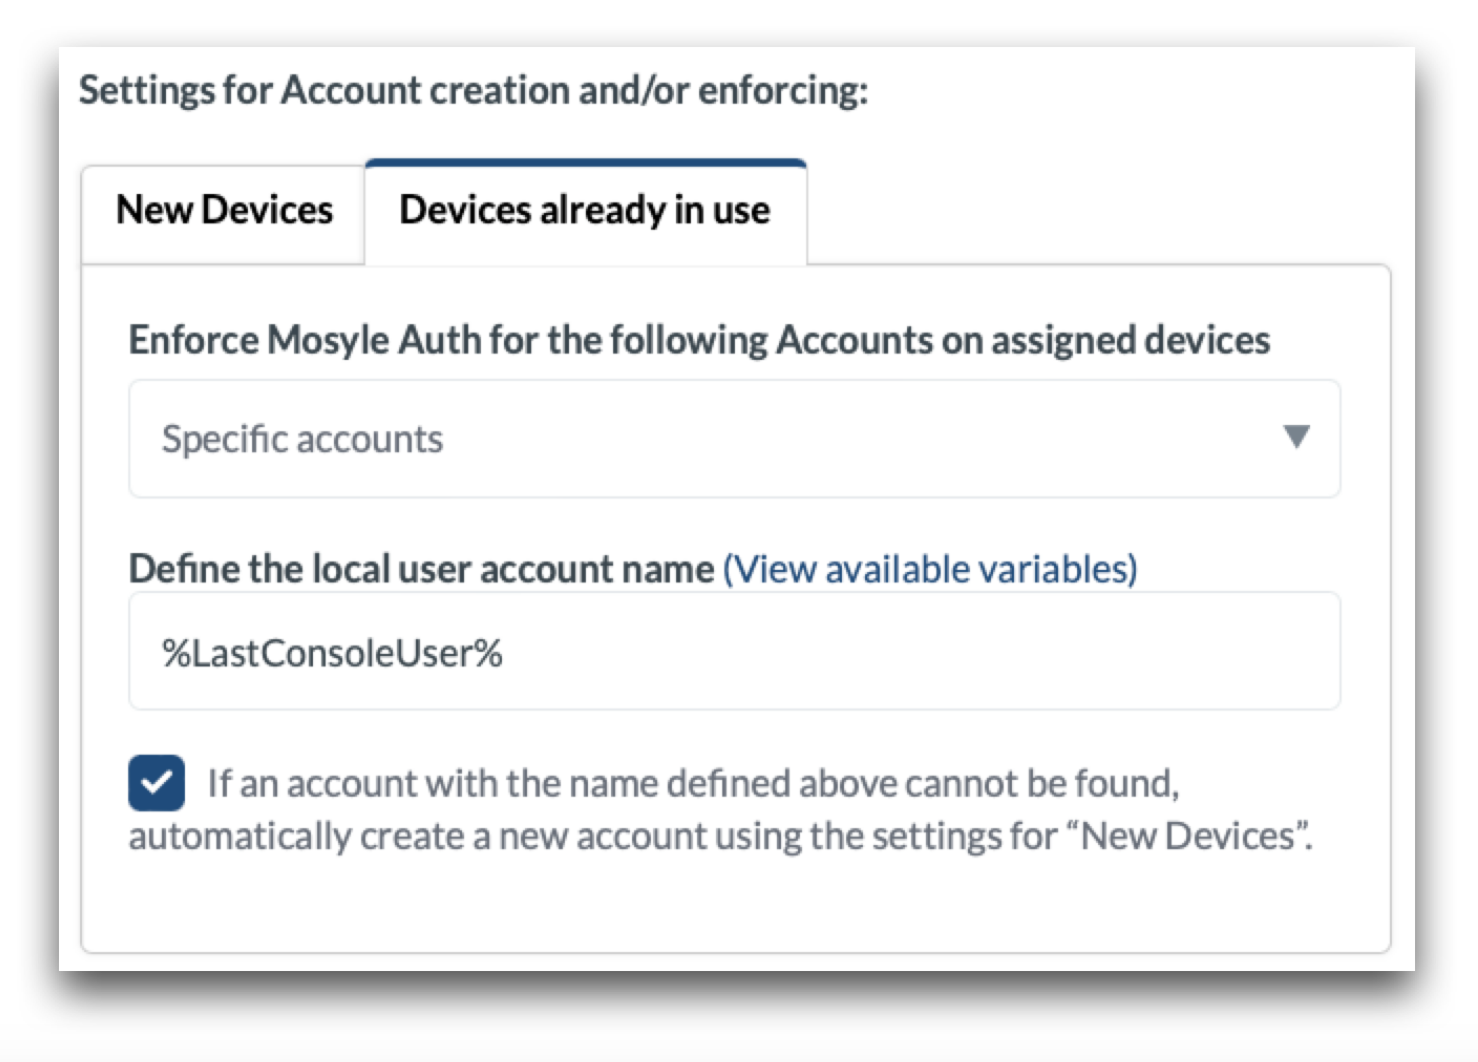
Choose whether or not Mosyle Auth should be enforced for all accounts on the device, or only for specific accounts.
-
All Accounts on the device: To access any/all user accounts on the Mac, the user must authenticate with Mosyle Auth. The expected user credentials to authenticate with Mosyle Auth are the assigned user credentials. Therefore, they will be able to login and access any/all user accounts that exist on the Mac with their organization credentials, with the exception of the DEP admin account. Choose the style of the login window:
- Force the user to type-in the account name: The Mac login window will present a field in which the user will need to enter an existing user account name that they wish to access prior to authenticating with Mosyle Auth. The user account name entered indicates which user account to login after authenticating with Mosyle Auth.
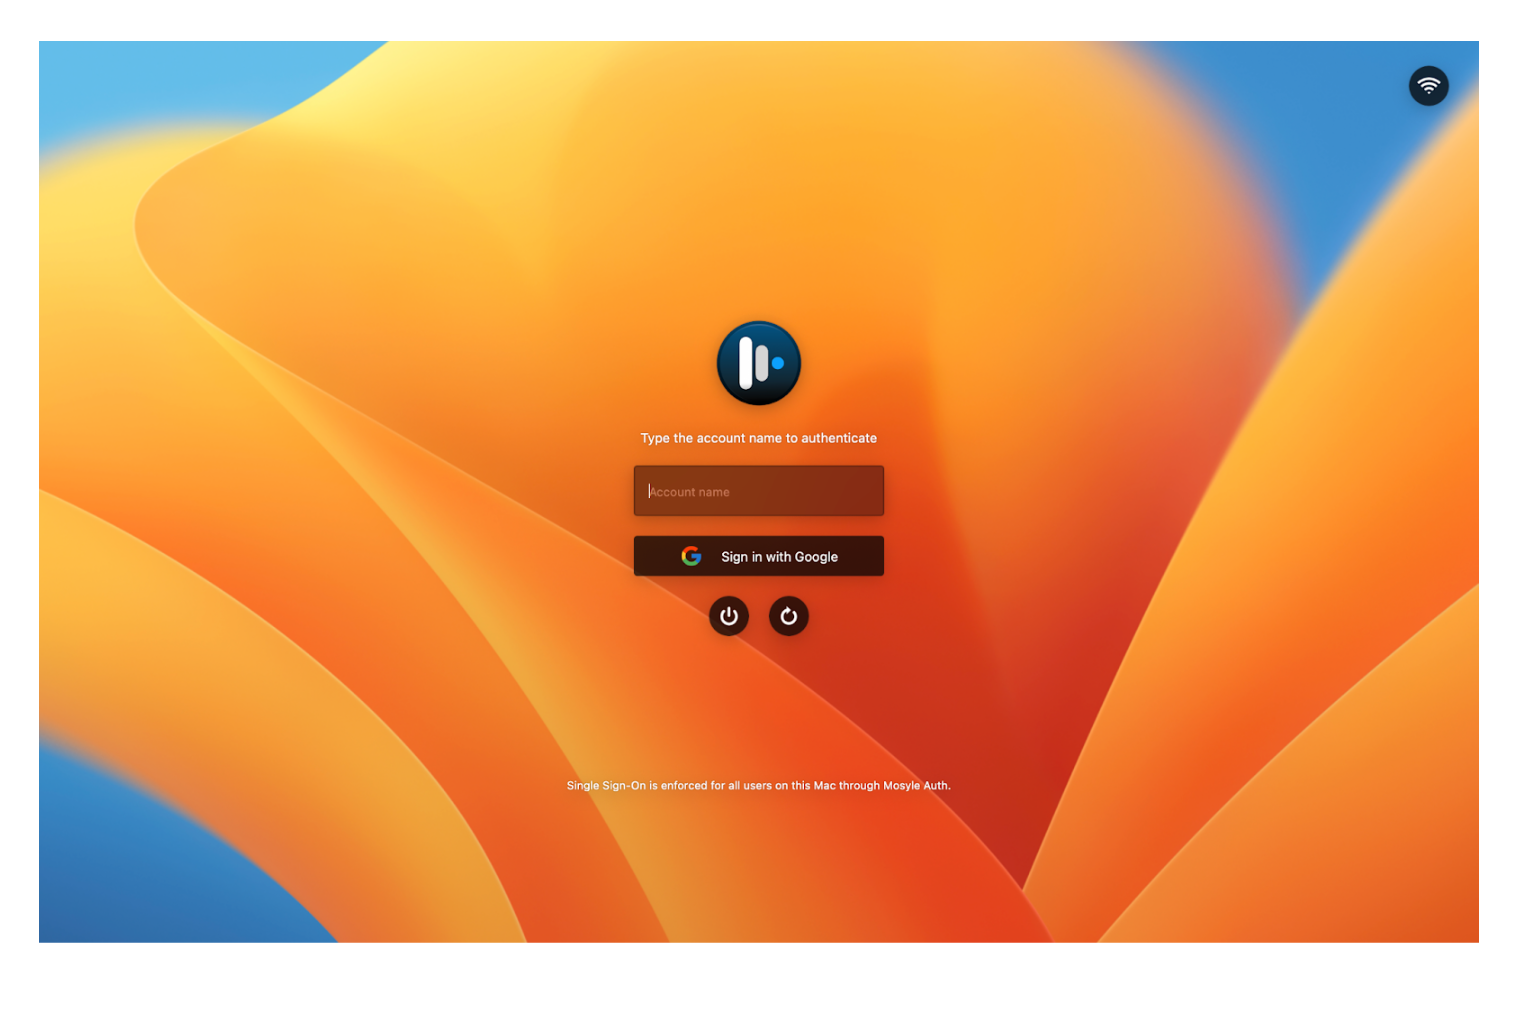
- List all users: The Mac login window will present a list of user account names that exist on the Mac. The user will select a user account and click to authenticate with Mosyle Auth to login to the selected account. Click the option “Do not show hidden users on the list of users” to ensure any hidden user accounts are not listed on the login window.
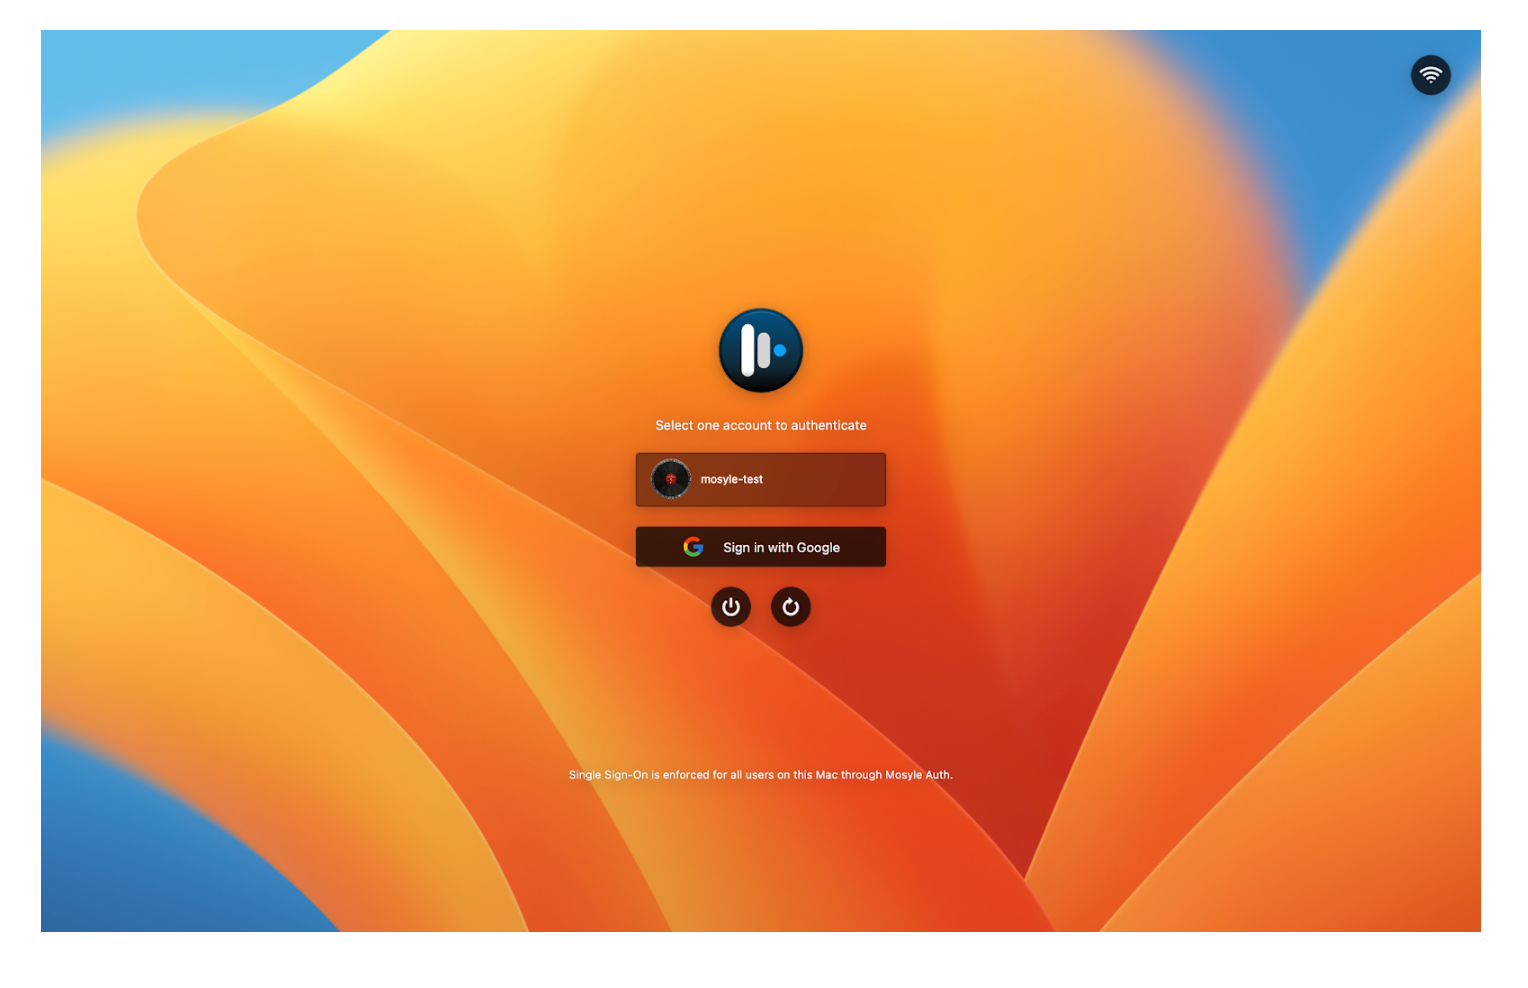
- Force the user to type-in the account name: The Mac login window will present a field in which the user will need to enter an existing user account name that they wish to access prior to authenticating with Mosyle Auth. The user account name entered indicates which user account to login after authenticating with Mosyle Auth.
-
Specific accounts: Only accounts with the specified, expected formatting can be accessed. In the field labeled Define the local user account name in the Mosyle Auth 2 profile, enter the expected user account name that already exists on the Mac. In doing this, when the user logs in with their organization credentials, Mosyle will check if a user account exists based on the expected formatting.
If the account exists, the user will be logged into the account. If not, a new user account will be created if the option “If an account with the name defined above cannot be found, automatically create a new account using the settings for New Devices” is selected. If the option is not selected and a user account with the specified formatting does not exist, the user will be unable to login.
In an environment where devices are already enrolled in Mosyle and the user's have a user account on the Mac, but its formatting does not match any registered user information in Mosyle, the “Last Console User” variable can be used to define the expected user account name.
Configuring Mosyle Auth 2 for Shared devices
It is typical to assign this type of Mosyle Auth 2 usage to devices enrolled in Shared Device Groups.
Removing Mosyle Auth 2
If you choose to remove Mosyle Auth from your devices, the login window will revert to the native macOS login window and users can login to their local user account on the Mac by entering their user account name and password (most likely the same password as their SSO password). The local user account on the Mac will not be removed if Mosyle Auth is removed. Therefore, all user data will remain and the user can access by logging in locally with their credentials.
Mosyle CDN
Overview
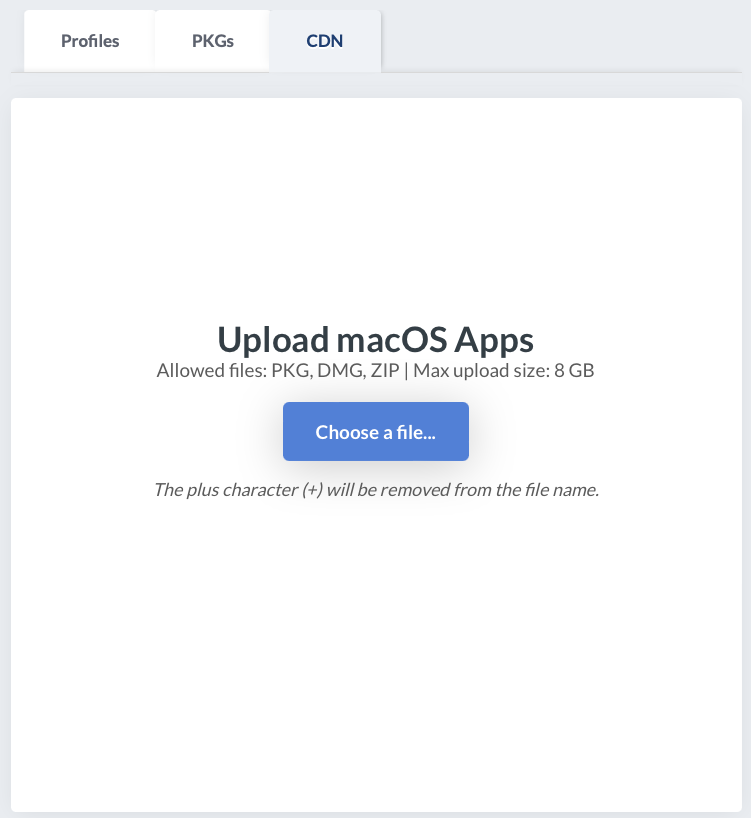
Mosyle offers a CDN solution that supports the PKG, DMG, ZIP, and IPA file types of up to 8 GB and is included in the Mosyle OneK12 subscription plan.
To Upload Packages to Mosyle's CDN
- Click Management > Install PKG > Click the CDN tab
- Click “Upload” > Choose a File
- Select the file > Click Choose for Upload
- Monitor the progress bar for the upload status
Using the CDN Variable
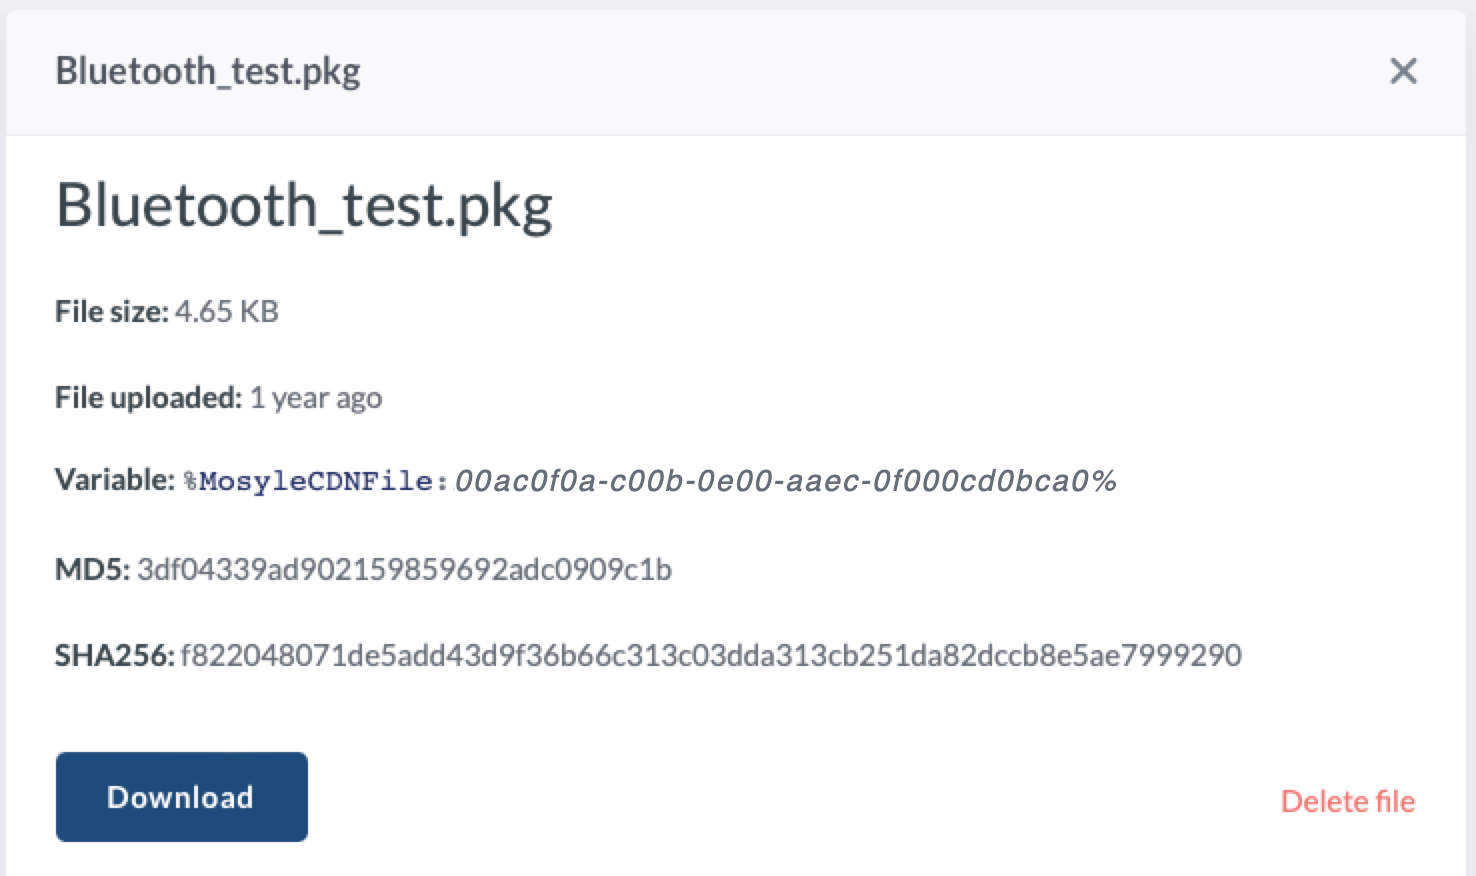
When hosting packages on the Mosyle CDN, the URL of each package is replaced with a Variable (ID). In order to continue deploying the packages using Custom Commands or other management profiles, replace any previous URLs with the PKG Variable ID to ensure expected behavior.
Finding a PKG Variable
- Click Management > Install PKG
- Click the CDN tab > Click the PKG name
- Copy the value in the Variable field (%MosyleCDNFile:00ac0f0a-c00b-0e00-aaec-0f000cd0bca0%)
- Navigate to a profile that includes the URL and replace the URL with the Variable
Adding a PKG Variable to the Custom Commands Profile
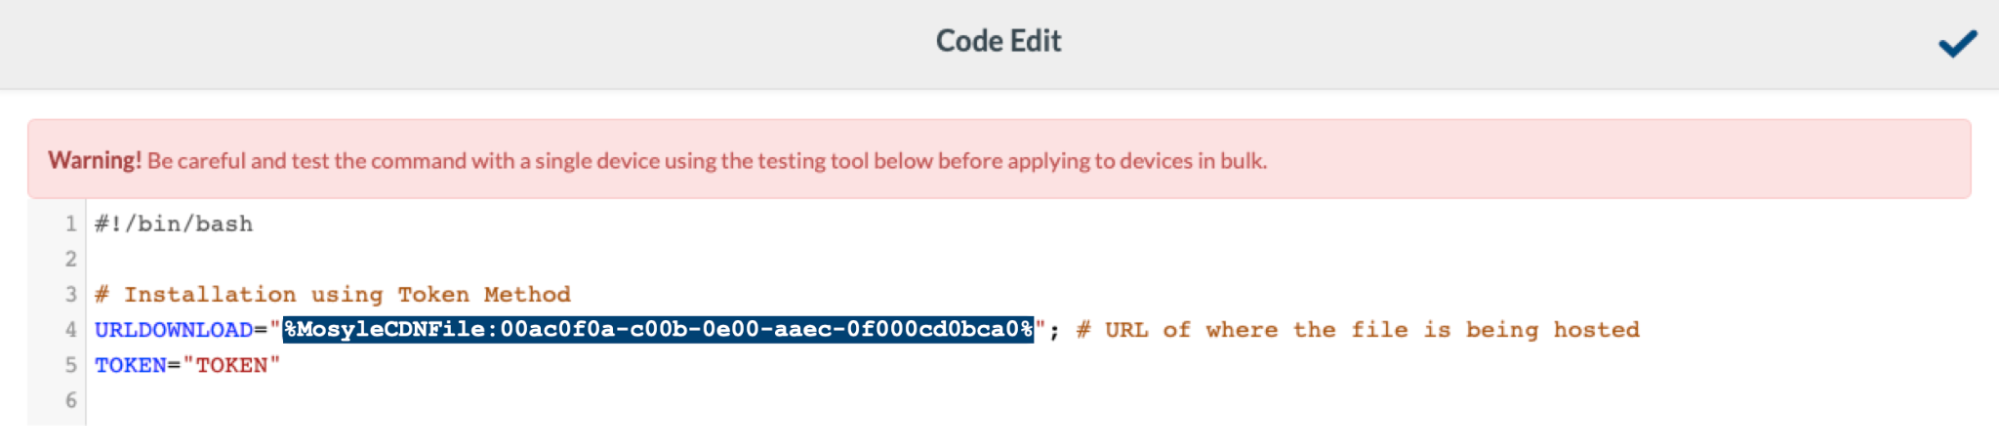
- Click Management > Custom Commands
- Click an existing profile's name or create a new profile
- Select 'Enable Variables for this profile' > Click the link 'Click here to view available variables'
- Click on View Mosyle CDN Variables > Copy the value in Variable
- Exit the pop-up
- Click the text box in Code > Delete the package's URL > Paste the package's Variable
- Click on the blue checkmark
- Save
Device Scout
Overview
Device Scout checks devices against a repository of recommended security controls or any custom controls to reflect security requirements needed for a school or district environment. The repository of rules for compliance are established by recommendations from many recognized cybersecurity agencies and are mapped to CIS and NIST frameworks, as well as a set of proprietary rules. Select any/all rules to apply to the devices and ensure they are in compliance. Enable auto-remediation so that non-compliant devices are automatically corrected to be in compliance with the specific security control.
For Mac computers, the agent is leveraged for compliance scans. Therefore, the Mosyle Manager app must be installed.
Click the Security tab and expand the Device Scout menu option in the left menu bar. Device Scout is organized into four sections:
- Overview
- Devices
- Security Controls
- Logs (macOS Only)
Overview
The Overview pane provides a quick summarized view of your device compliance status. You can view the following in this area:
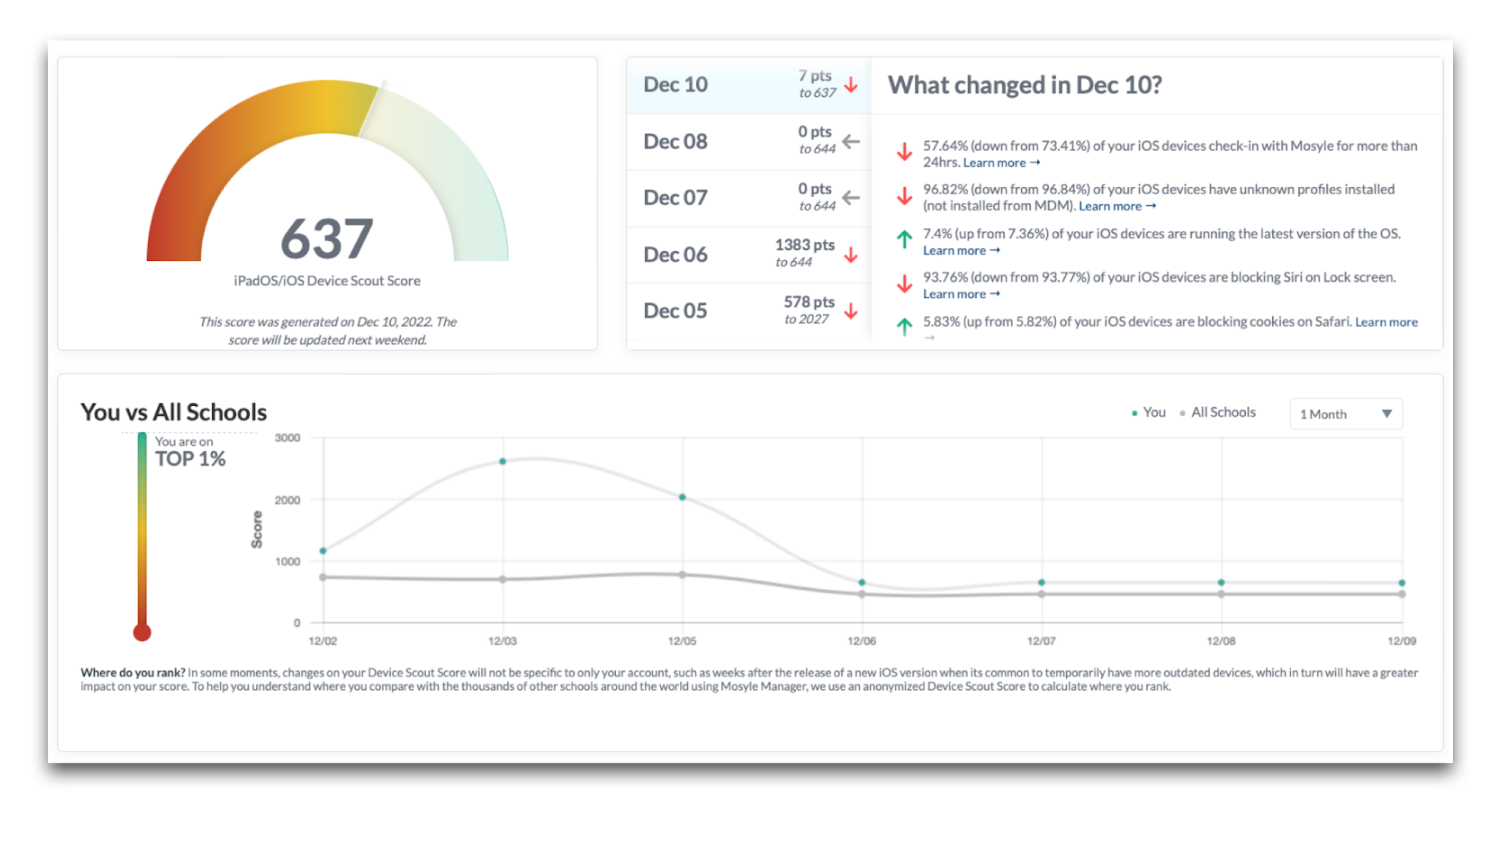
Device Scout Score: The score is calculated based on the security controls applied and device compliance status. The higher the score, the more secure your devices are.
Based on your Security Controls (macOS): Use the dropdown menus to view the top controls or top devices that are compliant or not compliant.
Top Rules among All Schools (macOS): A list of the top rules activated across all Mosyle companies.
Evolution over Time / You vs All Schools: View the compliance average or max active rules over a period of time for your school and other Mosyle schools.
What changed?: View any recent changes in the compliance status.
Security Controls
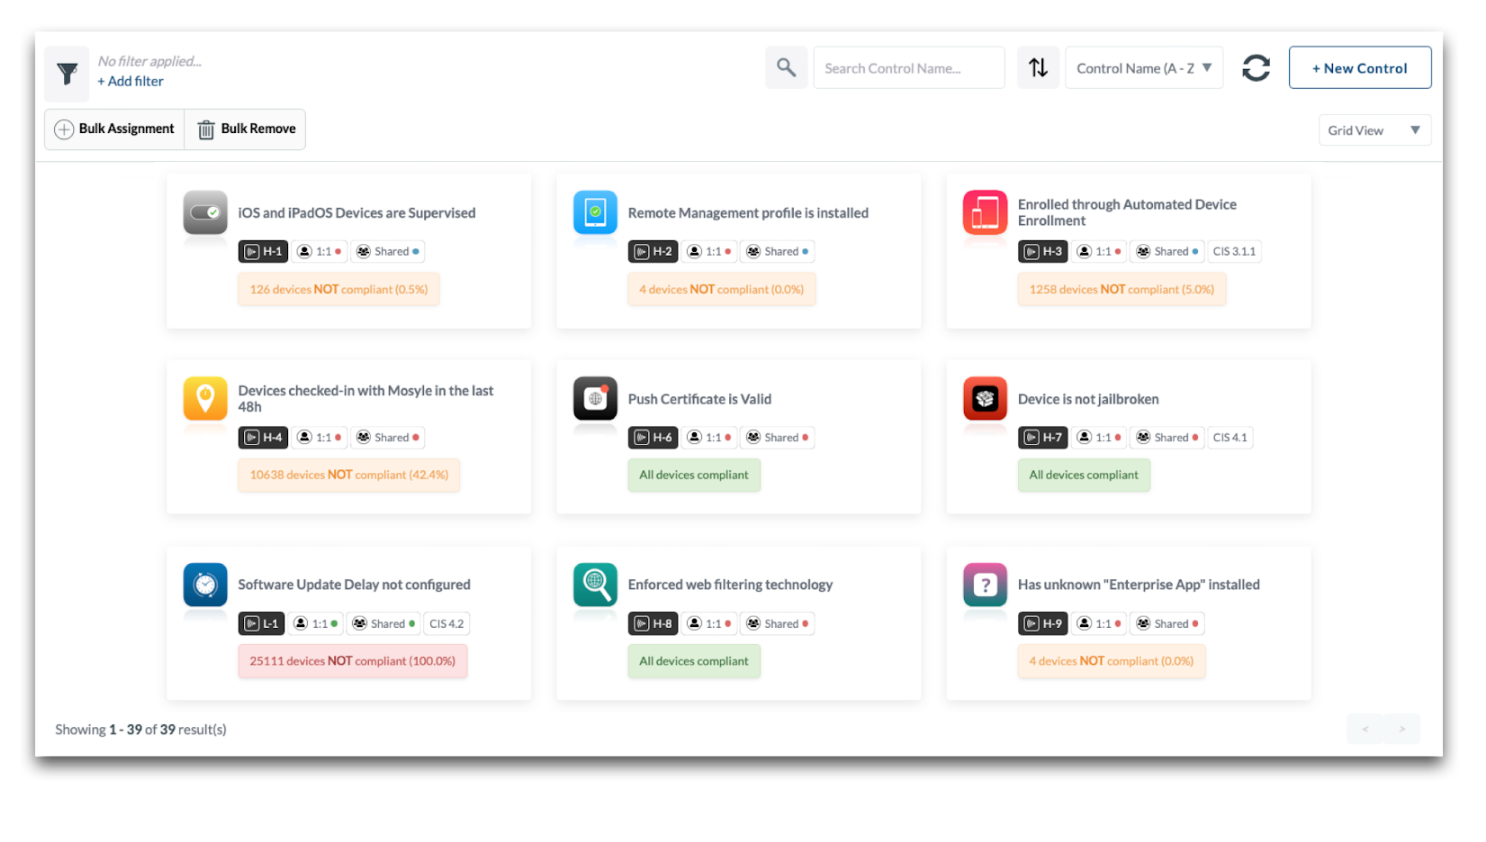
View a list or grid of all active Security Controls. To change views, use the dropdown on the right side of the screen to choose between “Grid View” or “List View”.
Each control will show the rule name, associated security benchmarks, the percentage of devices in compliance, as well as if remediation is turned on or not. Favorite any controls to make sure they show at the top of the list by clicking the star icon in the rule box. To refresh and update the controls to show the latest compliance status, click the refresh button within the rule. Device compliance status is checked every hour.
Using the filter, choose to view the rules based on: show only favorites, by security baselines, if remediation is available or unavailable, or if remediation is enabled or not enabled.
Search for specific Security Controls using keywords and sort based on the control name or compliance percentage.
Click + New Control at any time to add additional Security Controls. When adding controls, choose to use controls from Mosyle's Repository or by creating your own custom Security Control.
Use the Bulk Assignment or Bulk Remove buttons to assign controls to devices in bulk, or remove compliance checks for controls in bulk.
Devices that are not in compliance with the controls assigned will automatically be grouped into a “Security Group”, categorized by each control. Use these Security Groups when assigning management profiles as needed.
Devices
View a list of devices assigned to security controls and their corresponding compliance status. Clicking on a device tile will bring up a detailed list of the security controls assigned, which are compliant, and give you the ability to automatically remediate controls not in compliance. Click the link to open a new tab to view additional device info.
Filter the list of devices by: serial number, device name, asset tag, deviceUDID, Wifi MAC Address, Ethernet MAC Address, user assigned, grade levels, and more.
Sort the list of devices by the device name or compliance percentage.
After filtering and sorting devices as needed, export a spreadsheet of the devices and security controls by clicking the button in the upper right corner that indicates X devices match filters. The spreadsheet will include a list of devices (device name and serial number) and all assigned controls along with the compliance status.
Logs
View logs to see detailed info for when a device became compliant or lost the compliance status. In addition to the compliance status, the control name, date/time stamp, device name and serial number are listed. The logs provide detailed reports containing necessary information for any potential internal and external audits.
To export a list of devices and the compliance status, go to the Security tab and click the Devices menu option under Device Scout. Filter the devices as needed and click the Export button in the upper right to export in a CSV or XLSX file format.
Configuring Controls
When first accessing the Device Scout Overview area under the Security tab, a list of controls available from the Mosyle repository will be displayed that can be activated. Select any controls to scan for compliance and assign the devices. When finished, click Start.
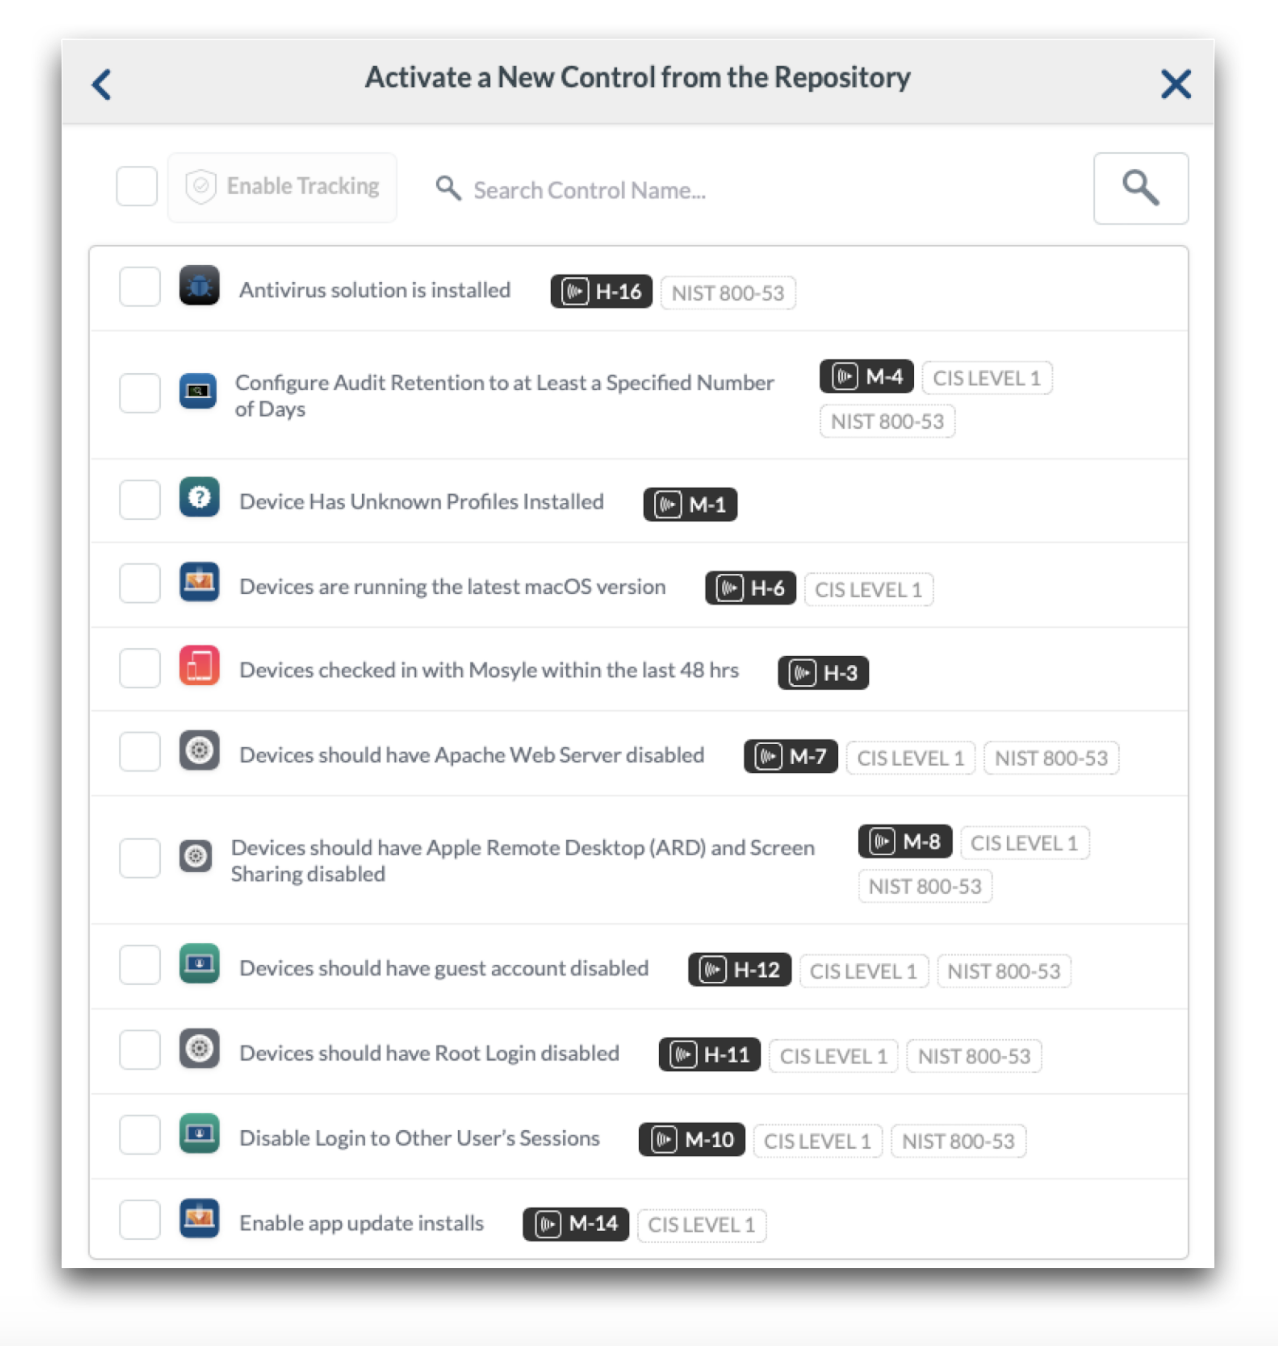
To add more controls to be checked for compliance, go to the Security tab > Device Scout > Security Controls > + New Control. Choose a rule from the Mosyle Repository or create your own custom control.
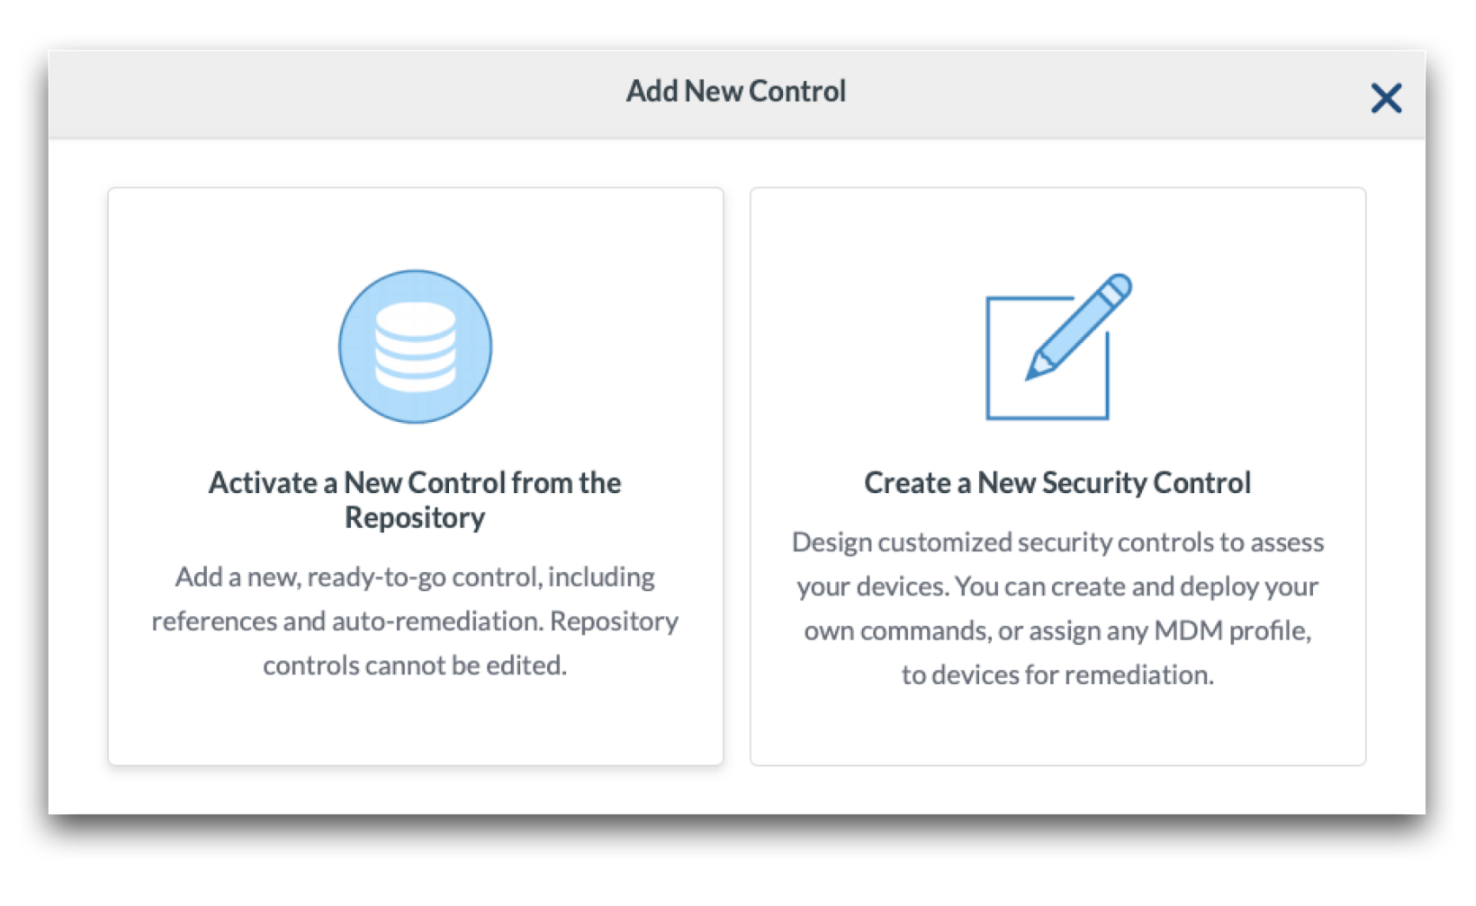
After checking the box for the rule, click the button to “Enable Tracking”. Select the users and/or devices to assign the control to and click “Enable”.
Once controls are enabled, they'll be listed in the Security Controls area. Click any of the controls to view detailed information about the control, change assignments, and/or turn on auto-remediation.
Configuring Custom Controls
To configure a custom control, go to the Security tab > Device Scout > Security Controls > + New Control. Choose “Create a New Security Control”.
Name the control, choose an icon, add tags and/or framework mapping or reference. Enter the code that should be run on devices to check for compliance. Be sure to include specific output that can be used to define devices in compliance or not. Define what should be considered compliant under “Results for Compliance”, anything that doesn't meet the definition will be considered not in compliance. Add the assignment and save.
To remediate the custom control, go to the Management tab and use any of the Management profiles, including Custom Commands, to create the profile or configuration to remediate the control. When assigning the profile for remediation, assign it to the automatically created Security Group for devices not in compliance with the control.
Compliance Checks
Devices are checked for compliance during every device info update. The device info update is automatically requested every hour, so long as the device remains online and reachable. If the device is not online, the update of device info along with any compliance checks will be pending. Once the device is back online, the commands will go through and the compliance status as well as the device info will update. For Mac computers, the compliance checks rely on the Mosyle Manager app being installed on the Mac.
If a device has not responded to a compliance status check in over 5 days, the compliance will change to “Not compliant” until the device checks back in to confirm it's current status.
Auto-Remediation
Auto-remediation is completed using a combination of management profiles and/or customized commands created by our Developers. When auto-remediation is turned off, or the security configurations are unassigned, the remediations installed via profiles will be removed from the device and the security control will no longer be enforced. Any other remediations that were not applied via profiles, rather were processed using customized commands, will no longer be executed. Turning off auto-remediation does not revert any settings.
If auto-remediation is turned on, it's recommended to not duplicate any controls or policy configuration through Management profiles to avoid any unexpected side effects. For example, if passcode controls are configured in Device Scout with auto-remediation enabled, it's not recommended to also push a Passcode Policy payload.
Detection & Removal
Overview
Detection & Removal is a client based solution that leverages Apple's Endpoint Security Framework to constantly monitor a set of different events that could potentially represent the introduction of a new malware on a macOS device. Once these events are identified, they are scanned against a multi-source signature database that combines the local XProtect Yara rules present on each device, a database of different well-known macOS malware and a proprietary database created and maintained by our Security Research team. When Detection and Removal is assigned to devices, the MosyleSecurity agent will automatically be installed.
Scans are typically done using an On-access strategy, which means that events immediately trigger scans as they happen for real-time protection, such as when a new file is downloaded from the internet or email. A weekly full-scan is also available in order to allow recently introduced definitions to be used to scan the system regardless of the occurrence of triggering events. All the routines are performed locally for privacy protection and no file is synced with Mosyle servers.
Click the Security tab and expand the Detection & Removal 2 menu option in the left menu bar. Detection & Removal is organized into four sections:
- Overview
- Devices
- Quarantine
- Settings
- Logs
Detection & Removal 2 is supported on macOS 10.15 and later.
Overview
The Overview pane provides a quick summarized view of your device status. You can view the following in this area:
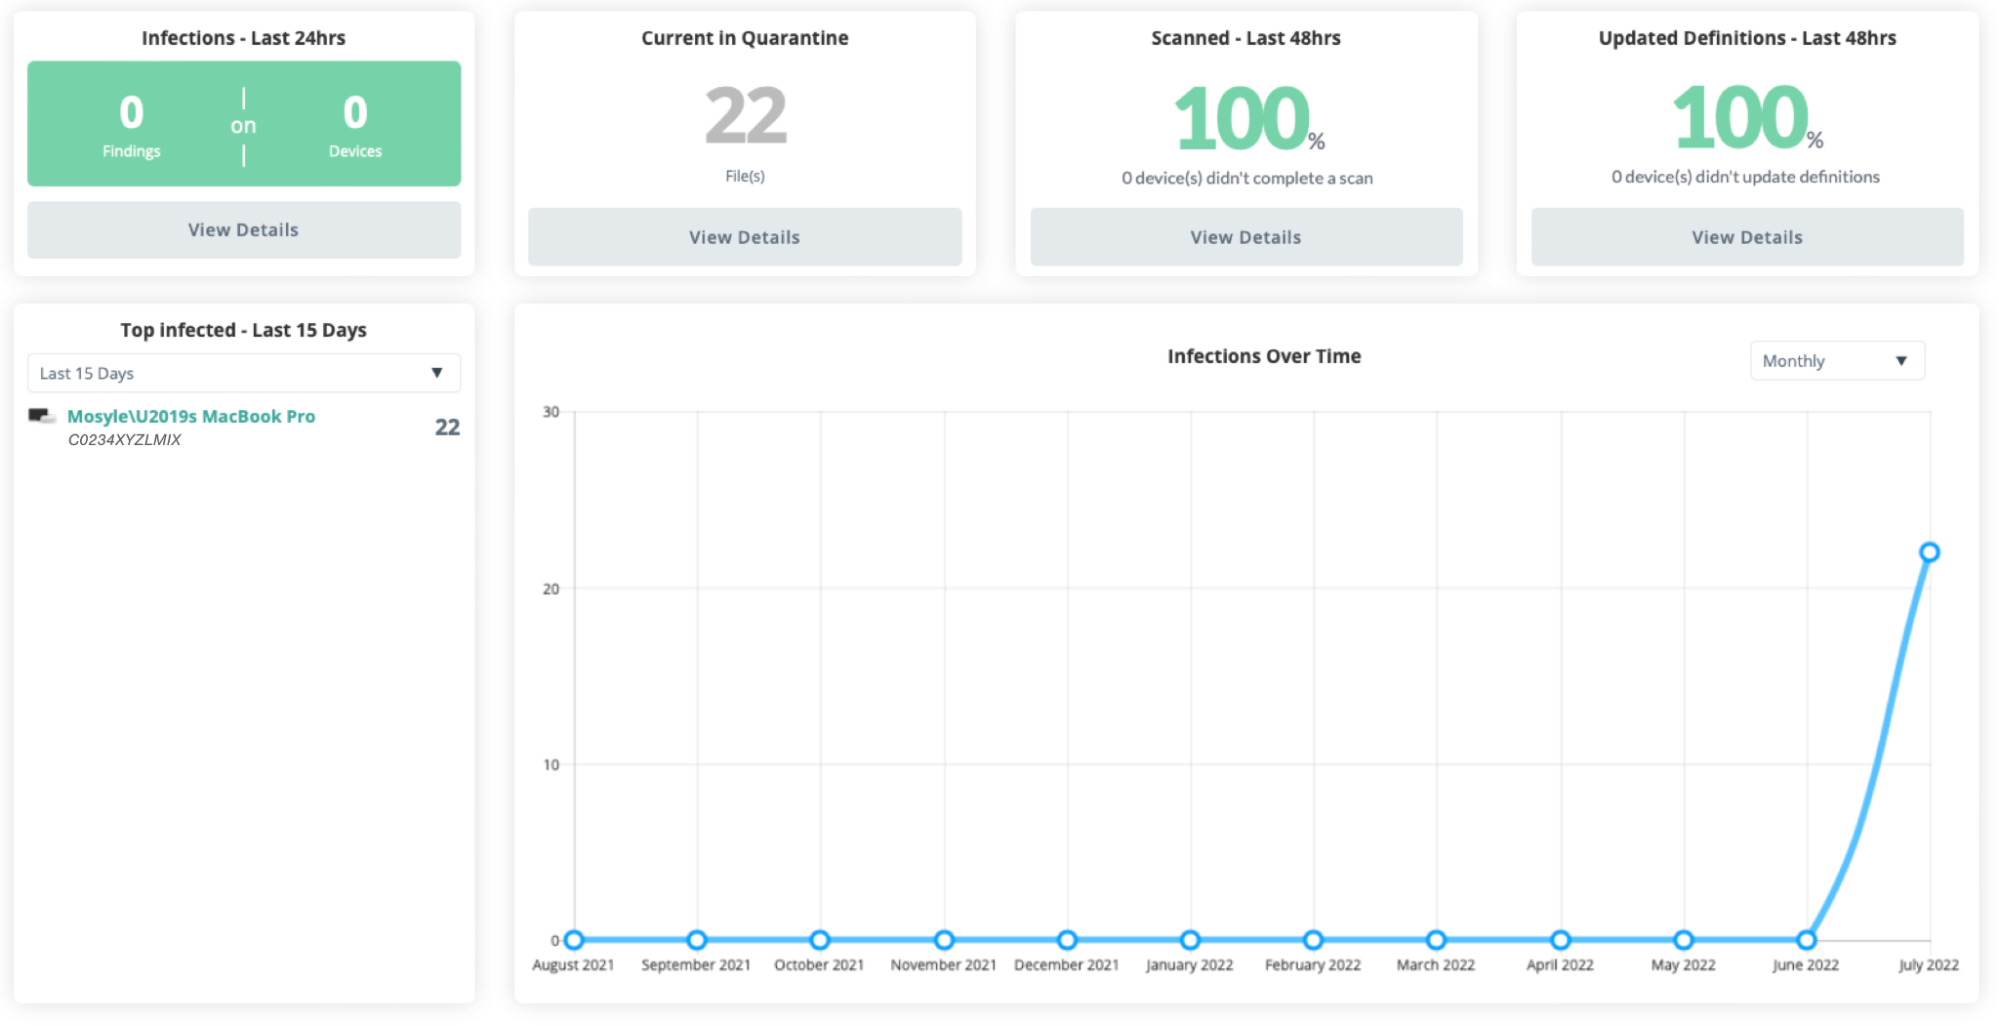
- Infections - Last 24 hours: Lists the number of findings on devices over the past 24 hours. Click View Details to check out the Logs.
- Current in Quarantine: Lists the number of files currently in quarantine. Click View Details to check out the files.
- Scanned - Last 48 hours: Percentage of devices that have been scanned in the past 48 hours. Click View Details to check the list of devices to see which devices haven't recently been scanned.
- Updated Definitions - Last 48 hours: Percent of devices that have updated definitions in the past 48 hours. Click View Details to check the list of devices to see which devices haven't recently updated definitions.
- Top Infected - Last X days: Use the dropdown menu to view the list of top infected devices over the past 7, 15, or 30 days.
- Infections Over Time: View the number of infections found over a period of time for your school or district.
Devices
View a list of devices assigned to Detection & Removal and their corresponding scan status, date and type of last scan, last definition updates, and if there are any files in quarantine. Clicking a device serial number will open the device info window.
The device status is determined based on the last scan. If the last scan was “Healthy” it shows “Healthy”. If the last scan detected any infected files (whether or not they were automatically removed), it shows the device “Infected”. If infected files are removed after the last scan, run the scan again to update the status. A status of “Not defined” indicates a scan hasn't run yet.
Different scan types available:
- On Access: Scans any new files downloaded. If a known infected file or malware is detected, the user is notified and it is registered in the Mosyle web console immediately.
- Full: Scans all files on the device. Choose when the full scan will run and what to do with detected files in the Settings tab.

Filter the list of devices by: serial number, device name, asset tag, deviceUDID, Wifi MAC Address, Ethernet MAC Address, local hostname, hostname, current console user, last SSID, user logged in, and more.
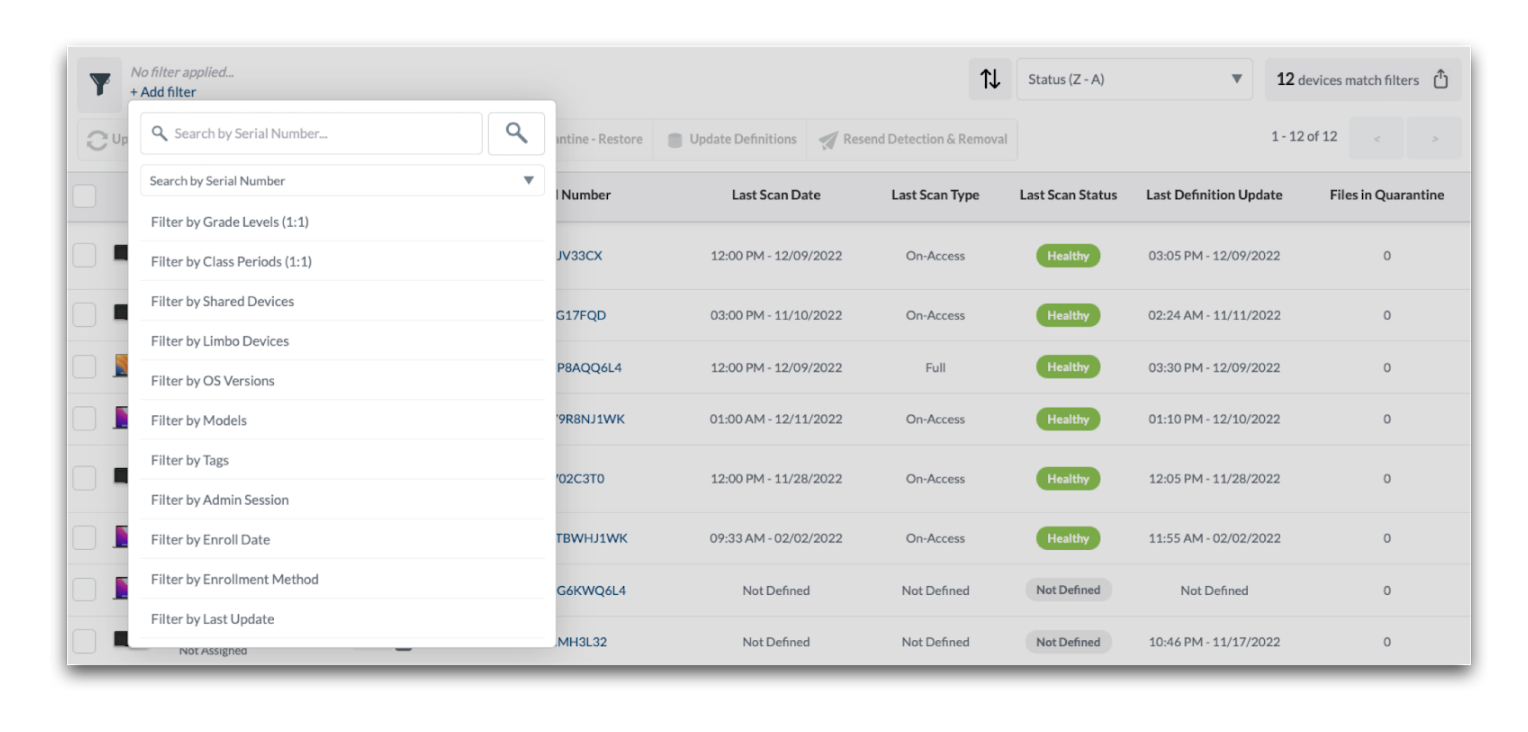
Sort the list of devices by the device name, files in quarantine, last definition update, last scan date, last scan type, serial number, status, tags, or compliance percentage.
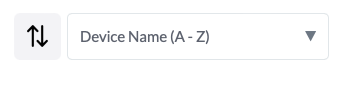
After filtering and sorting devices as needed, export a spreadsheet of the devices and scanned status by clicking the button in the upper right corner that indicates X devices match filters. The spreadsheet will include all information found in the interface.
Quarantine
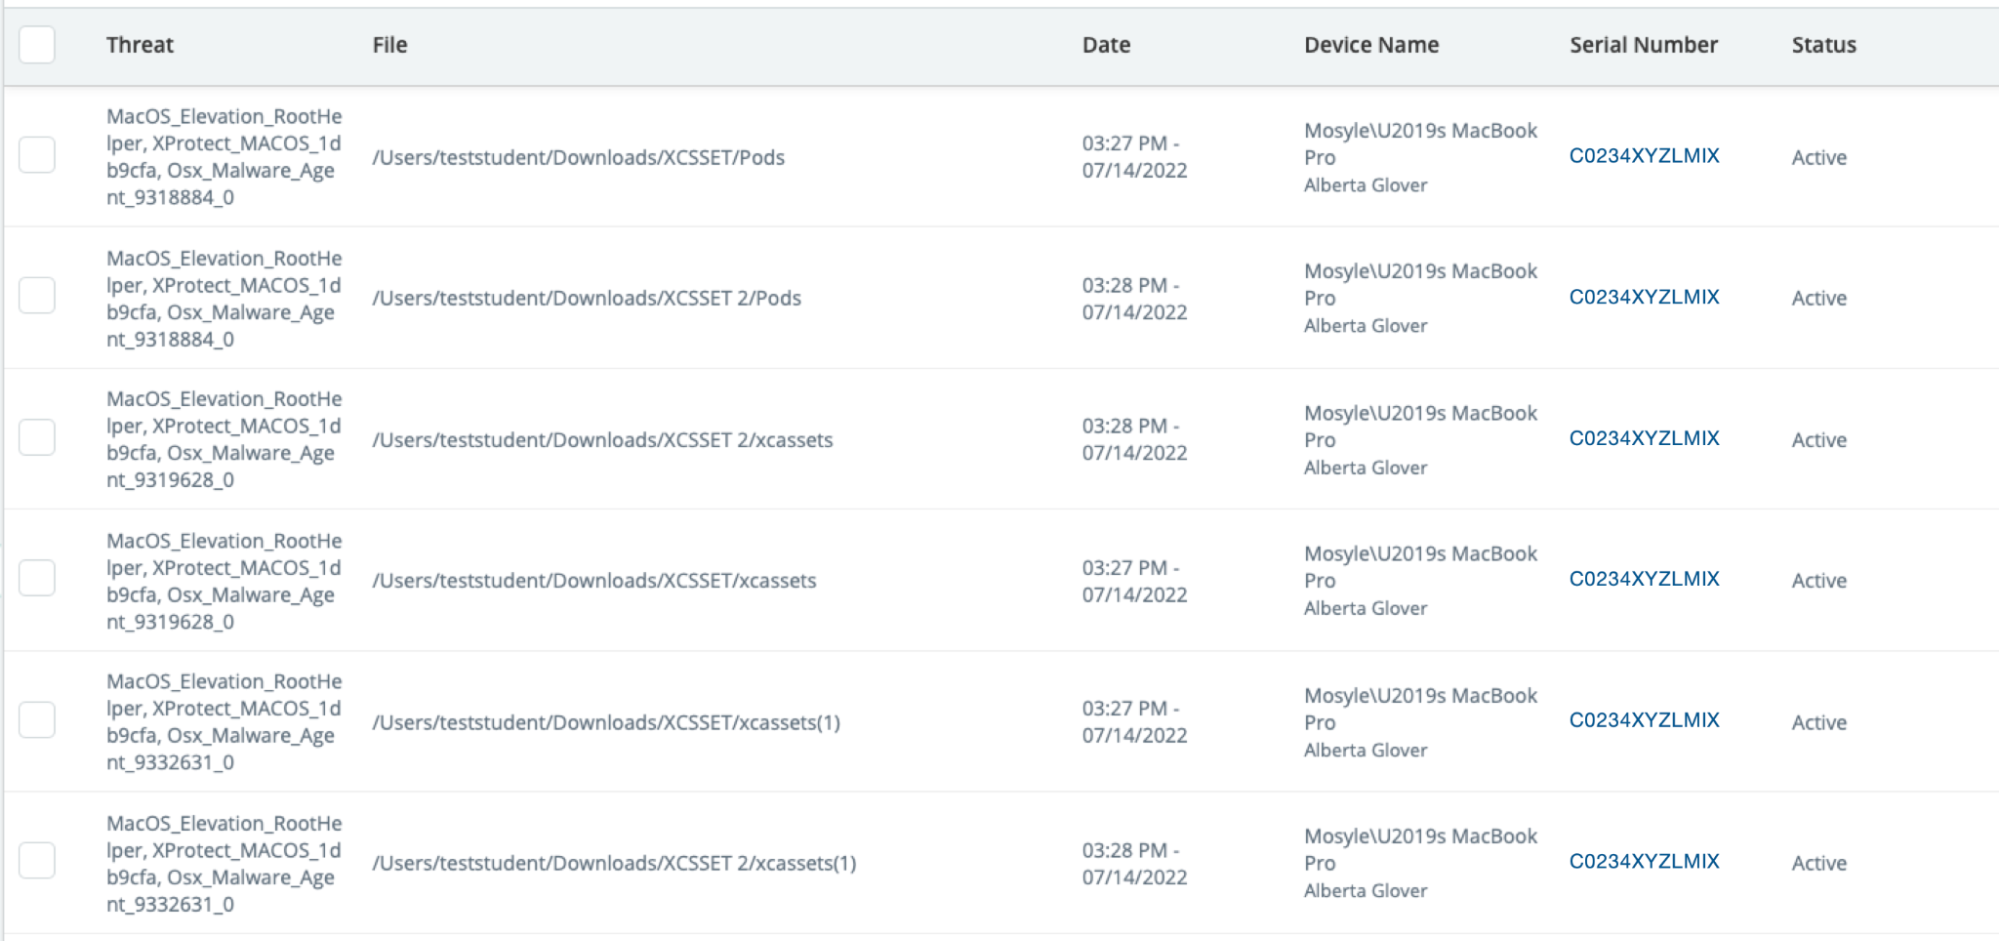
View the list of files in quarantine, including the type of threat, file path, and date and time the file was quarantined. The device name and serial number is also listed. Click the serial number to view the Device Info window.
If needed, quarantine files can be deleted from this area or restored. If a file from quarantine is restored on a device, the file will no longer be flagged as a threat on that particular device.
Sort and filter data to view specific information. Export data as needed with the export option.
Settings
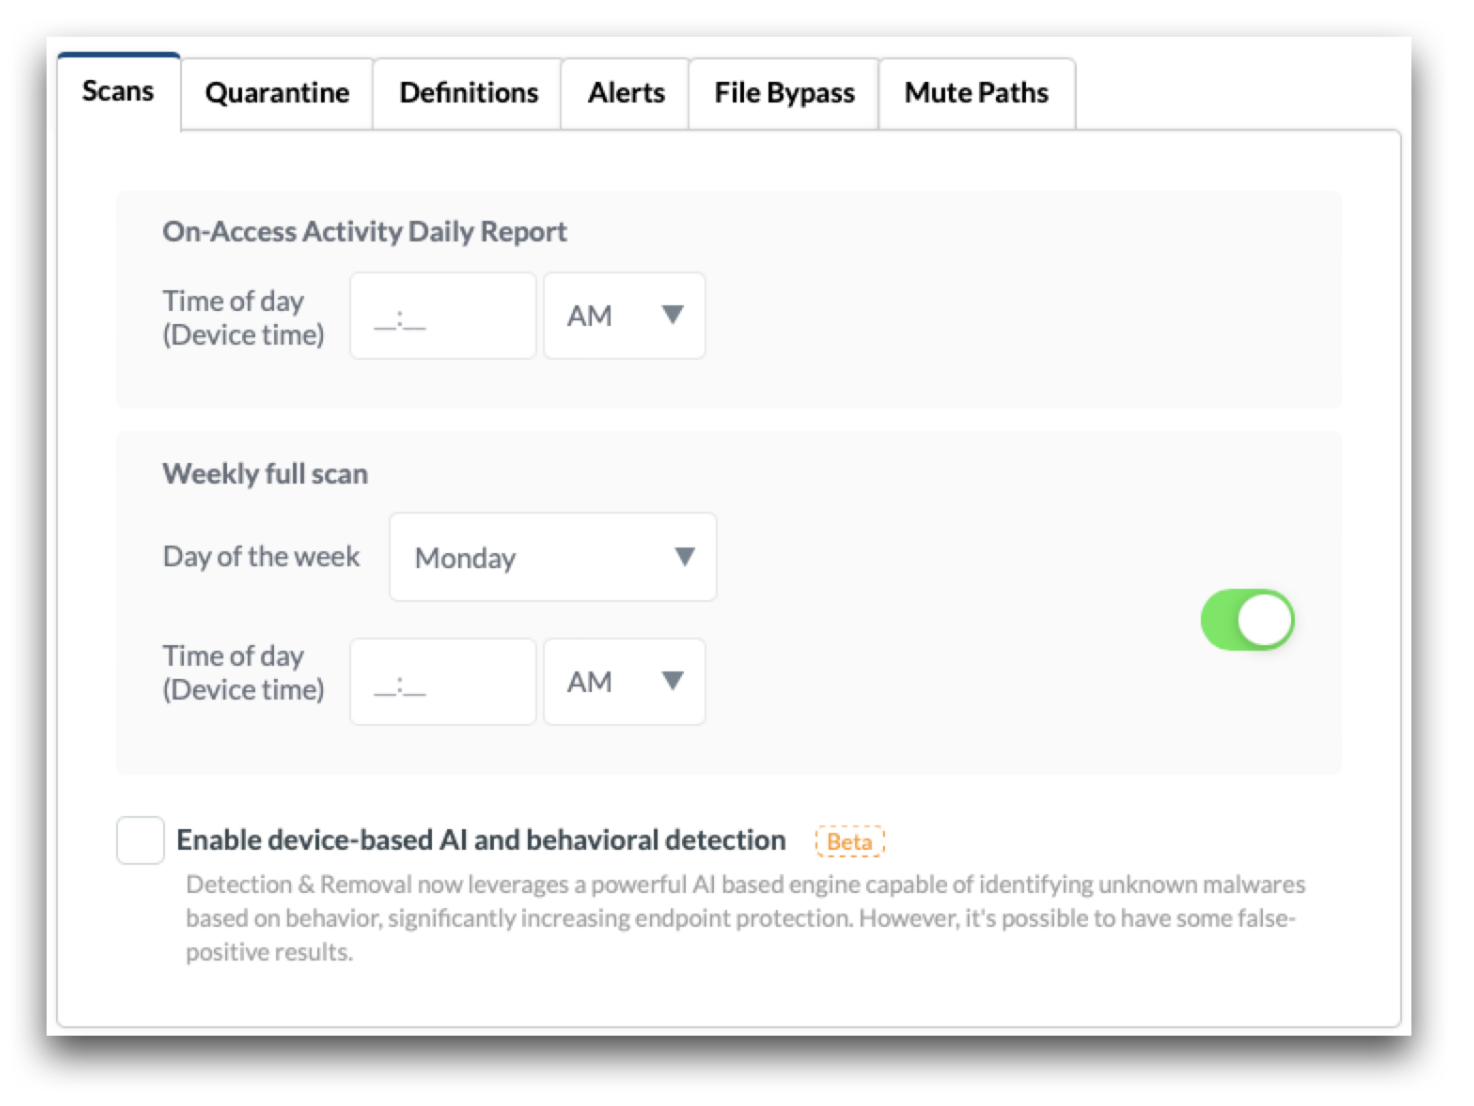
Configure the Detection & Removal settings, including the time and day of the weekly full scan, if device-based AI and behavior detection should be used, behavior for quarantined files, any manual definitions to be included, alerts, file bypass and mute paths.
Logs
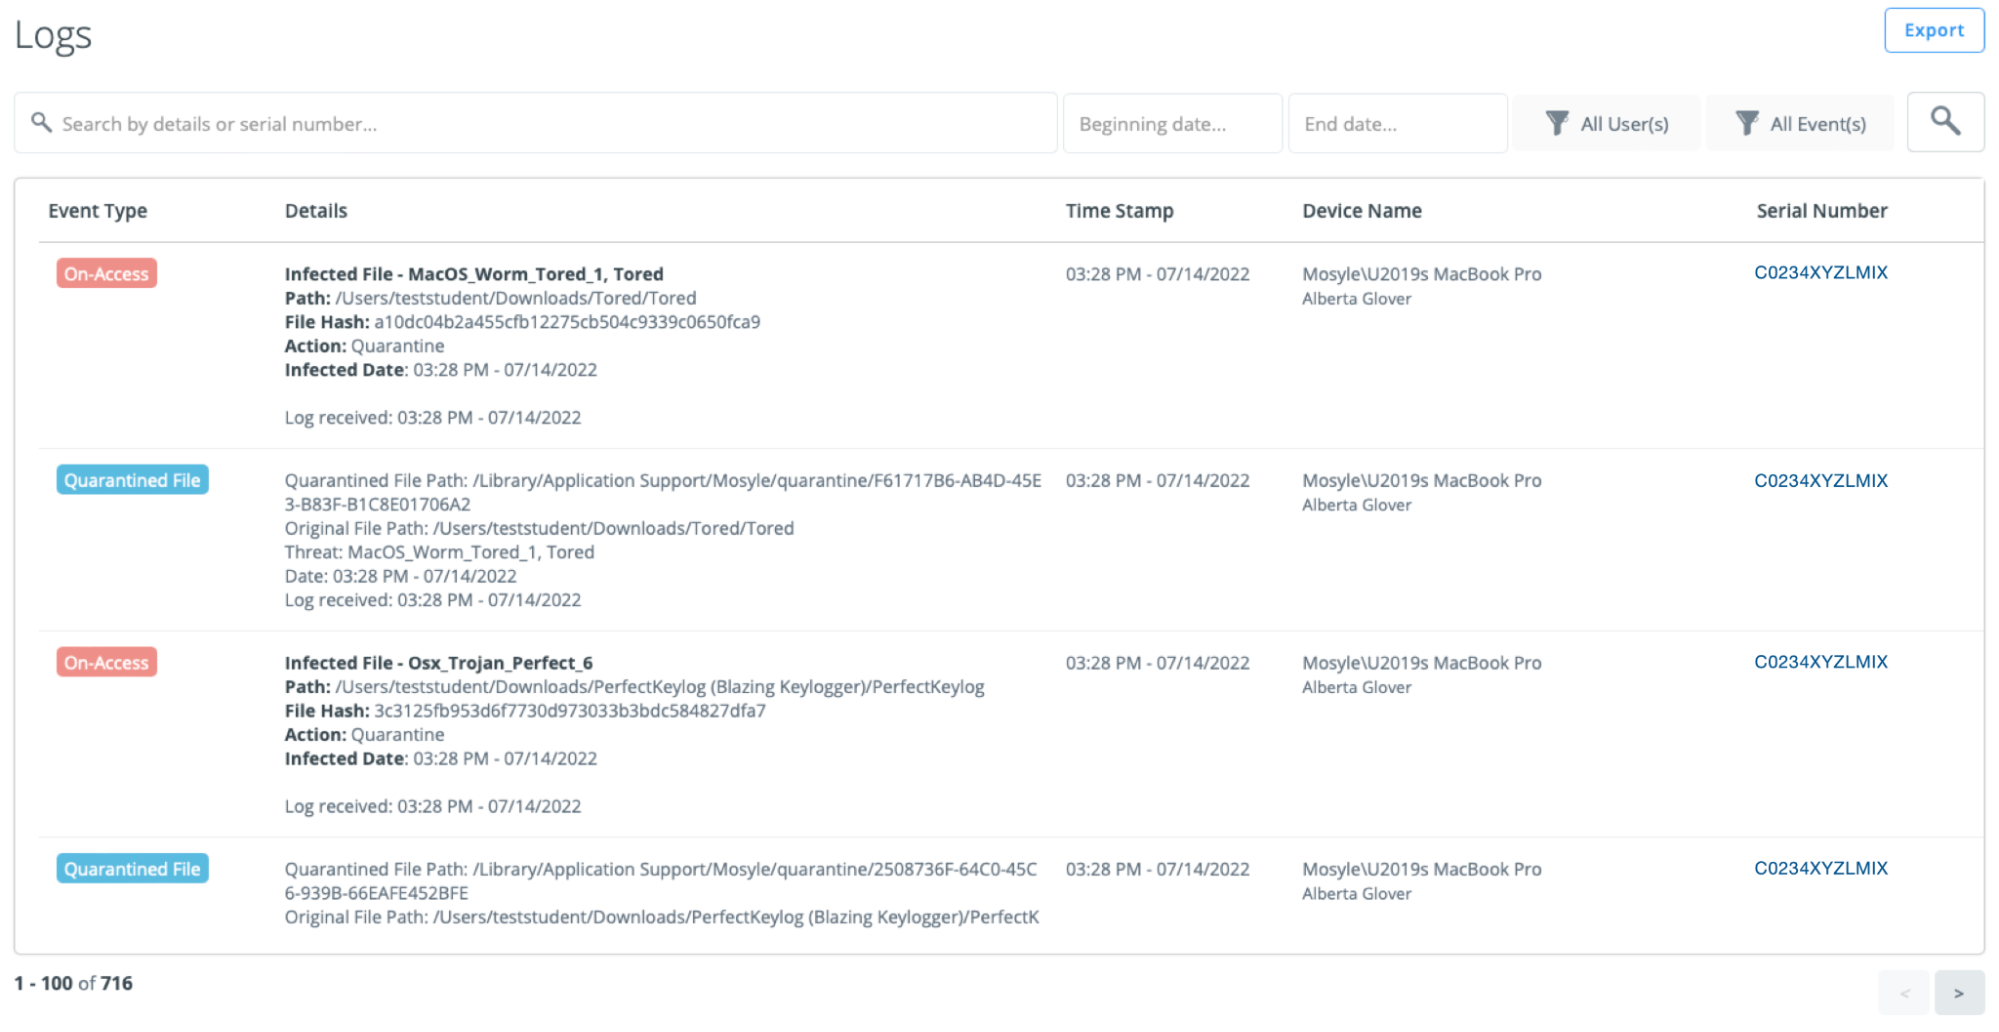
View logs to see detailed info for when a device was scanned and if any infected files or threats were found. In addition to the scanned status, the event type, details regarding the file, date/time stamp, device name and serial number are listed. To export the logs, click “Export” in the upper right corner.
Configuring Detection & Removal
To configure Detection and Removal go to Security > Detection & Removal 2 > Settings > Add new profile.
Enter the name of the profile and configure the following tabs:
-
Scans
- On-Access Activity Daily Report: Enter the time of day to receive the daily on-access report. The report will show in the logs and will provide the infection status in the Devices list.
- Weekly full scan: Toggle on the weekly full scan to trigger a full scan on a weekly basis at the designated time.
- Enable device-based AI and behavioral detection: Check the box to enable AI based detection of unknown malwares based on behavior.
-
Quarantine
- Define the standard behavior for known malware infections: Choose the action to be taken with identified threats on the Mac. If the file is not deleted immediately, it can be found by clicking Quarantine in the menu bar.
- Define the standard behavior for AI Flagged Files: Choose the action to be taken with identified threats on the Mac. If the file is not deleted immediately, it can be found by clicking Quarantine in the menu bar.
- Definitions
- Enter any additional malware definitions to be scanned. The added definitions allow Administrators to include their own hashes for any files to be blocked from end users, in addition to the definitions/files that Detection & Removal detects as a threat.
- When adding definitions, include the hash for the file (MD5, SHA1, or SHA256) in the specified format (HashString:*:MalwareName:73).
- For example: 71f6ac3385ce284152a64208521c592b:*:ThisIsATest:73
- Where 71f6ac3385ce284152a64208521c592b is the hash, "ThisIsATest" is the filename, with the default 73 at the end (version of engine). Mosyle's Detection & Removal will then quarantine any files found with that particular hash.
- Alerts
- Configure to receive alerts based on specific events: New infected devices or New AI flagged devices. Once the event type is selected, choose the frequency to receive the email alerts along with the Administrators to receive the emails.
- File Bypass
- Use the File Bypass to bypass a specific, trusted file from being flagged.
- Enter any known and trusted files to be bypassed and not flagged by Detection & Removal. When adding the files, enter the File Name and the Hash String in the format provided above.
- Mute Paths
- This is not to be used to exclude paths or files from being scanned. To exclude files from being scanned or flagged by Detection and Removal, use the File Bypass option. The use case for the Mute Paths is to ignore security events generated by the paths entered from being scanned.
- Enter any paths to be ignored by Detection & Removal. Any events occurring at the paths entered will not be scanned by the On Access scan or the Full Scan. Only enter paths that are absolutely trusted.
After configuring the options available for Detection & Removal, assign the profile to users and/or devices.
Mosyle will automatically install the Detection & Removal engine, along with any System Extensions and Privacy Preferences required.
What to Expect
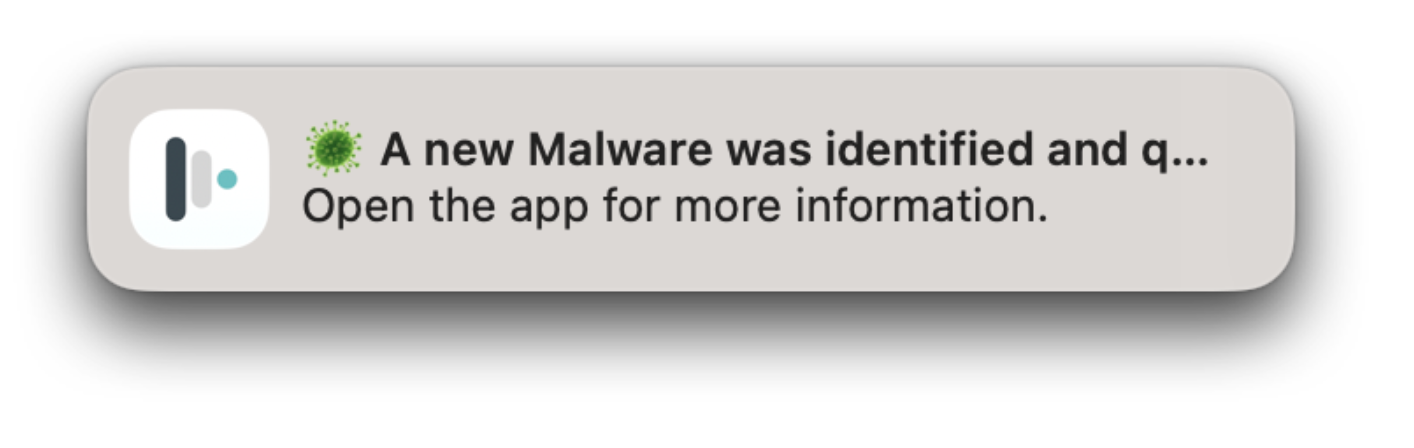
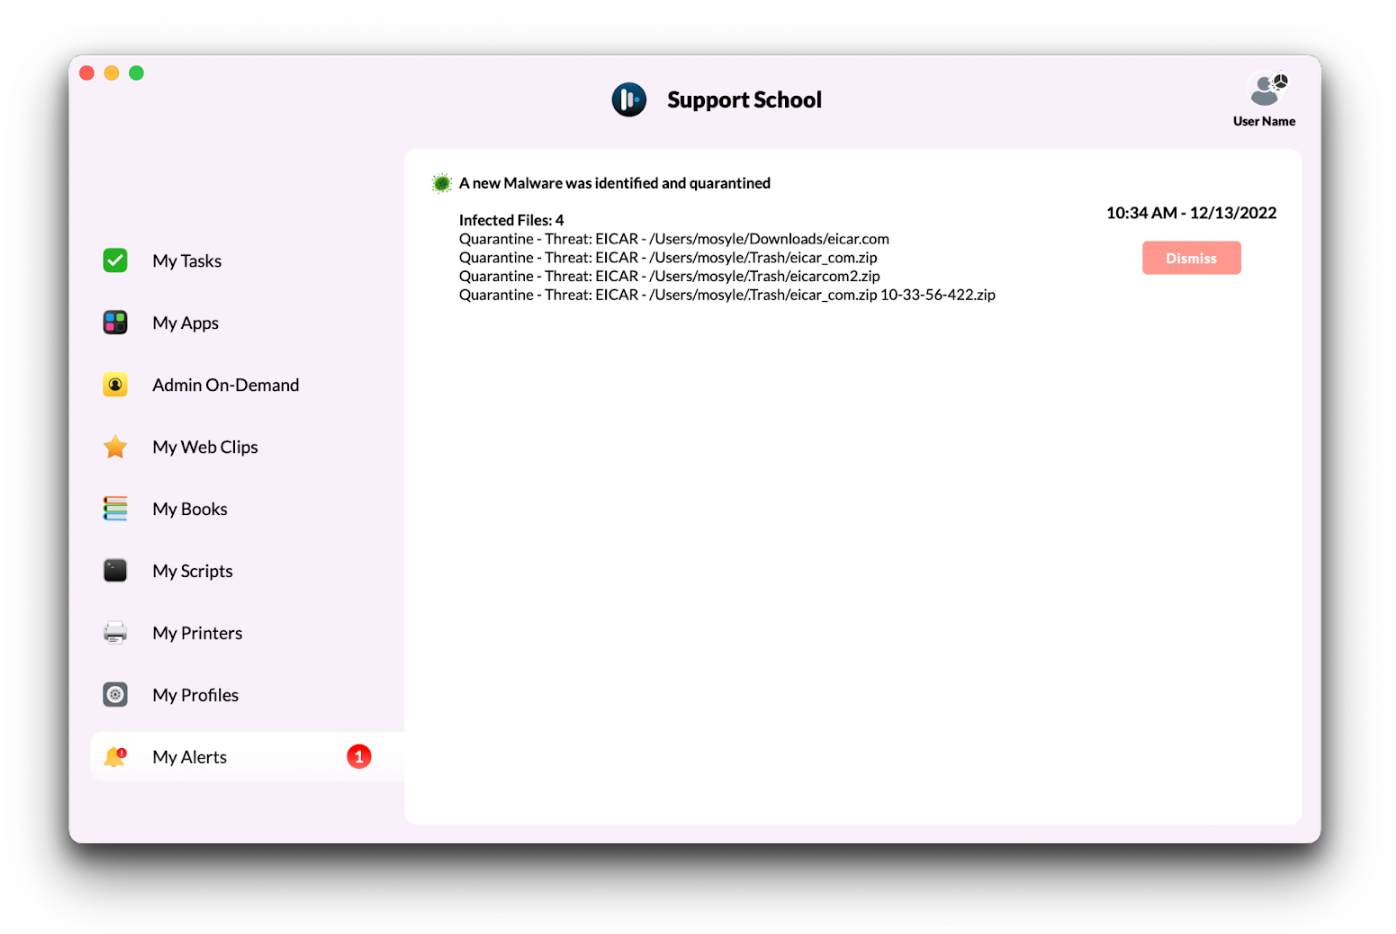
When an infection is detected, Administrators will see the infections in the Logs and in the device status view under Devices. End users will be alerted via a native macOS Notification as well as see an alert in the Manager application.
macOS Notification
Manager app
Admin On-Demand
Overview
Admin On-Demand provides a quick, easy way for Mosyle Administrators to convert Admin user accounts on the Mac to Standard users, while also allowing user accounts on the Mac to request temporary user account escalation to complete any tasks that require Admin access.
Admin On-Demand is organized into four menu items: Overview, Devices, Settings, and Logs.
Overview
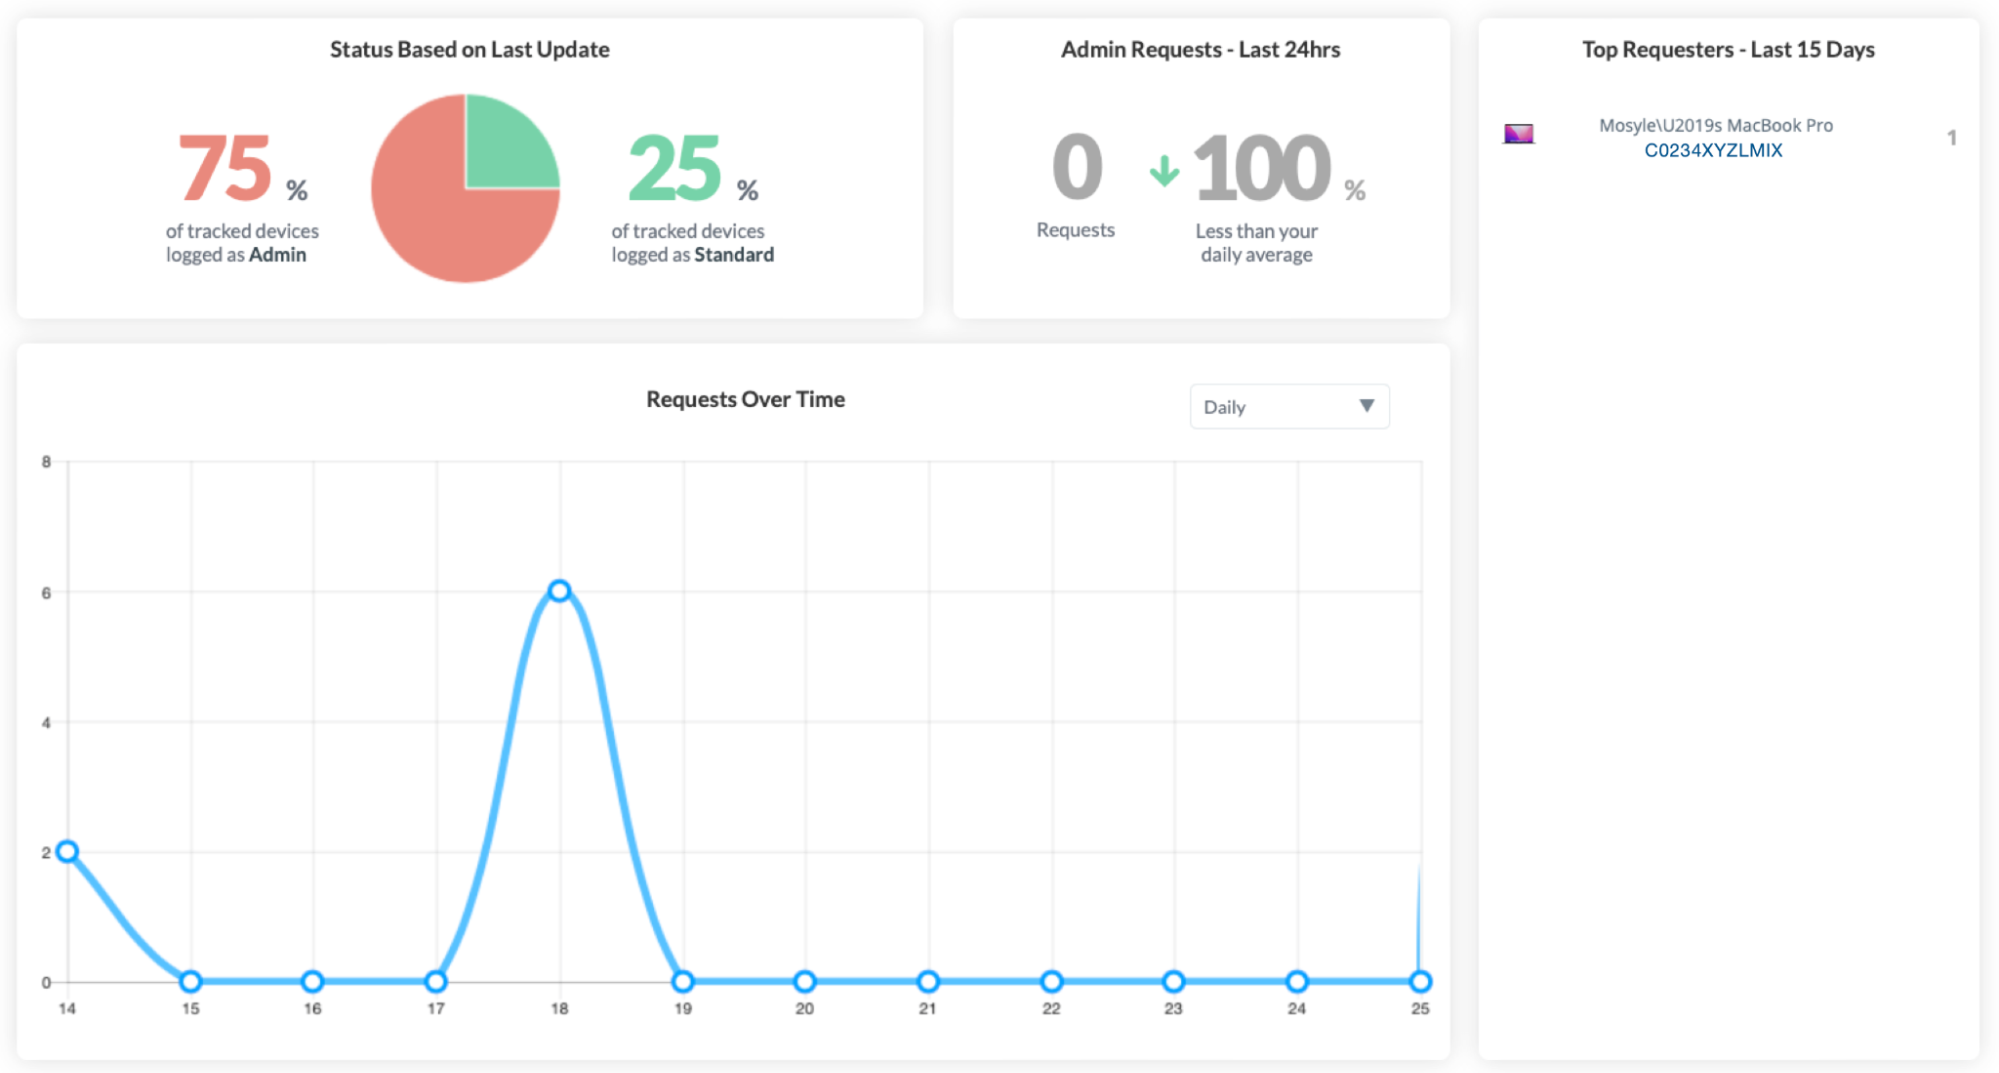
The Overview pane provides a quick summarized view of your user account status on devices. You can view the following in this area:
- User account status based on last update: Includes the percentage of devices with Admin user accounts and percentage of devices with Standard user accounts.
- Number of Requests for temporary Admin escalation
- Top Requesters over the last 15 days: Displays the top users requesting temporary Admin access
- Requests over time: A graph showing the number of requests for temporary Admin access.
Devices
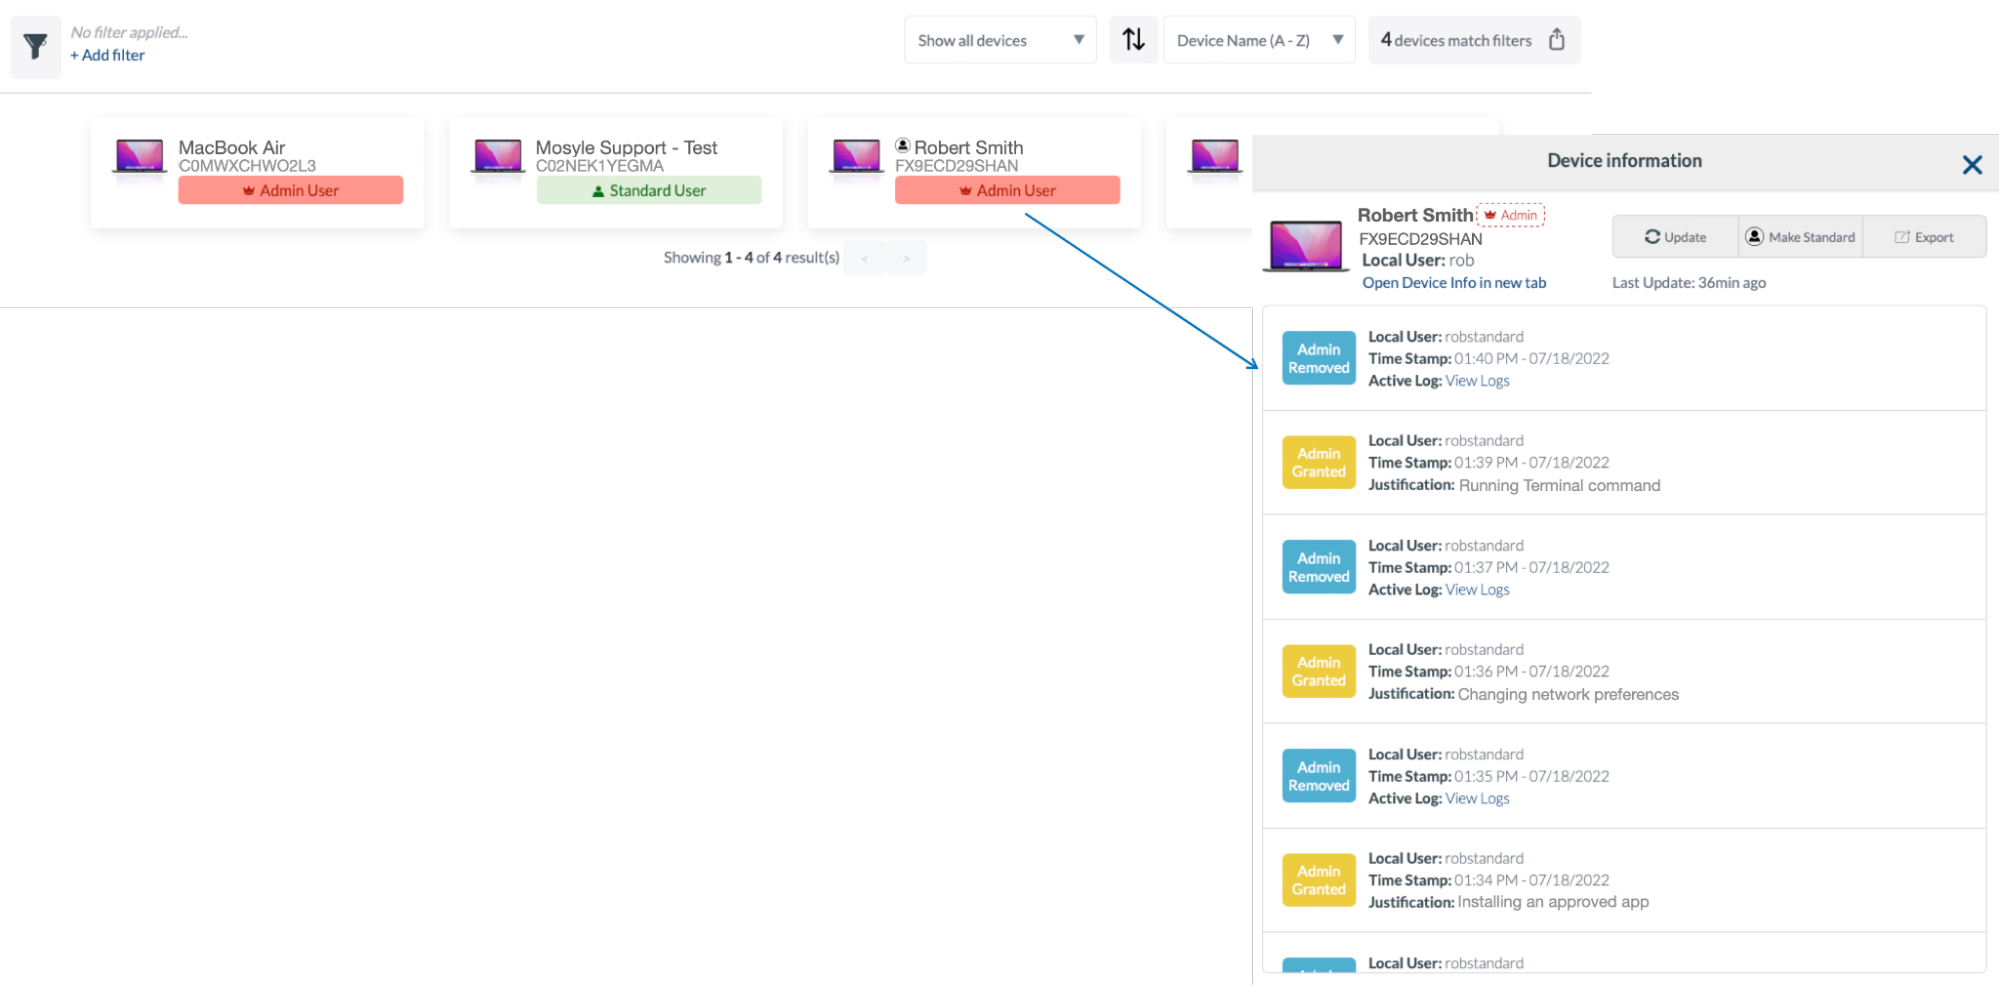
The Devices tab will show all devices assigned to the Admin On-Demand configuration and the current user type logged in on the device - either Admin or Standard.
Use Filters available to filter and sort devices to show only those of interest. If needed, the data can be exported at any time using the button in the upper right “X devices match filters”.
Click a device tile to bring up additional details about the device and user. See any logs or actions taken on the device, export the data, or convert the user to Admin or Standard user.
Settings
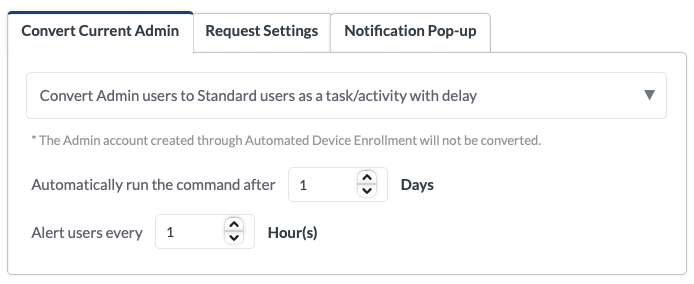
Configure the Admin On-Demand settings, including the conversion behavior, request settings, and/or customize the notification text for end users.
Logs
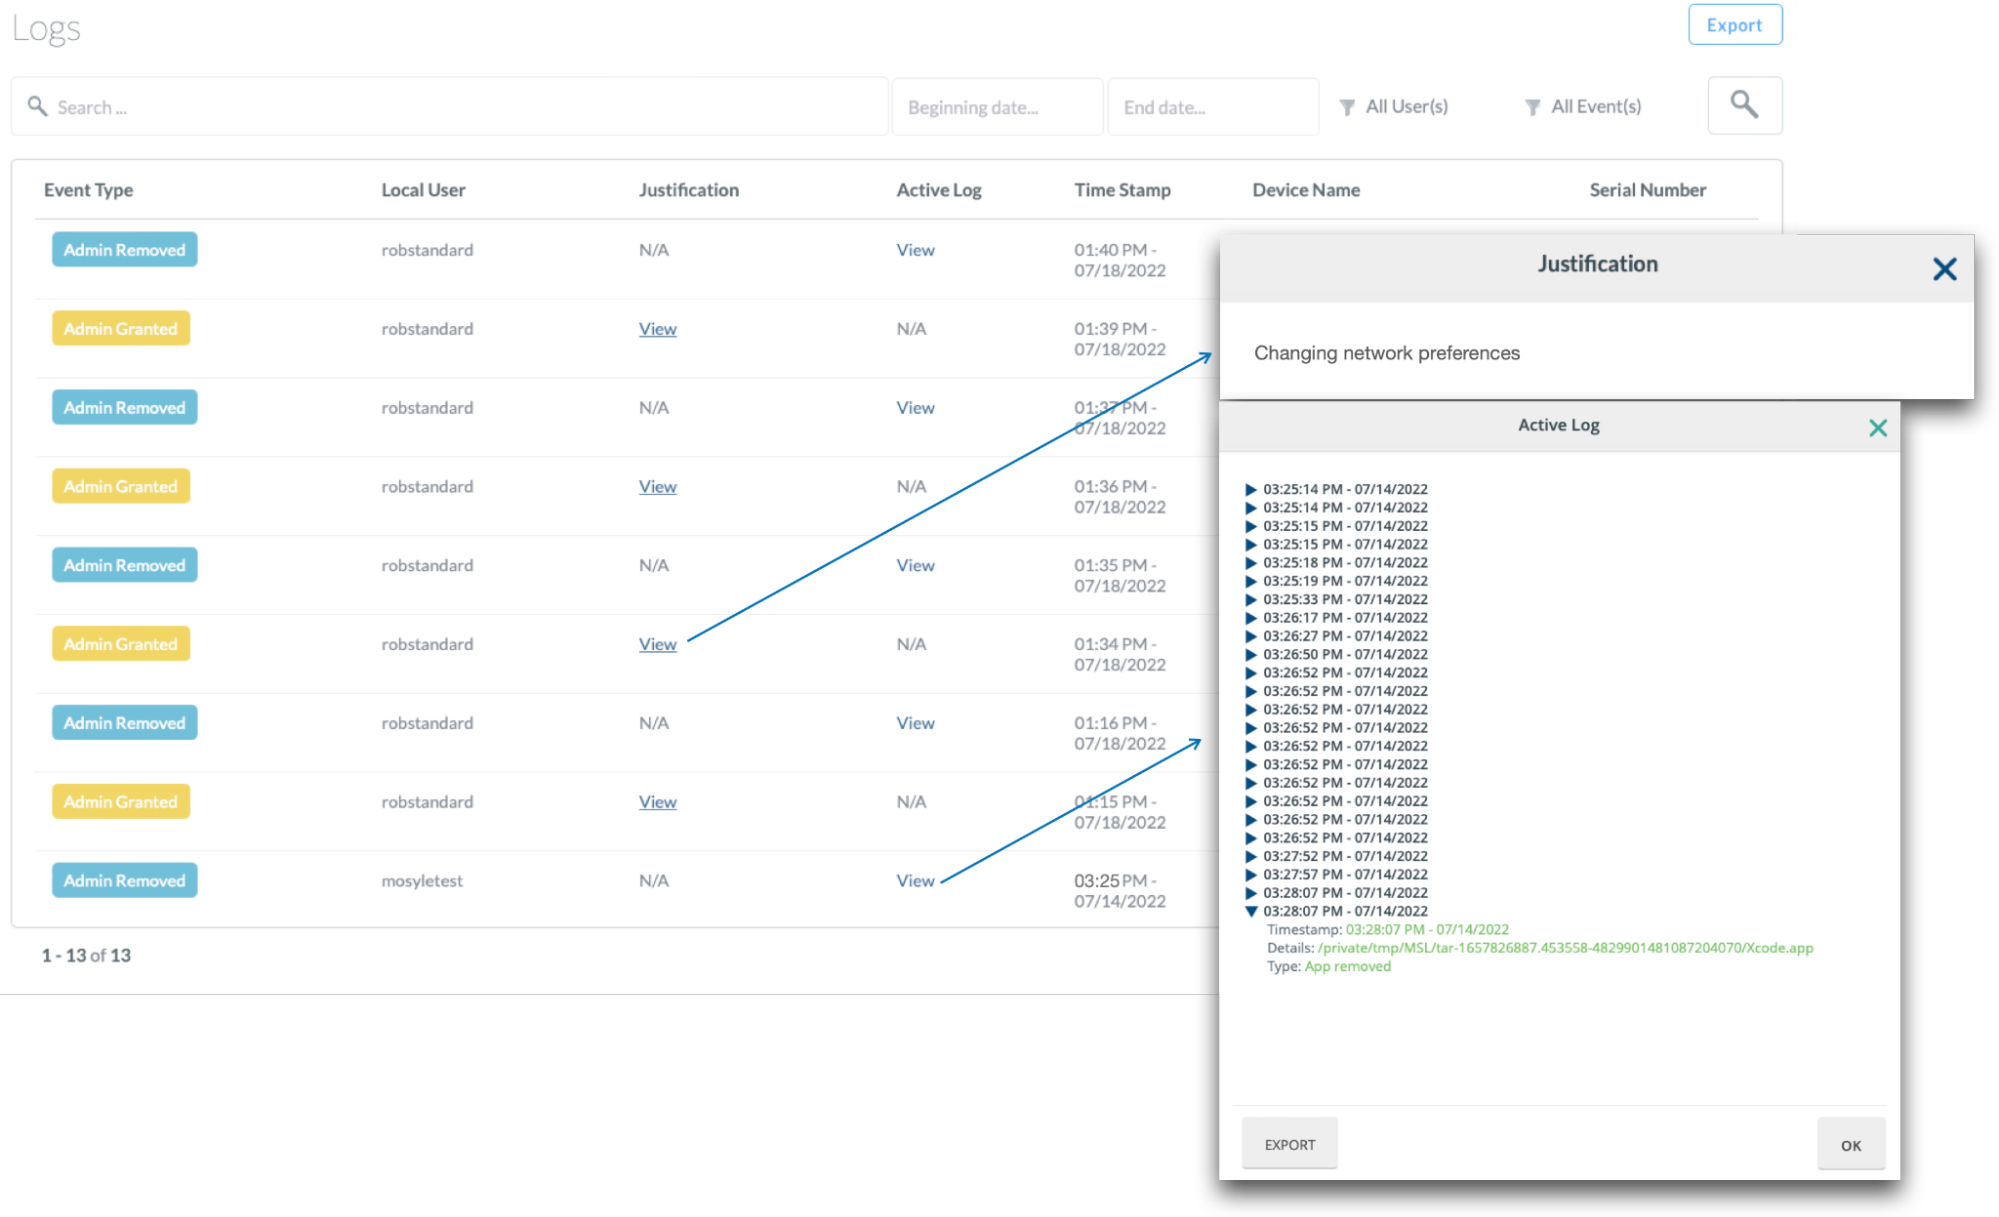
View logs to see detailed info for when a user requested Admin access, when it was granted and removed, the justification for the access, and any corresponding logs. The date & time stamp, device name and serial number are also listed. To export the logs, click “Export” in the upper right corner. To export individual device action logs, click “View” under the Active Log column and click “Export”.
Configuring Admin On-Demand
To configure Admin On-Demand
- Go to Security
- Admin On-Demand
- Click Settings > Add new profile
- Configure the settings in the three available tabs: Convert Current Admin, Request Settings, and Notification Pop-Up
Convert Current Admin
The Convert Current Admin settings will convert the current logged in Admin user to a Standard user. This option will not convert the additional Admin account created during Automated Device Enrollment (DEP Admin), however it will convert any other logged in Admin users if enrolled manually.
Using the dropdown menu, choose from the following:
- Convert Admin users to Standard users as a task/activity with delay: This will prompt the logged in Admin user indicating they have a task assigned to convert their Admin account to a Standard user account. With this, they can choose when to execute the account conversion by clicking the task in the Manager app. As the Admin, you have the option to select how long of a delay the user will have before the command is automatically sent, as well as how often to alert users.
- Convert Admin users to Standard users upon profile save and assignment: This will send a command to automatically convert any logged in Admin user accounts to Standard user accounts when the profile is saved and/or when the profile is assigned to the user/device. The end user will not receive a notification regarding the account conversion.
- Do not convert Admin users to Standard users: This will not convert any current Admin user accounts to Standard user accounts. To convert individual user accounts to Standard user accounts you can do so under the Devices tab.
Request Settings
The Request Settings tab allows configuration of whether or not users will have access to Admin On-Demand in the Manager application to request temporary Admin access. There are two options available:
- Allow users to temporarily escalate their privileges to Admin
- Do not allow users to temporarily escalate their privileges to Admin
When users have the option to temporarily escalate their privileges to Admin, they can request the escalation in the Manager application and because they have access to perform such escalation, it will be granted automatically to the end user. The following options are available to configure for this escalation period:
- Select the duration of Admin privileges for each request: Set how long each user will have Admin access on the device after it is requested. In most cases, 1 minute is ample time to complete any task that needs Admin credentials, however, 3 minutes and 5 minutes are also available.
- Limit the number of requests: Limit the number of times users can request account escalation per day, week, month, or year.
- Require users to provide a justification for the account escalation request
- Quit Terminal app when removing Admin privileges: If the Terminal app is not quit when the user is converted back to a Standard account, the user will continue to have Admin access in Terminal so long as the current session is active.
- Quit System Preferences when removing Admin privileges
- Save relevant action logs during the period in which the user has Admin privileges: Any actions taken by the user, including any Terminal commands, will be logged.
Notification Pop-Up
Customize the pop-up message users will see before their user account is escalated to have Admin privileges.
What to Expect
When users have access to Admin On-Demand, they can request the user privilege escalation from the Manager application.
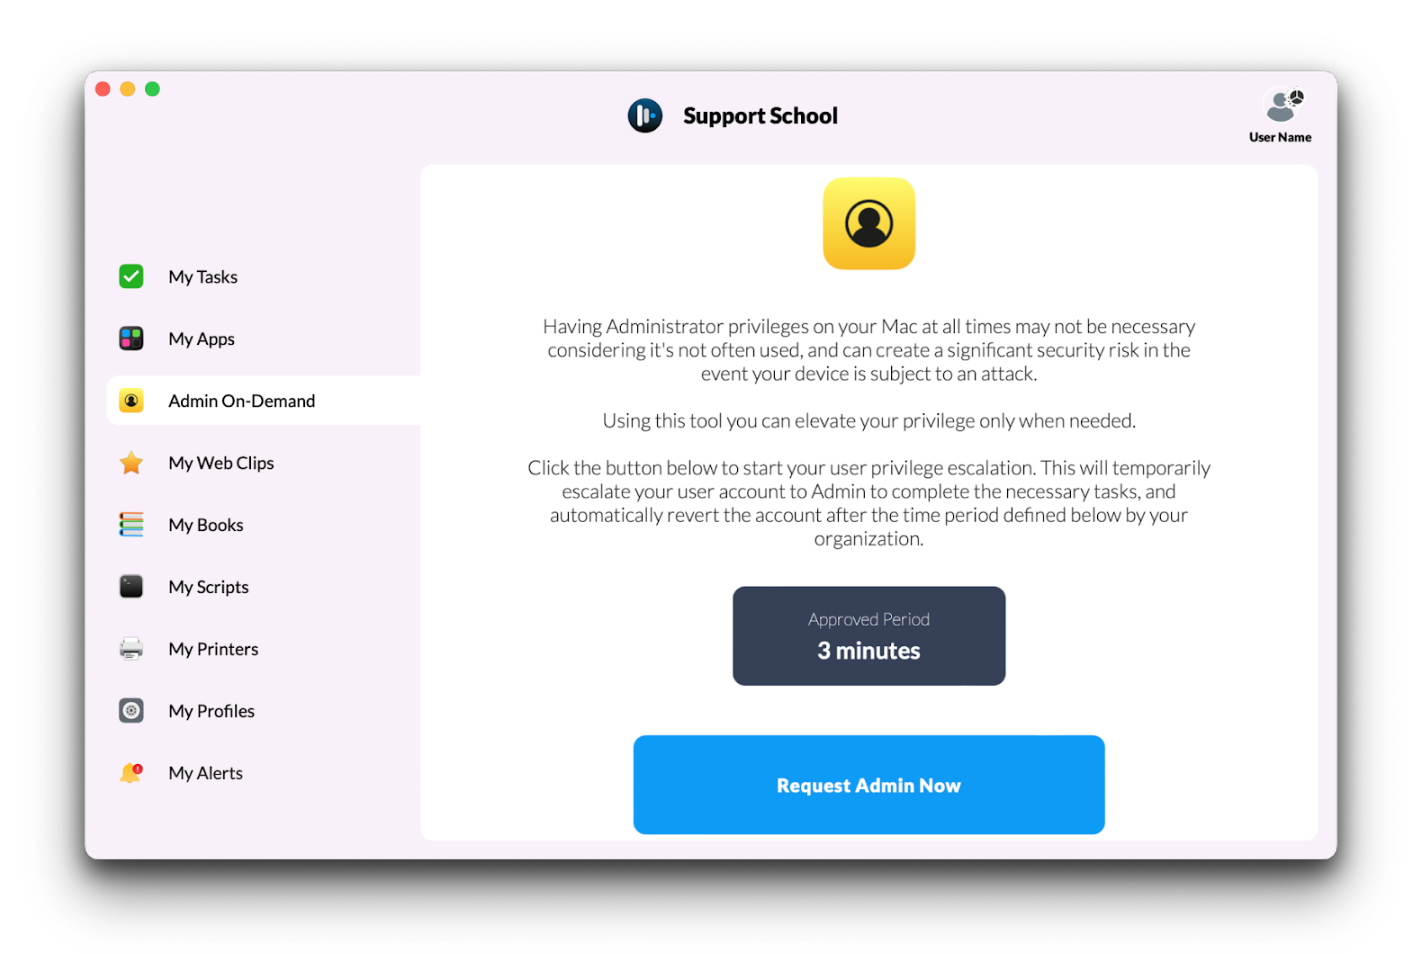
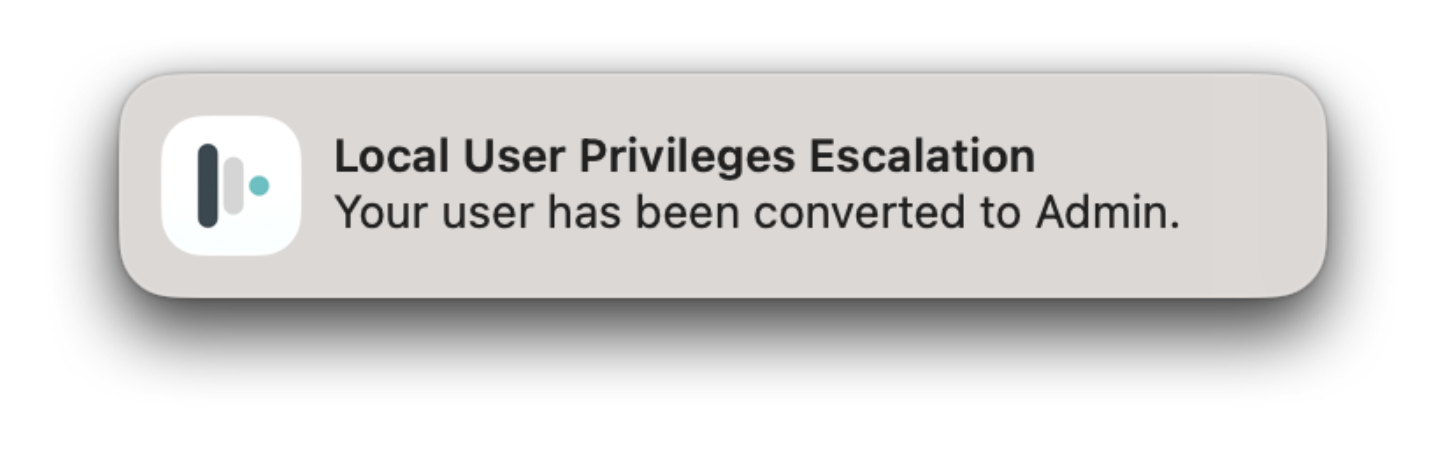
After requesting Admin access, users will receive a notification indicating the account has been converted.
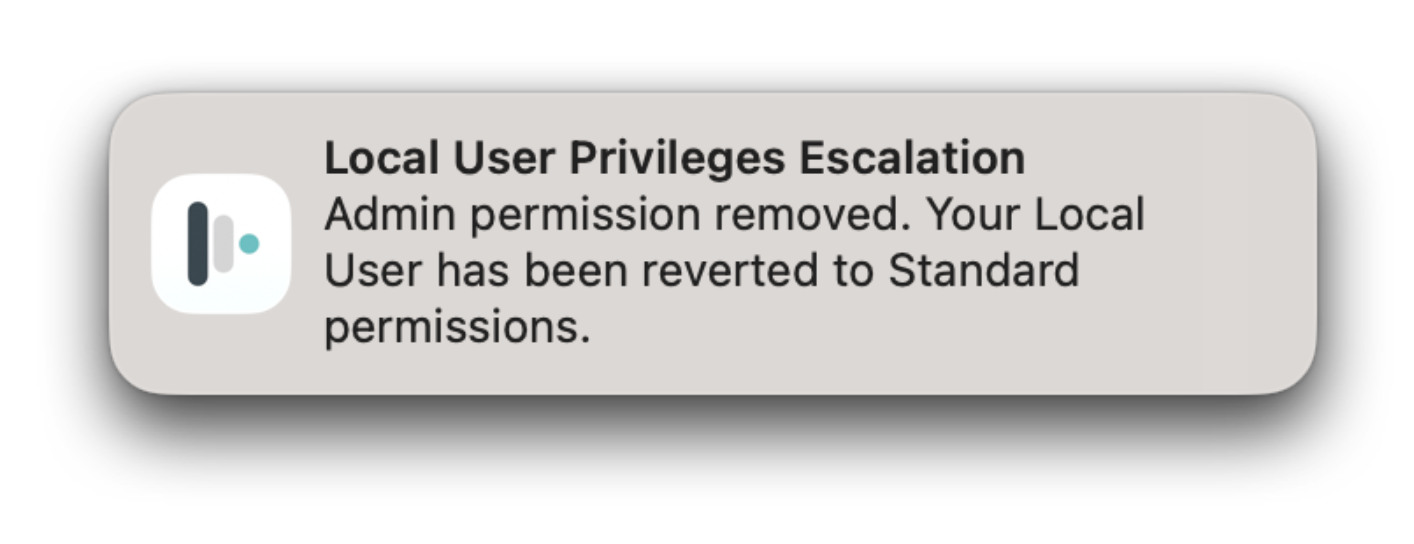
At the end of the approved time period, the end user will receive a notification that their account has been converted back to Standard user access.
Actions taken during the user privilege escalation can be viewed in the Admin On-Demand Logs.
DNS Filtering
Overview
DNS Filtering provides Administrators an easy way to filter network traffic to ensure users are accessing approved sites. It is organized in 7 tabs: Overview, Settings, Filtering, Security, Allowed/Blocked, Alerts, and Logs.
DNS Filtering profiles and configurations can be assigned to individual users and groups, or to all devices. Complete assignment based on what is needed for the school or district environment. Profiles can be quickly toggled ON and OFF using the toggle in the left menu.
When the DNS Filtering is assigned to a user/device, the necessary configuration profiles (DNS Settings and DNS Proxy Extension) will be automatically installed. Mosyle's DNS Filtering requires iOS/iPadOS 14+ and macOS 11+.
The Mosyle DNS Filtering requires specific domains and ports. Please see the help center article titled “Domains and Ports for DNS Filtering” for more information.
Overview
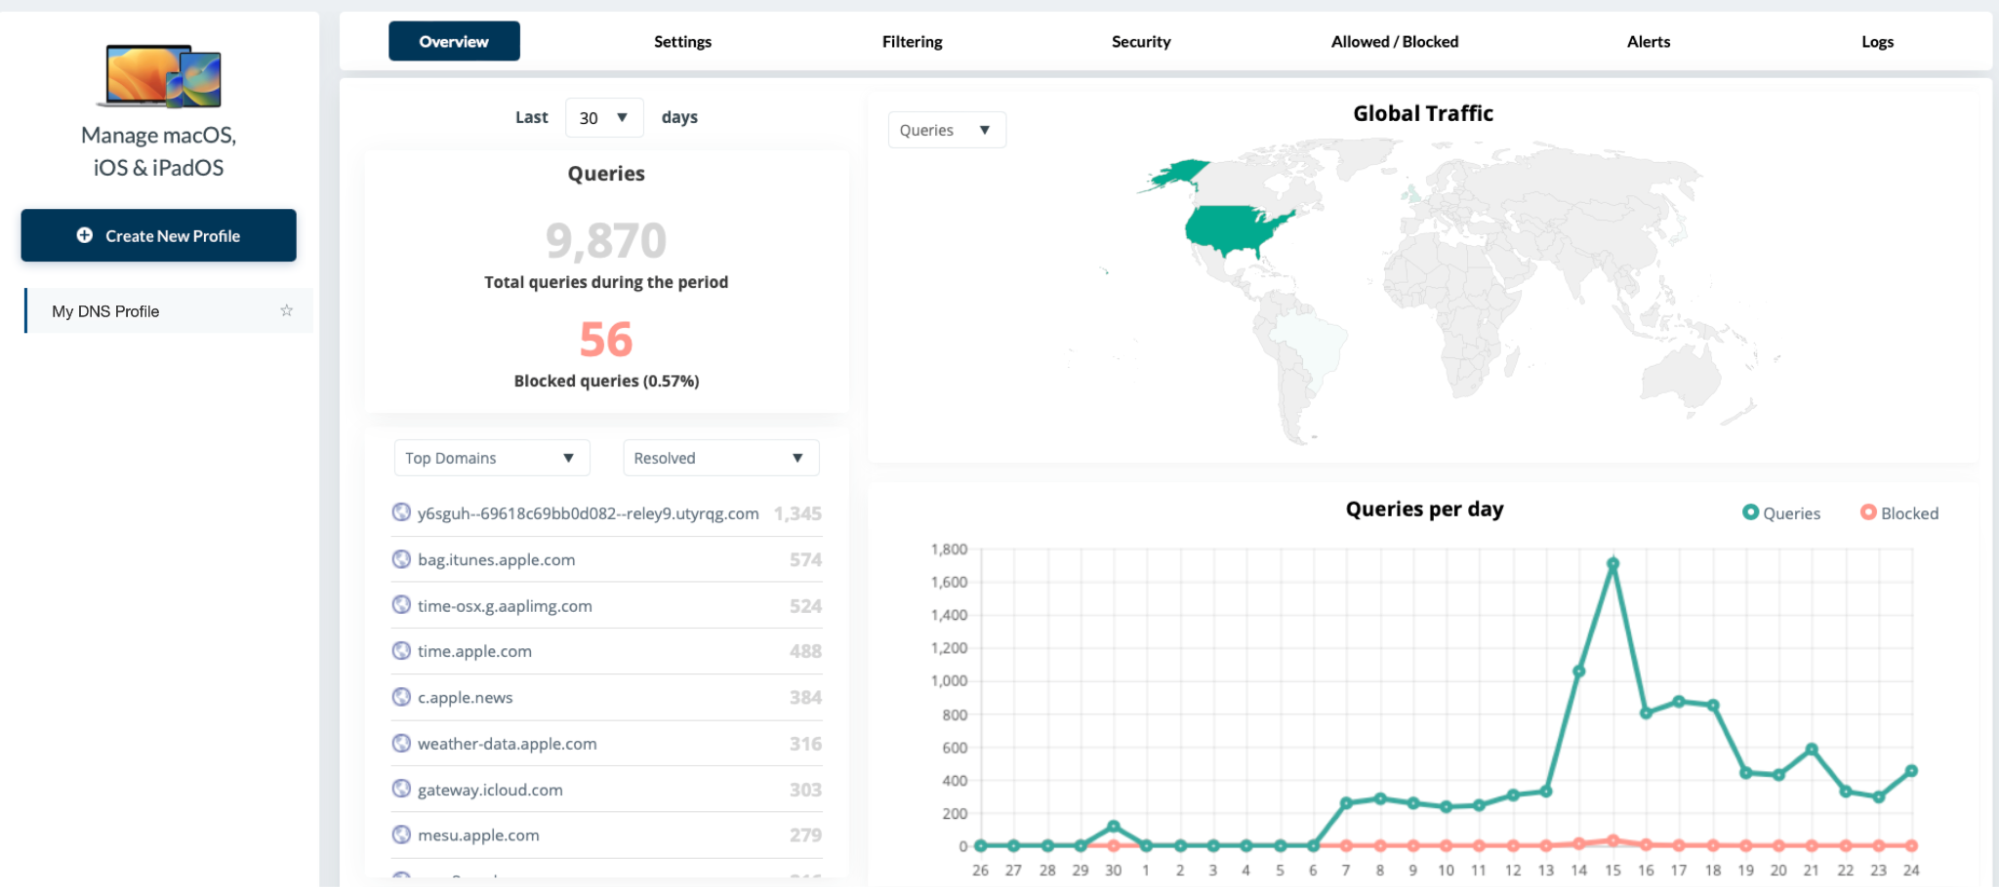
The Overview tab provides query data on the devices assigned to the individual profile. View the total number of queries, number of blocked queries, global traffic, number of queries per day, and filter by the list of top domains resolved and/or blocked.
Settings
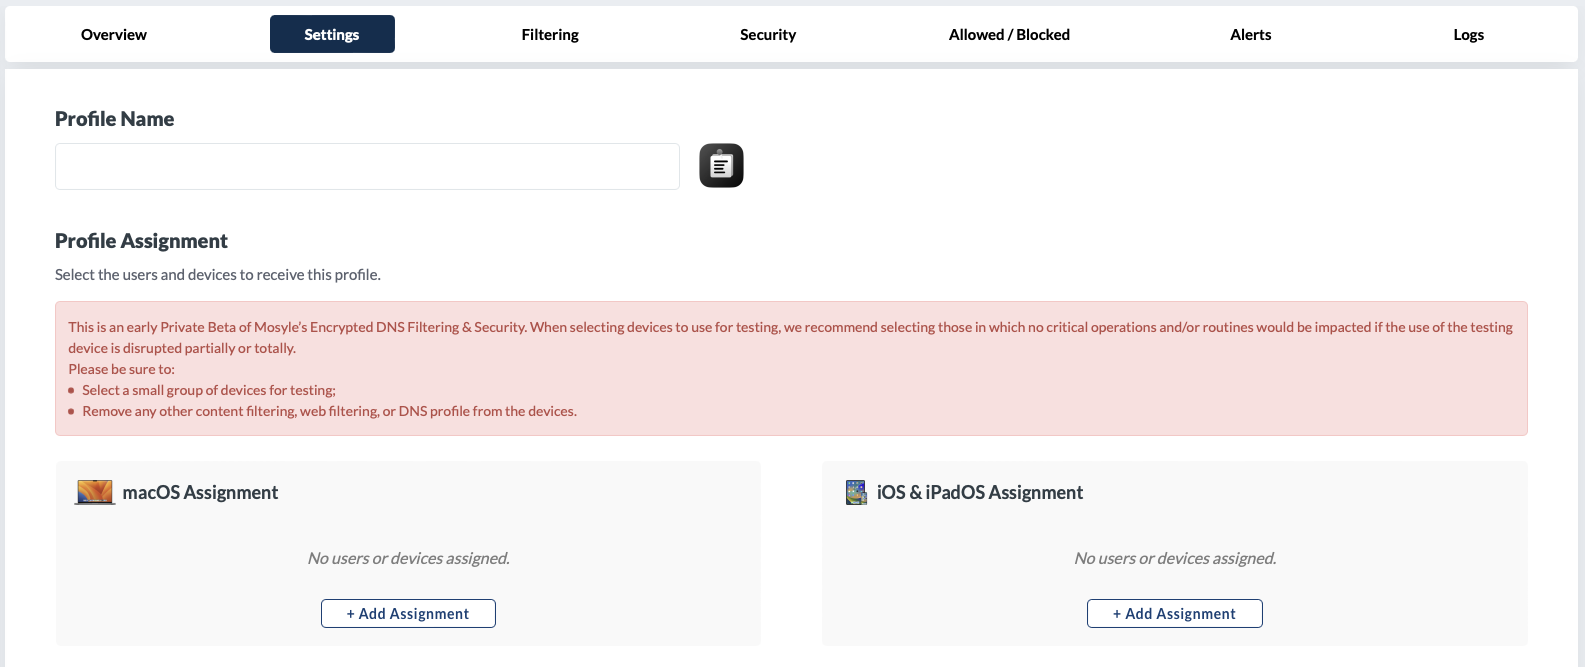
The Settings tab can be configured to specify Privacy & Logging settings, settings for macOS and iOS management, and any DNS Bypass rules. Assign the profile to the users/devices to be filtered. When using the DNS Filtering, it's strongly recommended not to apply any other content filtering solutions or profiles to avoid conflicts.
Filtering
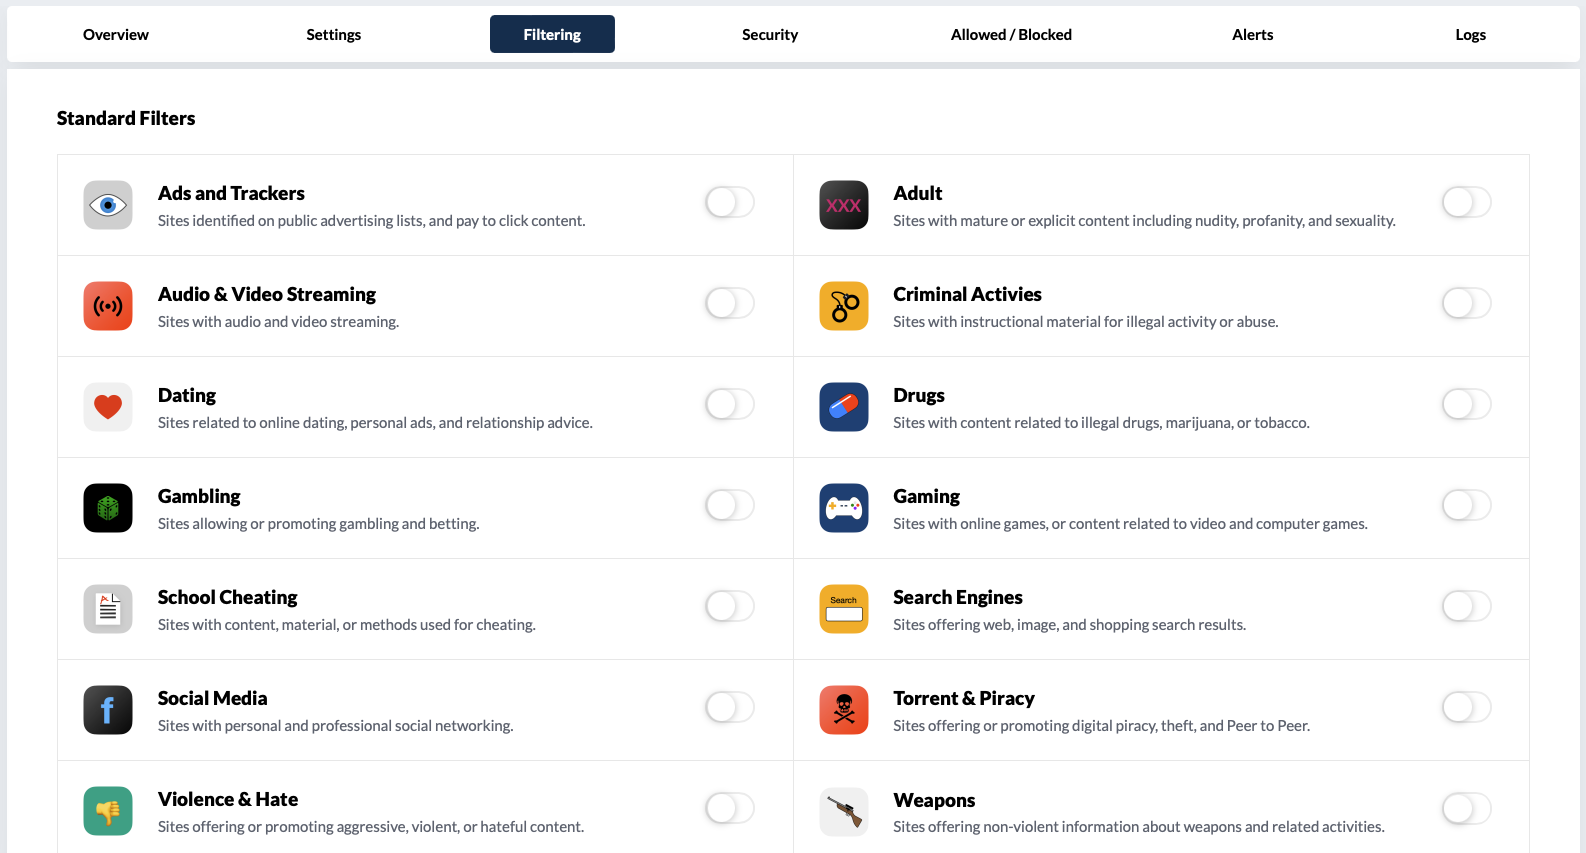
The Filtering tab can be configured to apply a Standard set of filters to filter network traffic. Custom filters can be created and applied.
Security
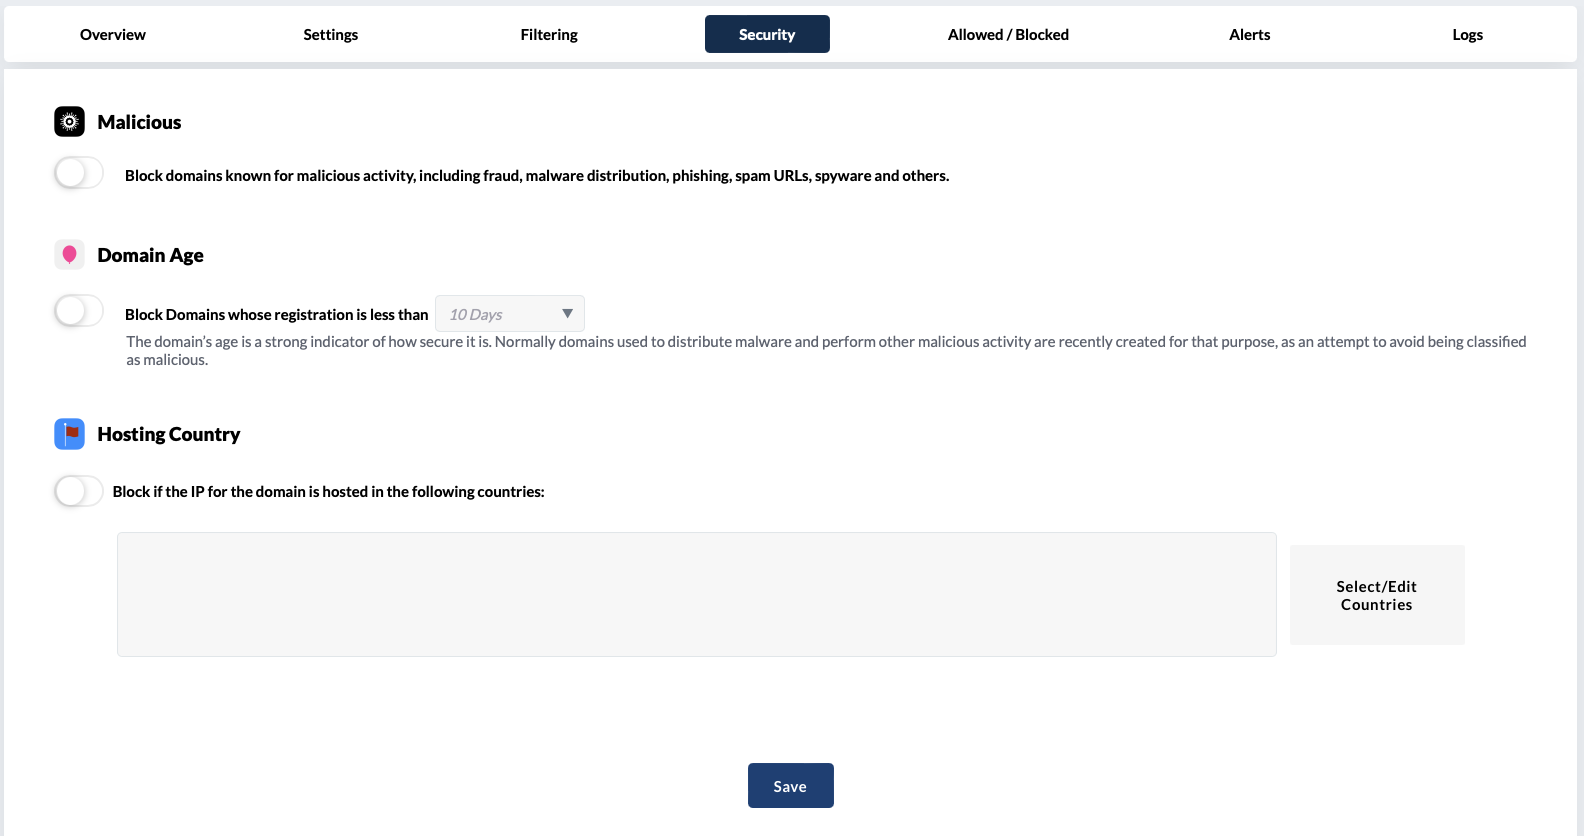
Configure the Security tab to block domains based on malicious activity, domain age, or hosting country.
Allowed/Blocked
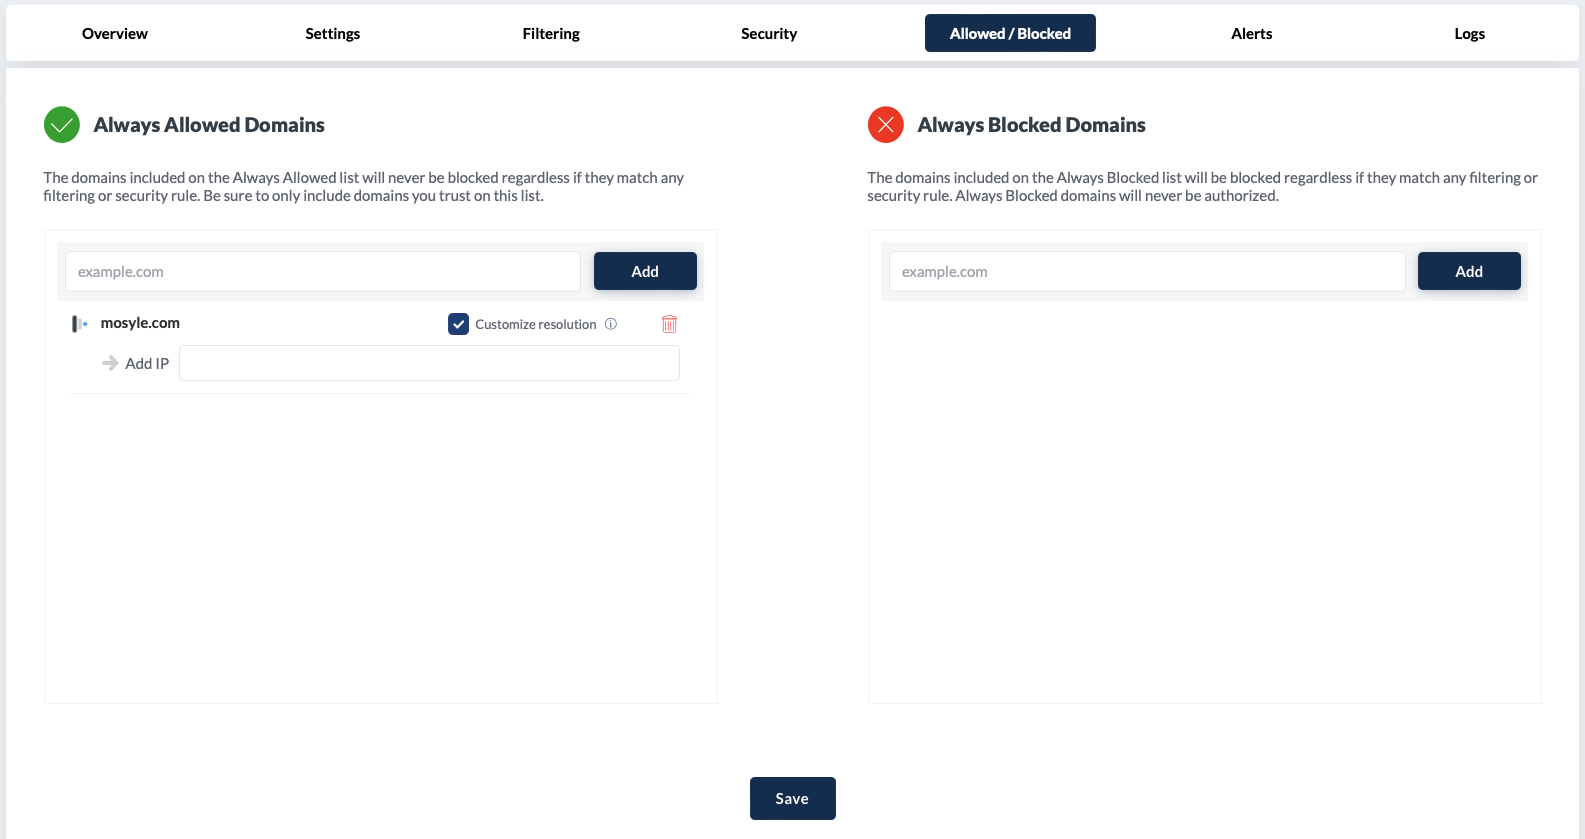
Customize specific domains that should be always allowed or always blocked, despite their categorization. Add domains that require custom resolution.
Alerts
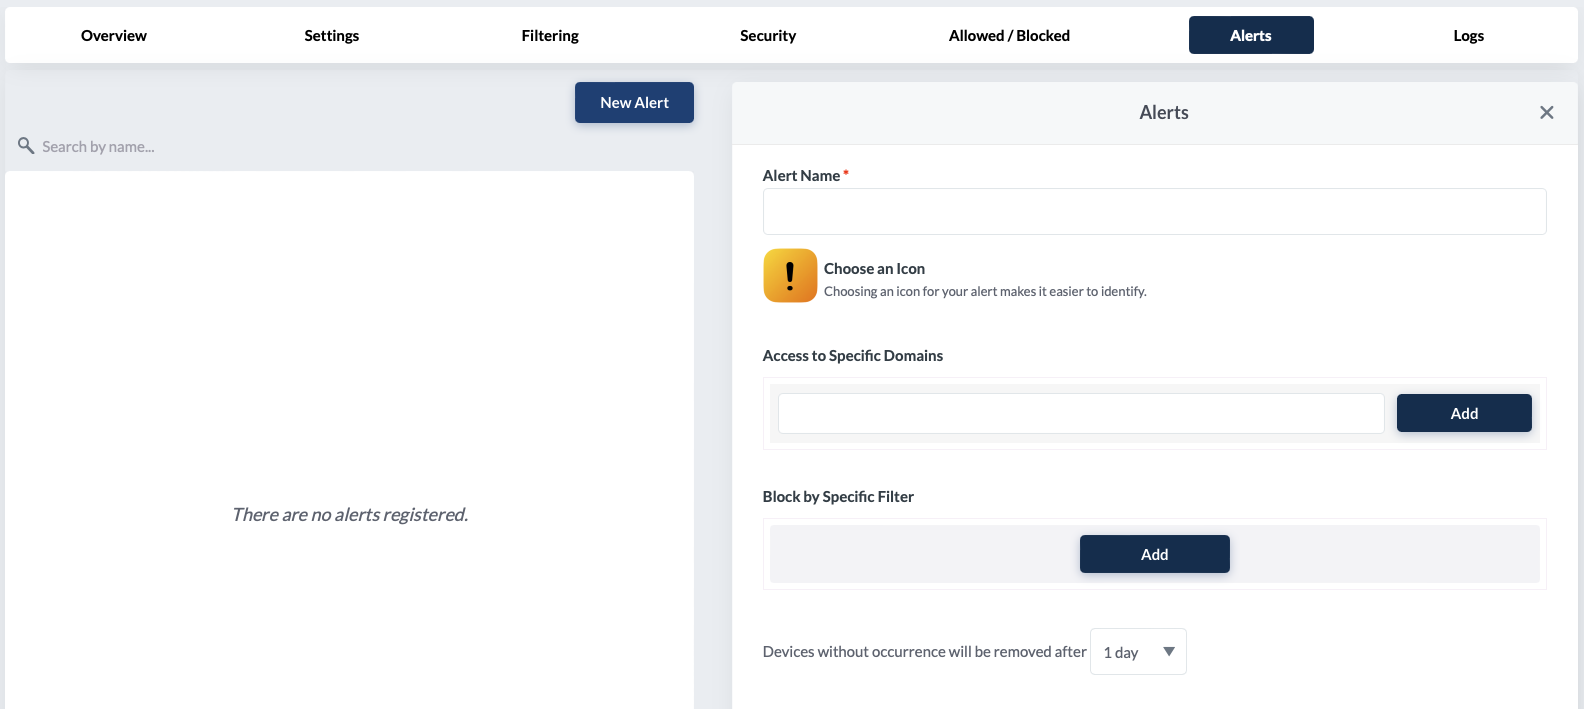
Configure alerts so that Administrators are notified when users attempt to access a domain or site that is not allowed.
Logs
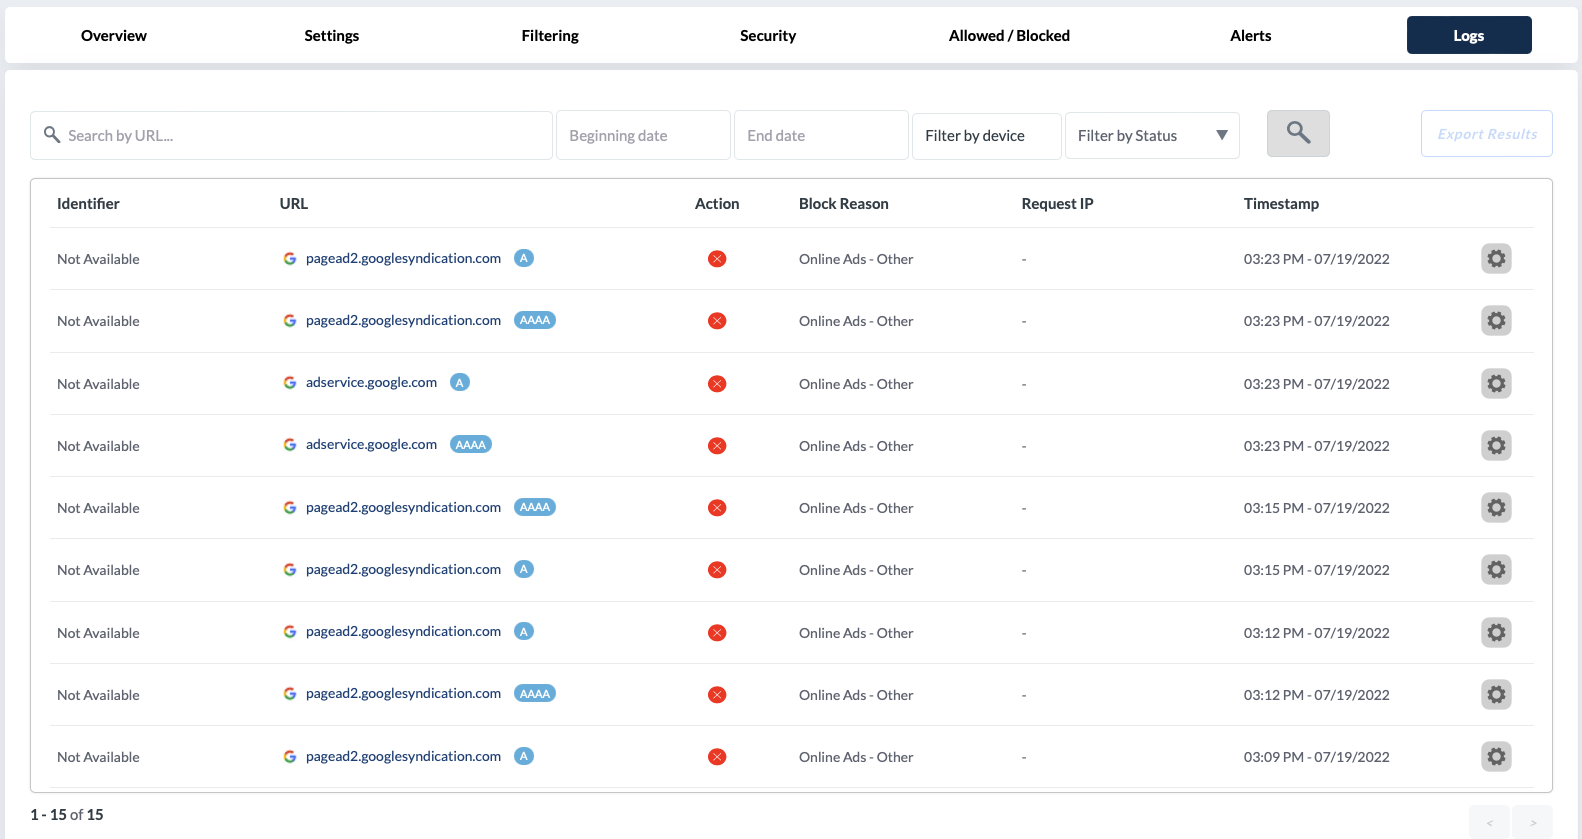
View logs to see any blocked and/or allowed sites. The logs provide the device identifier, serial number, URL visited, the action (blocked/allowed), the reason for the block based on URL categorization, the IP address, and date & time stamp.
Click the gear icon to add the URL as an always blocked domain, always allowed domain, report as wrong classification, or set to exclude the domain in the logs.
The logs can be filtered by specific URLs, dates, devices, or by status (allow/block). Once filtered, the results can be exported.
Configuring DNS Filtering
To configure DNS Filtering
- Go to DNS Filtering
- Click + Create New Profile
- Name the profile and select the users/devices the filtering will be assigned to
- Configure the following tabs: Settings, Filtering, Security, Allowed/Blocked, and Alerts
Settings
The following options can be configured in the Settings tab. When finished, click Save.
-
Privacy & Logging Settings
- Log all resolved requests. By default all blocked requests will be logged. Checking this box will ensure all requests, even allowed requests are logged.
- Include device identifier in the logs: Indicate the device identifying information that will be displayed in the logs - either device name or assigned user. Leave this unchecked to exclude the device identifier from the logs.
- Include device IP in the logs: Check this option to include the device IP. By default the device IP will not be included in the logs.
- Select the duration of time to retain logs of blocked requests: 10 days, 15 days, or 30 days
- Exclude common system domains in the logs: Customize the list of domains to be excluded in the logs. Domains trusted and frequently used can be excluded, such as *.apple.com.
-
macOS management
- Extend the DNS Filtering to Google Chrome or Firefox by checking the appropriate boxes
- Automatically block other third party internet browsers and applications that can conflict with the DNS Filtering: Click “Customize this selection” to choose the browsers and apps to block. By default, Google Chrome and Firefox will be included in the list. If users are permitted access to these browsers, be sure to deselect them from the list.
-
iOS management
- Automatically block other third party internet browsers and applications that can conflict with the DNS Filtering: Click “Customize this selection” to choose the browsers and apps to block.
- The DNS Filtering utilizes the Mosyle Manager application on iOS/iPadOS devices. To ensure end users cannot remove the app from the devices, check the box “For the DNS Filtering to work on the iOS Devices, the Mosyle Manager app must be installed….”
-
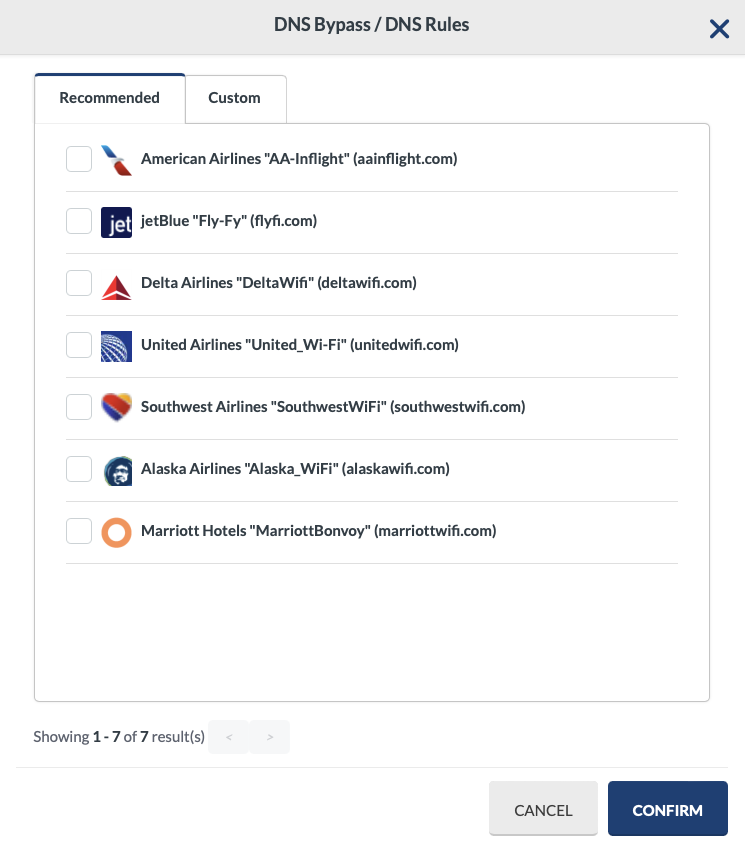
Mosyle DNS Bypass for flights, hotels, and local domains / DNS Rules
-
Configure the DNS Bypass rules so devices can connect to captive portals on flights or in hotels to allow network connectivity or enter custom domain configuration for the DNS Filtering to bypass.
-
Filtering
Toggle ON any of the Standard filters to be blocked. If any additional filters need to be applied, create a custom filter by clicking “Create new filter”. Choose the site categories to be blocked. If needed, enter a URL in the URL checker to check the site categorization.
If desired, toggle on the options to enforce Safe Search and/or YouTube restricted mode. When finished, click Save.
Security
Toggle ON any of the options to block domains based on malicious activity, domain age, or hosting country. To add a hosting country click the button “Select / Edit Countries”. When finished, click Save.
Allowed/Blocked
Domains added in the Allowed list will always be allowed, even if they are configured to be blocked due to site categorization. Domains added in the Blocked list will always be blocked, even if their site categorization is not blocked.
If a domain requires custom resolution, such as an internal resource, enter the domain in the Allowed list and check the box for “Customize resolution” and enter the IP address.
Alerts
Configure to receive email alerts if users attempt to access a restricted domain, or attempt to access a site that is blocked due to its categorization. Choose how long devices will remain in the alerts until they are removed if there are no additional occurrences.
Email Preferences can be configured to receive a daily report, receive an email for every alert, or not receive email alerts. Choose the Administrators to receive the alert emails. When finished, click Save.