# Management Profiles & Device Configuration
# Management profiles
## Overview
---
The Management Tab in the Mosyle Web Panel is organized by OS platform and provides Administrators a variety of Management profiles which can be customized to automate the application of policies and restrictions to fit the needs of each school or district. Some profiles have specific requirements such as supervision or a certain OS version. Requirements will be listed within the profile.
## Activating and Deactivating Management Profiles
---
The list of Management profiles can be found in the menu on the left and are organized in alphabetical order, with the exception of Install App and Install Enterprise/PKG. Each account, upon first setup, is equipped with a standard set of commonly used Management profiles. Additional Management profiles are available and can be activated by clicking “+ Activate New Profile Type”. Enter keywords to search for a specific profile, or click the link to read more about the Management profile.
[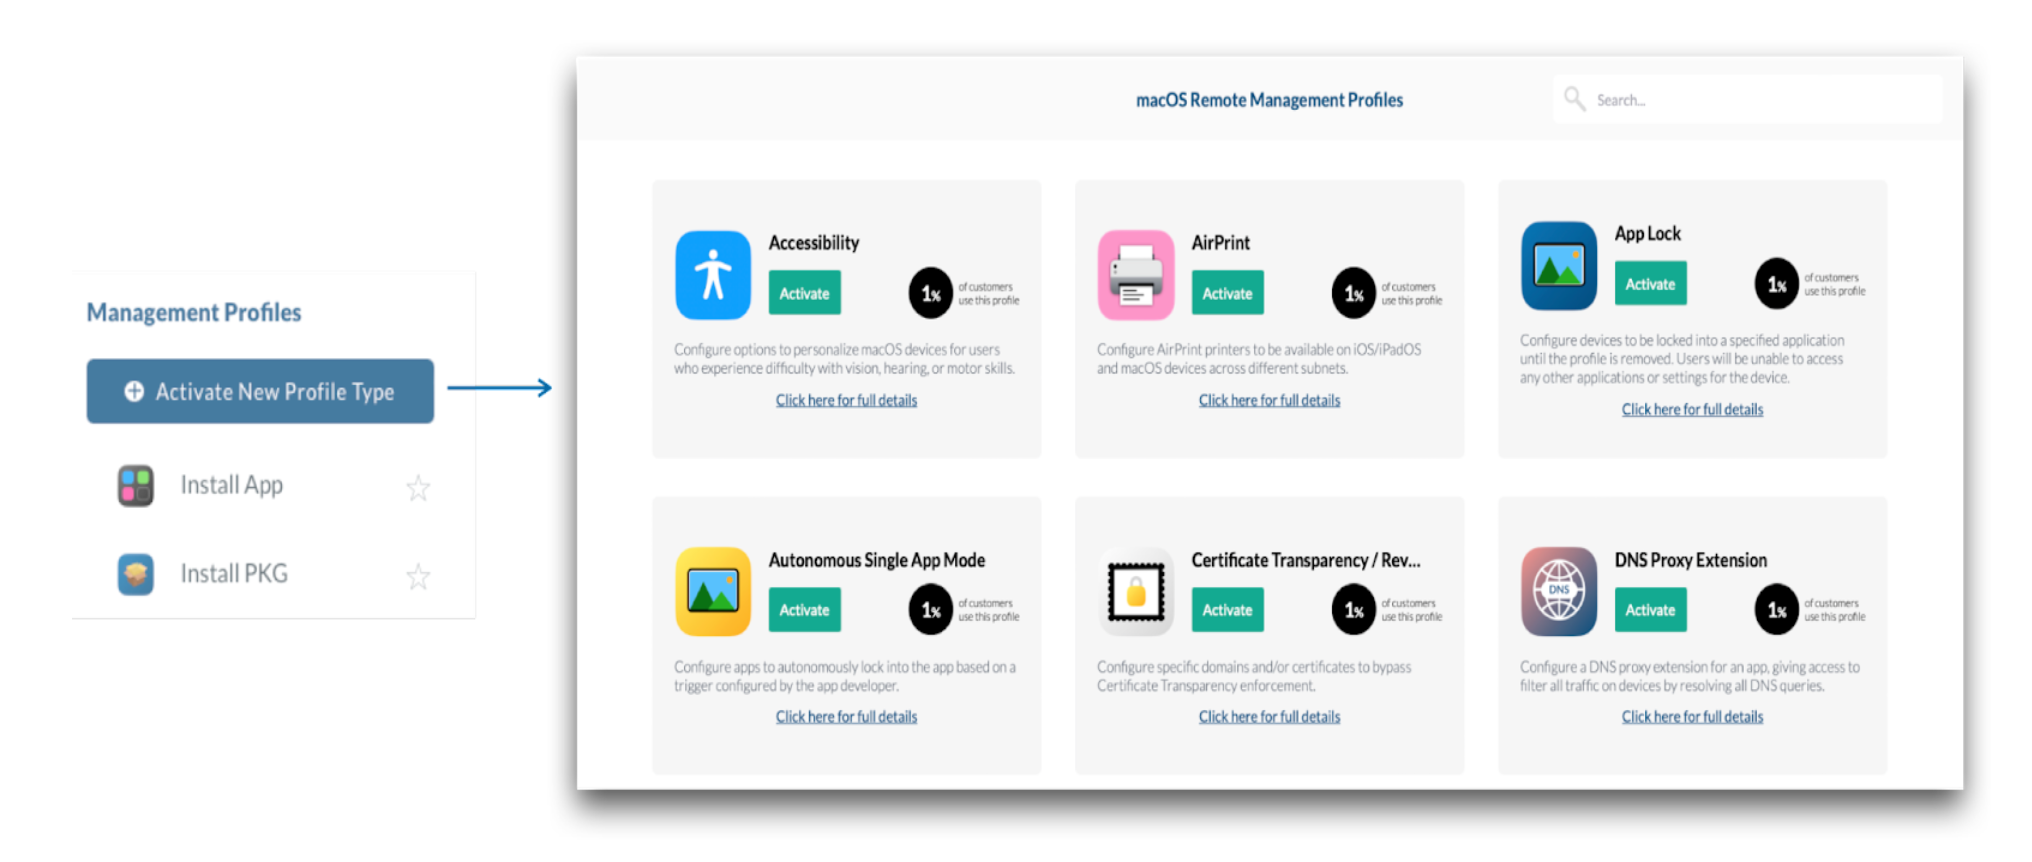](https://academy.mosyle.com/assets/images/courses/manager-msp-certification/lesson-7/7.1-management-profiles/activating-and-deactivating-management-profiles/activating.png)
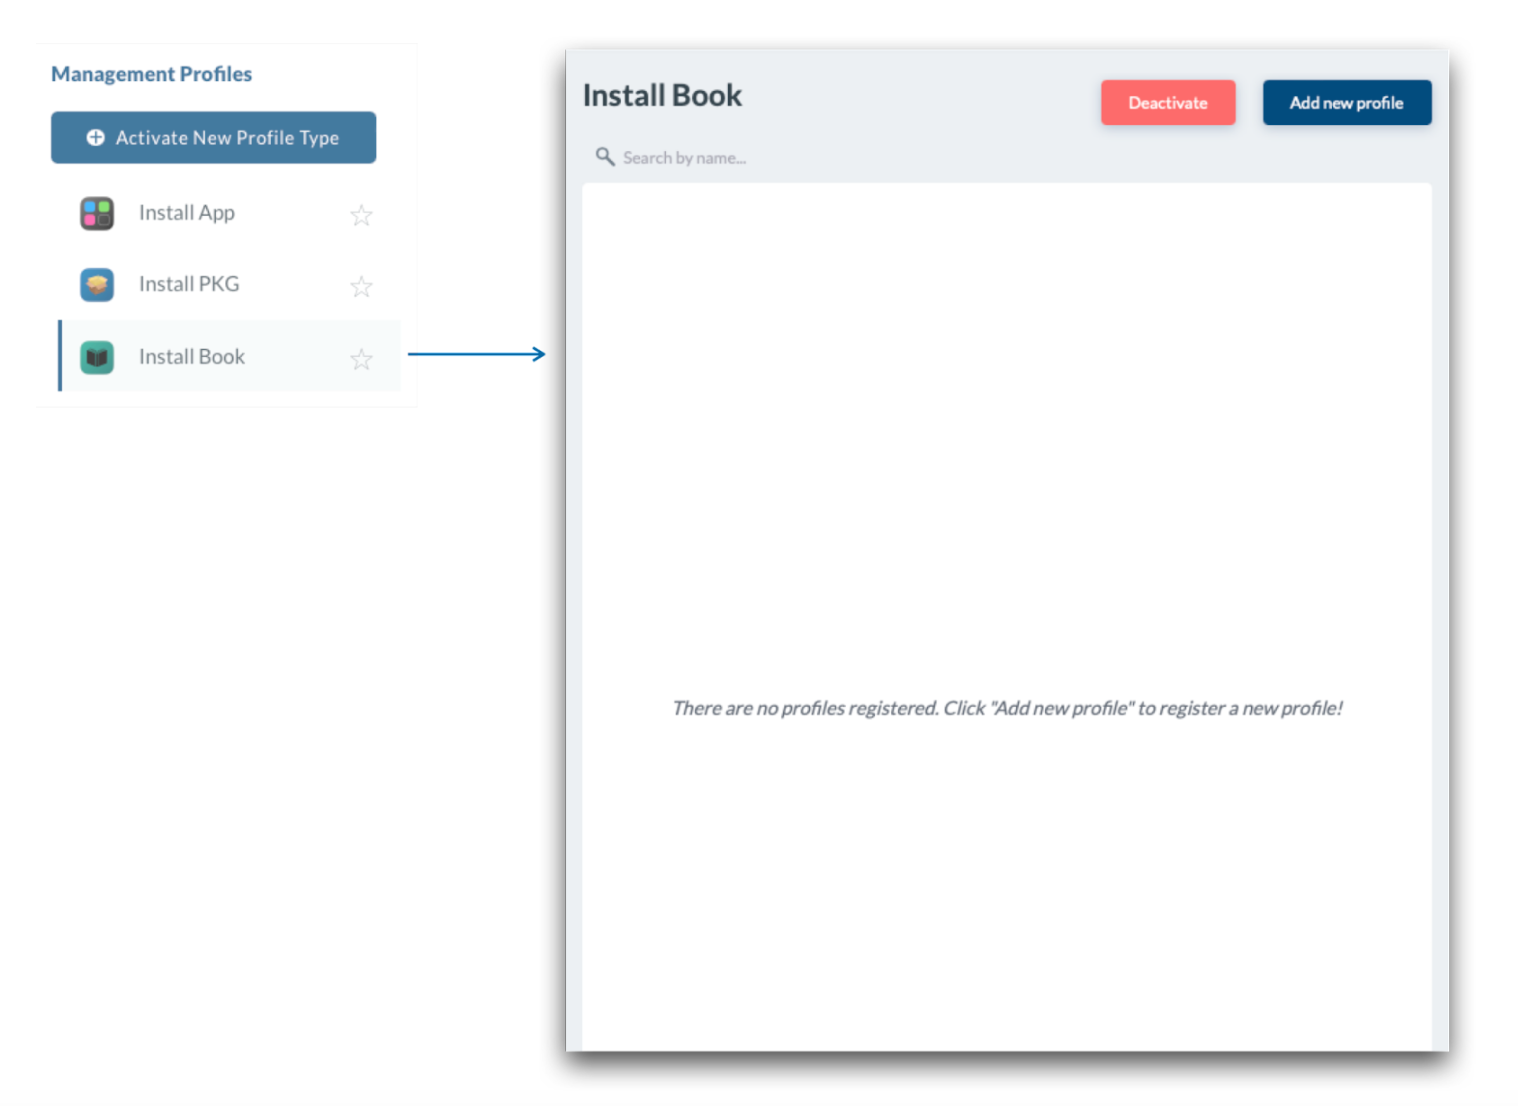
If the school or district does not have a need for a specific Management profile, select the profile from the menu on the left and click “Deactivate”. Only Management profiles that aren't in use and don't have any configuration profiles can be deactivated.
[](https://academy.mosyle.com/assets/images/courses/manager-msp-certification/lesson-7/7.1-management-profiles/activating-and-deactivating-management-profiles/deactivating.png)
## Favorite Management Profiles
---
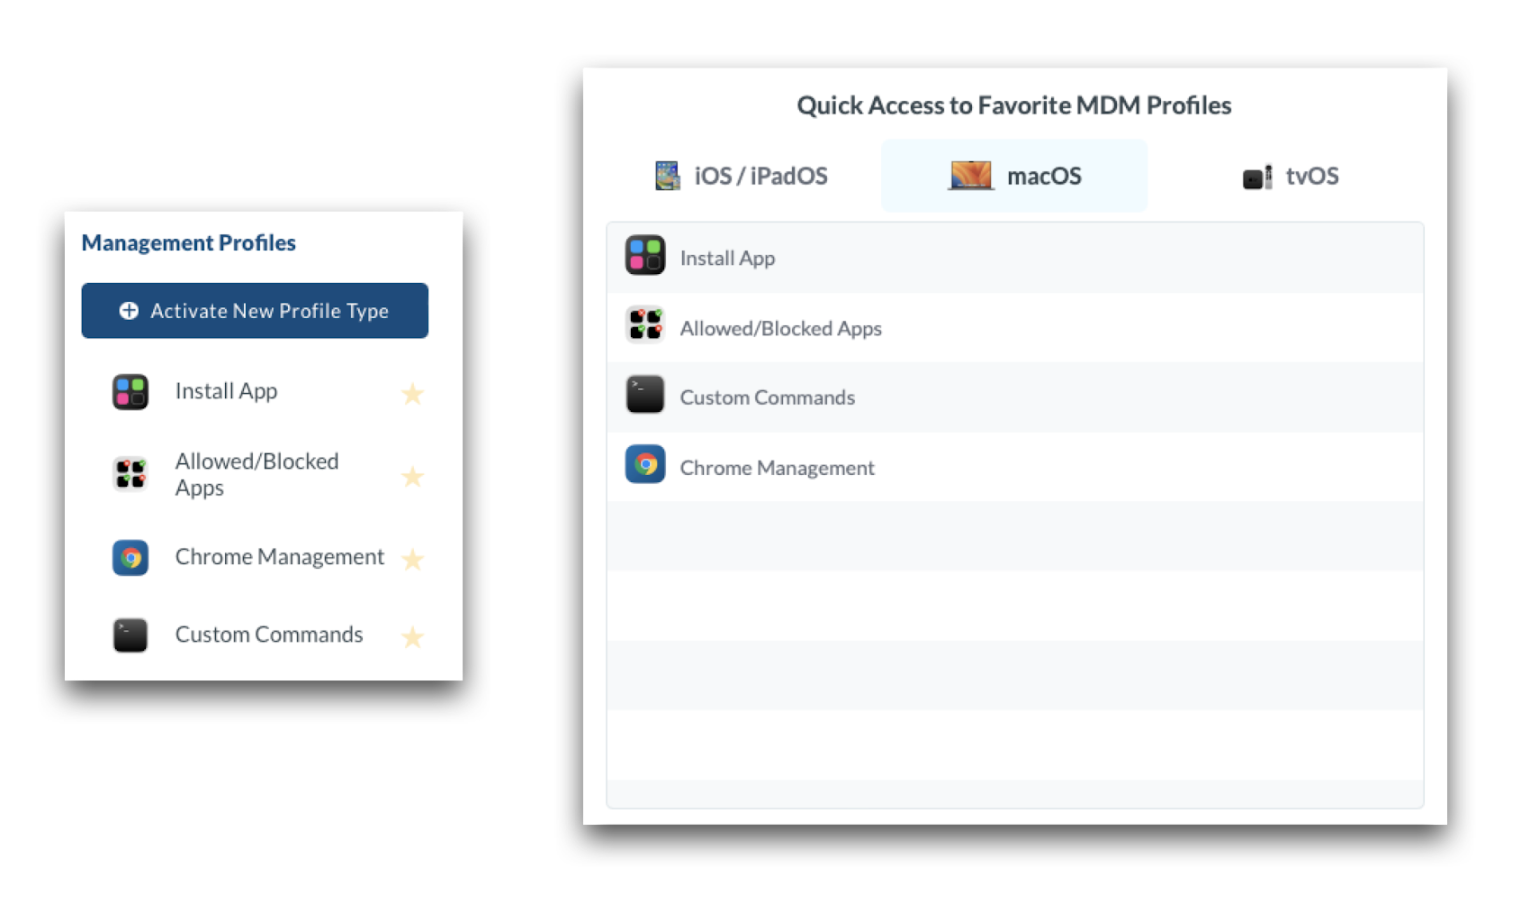
Frequently used Management profiles can be marked as a “Favorite” so that they appear at the top of the list, and on the Dashboard under the Profiles. To add a profile as a favorite, click the ⭐ icon. The favorite profiles are customizable for each Admin user.
[](https://academy.mosyle.com/assets/images/courses/manager-msp-certification/lesson-7/7.1-management-profiles/favorite-management-profiles/favorite.png)
## Profile Scopes
---
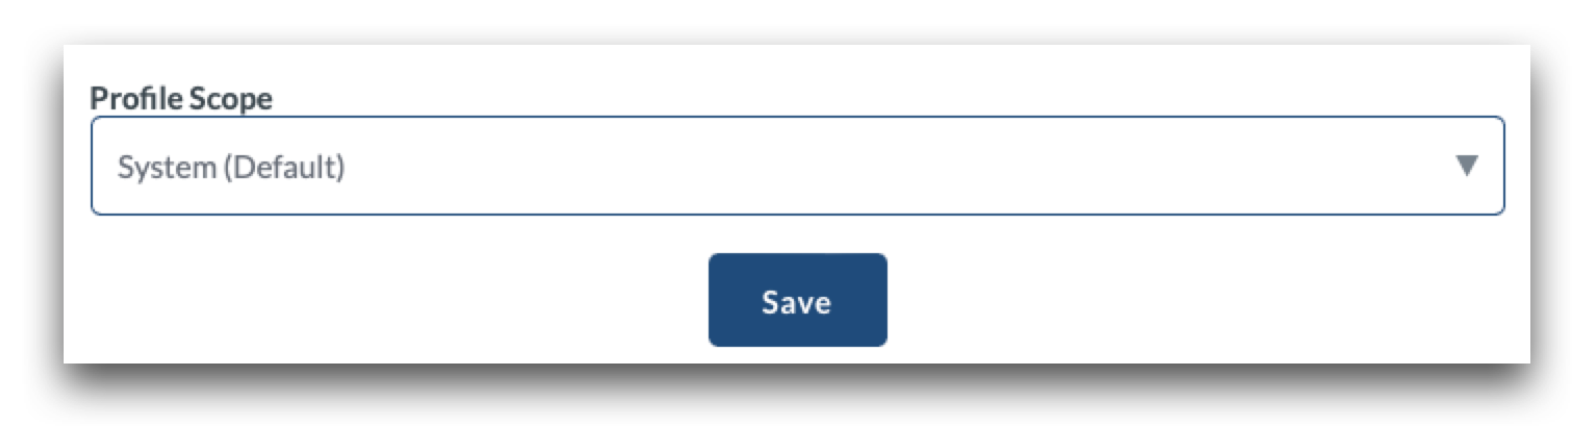
Apple Shared iPad devices and macOS devices support both system and user scope configurations. By default, profiles install at the system scope unless it is not supported. However, profiles can be installed at the system scope or user scope based on the needs of the school or district. Choose one from the Profile Scope menu at the bottom of a profile.
[](https://academy.mosyle.com/assets/images/courses/manager-msp-certification/lesson-7/7.1-management-profiles/profile-scopes/profile-scope.png)
**System Scope**
Profiles installed at the system scope apply the configured preferences at the system level, affecting all user accounts on the device and show under System Settings > Privacy & Security > Profiles > Device Profiles. Typically, settings configured via Management profiles are enforced on the device and cannot be manually changed.
**User Scope**
Profiles installed at the user scope apply the configured preferences only for the specific user accounts who are assigned and eligible for user scope profiles. User accounts are eligible for user scope profiles in the following scenarios:
- The account that was manually created in Setup Assistant during Automated Device Enrollment (macOS);
- The Admin account created via the Automated Device Enrollment profile and the option to 'Set as managed' is selected (macOS);
- The Admin account that enrolled the device from Terminal (macOS);
- The Admin account that enrolled the device from Safari (macOS);
- The account that enrolled the BYOD device (macOS);
- Any mobile or network accounts created when the device is bound to Active or Open Directory (macOS);
- Managed accounts created using Mosyle Auth 2 (macOS);
- Any accounts logging into Shared iPad (iPadOS)
When assigning profiles via the user scope, be sure to assign the profile to users rather than to devices. Profiles installed at the user scope on macOS devices show under System Settings > Privacy & Security > Profiles > User Profiles.
Notes:
- If 'Prompt user for account creation' is skipped in Automated Device Enrollment, a user scope is not created on a macOS device unless the local administrator is configured to 'Set as managed'.
- The user scope is created for only one account on devices running macOS 10.12 or later, unless the device is bound to Active or Open Directory or Mosyle Auth 2 is used.
- If a user scope does not exist and is required in the environment, it's recommended to re-enroll the device.
## Scheduling Profiles
---
Management profiles such as restrictions and allowed/blocked apps, provide options for scheduling their automatic installation and removal. This is useful in a variety of environments, some examples listed below:
- Block specific apps during the school day, but allow access after school.
- Lock devices into a specific kiosk or app for a specific class period, but release the lock for all other classes.
For profiles that support time based scheduling, there is an option to apply the profile “Fulltime (24x7)” or “Schedule choosing a time profile”.
[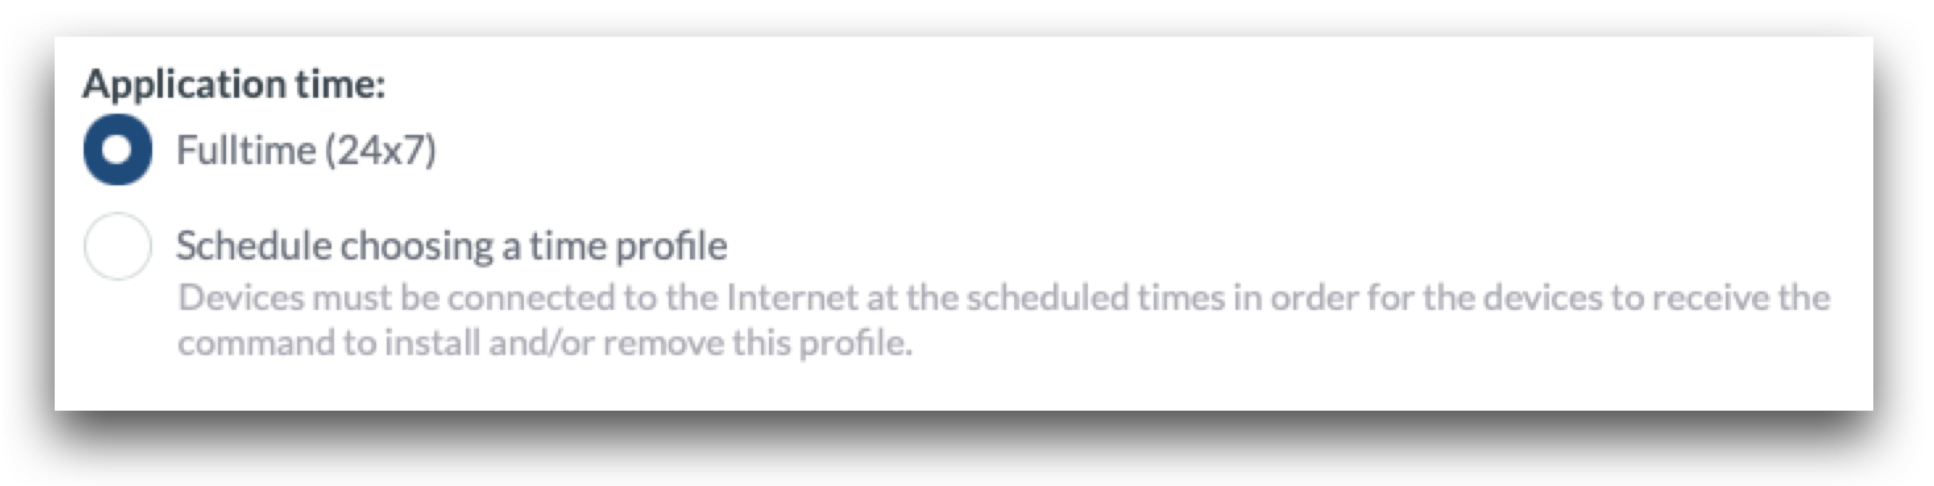](https://academy.mosyle.com/assets/images/courses/manager-msp-certification/lesson-7/7.1-management-profiles/scheduling-profiles/schedule.png)
Applying the profile full time will install the profile and enforce the settings until it is unassigned or removed. In the case of an App Lock or Kiosk Mode profile, Administrators have the option to install the profile only once or to resend the profile every 24 hours. When selecting the option to resend every 24 hours, the profile will install and be configured to automatically remove from the device after 24 hours. Mosyle will simultaneously send a command to reinstall the profile. This option for the 24 hour expiration is provided as a potential failsafe for devices in the event they lose network connectivity so that the profile will automatically be removed locally, releasing the device from the App Lock so it can be reconnected.
In a scenario where the profile is not resent every 24 hours, if the device loses network connectivity, the command from Mosyle to remove the App Lock will be unable to go through. If this happens, the device will need to be connected to ethernet, paired with a computer, or erased in order to remove the App Lock and regain access to the device.
[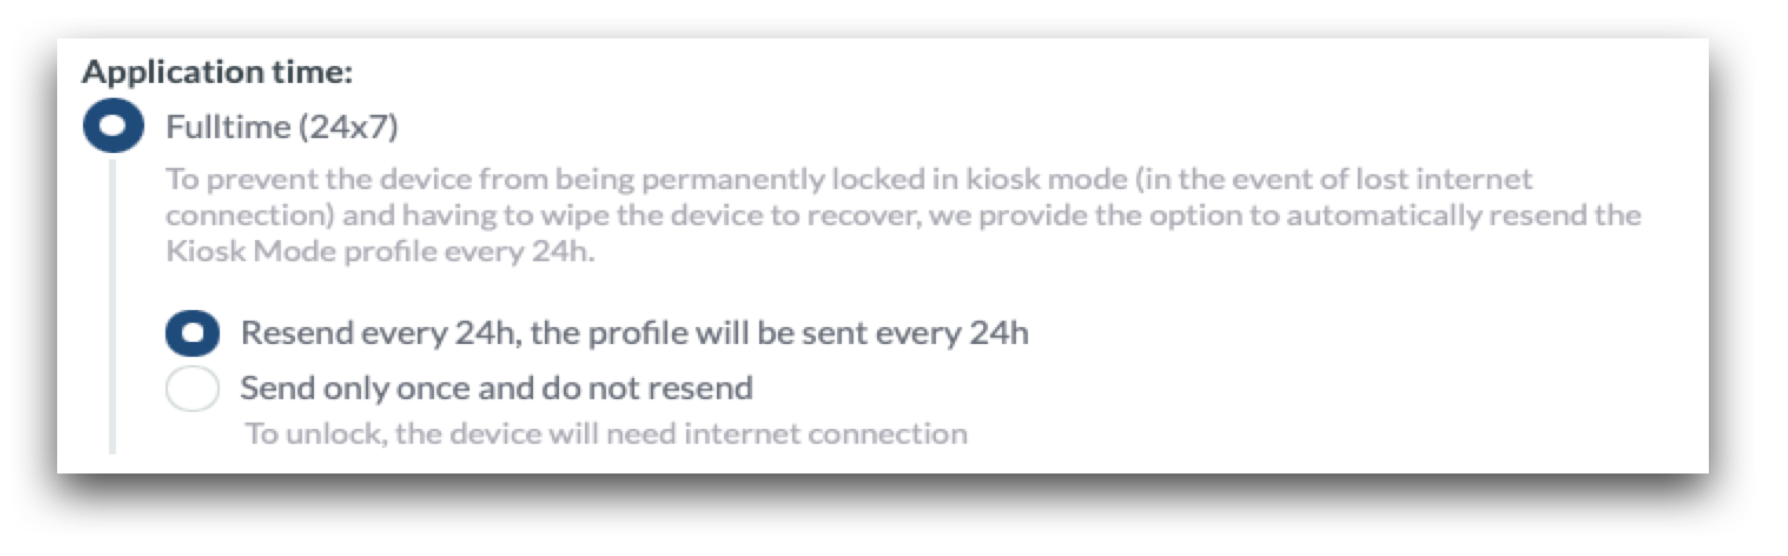](https://academy.mosyle.com/assets/images/courses/manager-msp-certification/lesson-7/7.1-management-profiles/scheduling-profiles/resend.png)
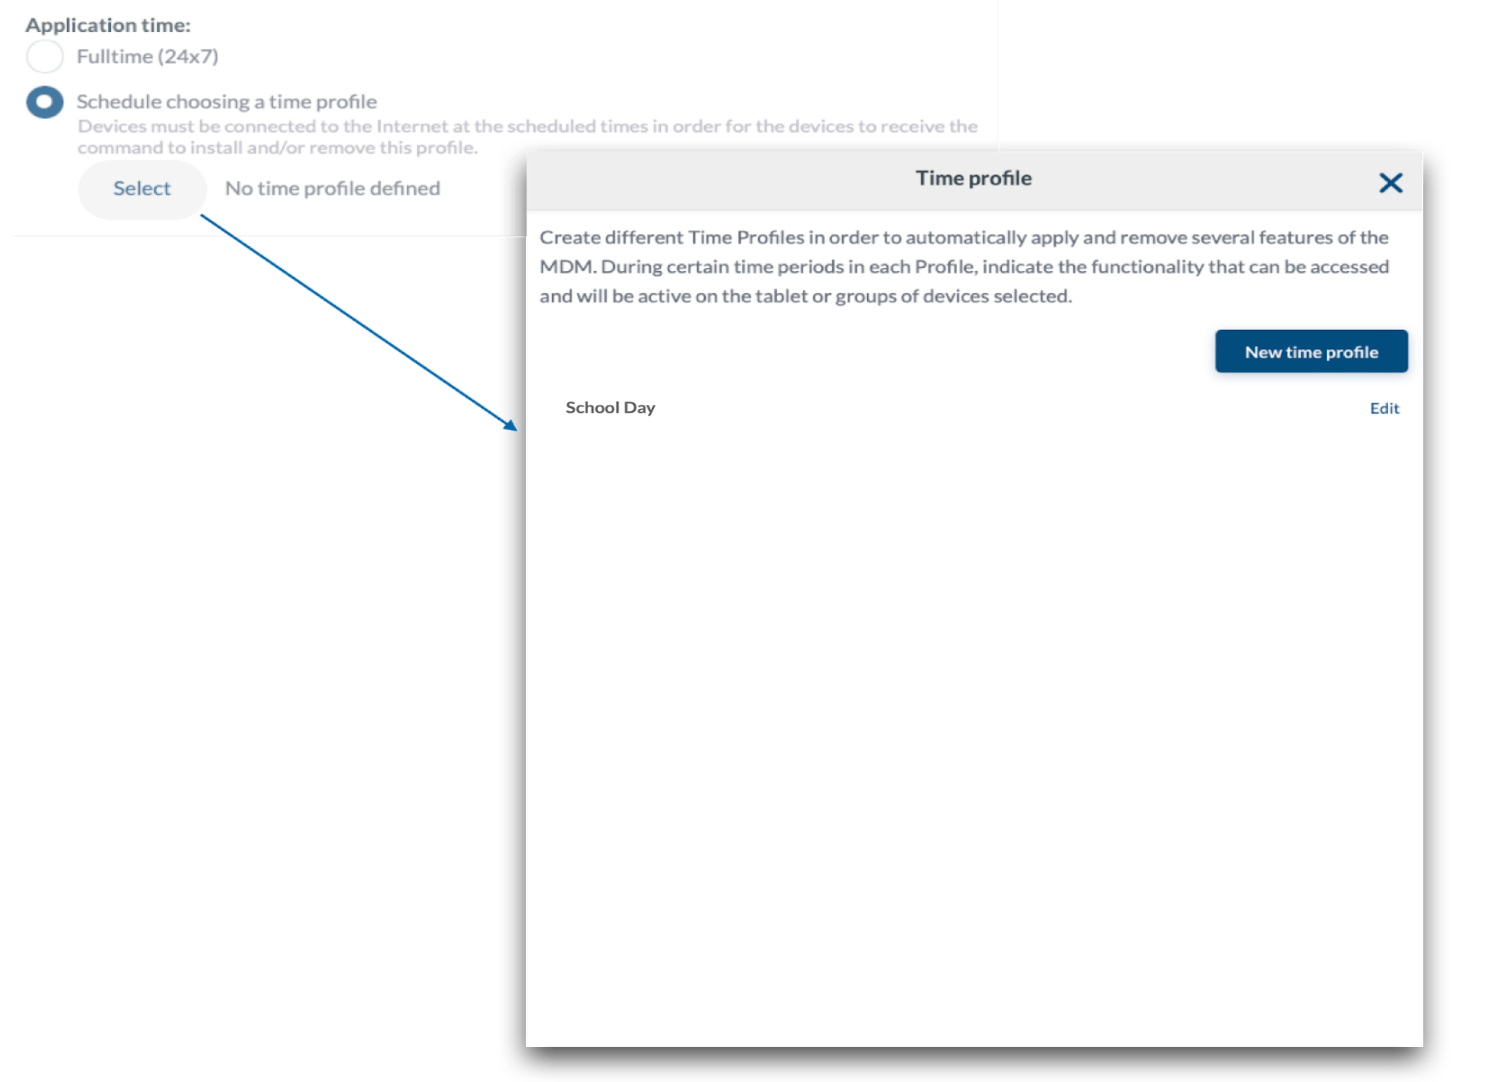
When scheduling the profile using a time schedule, click Select to create a new time profile or choose an existing time profile to define when the configuration will be installed and removed.
[](https://academy.mosyle.com/assets/images/courses/manager-msp-certification/lesson-7/7.1-management-profiles/scheduling-profiles/schedule-time.png)
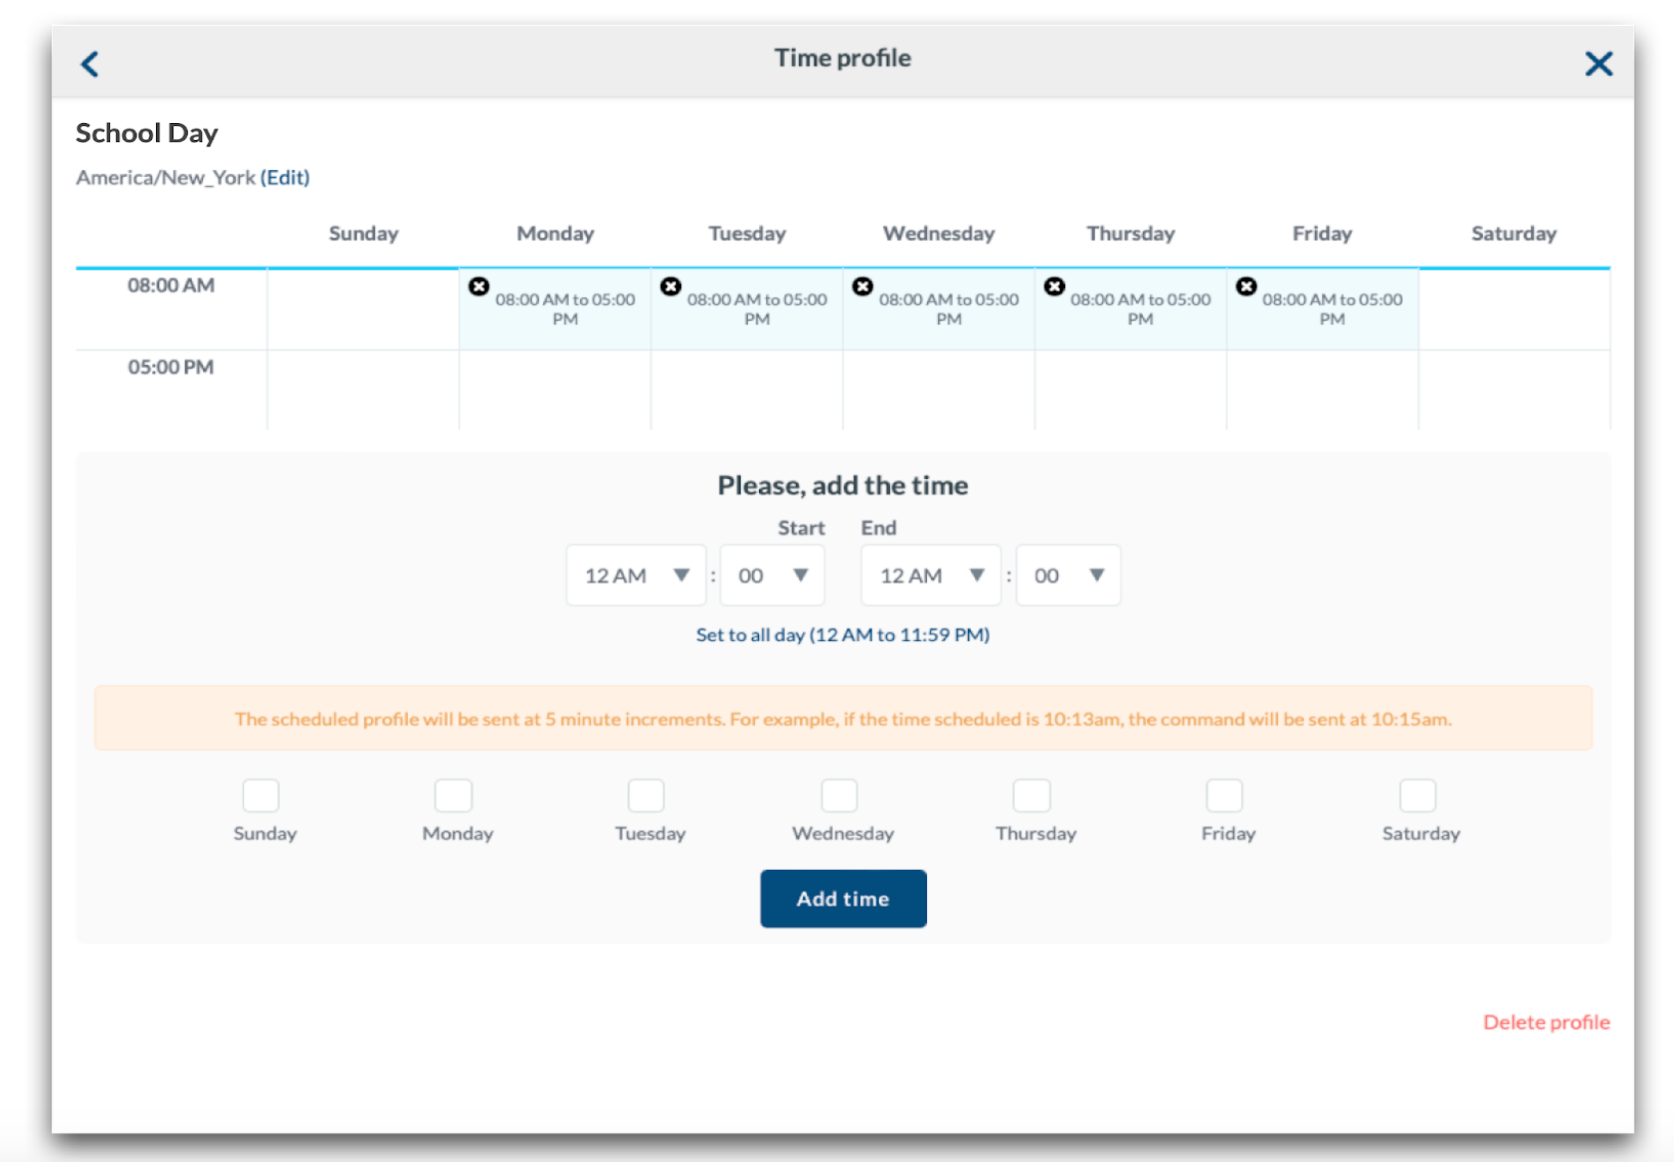
To choose an existing time profile click on the time profile; click “Edit” to edit an existing time profile. To create a new time profile click “New time profile”. Enter a name for the time profile, choose the time zone, and choose whether to restrict access or not, click Save. On the next screen, enter the start time in which the management profile will be sent, and an end time to designate when Mosyle will send a profile removal command. Select the days the schedule will be applied and click Add time. When finished, click the back arrow in the upper left corner and then select the time profile to apply it to the management profile.
[](https://academy.mosyle.com/assets/images/courses/manager-msp-certification/lesson-7/7.1-management-profiles/scheduling-profiles/profile-time.png)
## Installation Options in Profiles
---
Some profiles include additional installation options within the profile to control when the profile is pushed to the devices. The options include:
- Do not reinstall the profile during the assignment/login: This will prevent the profile from reinstalling on devices it is already installed when users login to the device, or when the device is assigned to the user.
- Do not remove the profile when the assignment is removed or during logout: This will prevent the profile from being removed if the user or device is removed from the assignment of the profile or after a user has logged out.
- Do not auto-install the profile after saving: This will prevent the profile from automatically installing after the profile is saved or after the profile is assigned. The profile will show "On Hold" in the Device Information screen and under the profile Compliance Status until it is manually installed.
- Show this profile at the Self-Service Page: This will add the profile to Self-Service in the Education app under the “Profiles” tab so users can install on-demand as needed.
## Using Variables in Profiles
---
Many profiles support the use of variables to automate the inclusion of user or device information in profile fields, saving administrators time. Variables pass user information based on the data contained within each user's profile under the Organization tab. Check the link within the profiles to view the available variables. Check the box to indicate the profile is using variables to ensure the payload is properly configured.
[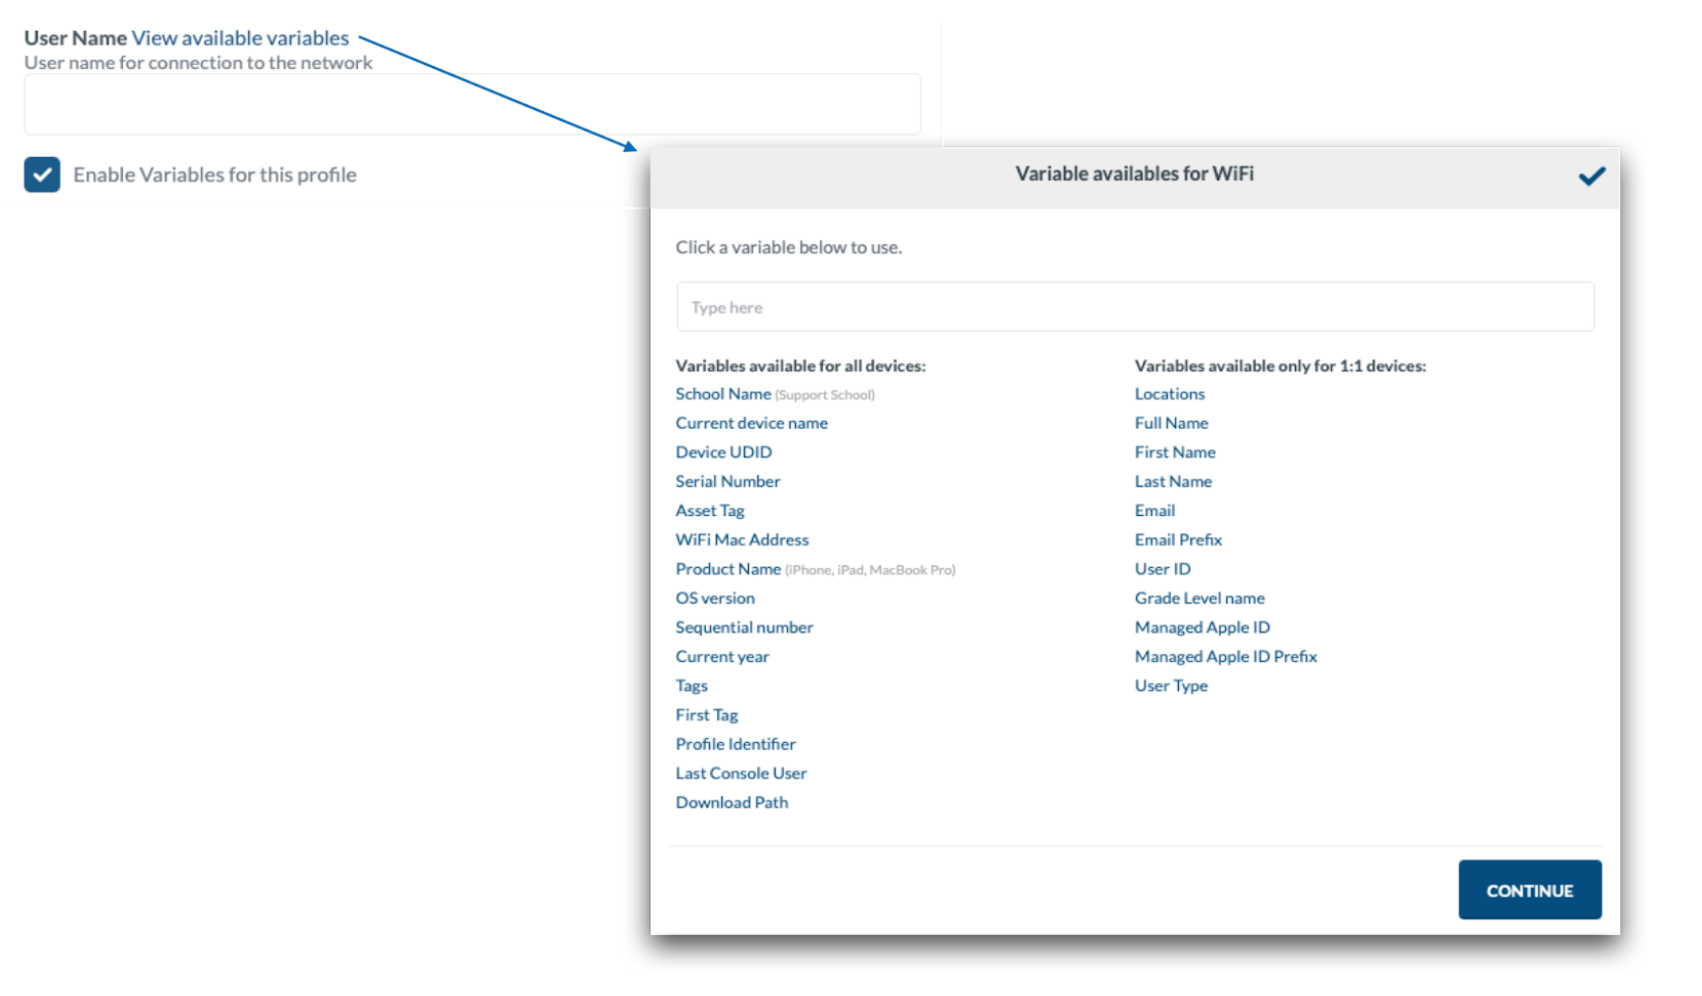](https://academy.mosyle.com/assets/images/courses/manager-msp-certification/lesson-7/7.1-management-profiles/using-variables-in-profiles/variables.png)
## Compliance Status
---
After a Management profile is created and saved, the profile Compliance Status will be displayed and accessible under the “View Details” link for the profile. Devices with the profile installed will be listed, along with devices where the profile is pending to install, either because the device is turned off or offline, or devices with the profile removed. At any time a Push can be sent to call devices to the MDM server to retrieve the command to install the profile.
Profiles showing a compliance status as “Not compatible” will occur if the device does not meet compatibility requirements of the profile, or if the profile contains variables and Mosyle is unable to fill the variables. For example, a profile using user variables such as User ID or Email, but the device is not assigned to a specific user. In this scenario, the variables are unable to be filled, therefore the profile will be listed as “Not compatible”.
# Commands Activity Log
## Overview
---
The Commands Activity Log provides an overview of all pending and failed commands. Filter commands, send a push to the devices, or clear specific commands with a few clicks. To access the Commands Activity Log, go to Management > Devices > Commands Activity Log.
[](https://academy.mosyle.com/assets/images/courses/manager-msp-certification/lesson-7/7.2-commands-activity-log/72-overview/commands-activity.png)
## Pending Commands and Failed Commands
---
The Pending Commands tab shows commands that have not been delivered to or acknowledged by devices. The Failed Commands tab shows commands received by devices but failed or received some other error. Ten commands are shown per page with information about the type of command, the scope, the device's name, the device's serial number, the date of the command, and the last time the device communicated with the MDM.
Administrators can filter the commands by serial number and then narrow their search by time frame, including today's date, this week, this month or all-time, or by type of command. After filtering the commands, click Send a Push to Devices to communicate with the devices and resend pending and failed commands.
If the commands remain pending or failed, troubleshoot your local network for firewalls or proxies, or get in touch with the Mosyle Support team for assistance. Click Export to request a CSV file of the current pending or failed commands. Review the export for any trends, such as a common last connection date for devices, or repeat devices in the list of pending commands. This data can assist with isolating communication issues with devices.
Notes: If a device's last connection was prior to the command date, it's possible the device is no longer communicating with the MDM. First, check to make sure the MDM profile is still installed on the device, then select the device and send an Update Info command from Management > Devices Overview.
## Clear Commands
---
The Clear Commands tab lists all commands available for clearance. Filter the commands by date, devices, pending or failed. Select the commands from the list and click Submit to clear them.
Commands that have been cleared will not be automatically resent to devices. If a command is cleared, it will need to be manually regenerated to be sent to the device.
If a historical analysis is needed of cleared commands, click View Cleaning History. A pop-up will show who, when, and how many commands were cleared. To restore commands sent in the last two days, click Restore.
# Managing OS Updates
## Overview
---
Mosyle encourages administrators to update devices to the latest OS version available when possible. Both major and minor, or incremental, updates can be managed, downloaded, installed, and/or deferred using Mosyle. The OS update process is a two-step process:
1. The OS update is first downloaded on the device
2. The OS update is then installed on the device
Devices must be online, supervised, charged, meet the minimum OS requirement, have sufficient storage available, and a battery percentage of at least 50 percent when receiving the OS update command.
Devices cannot downgrade to an older version than their existing version and must be compatible with the version selected. If incompatible, the command will not be sent. Only copies of operating system versions that are actively being signed by Apple can be installed on devices.
## Software Delay
---
The MDM is unable to block or prevent OS updates, however the Software Delay profile allows Administrators to defer OS updates and upgrades. Using the Software Delay profile, Administrators can configure devices so that OS updates are not visible to end users up to 90 days from the release date. Delaying software updates provides time to test the latest release and ensure all apps and systems work as expected before updating the fleet.
The Software Delay settings will not prevent the MDM from pushing OS updates to devices or querying available OS updates.
To create a Software Delay profile, go to Management > Click the Software Delay profile. Choose from the options available.
**Delaying iOS/iPadOS Updates**
On iOS/iPadOS devices, you can delay the software updates from being visible to end users for up to 90 days.
[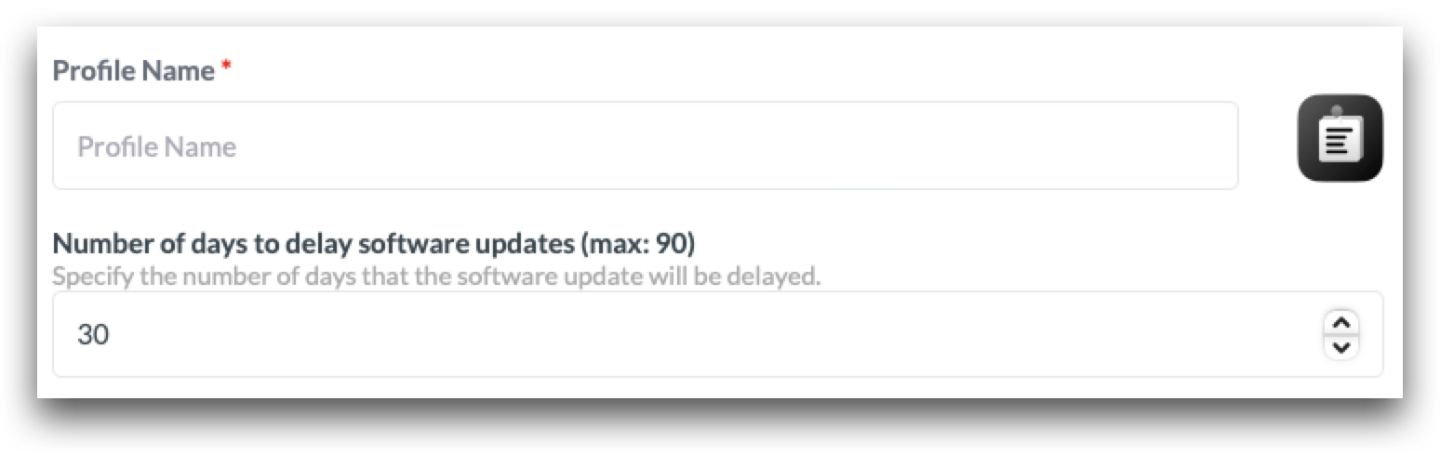](https://academy.mosyle.com/assets/images/courses/manager-msp-certification/lesson-7/7.3-managing-os-updates/software-delay/delaying.png)
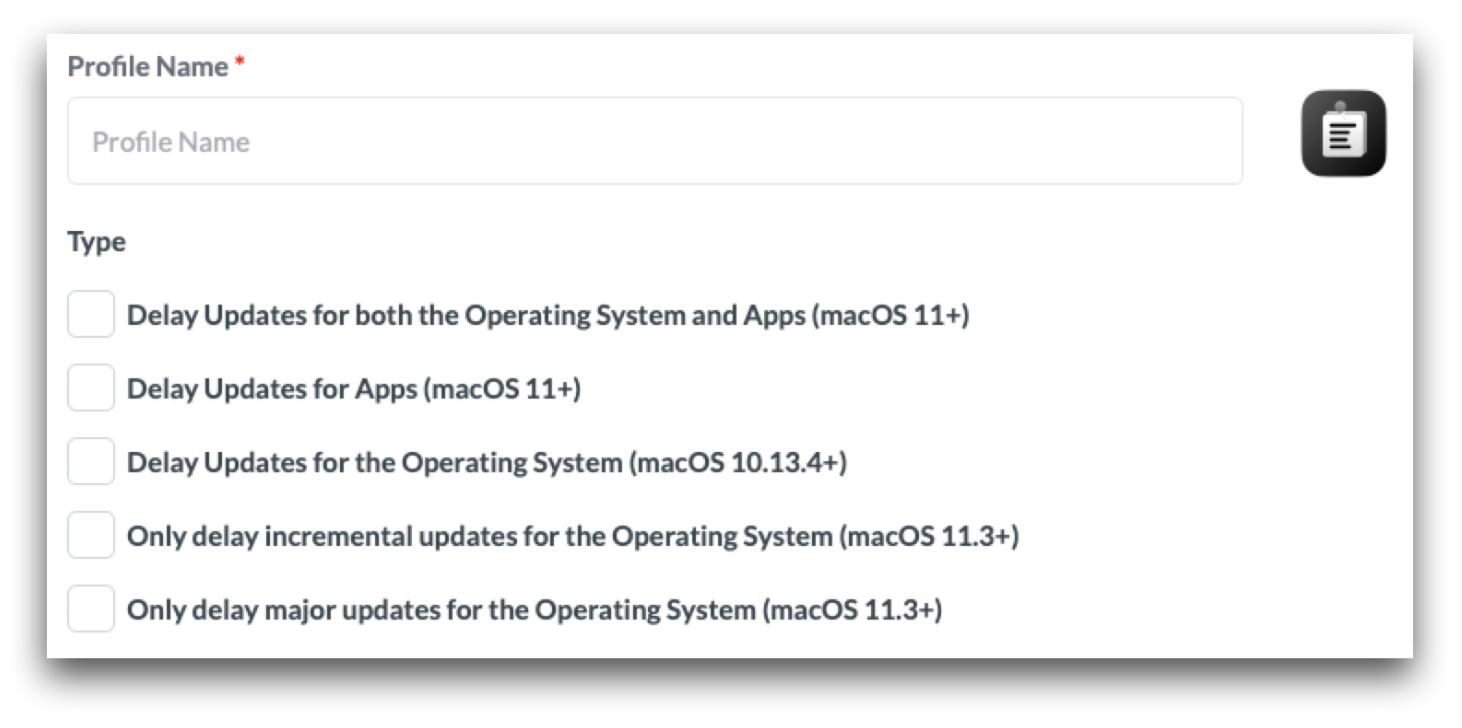
**Delaying macOS Updates**
On macOS devices, you can delay major or minor software updates, and/or App updates, from being visible to end users for up to 90 days.
The options available when delaying macOS software updates include:
- Delay Updates for both the Operating System and Apps (macOS 11+): This will delay visibility for any and all OS updates and non-OS updates for end users.
- Delay Updates for Apps (macOS 11+): This will delay visibility for any and all non-OS updates, such as Safari updates, for end users.
- Delay Updates for the Operating System (macOS 10.13.4+): This will delay visibility for any and all OS updates, including both major and minor updates.
- Only delay incremental updates for the Operating System (macOS 11.3+): This will delay visibility for only minor OS updates, for example, an update from macOS 12.0.1 to macOS 12.1.
- Only delay major updates for the Operating System (macOS 11.3+): This will delay visibility for only major OS updates, for example, an update from macOS 11.6.2 to macOS 12.
[](https://academy.mosyle.com/assets/images/courses/manager-msp-certification/lesson-7/7.3-managing-os-updates/software-delay/delaying-options.png)
## Software Update Settings
---
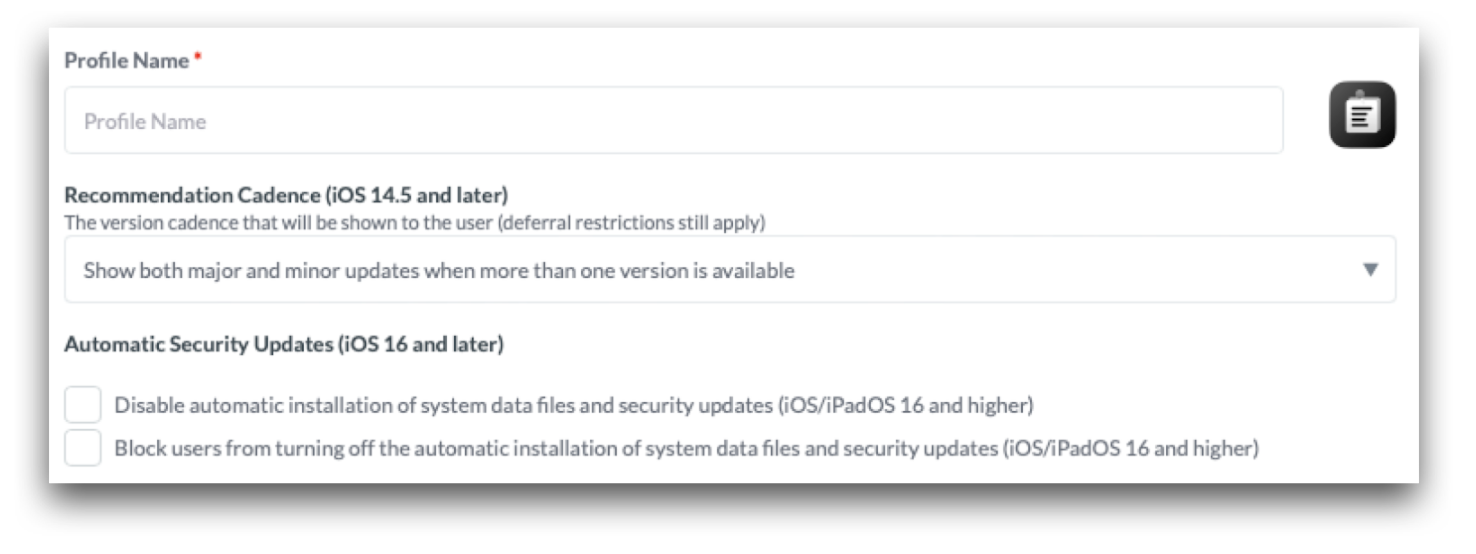
Software Update settings include which OS will show available to end users on iOS and iPadOS devices when more than one is available, automatic security updates (iOS/iPadOS 16+), and background OS update behavior on Mac computers.
To create a Software Update profile, go to Management > Click the Software Update profile. Choose from the options available.
The Software Update profile does not push OS updates. To send commands to update the OS on devices, use Devices Overview or Single Shot.
**iOS/iPadOS Software Update Settings**
Recommendation Cadence (iOS/iPadOS 14.5+ and tvOS 15+): The software updates that will be visible when more than one is available.
Automatic Security Updates (iOS/iPadOS 16+): Configure the automatic security update settings on the device.
[](https://academy.mosyle.com/assets/images/courses/manager-msp-certification/lesson-7/7.3-managing-os-updates/software-update-settings/software-update-ios.png)
**macOS Software Update Settings**
The Software Update profile configures the advanced options on macOS devices in System Settings > General > Software Update > . If the profile is installed, the options will be grayed out for users.
Once configured, native OS protocols will control when the macOS device is updated. This is similar to configuring these settings natively on the device but without allowing the end-user to change it afterwards.
**Available options for macOS devices:**
- Specify the software update server (macOS 10.15 or earlier)
- Allow installations of beta or pre-released macOS releases
- Automatically install app updates from the App Store (macOS 10.15+)
- Automatically install macOS updates (macOS 10.15+)
- Automatically check for updates (macOS 10.15+)
- Download newly available updates in the background (macOS 10.15+)
- Install system data files (macOS 10.15+)
- Install security updates (macOS 10.15+)
- Restrict app installations to admin users only (macOS 10.15+): This option will prompt Admin credentials in order to install OS updates, including when the OS update is pushed from the MDM.
More information about each of the options above can be found in Apple's [Change Software Update preferences on Mac documentation](https://support.apple.com/en-md/guide/mac-help/mchla7037245/mac).
[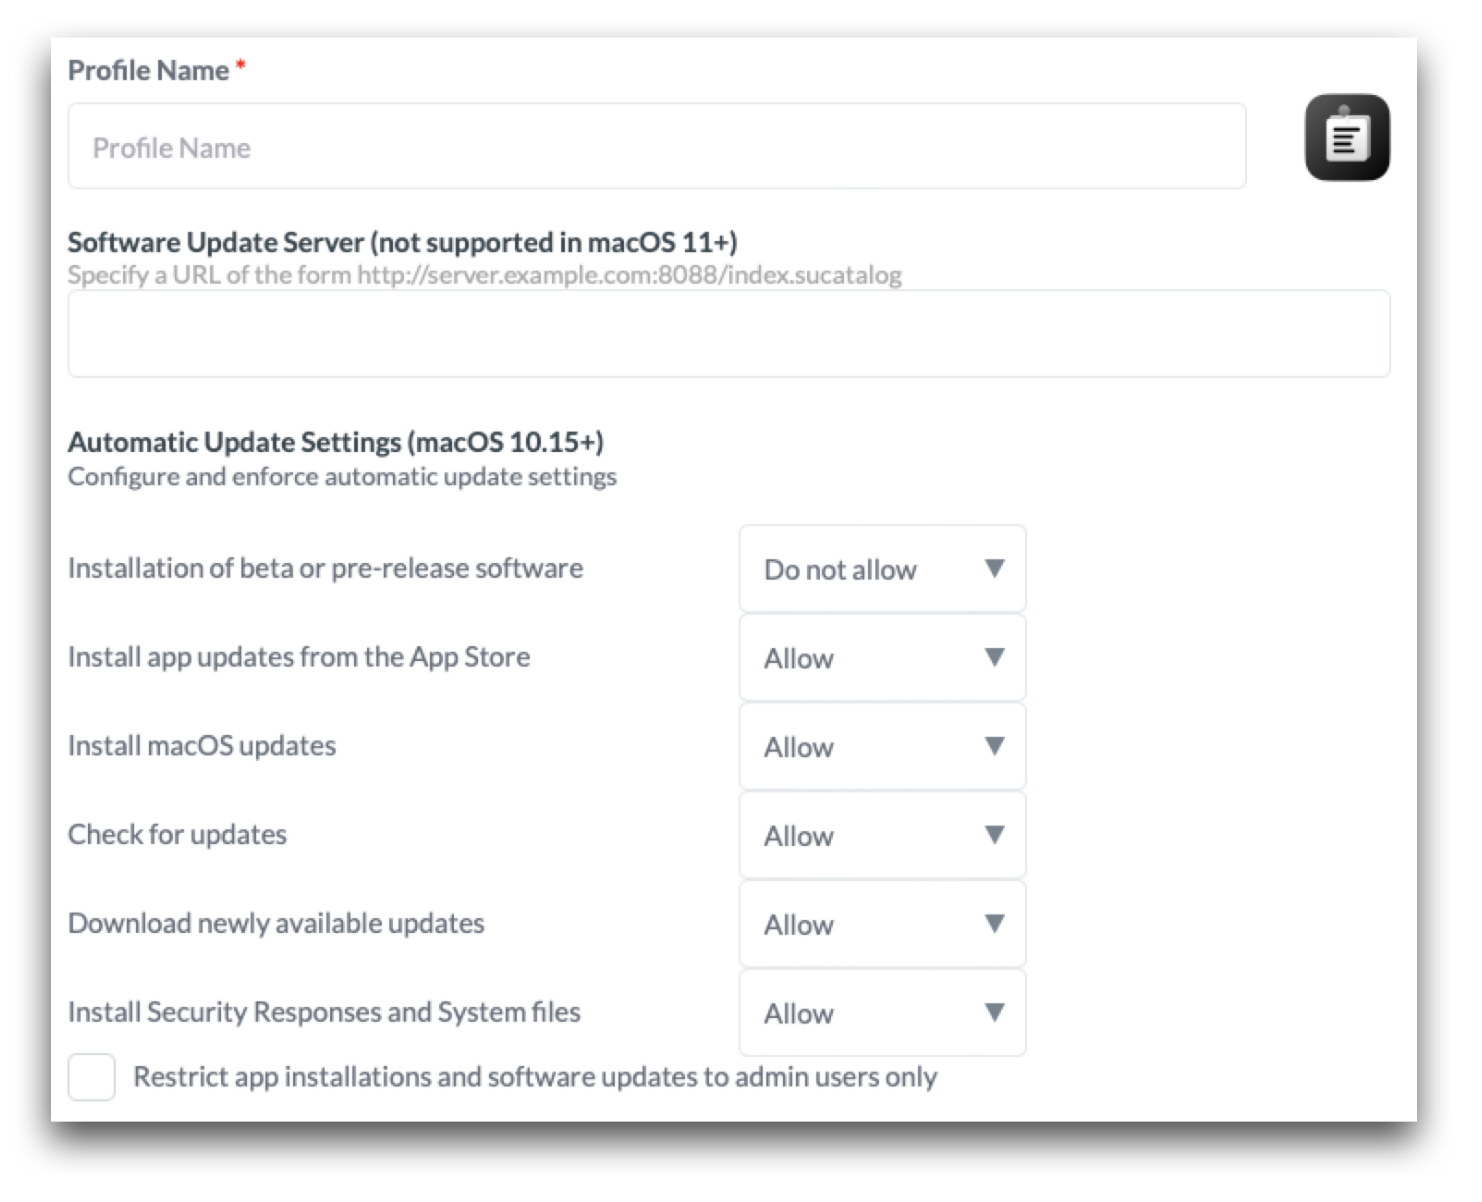](https://academy.mosyle.com/assets/images/courses/manager-msp-certification/lesson-7/7.3-managing-os-updates/software-update-settings/software-update-macos.png)
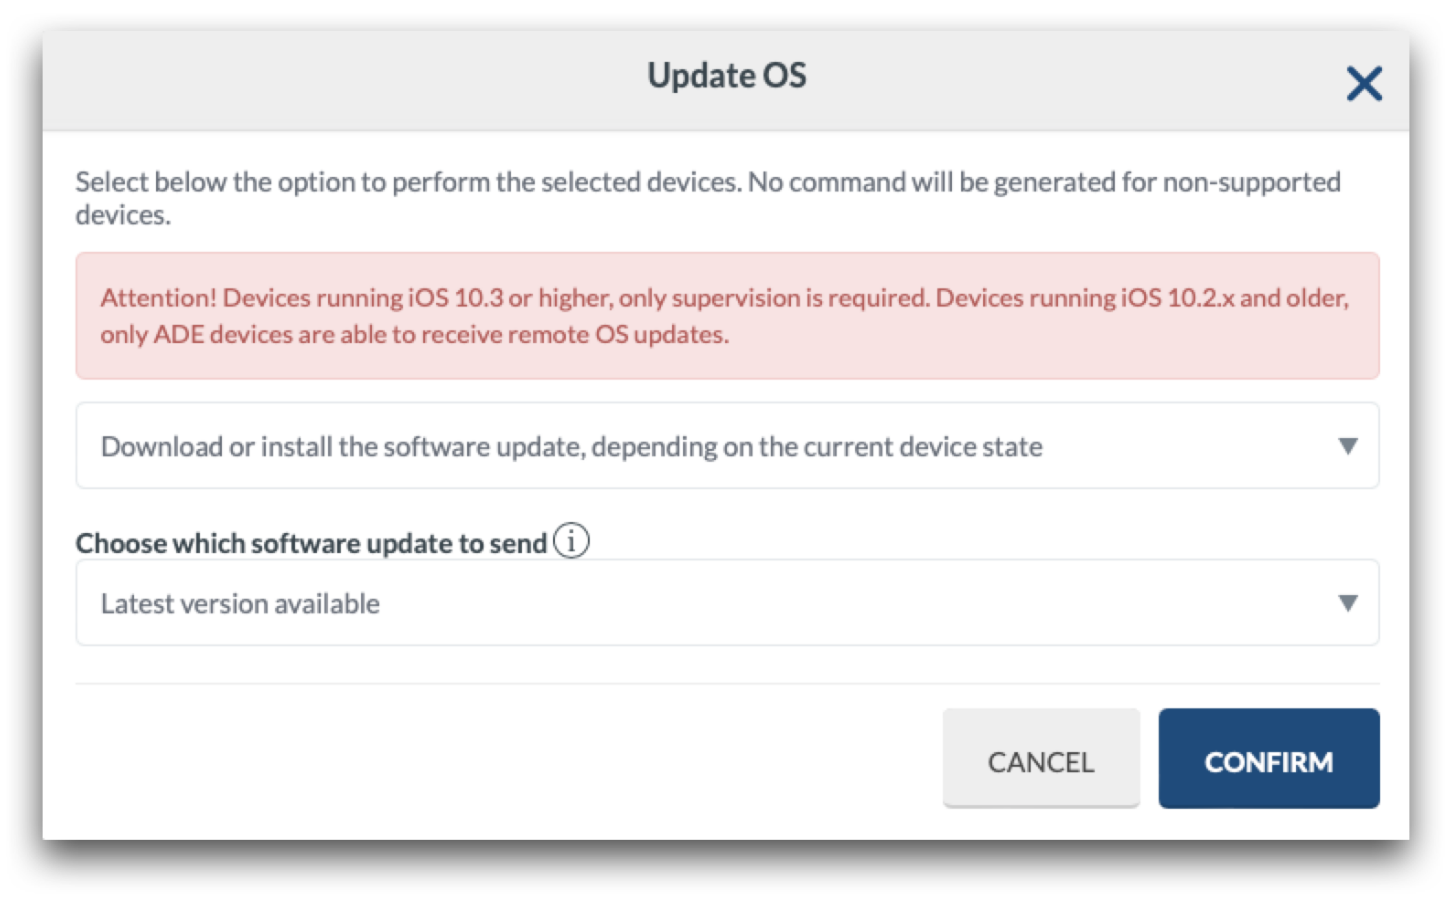
## Deploying iOS & iPadOS Updates
---
Devices will report the latest available OS updates to the MDM via the AvailableOSUpdate query. Any additional OS updates available are identified using Apple Software Update Servers and the software update ID for the device. Updates that have expired, or are no longer signed by Apple, cannot be pushed from the MDM.
Devices running iOS 10.2 or earlier, must be supervised and enrolled through Automated Device Enrollment in order for the MDM to push OS updates to the device. Devices running iOS 10.3 or later just need to be supervised.
If an iOS/iPadOS device has a passcode, the user will need to authorize the update by entering their passcode, allowing them to defer the update a limited number of times. After the user reaches the limit, the system will prompt to update every time the device returns to the home screen.
**Update through Devices Overview**
Update the operating system (OS) on iOS, iPadOS and tvOS devices in Management > Devices Overview. The toolbar shows the command based on the platform selected, such as Update iOS or Update tvOS, and offers multiple options for updates:
- Download or install the software update, depending on the current device state (Default behavior): This will either download the software update if it hasn't already been downloaded, or install the software update if one has been downloaded.
- Download the software update without installing it
- Install an already downloaded software update
After selecting the command, select the OS version to install. Check the status of the update in Management > Devices Overview > Click on the device's name to bring up Device Info > Operating System Version.
[](https://academy.mosyle.com/assets/images/courses/manager-msp-certification/lesson-7/7.3-managing-os-updates/deploying-ios-and-ipados-updates/update-ios.png)
**Update through Single Shot Profile**
Update the operating system (OS) on iOS, iPadOS and tvOS devices in Management > Management Profiles > + Activate New Profile > Single Shot. The Single Shot profile provides the ability to send the commands to update the OS at a time that is convenient for users, such as outside of school hours. Since the OS update is performed in two steps, it's recommended to configure two Single Shot profiles:
- The first to download the OS update: Choose the action 'Update iOS' and the option 'Download the software update without installing'. Choose the OS version to download.
- The second to install the OS update: Choose the action 'Update iOS' and the option 'Install an already downloaded software update'. Choose the OS version to install.
Choose when the commands will be sent - when saving the profile and based on a schedule, only when saving the profile, or based on schedule only. The option “when saving the profile” includes when the profile is saved and when the device is enrolled or assigned to the profile. When scheduling the commands, it\\’s recommended to schedule at a time that will not impact device use.
## Deploying macOS Updates
---
Devices will report the latest available OS updates to the MDM via the AvailableOSUpdate query. Updates that have expired, or are no longer signed by Apple, cannot be pushed from the MDM.
Devices running earlier versions than macOS 11 must be supervised and enrolled through Automated Device Enrollment. Devices running macOS 11 or later, only supervision is required. Mac computers with Apple silicon must have a bootstrap token to allow the MDM to push and install software updates.
**Update through Devices Overview**
Update macOS on devices in Management > Devices Overview > More dropdown menu > Update macOS. The command downloads and/or installs the version available to devices.
The list of available macOS versions across the fleet will be displayed in the pop-up window, where administrators select the version to update the devices. If the device is not compatible with the version selected, or the version selected is lower than the macOS version running on the Mac, the command is not generated. Administrators can send or schedule the command. If scheduled, the command will be available for users to run from the Self-Service application after the days-long delay expires.
[](https://academy.mosyle.com/assets/images/courses/manager-msp-certification/lesson-7/7.3-managing-os-updates/deploying-macos-updates/update-macos.png)
Available Commands
- Download and/or install the software update, depending on the current device state
- Download the software update without installing (macOS 11 or later)
- Download the software update and trigger restart countdown: This option is available to install the OS update immediately (InstallASAP). The command will immediately trigger the installation of an already downloaded software update, however if a software update is not already downloaded, the macOS will download the OS update and then immediately install after showing the restart countdown notification to the end user.
- Download the software update and notify the user via the App Store
- Download the software update and install it at a later time
- Download and/or install the software update, but will force a restart (with potential data loss; macOS 11 or later)
The Priority dictates the priority of the OS update. If set as “Low” the standard behavior will occur. If set as “High”, the macOS will interpret the command as if the user requested it manually on the Mac.
**Update through Single Shot Profile**
Update macOS on devices in Management > Single Shot. The Single Shot profile provides the ability to send the commands to update the OS at a time that is convenient for users, such as outside of school hours. Since the OS update is performed in two steps, it's recommended to configure two Single Shot profiles similar to the iOS/iPadOS updates.
Choose when the commands will be sent - when saving the profile and based on a schedule, only when saving the profile, or based on schedule only.
## Automating OS Updates
---
Automate OS updates for devices in your school or district using a combination of Device Groups and two Single Shot profiles. Doing this will ensure the devices download and install any updates as soon as they are available. To do this, follow the steps below.
1. Create a Dynamic Device Group to identify devices that have available updates using the criteria: "OS Update" is "Available".
The Device Group will update daily and automatically add any devices that are reporting a software update is available. As soon as the devices are updated, they will no longer meet the criteria for the Device Group and will be removed from the group and no longer receive the commands to download/install software updates until a new software update is available.
2. Create a Single Shot profile to Download the OS Update on devices that are identified as having a software update available. Using the dropdown menu for Action choose "Update iOS/ tvOS/macOS" and select the option "Download the software update without installing" along with the "Latest version available".
Execute the command based on the schedule only and choose a day/time outside of school hours to avoid any interruption in use. You can schedule to run as often as you'd like or as needed. Assign the Single Shot profile to the Dynamic Device Group created earlier. As devices are added to the Device Group, the command to download the OS update will be sent based on the defined schedule.
3. Create a Single Shot profile to Install the OS Update on devices that have been identified as having a software update available and received the command to download the OS update. Using the dropdown menu for Action choose "Update iOS/tvOS/macOS" and select the option "Install an already downloaded software update" and the "Latest version available".
Execute the command based on the schedule only and choose a day/time outside of school hours to avoid any interruption in use. Be sure to schedule for days/times after the command to download the OS update was sent. You can schedule to run as often as you'd like or as needed. Assign the profile to the Dynamic Device Group created earlier. As devices are added to the Device Group, the command to install the OS update will be sent based on the defined schedule.
**Additional Options**
Considering OS updates can take some time, additional notifications and configurations can be used to alert users that the OS update is required. Some examples are included below:
- Wallpaper profile: Create a Wallpaper profile under the Management tab and assign it to the Dynamic Device Group with an OS update available. The wallpaper can be an image indicating the user has an OS update available and needs to update the device as soon as possible.
- Single Shot profile with Custom Pop-Up message (macOS): Create a Single Shot profile under the Management tab with the Action "Custom Pop-Up Message". Choose to “Send a new Custom Pop-Up Message”, enter a title for the pop-up notification, and choose to show a custom message. Enter the message the end-users will see in the pop-up notification that will be displayed on their Mac. Execute the command based on what will work best in your school or district and how frequently you want the users to be prompted about the available OS update. Assign to the Device Group with an OS update available.
A combination of these additional options along with the Single Shot profile to enforce the OS update has proven successful to keep devices up to date.
# Device Restrictions & Passcode Policies
## Device Restrictions
---
The Restrictions profile configures restrictions on iOS, iPadOS, macOS, and tvOS devices. Features may vary based on the type and OS version of the device, and some may require supervision.
To create a Restrictions profile go to Management > Restrictions. Select the restrictions to be applied, and choose the Application time (Full time or according to a time profile). Assign the profile to users and/or devices and click Save.
If multiple Restriction profiles are installed on a device, the OS will combine all settings for the most restrictive configuration.
## Common iOS/iPadOS Restrictions
---
Below is a list of common restrictions applied to iOS/iPadOS devices:
- Do not allow device name change: Users cannot modify the name of the device in Settings (iOS 9 or higher)
- Do not allow Wallpaper change: Users cannot modify the device wallpaper (iOS 9 or higher)
- Do not allow passcode change: Users cannot add, change, or remove a passcode to access the device (iOS 9 or higher). This includes Touch ID or Face ID.
- Do not allow News: Users will not have access to the News App (iOS 9 or higher)
- Do not allow modifications to account settings: Users can't create new accounts or change user name, password, or other settings associated with their account. Accounts include-- Apple ID, Mail, Twitter, Facebook, Flickr and Vimeo
- Do not allow Find my Device: It turns off Find My Device in Find My App. This restriction requires supervision.
- Don't allow the installation of apps via App Store: Users will not be able to install apps from the App Store
- Do not allow access files on Network Drive: Users will not be able to access files on Network Drive. This restriction requires supervision
- Do not allow USB Files Drive: Users will not be able to access USB Files Drive. This restriction requires supervision
- Force Wifi Power On: The user will not be able to turn off WiFi
- Force automatic Date & Time: The Date & Time setting is set automatically
- Do not allow AutoFill Passwords: Users cannot use the AutoFill Passwords feature. Users also won't be prompted with the option to pick a saved password to use in password fields in Safari or other apps.
- Do not allow nearby iOS devices to share requests for a password: Users' devices will not be able to advertise themselves to nearby devices for passwords by using the Proximity AutoFill capability.
- Do not allow password sharing: Users cannot share their passwords with the AirDrop Passwords feature
## Common macOS Restrictions
---
The macOS Restriction profile is organized into six categories/tabs. Use the option 'Do not configure the options on this tab' in the Restrictions profile to ensure any settings or restrictions within the tab are not applied and the default or manual configuration that's present on the macOS devices will remain unchanged. This feature is important in prevention of accidental deployment of configurations and impact of devices assigned to the profile.
The tabs are organized with their corresponding restrictions. After making any changes to a Restriction profile and reinstalling the profile on devices, the Mac may require a reboot for the new restriction configurations to be applied.
**macOS Restrictions Tabs**
- Preferences: Restrict users from accessing areas of System Preferences or System Settings on the Mac. For devices running macOS versions earlier than macOS 13, configure the System Preferences tab. For devices running macOS 13 or later, configure the System Settings tab.
- Apps: Restrict settings for applications such as Game Center, Safari Autofill, and restrictions for the installation and updates of applications. This tab also allows you to restrict applications from launching. The Allowed and Disallowed Folders options have been deprecated in macOS 10.15 and later.
- Widgets: Allow specific widgets to run. This restriction option has been deprecated in macOS 10.15 and later.
- Media: Configure media types that are allowed, such as network media (AirDrop), internal disks, external disks, disk images, DVD-RAM, CDs & CD-ROMs, DVDs, and recordable disks. This restriction has been deprecated with macOS 11.
- Sharing: Configure services to be available in the sharing menu. For devices running macOS 10.13 or later, you can configure these services using the Extensions profile.
- Functionality: Configure specific settings to allow or disallow on the Mac. Some examples include iCloud services, password sharing, password AutoFill, requiring Admin credentials for network changes, erase all content and settings, AirPrint, and content caching.
## Passcode Policies
---
The Passcode Policies profile configures passcode criteria on iOS, iPadOS and macOS devices. It supports the system scope and user scopes on macOS devices. If user scope is chosen, please assign only users to the profile. If existing passcodes do not meet the policy standards, users will be prompted to reset their password.
The Passcode Policy profile does not create or set passcodes and is not compatible with Apple Shared iPad devices. To set the PasscodeLockGracePeriod on Apple Shared iPad devices, configure the Apple Shared iPad Shared Device Group settings.
To create a Passcode Policy, go to Management > Passcode Policies.
Features include:
- Force PIN: Prompts users to set passcode within 1 hour (iOS, iPadOS)
- Allow simple value: Permits repeating, ascending and descending characters
- Require alphanumeric value: Requires passcodes to contain at least one letter and one number
- Force Password Reset (10.13+): Prompts for reset on next user authentication (macOS). This will prompt users anytime the profile is saved and/or reinstalled.
- Minimum passcode length: Sets the minimum of characters allowed
- Minimum number of complex characters: Sets the minimum of non-alphanumeric characters allowed
- Maximum passcode age: Enter 0 to not configure, or 1 day to 730 days
- Maximum Auto-Lock: Narrows times available to users to manually set Auto-Lock. On macOS, this maximum auto-lock value configures the screen-saver settings.
- Passcode history: Enter 0 to not configure, or 1 passcode to 50 passcodes (iOS, iPadOS)
- Maximum grace period for device lock: Longest device lock grace period available to users
- Maximum number of failed attempts: Maximum failed attempts prior to the device erases
- Delay after failed login attempts: Minutes that the device is locked for after maximum failed attempts (macOS)
**Additional Considerations**
- When an iOS/iPadOS device is locked, some commands may not apply until it is unlocked.
- If an iOS/iPadOS device has a passcode, it will not auto-join the network until it is unlocked after a restart. This can impact commands being delivered to the device if it is not connected to the network.
- If using Mosyle Auth on macOS devices, it's recommended to configure password policies through the identity service provider (IdP).
- Local administrators created from an Automated Device Enrollment profile are not exempt from the Passcode Policies profile on macOS devices. If the policy should not be applied to the Administrator created using Automated Device Enrollment, the profile should be assigned via the User Scope to specific users.
- It's recommended to turn on Force Password Reset to prevent lockout of users whose password does not meet policy standards on macOS devices.
- If the passcode policy still applies after profile uninstallation on macOS devices, please run the following command in Terminal, which is opened from Applications/Utilities, or the Custom Commands profile: pwpolicy -clearaccountpolicies
## Removing a passcode on iOS/iPadOS devices
---
If the passcode is forgotten on an iOS/iPadOS device, it's important to keep the device connected to the network and not restart the device. The device will remain auto-joined to the network as long as it has not been restarted or powered off. As long as the device remains connected it can receive the Remove Lock Passcode command from Mosyle to remove the passcode, Touch ID, and/or Face ID.
To remove the passcode from an iOS/iPadOS device go to Management > Devices Overview > Select the device > More dropdown menu: Remove Lock Passcode.
If the command is sent and the device is connected to the internet, it will remove the passcode and allow the device to be unlocked with the Home button. If the Passcode Policies profile is installed on the device to force a password, it will prompt the user to set a new passcode.
## Managing User Accounts on macOS
---
Administrators can manage User Accounts on Mac computers that are supervised and enrolled in Mosyle.
To access these options, go to Management > Devices Overview > Click on a device's name to bring up the Device Information window > More dropdown: Manage Users. Here you can either change the user's password or unlock the user account after too many failed password attempts.
In order to change a user's password, Administrator credentials for an admin user with a Secure Token is required. The new password must meet password policies, including the Passcode Policies profile or active rules in Security. If FileVault is turned on, the disk must be unlocked for the device to acknowledge the commands. The device must be online at the login window in order for the commands to go through to change the user's password or unlock the device.
If the user's password is unable to be changed through Mosyle, the password can be changed using the Reset Password Assistant in recoveryOS. To reset an account's password, follow the instructions under the heading "Use the Reset Password assistant" in the [Apple Support article](https://support.apple.com/en-us/HT212190).
**Changing the ADE Admin Password**
When creating the Administrator account using the Automated Device Enrollment profile, a password needed to be defined. This password can be changed by sending the Set Admin password in Devices Overview, or using the Single Shot profile to Change the Randomized DEP Admin Password.
- Devices Overview: Go to Management > Devices Overview > Select Devices > More dropdown menu: Set Admin Password. Enter the new password for the DEP Admin account.
- Single Shot: Go to Management > Single Shot profile > Change Randomized DEP Admin Password. Choose the rotation interval of 30, 60, 90, or 120 days. This option ensures that devices are rotating the DEP Admin password on a regular basis to keep devices secure.
# Managing WiFi Connectivity
## WiFi Authentication
---
The WiFi Authentication profile configures networks for devices to join. To create a WiFi Authentication profile, go to Management > WiFi Authentication. Name the profile, enter the network SSID, choose the Security Type, and enter the password to join the network. Assign the profile to users/devices and click Save.
It's important the Security type and password are correct in the profile so that the device can successfully join the network.
**MAC Address Randomization (iOS/iPadOS)**
Starting with iOS and iPadOS 14, devices use a unique MAC address, or network address, when connecting to each network. This is a security and privacy enhancement to prevent network administrators from tracking devices, especially in the public sphere. In a school or district, this enhancement may conflict with network protocol that filters devices based on their MAC address. If your environment is impacted, please turn off MAC Address Randomization by checking the box in the profile.
When disabling MAC Address Randomization, it is on a per-SSID basis and will result in a privacy warning being displayed in the Settings app indicating the network has reduced privacy.
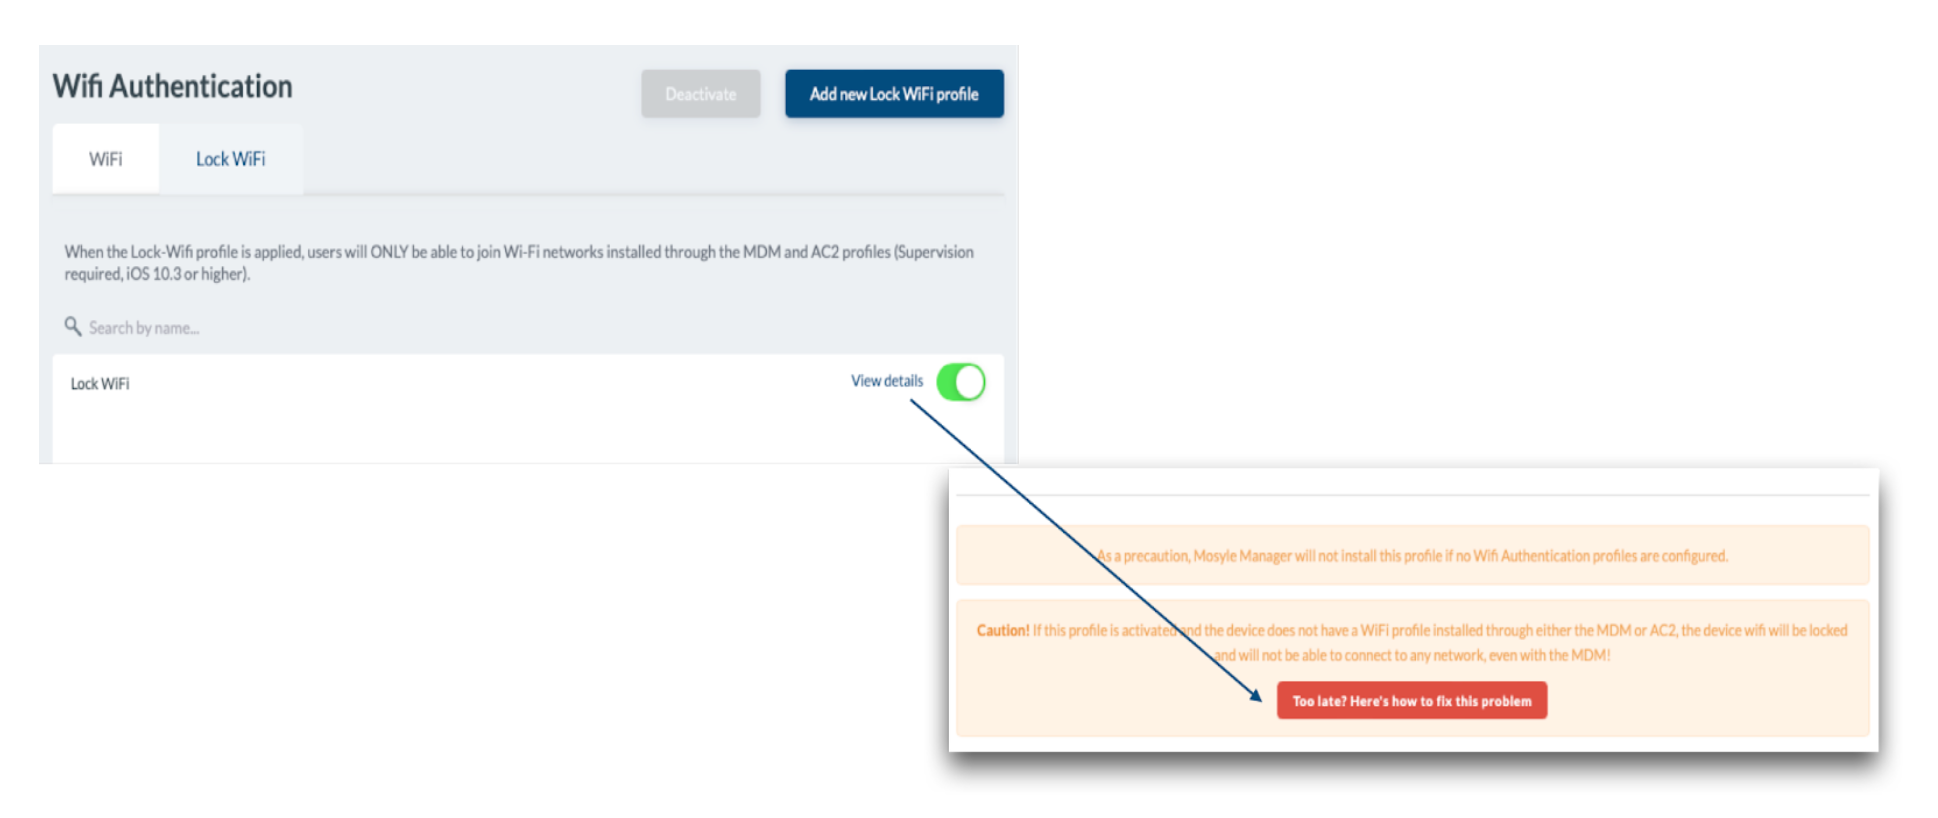
**Lock WiFi (iOS/iPadOS)**
The Lock WiFi configures iOS and iPadOS devices to only connect to managed networks that have been configured on devices using a WiFi Authentication profile.
To create a Lock WiFi profile, go to Management > WiFi Authentication > Click the Lock WiFi tab. Name the profile and choose an Application time.
Mosyle automatically installs a backup WiFi Authentication profile on enrolled devices so that in the event a Lock WiFi configuration is applied, and the device is unable to join the managed network, a temporary SSID can be configured to allow the device to connect. To view the credentials for the backup WiFi Authentication profile, a Mosyle Administrator can click View Details for the profile then click the link “Too late? Here's how to fix this problem”.
[](https://academy.mosyle.com/assets/images/courses/manager-msp-certification/lesson-7/7.5-managing-wifi-connectivity/wifi-authentication/wifi.png)
## Multi-Cert Profile
---
The Multi-Cert Profile configures network settings that use certificates to authenticate to the network by combining related WiFi, VPN, SCEP, or AD Certificate payloads. It supports installations at the system scope and the user scope. If user scope is chosen, please assign only users to the profile.
To create a Multi-Cert Profile:
1. Click on Management > Multi-Cert Profile
2. Click “Add New Profile”
3. Name the profile and click + Add Profile
4. Click the payload
5. Configure as needed and Save
6. Save
7. Assign the profile to users/devices
8. Save
The WiFi Authentication profile and Multi-Cert profiles will be reinstalled each time they are saved. To avoid this behavior, it's recommended to select 'Do not reinstall the profile during assignment/login'.
# Kernel Extensions, System Extensions, Privacy Preferences
## Overview
---
Applications deployed to macOS devices may require the configuration of Kernel Extensions, System Extensions or Privacy Preferences. This can be remotely configured through Mosyle so the user isn't prompted to allow any additional items upon the installation of the application.
## Kernel Extensions
---
The Kernel Extensions profile allows signed kernel extensions to load from a list of developer Team Identifiers or a list of Team Identifiers mapped to application Bundle Identifiers. Map Team Identifiers to Bundle Identifiers to allow specific Bundle Identifiers to load. Enter only the developer Team Identifier to allow all Bundle Identifiers.
Be sure to reference an application's software documentation if system extensions have replaced kernel extensions, or if both are needed. Mac computers running macOS 11 or later require user approval or manual intervention to load kernel extensions, unless it is a Mac computer with Apple silicon and Bootstrap Token is allowed for authentication. Check [Apple's documentation](https://support.apple.com/en-md/guide/deployment/depa5fb8376f/1/web/1.0) for more information on kernel extensions and [management of legacy extensions](https://support.apple.com/en-us/HT211860).
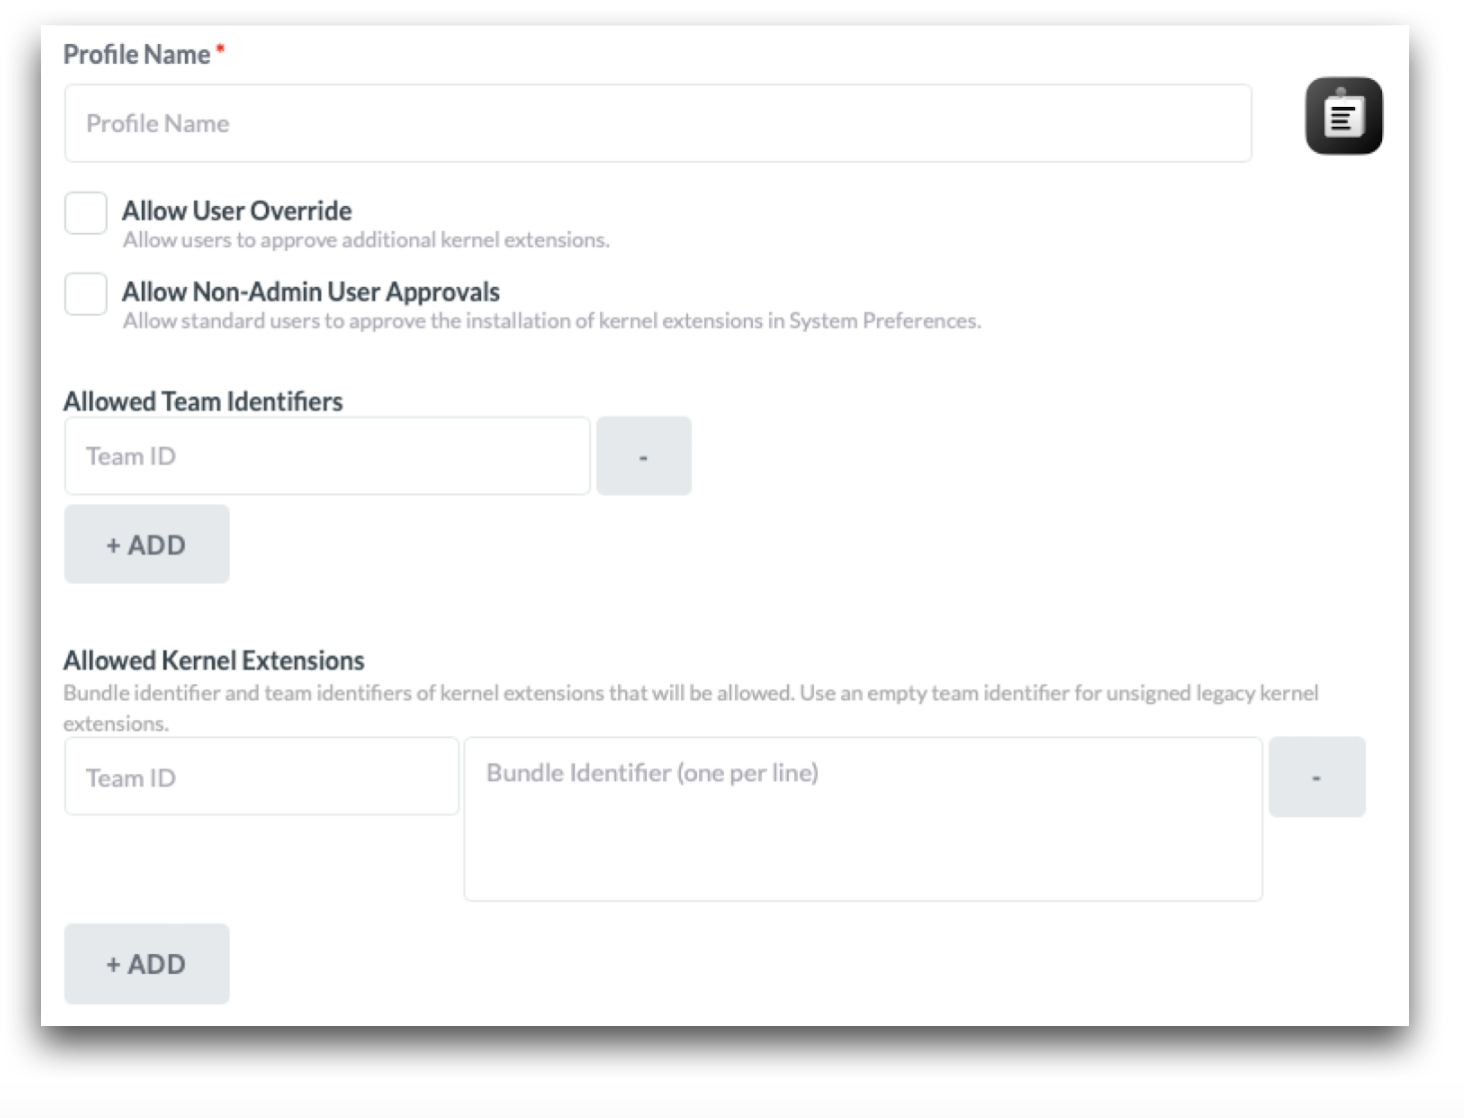
To create a Kernel Extensions Profile
- Click Management > Click Kernel Extensions
- Click “Add New Profile” and name the profile
- Select options as needed:
- Allow User Override: This option allows users to approve kernel extensions that are not approved or pushed using the MDM
- Non-Admin User Approvals: This allows non-admin users to approve kernel extensions (Recommended on devices running macOS 11+)
- Allowed Team Identifiers: to approve all kernel extensions from a specified developer, enter the developer Team identifier in the field
- Allowed Kernel Extensions: to approve kernel extensions for specific bundle identifiers from a developer, enter the developer Team Identifier and the corresponding approved application Bundle Identifiers
- Assign the profile to users and/or devices
- Save
[](https://academy.mosyle.com/assets/images/courses/manager-msp-certification/lesson-7/7.6-kernel-extensions-system-extensions-privacy-preferences/kernel-extensions/kernel-extension.png)
## System Extensions
---
The System Extensions profile loads system extensions on devices running macOS 10.15 or later. System extensions run in the user space and replace Kernel extensions. As developers transition applications to use System Extensions instead of Kernel Extensions, apps may require the combination of Kernel Extensions profile in addition to the System Extensions profile in the meantime. Check the developer documentation to confirm the use of either Kernel or System Extensions. Reference [Apple's documentation](https://support.apple.com/en-us/HT210999) for more information about system extensions.
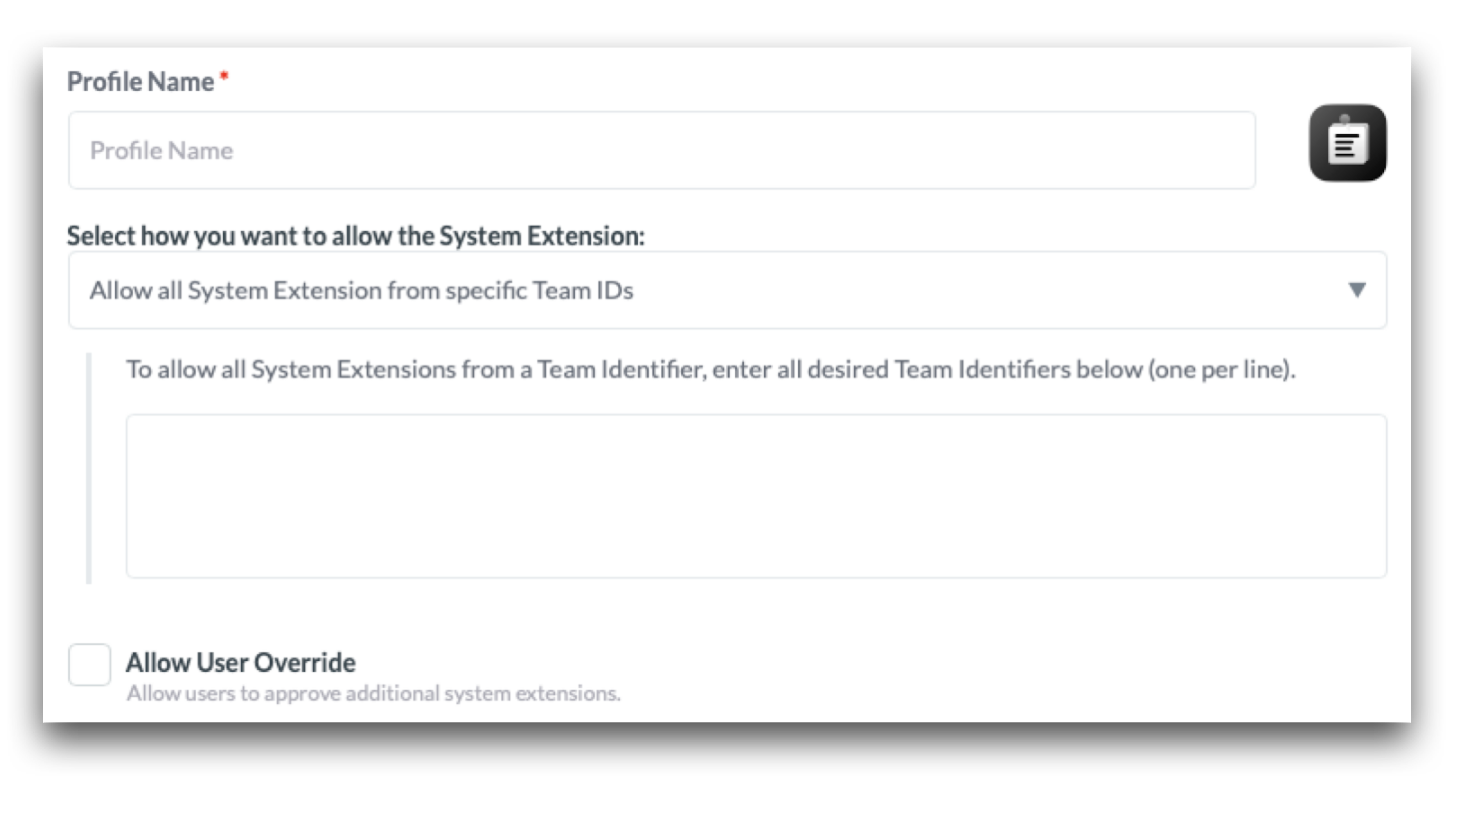
To create a System Extensions Profile
1. Click Management > System Extensions
2. Click “Add New Profile” and name the profile
3. Choose how to allow the extensions: Allow all system extensions from specific Team IDs; allow specific system extensions from specific Team IDs; allow specific system extensions
4. Enter the Team ID and Bundle ID
5. Assign the profile to users and/or devices
6. Save
[](https://academy.mosyle.com/assets/images/courses/manager-msp-certification/lesson-7/7.6-kernel-extensions-system-extensions-privacy-preferences/system-extensions/system-extension.png)
## Privacy Preferences
---
The Privacy profile configures privacy permissions for applications. It's installed at the system level, meaning configurations will not be visible to the logged-in user in System Settings > Privacy & Security.
Apple's MDM protocol does not provide MDM solutions access to remotely grant certain privacy permissions such as Camera, Microphone, Screen Sharing/Capture, Location Services, and Listen Events (Input Monitoring). For microphone and camera, these permissions may be approved by a Standard local account. By default, Screen Capture and Listen Events require Admin credentials. For devices running macOS 11+, you can create the Privacy profile with the option "Allow Standard User to Set (macOS 11 and later)" for these two permissions.
It's recommended to configure permissions by an application's Bundle Identifier unless otherwise instructed by software documentation. For binaries, it's recommended to configure by Application Path.
To create a Privacy Profile
1. Click Management > Click Security & Privacy > Privacy tab
2. Click “Add New Profile” and name the profile
3. Configure as needed
4. Assign the profile to users and/or devices
5. Save
Some features in Mosyle require the agent to have certain Privacy Permissions. Check the box “Install the Privacy Preferences Policy Control settings for the Mosyle Manager app to allow access to all necessary files and application data.”
# Securing Devices
## Overview
---
In the event a device belonging to the school or district is lost or stolen, there are remote management methods to lock the device, secure data stored, and/or prevent further use of the device.
Available options via the MDM include:
- Lost Mode (iOS & iPadOS): Lock a device with a specified message. Once locked, ping the device's location or play a sound to assist with locating the device.
- Activation Lock (iOS, iPadOS, & macOS): Lock the device so that once erased, it cannot be reactivated and set up until the user enters the Apple ID credentials to authorize the unlock or Activation Lock is disabled via the MDM. Available only for devices in Apple School Manager that are owned by the school or district.
- FileVault (macOS): Enforce FileVault to encrypt the disk and prevent unauthorized access.
- Firmware Password (macOS): Lock the device with a firmware password to block the ability to use startup key combinations and prevent users from starting up any internal or external storage device other than the selected startup disk. Available only for Mac computers with an Intel processor.
- Recovery Lock (macOS): Set a recovery lock password to prevent unauthorized access to the recovery partition on macOS devices. Available only for Mac computers with Apple silicon running macOS 11.5 or later.
- Lock device (macOS): Lock a device with a 6-digit PIN. The device cannot be accessed until the 6-digit PIN is entered. To lock Mac computers with Apple silicon, macOS 11.5 or later is required.
IMPORTANT NOTE: Mosyle will retain the Activation Lock bypass codes, FileVault Personal Recovery Key, and Lock PIN for the duration of time the device remains in the Mosyle system. If the device is removed from the MDM, the data will be removed from all Mosyle systems and cannot be recovered. Before removing devices from the Mosyle MDM, please be sure to take note of any codes, keys, or passwords that may be needed in the future.
## Lost Mode (iOS/iPadOS)
---
To enable Lost Mode on a device, go to Management > Devices Overview > Select any/all devices to enable Lost Mode. From the More dropdown menu, choose “Activate Lost Mode”. Enter the desired message to be displayed on the device screen when it is locked (required), as well as a phone number or footnote (optional). In order for Lost Mode to be enabled on the device, it must have a valid network connection so it can receive the command from the MDM.
When Lost Mode is enabled, a banner will be presented under the Security Info tab in Device Information for the iPhone or iPad.
[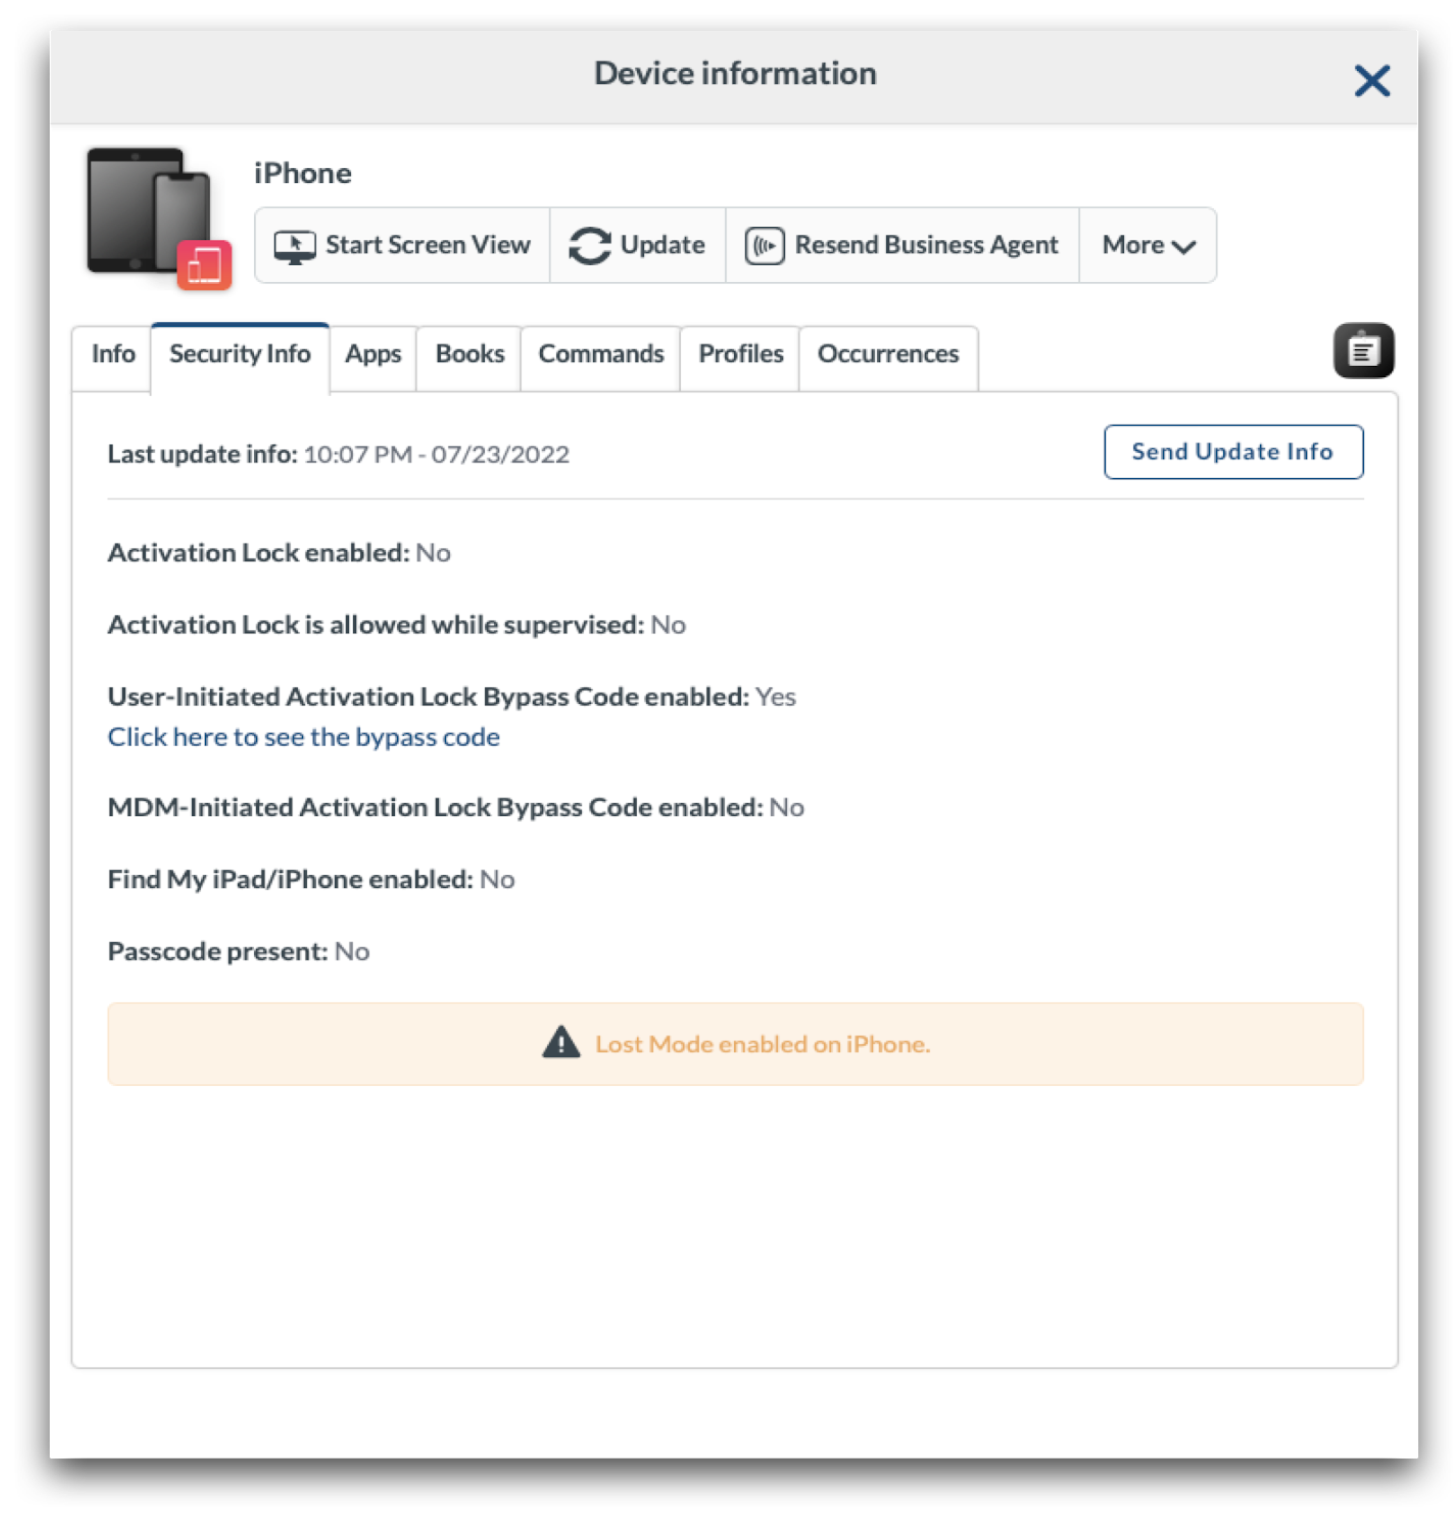](https://academy.mosyle.com/assets/images/courses/manager-msp-certification/lesson-7/7.7-securing-devices/lost-mode-ios-ipados/lost-mode.png)
After turning on Lost Mode, the device will be locked. To play a sound or request the device location, click the More dropdown menu and choose: Request Location or Play Sound.
[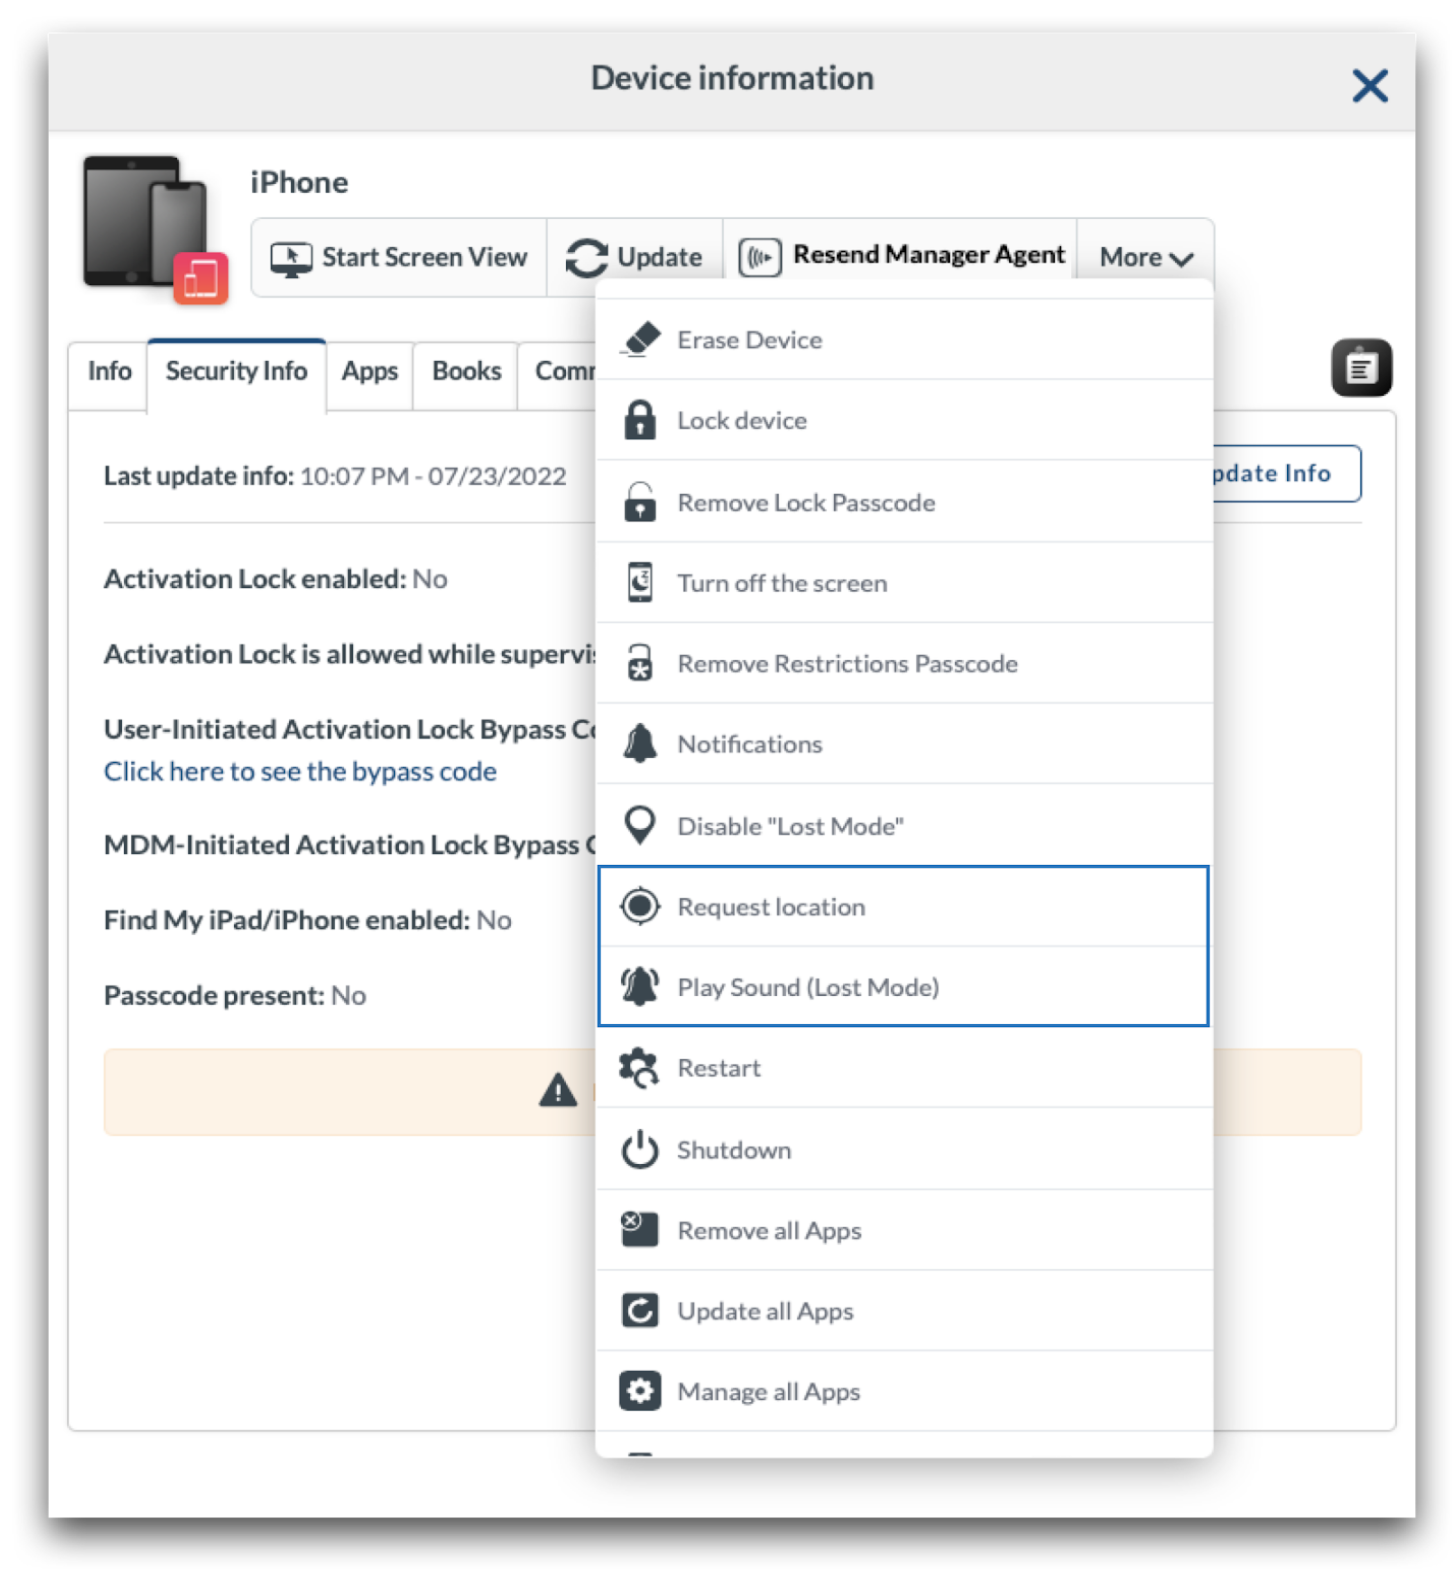](https://academy.mosyle.com/assets/images/courses/manager-msp-certification/lesson-7/7.7-securing-devices/lost-mode-ios-ipados/location-or-sound.png)
Enabling Lost Mode will not prevent someone from erasing the device. If erased and the device is part of Apple School Manager and assigned to Mosyle, it will automatically re-enroll in the MDM after connecting to a network and will re-apply Lost Mode. If the device is not part of Apple School Manager, or is not assigned to the Mosyle MDM server, it can be erased and the user will be able to proceed with normal setup.
To disable Lost Mode, go to Management > Devices Overview > Select any/all devices to turn off Lost Mode. From the More dropdown menu, choose “Disable Lost Mode”. Again, devices will need a valid network connection to receive the command to release Lost Mode.
## Activation Lock
---
Activation Lock is a built-in security mechanism on iOS, iPadOS, and macOS devices which prevents users from being able to activate and set up a device without knowing the Apple ID credentials that enabled Activation Lock. If Activation Lock is enabled and the device is erased, the user will be presented with a screen requesting the Apple ID credentials used to enable Activation Lock in order to proceed with setup. The device will be locked and unusable until Activation Lock is released or unlocked.
Activation Lock can be managed on devices owned by the school or district, and exist in Apple School Manager. Devices can be locked with Activation Lock in two forms:
- User-initiated: Users turn on Activation Lock in Find My or iCloud with their personal Apple ID
- MDM-initiated: The MDM turns on Activation Lock
Note: A T2 chip or Apple silicon is required on macOS devices for Activation Lock.
**User-initiated Activation Lock**
By default, devices enrolled in Mosyle MDM using Automated Device Enrollment will be blocked from User-initiated Activation Lock being enabled, in other words users enabling Activation Lock with their personal Apple ID. If the school or district prefers users to have access to enabling Activation Lock, check the box to “Allow User-initiated Activation Lock” in the Automated Device Enrollment profile.
Upon enrollment, Mosyle requests an Activation Lock bypass code from the device. This code can be used to unlock a device which has been Activation Locked by a user. Please note, Mosyle MDM is unable to manage or unlock Activation Lock if it was enabled prior to enrolling in the MDM.
If devices have already been enrolled and you wish to either allow or block User-initiated Activation Lock:
- iOS/iPadOS: Go to Management > Devices Overview > Click the device name to bring up Device Info > More dropdown menu > Allow User-Initiated Activation Lock.
- macOS: Go to Management > Devices Overview > MDM Options > Select or deselect Allow User-initiated Activation Lock.
If a device is User-Initiated Activation Locked after being enrolled in the Mosyle MDM, it can be turned off using one of the methods below:
- Within the Mosyle console: Management > Devices Overview > Click the device name to bring up Device Info > More dropdown menu > Disable Activation Lock.
- On the Activation Lock screen on the device, enter the Managed Apple ID and password of the ASM Admin user into the Apple ID and password fields. The credentials should be for the ASM Admin user who integrated and assigned devices to the Mosyle MDM server.
- Using the Activation Lock Bypass Code:
- iOS/iPadOS: On the Activation Lock Screen on the device, leave the Apple ID field blank and enter the User-Initiated Activation Lock Bypass Code from Mosyle in the password field.
- macOS: From the Activation Lock Screen on the device, click the Recovery Assistant menu option in the top left and select "Activate with MDM Key". Enter the User-Initiated Activation Lock Bypass Code from Mosyle in the field presented.
**MDM-initiated Activation Lock**
The MDM can enable MDM-initiated Activation Lock on any enrolled device that was enrolled via Automated Device Enrollment and is part of the school or district's Apple School Manager account. When enabling Activation Lock, the device is not required to have a network connection as the Activation Lock request is simply an API call between the Mosyle servers and Apple servers.
To enable Activation Lock, go to Management > Devices Overview > Click a device name to bring up Device Info > More dropdown menu: Enable MDM-Initiated Activation Lock.
If a device is MDM-Initiated Activation Locked, it can be turned off using one of the methods below:
- Within the Mosyle console: Management > Devices Overview > Click the device name to bring up Device Info > More dropdown menu > Disable MDM-Initiated Activation Lock.
- On the Activation Lock screen on the device, enter the Managed Apple ID and password of the ASM Admin user into the Apple ID and password fields. The credentials should be for the ASM Admin user who integrated and assigned devices to the Mosyle MDM server.
- Using the Activation Lock Bypass Code:
- iOS/iPadOS: On the Activation Lock Screen on the device, leave the Apple ID field blank and enter the MDM-Initiated Activation Lock Bypass Code from Mosyle in the password field.
- macOS: From the Activation Lock Screen on the device, click the Recovery Assistant menu option in the top left and select "Activate with MDM Key". Enter the MDM-Initiated Activation Lock Bypass Code from Mosyle in the field presented.
**Activation Lock Bypass Code**
Each device will have two Activation Lock Bypass Codes. One code is to bypass User-Initiated Activation Lock, the other is to bypass MDM-initiated Activation Lock (if MDM Activation Lock was enabled). Be sure to use the appropriate Activation Lock Bypass Code depending on how Activation Lock was enabled. To view the Bypass Codes, go to Management > Devices Overview > Click on a device's name to bring up Device Info > Click Security Info tab.
If Activation Lock is unable to be removed, the device will need to be taken to an Apple Store with proof of purchase in order to be unlocked.
[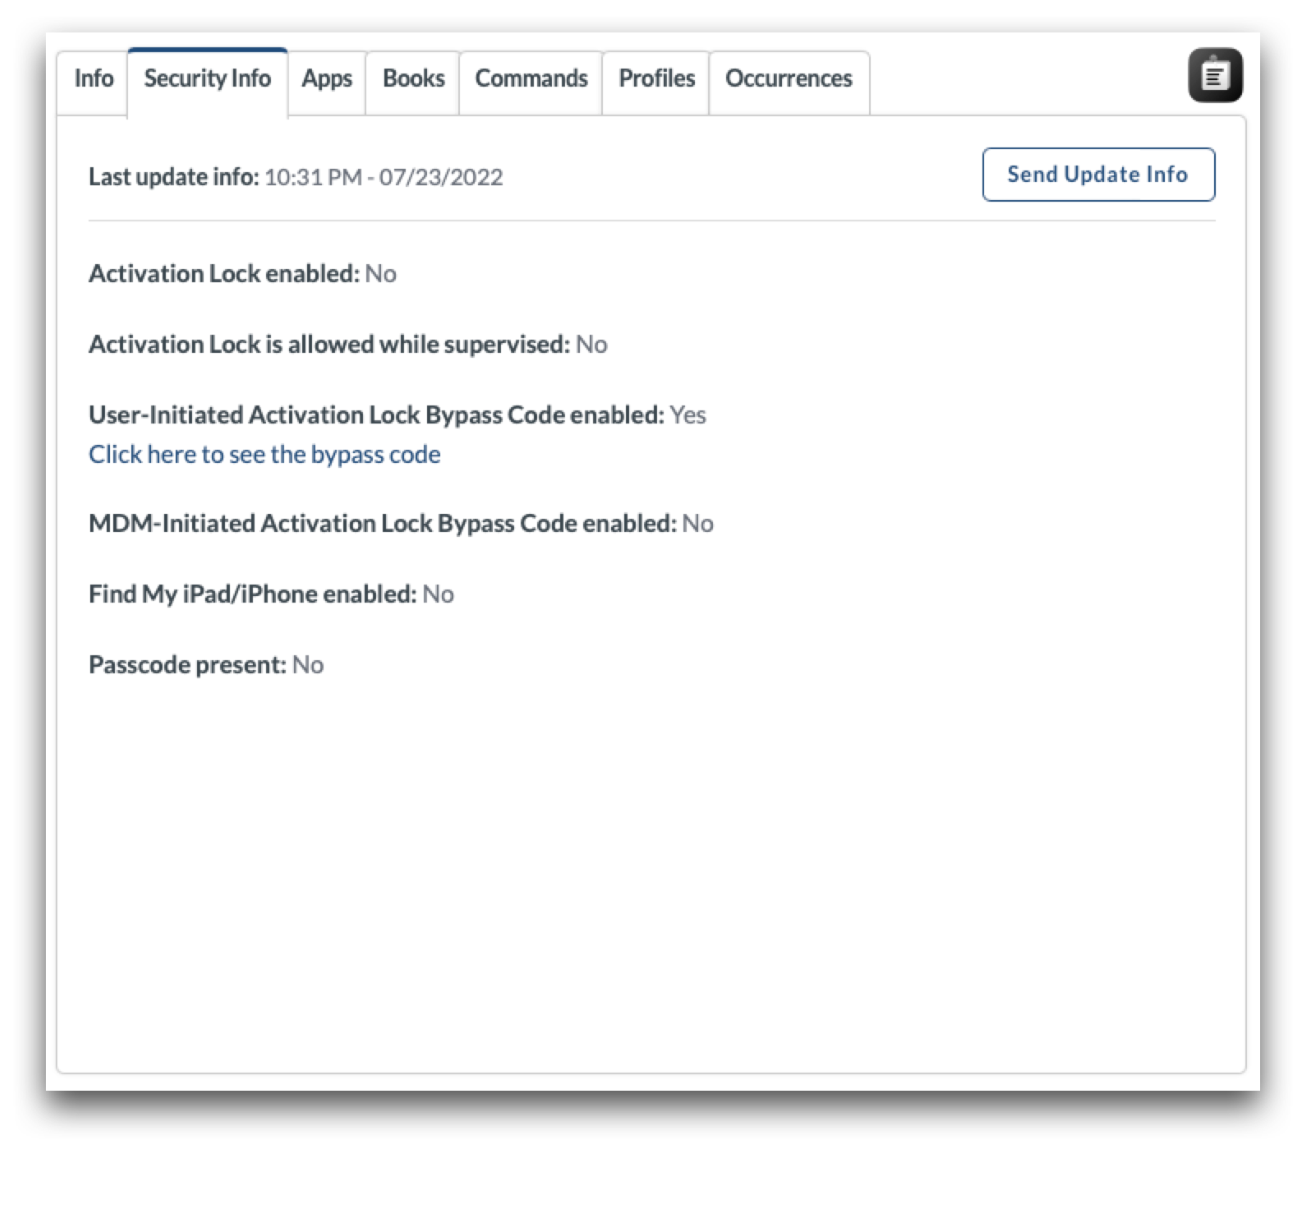](https://academy.mosyle.com/assets/images/courses/manager-msp-certification/lesson-7/7.7-securing-devices/activation-lock/activation-lock.png)
## FileVault (macOS)
---
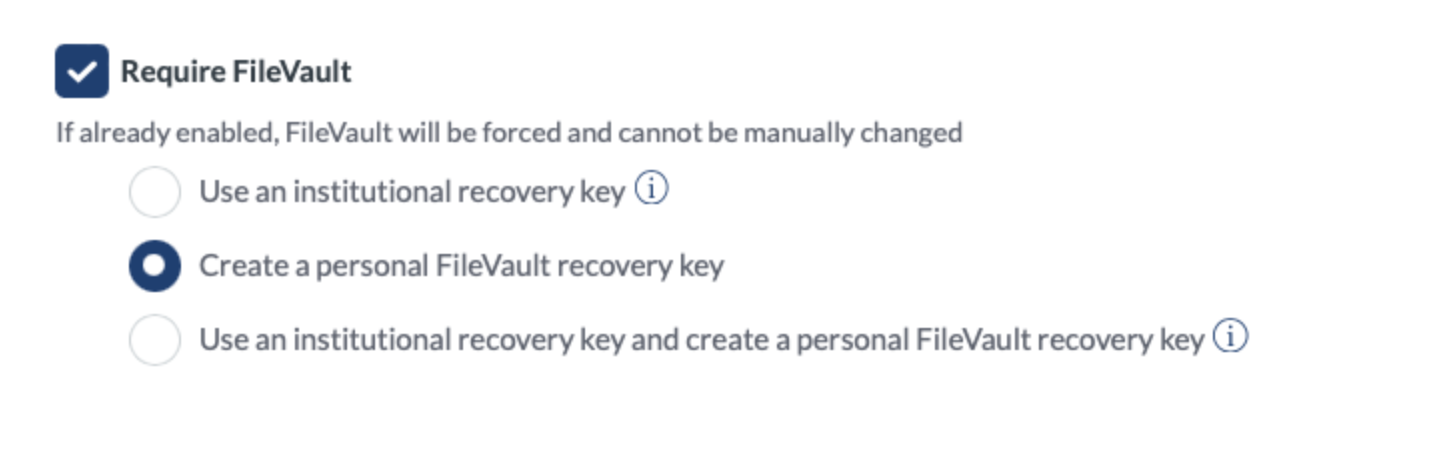
The Security profile in Mosyle will enforce the enablement of FileVault. Find the profile by going to Management > Security & Privacy > Security tab > Add new profile. The FileVault settings are available under the FileVault tab.
To enforce and require FileVault, check the box for “Require FileVault”. Choose whether to use an Institutional Recovery Key, Personal Recovery Key, or both. Institutional Recovery Keys are not supported on Mac computers with Apple silicon, so it's recommended to use Personal Recovery Keys.
[](https://academy.mosyle.com/assets/images/courses/manager-msp-certification/lesson-7/7.7-securing-devices/filevault-macos/personal-recovery.png)
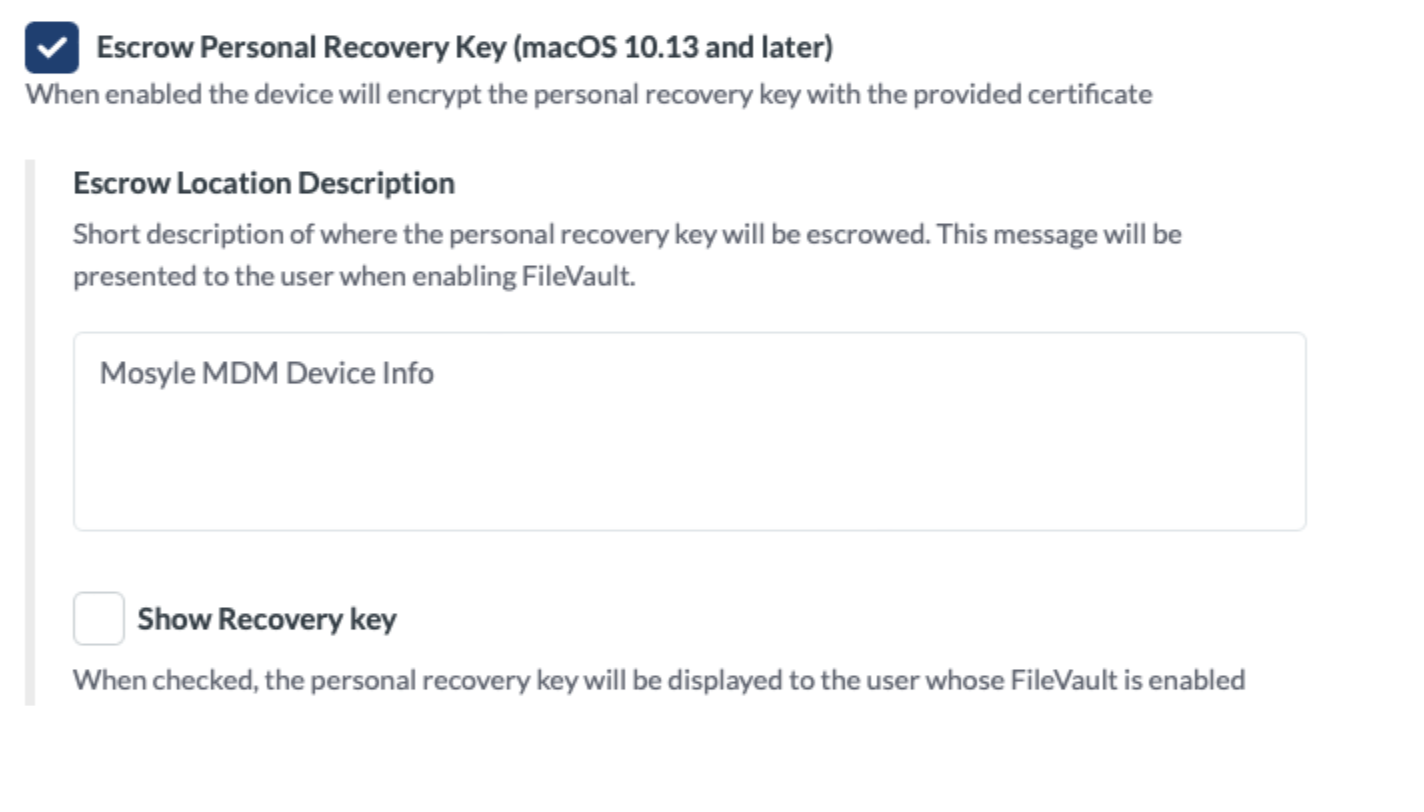
When using Personal Recovery Keys, it's recommended to escrow the key to the MDM so it's available as needed. To escrow the key, check the box “Escrow Personal Recovery Key”. Enter location information for the key and choose whether or not to show the end user the recovery key locally on the Mac when FileVault is enabled.
[](https://academy.mosyle.com/assets/images/courses/manager-msp-certification/lesson-7/7.7-securing-devices/filevault-macos/escrow.png)
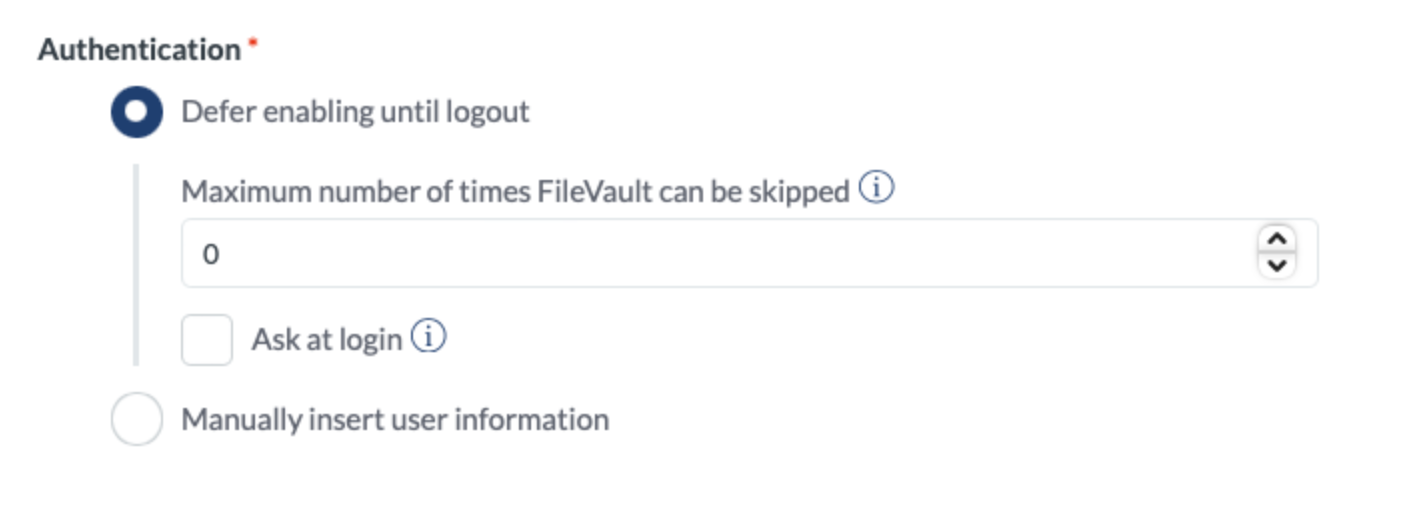
Last, choose when to prompt the user to enable FileVault. Select “Defer enabling until logout” to prompt users to enable FileVault when logging out, check the box “Ask at login” to prompt users to enable FileVault when logging in. Set the maximum number of times the user can skip the prompt to enable FileVault before being forced.
[](https://academy.mosyle.com/assets/images/courses/manager-msp-certification/lesson-7/7.7-securing-devices/filevault-macos/prompt-enable.png)
**Secure Token & Bootstrap Token**
Users can only enable FileVault if they have a secure token. Starting with macOS 11, the first user created on the Mac with a plain text password is granted the initial secure token.
Users granted a secure token on macOS 11 and later:
- If the device is enrolled using Automated Device Enrollment and no Local User profiles are assigned, the user created during the Setup Assistant will be granted the initial secure token.
- If a Local User profile is deployed to devices enrolled using Automated Device Enrollment, this could result in the local user account being granted the initial secure token.
- If the device is enrolled using Automated Device Enrollment, no Local User profiles are assigned, and the user is not prompted to create an account during the Setup Assistant, the first user to login on the Mac will be granted the initial secure token. This is the case for deployments using Mosyle Auth 2, devices bound to AD using network/mobile accounts, or devices that only have the admin account created through Automated Device Enrollment and the user logs in to this account.
Because the password for the additional admin account created during Automated Device Enrollment is set using a password hash, the admin account created during Automated Device Enrollment is typically not the first user to be granted a secure token. In order for the admin account created during Automated Device Enrollment to be granted a secure token, the bootstrap token must be generated and escrowed. The bootstrap token is generated and escrowed to Mosyle only after a user with a secure token logs in for the first time. Once the bootstrap token is generated and escrowed, any other user who logs in on the Mac will receive a secure token (macOS 11 and later). This means, in order for the admin account created during Automated Device Enrollment to be granted a secure token, the user account will need to login on the Mac.
Mac computers with Apple silicon, enrolled via Automated Device Enrollment, require the bootstrap token to authorize the installation of kernel extensions and software updates via the MDM. Additionally, the bootstrap token is used to authorize the Erase All Content and Settings (EACS) command on Mac computers with the T2 security chip or Apple silicon running macOS 12.0.1 or later. Mac computers with Apple silicon that are manually enrolled will need to update the Security settings in Recovery mode so the MDM can install kernel extensions, software updates, and authorize EACS.
To allow the bootstrap token, configure your Automated Device Enrollment profile to “Allow Bootstrap Token” by going to:
1. My School > Apple Basic Setup
2. Enrollment > Automated Device Enrollment
3. Click the enrollment profile
4. Check the box to “Allow Bootstrap Token” and save
5. After the device is enrolled and a user with a secure token logs in, the bootstrap token will be created and escrowed in Mosyle.
Apple silicon devices that have already been enrolled via Automated Device Enrollment, but were not enrolled with the option to “Allow Bootstrap Token” can be sent a command after the enrollment to allow bootstrap token. To do this, follow the steps below:
1. Management > Devices > Devices Overview
2. Select the device(s) > More dropdown menu: MDM Options
3. Choose the option “Allow bootstrap Token”
4. After the command goes through, a user with a secure token will need to login to generate and escrow the bootstrap token. Once generated and escrowed, all other users logging in on the Mac will receive a secure token (macOS 11 and later).
Check out [Apple's documentation](https://support.apple.com/en-md/guide/deployment/dep24dbdcf9e/web) for more information on FileVault, Secure token, and Bootstrap Tokens.
**Rotating the Recovery Key**
For security reasons, you may need or want to rotate the personal recovery key. You can do this in intervals of 30, 60, 90, or 120 days using the Single Shot profile under the Management tab.
1. Go to Management > Single Shot
2. Choose the action "Rotate FileVault key"
3. Select to rotate the personal recovery key or the institutional recovery key and enter the required information
4. Choose the interval for the rotation: 30, 60, 90, or 120 days
5. Assign the profile to users/devices
To rotate the institutional recovery key, you must enter the username and password for an Admin user on the Mac that has a secure token and upload the new institutional recovery key. To rotate the personal recovery key, you must enter the username and password for an Admin user on the Mac that has a secure token or select the option to use the current recovery key if it is escrowed in Mosyle.
**Managing devices that are already encrypted**
Devices that are already encrypted can be managed so that the personal recovery is escrowed in Mosyle. Some scenarios that administrators may find the need to do this include:
- If you are migrating to Mosyle from another MDM, are unable to erase and re-enroll the Macs, and they are already encrypted.
- Devices are currently encrypted with an institutional recovery key but need to be changed to be encrypted with a personal recovery key.
Below are options and workflows that can be used to migrate encryption management:
1. Decrypt the Macs, enroll in Mosyle and then install the Security profile to enforce FileVault encryption and escrow the recovery key in Mosyle.
2. If you know the username and password for an Admin user on the Mac with a secure token, once the Security payload from Mosyle is installed, you can configure the Single Shot profile to rotate the recovery key. After it's rotated, it will be escrowed in Mosyle.
If you need assistance with escrowing the personal recovery key, please contact the Mosyle Support Team.
## Firmware Password (macOS)
---
The Firmware Password profile sets a password on the firmware of Intel-based devices running macOS 10.13 or later. A firmware password prevents users who don't have the password from starting up all disks other than the designated startup disk and blocks most startup key combinations.
To add a firmware password to a Mac, go to Management > Click the Firmware Password profile > Enter the new password. If the devices already have a firmware password and it needs to be changed, select “The devices already have a firmware password” and enter the old password. To remove the firmware password, leave the new password field blank and enter the current password.
Mac computers with Apple silicon do not support firmware passwords. Mosyle is unable to remove or change a firmware password if the current password is forgotten. In a scenario where the firmware password is unknown, please contact Apple.
## Recovery Lock Password (macOS)
---
The Recovery Lock profile sets a Recovery Mode password on Apple silicon devices running macOS 11.5 or later. A Recovery Lock password prevents users who don't have the password from booting Apple silicon devices into Recovery Mode. Recovery Lock passwords are removed when a device is erased or removed from the MDM.
To add a recovery lock password to a Mac, go to Management > Click the Recovery Lock Password profile > Enter the new password. If the devices already have a recovery lock password and it needs to be changed, select “The devices already have a recovery lock password” and enter the old password. To remove the recovery lock password, leave the new password field blank and enter the current password.
## Lock Device (macOS)
---
Lock a device with a 6-digit PIN so it cannot be accessed until the correct 6-digit PIN is entered. To send the command to lock the Mac, go to Management > Devices Overview > More dropdown menu: Lock Device. Enter the 6-digit PIN.
[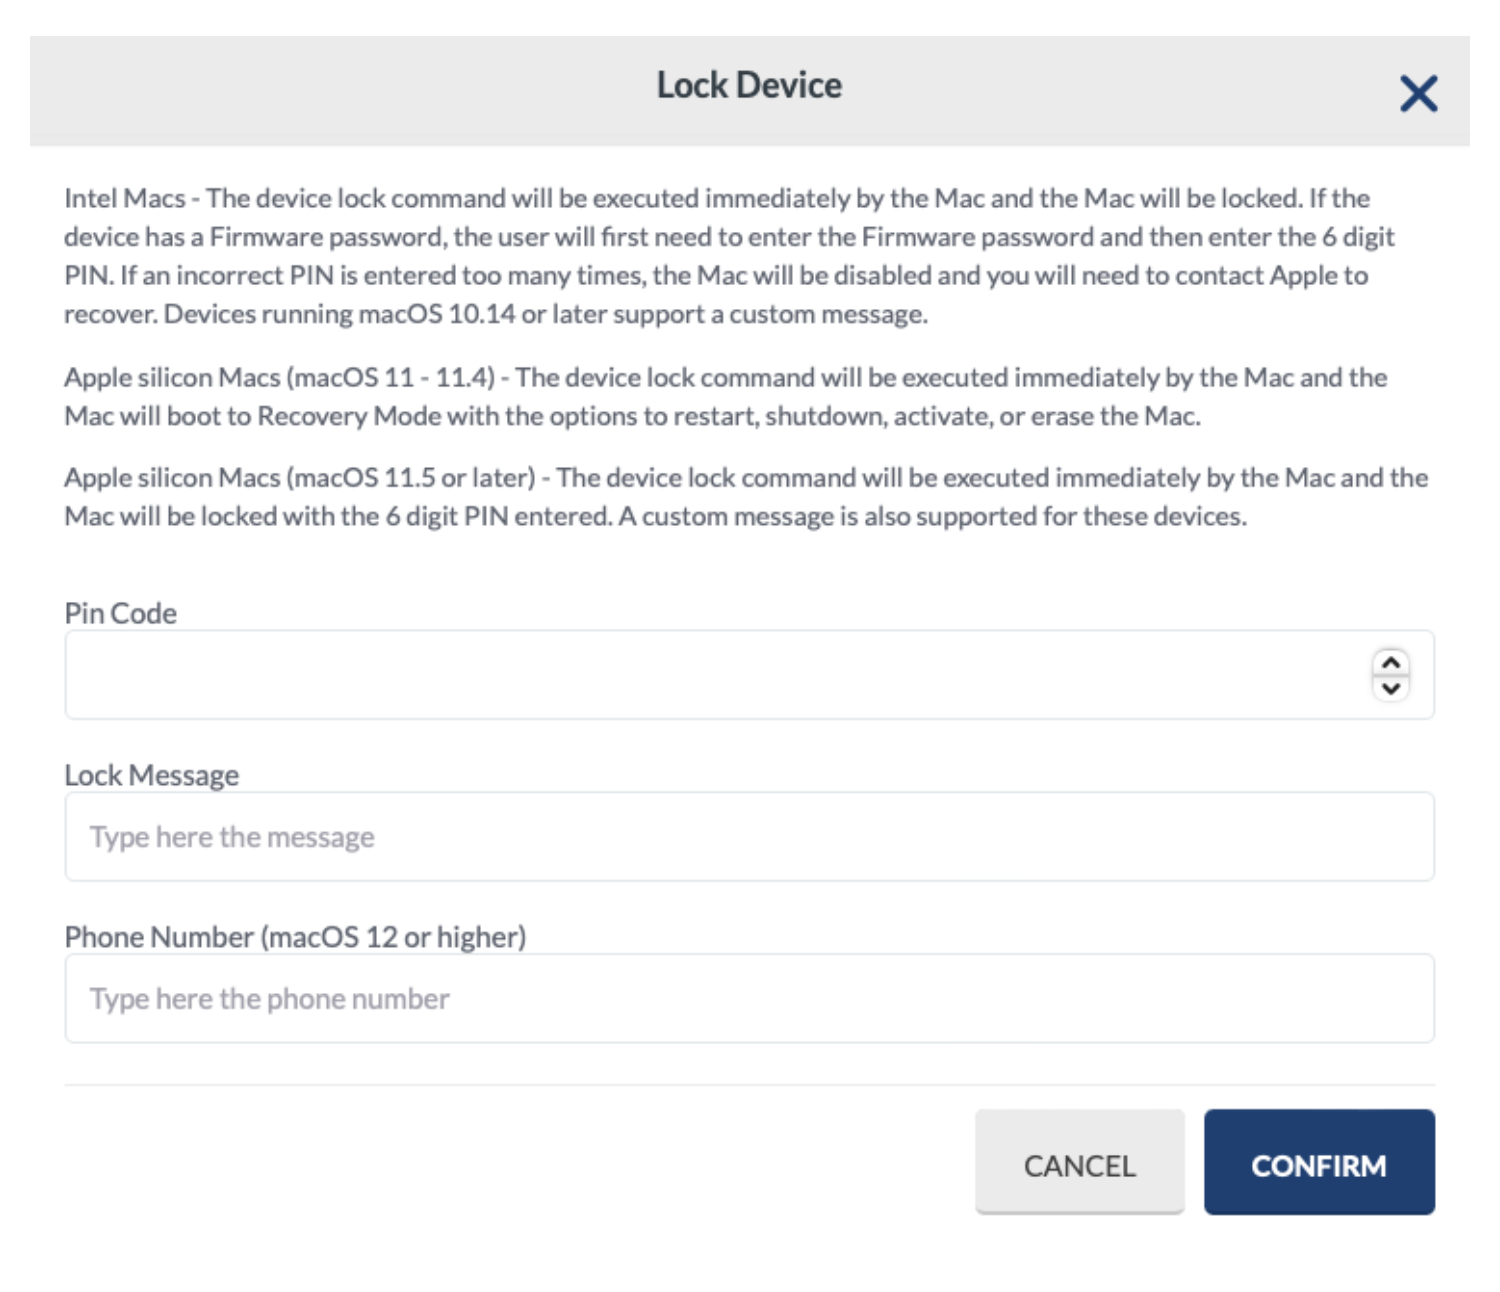](https://academy.mosyle.com/assets/images/courses/manager-msp-certification/lesson-7/7.7-securing-devices/lock-device-macos/lock-device.png)
The last 10 Lock PIN codes are available under Management > Devices Overview > Click on the device's name > Has Lock PIN Code? > Click here to see the last Lock PIN Code. If the PIN is entered incorrectly too many times and shows the Mac is “Disabled”, please contact Apple support to unlock the devices.
Reminder: If the device has been sent a command to lock the device with the Lock PIN code and is then removed from Mosyle MDM, the PIN code sent will no longer be able to be retrieved from Mosyle systems if it is forgotten.
## Using Dynamic Device Groups
---
Check device security status using Dynamic Device Group criteria. Criteria listed below can help identify devices that are not meeting security requirements of the school or district and need to be addressed, or assist in identifying devices that have potentially been lost or stolen:
- Activation Lock Status: Disabled or Enabled
- Bootstrap Token: is or is not Present
- Bootstrap Token Allowed for Authentication: is or is not Allowed
- FDE Personal Recovery Key: Disabled, Enabled, or Escrowed
- FileVault Encryption: Disabled or Enabled
- Lost Mode: Disabled or Enabled
# Erasing Devices
## Overview
---
The ability to send remote commands to erase devices is critical when managing a fleet of devices. Devices typically need to be erased to prepare for a new user, when reselling devices, if the device has been misplaced, or many other reasons. Mosyle provides the ability to remotely erase devices when needed.
## Erasing iOS/iPadOS Devices
---
Erasing an iOS/iPadOS device using the command from Mosyle, will erase all data on the device. If the device is associated with your Apple School Manager account and has an Automated Device Enrollment profile assigned to it, once the device reboots and Wifi is connected the device will automatically re-enroll into Mosyle.
To send the erase command to an iOS/iPadOS device
1. Go to Management > Devices Overview
2. Select any device(s) > More dropdown menu: Erase device
The erase command can be sent for individual devices via the Device Information window or can be sent on a schedule using the Single shot profile.
Additional Options:
- Preserve data plan after the wiping (iOS 11 and later): When selected, the cellular data plan settings will be preserved so you do not need to reconfigure the cellular data plan after the device is erased.
- Disable Proximity Setup (iOS 11.3 and later): When this is selected, the device will not prompt for Proximity Setup during the Setup Assistant.
- Revoke VPP licenses: When this is selected, all VPP app licenses assigned to the device will be revoked so that the licenses can be distributed to other devices.
- Disable Activation Lock (ASM devices only): This option can be used for devices that are associated with your ASM account and have been enrolled via Automated Device Enrollment to ensure Activation Lock is disabled so that the device will automatically go through the Setup Assistant once it is wiped and will not be locked on the Activation Lock Screen.
## Erasing macOS Devices
---
Erasing a Mac computer with an Intel processor using the command from Mosyle will erase all data, volumes, containers, and partitions, including the recovery partition. In order to reinstall the macOS on the device, you will need to use Internet Recovery. When sending the command from Mosyle you will be required to enter a 6-digit PIN which will need to be entered on the device before it is erased. If a Firmware Password exists, it will first need to be removed in order to erase the Mac.
When erasing a Mac running macOS 12.0.1 or later with T2 Security Chip or Apple silicon, the device will Erase all Content and Settings (EACS) unless the command fails. In the event the command to Erase all Content and Settings fails, the defined 'Obliteration behavior' will be used.
The options available for the Obliteration behavior include:
- Do Not Obliterate: If EACS fails, the device will not erase. In this scenario, you can use Apple Configurator 2 to restore, [click here](https://support.apple.com/en-md/guide/apple-configurator-mac/apdd5f3c75ad/mac) to learn more.
- Obliterate With Warning: If EACS fails, the device will revert to the traditional erase behavior and erase all data, including the OS. The macOS will need to be reinstalled.
- Default: If EACS fails, the device will revert to the traditional erase behavior and erase all data including the OS. The macOS will need to be reinstalled.
To send the erase command to a macOS device
- Go to Management > Devices Overview
- Select any device(s) > More dropdown menu: Erase device.
The erase command can be sent for individual devices via the Device Information window or can be sent on a schedule using the Single shot profile.
## Setting up devices for a new user
---
To set up a device for a new user, you can simply change the device assignment by first unassigning the device and then assigning it to the new user, or you can erase the device, re-enroll and assign it to the new user. Whenever possible, it's recommended to first erase the device before distributing to a new user.
## Device Refresh or Selling Devices
---
When refreshing or replacing devices, the old devices will need to be erased. Send the erase command from Mosyle to ensure all data is removed.
Be sure to unassign the device from the Mosyle MDM server in ASM and remove the devices from Mosyle in order to free up a license for a new device. To remove a device from Mosyle, go to Management > Devices Overview > Click a device name to bring up the Device Information window > More dropdown menu: Remove device/Remove MDM.
When selling devices, it's recommended to release devices from ASM indicating the school or district no longer owns the device. Click here for more information about releasing devices.