Inventory Management
Devices Overview
Overview
Devices enrolled in the Mosyle account are listed under Management > Devices Overview for their respective platform. Change platforms by clicking the dropdown menu in the top left under Manage OS to choose between iOS/iPadOS, macOS, and tvOS.
In the top right, the Personalize button allows each Admin to personalize the data displayed on the Devices Overview screen when they login and access. This allows the ability to display data relevant to the school or district.
Administrators can use the Bulk by Import feature to upload a spreadsheet to change Device Names, Tags, Asset Tags, and the Lock Screen Message for multiple devices at once
Device Information
Clicking a device name will bring up device specific detailed information in the Device Information view. The menu in the Device Information view provides access to many of the same commands offered in the Devices Overview area. Information regarding the specific device is available within each of the tabs.
iOS/iPadOS Device Information
The Device Information for iOS/iPadOS devices includes seven tabs: Info, Security Info, Apps, Books, Commands, Profiles, Occurrences.
The Info tab provides information regarding the device hardware and the OS. Key pieces of information in this area include:
- Update Info: The last time the device checked in with the Mosyle MDM servers to provide an update on the device status. The Device Information command is sent automatically every hour to update the status of the data on the first tab. The full Update Info consists of many commands to gather data for all tabs in the Device Information view, and is automatically sent every 24 hours. Note: Location information and WiFi SSID rely on the Mosyle application having access to location services permissions.
- Operating System Information: Includes the current operating system version, any available updates, and the status of any downloaded OS updates. Send commands to update the OS using the commands in Devices Overview, Device Information, or Single Shot profile.
- Other information included in this tab include: Device Name, Serial Number, Enrollment Date & Status, Supervision Status, and more.
The Security Info tab provides information regarding the status of Activation Lock, Find My, and if a passcode is present on the device. If User-Initiated Activation Lock is allowed, the Activation Lock bypass code can be found in this tab. This information is updated every 24 hours as part of the full Update Information. If you wish to update sooner, click the “Send Update Info” button within the tab.
The Apps tab provides information regarding the apps assigned and installed on the device. Likewise, the Books tab provides information regarding any media assigned and installed on the device. The apps and books information is updated every 24 hours as part of the full Update Information. If you wish to update sooner, click the “Send Update Info” button within the tab.
Apps
The Apps tab is organized into four sections: Installed, Profiles, Study Apps, and VPP Licenses.
- Installed: Lists the apps that are currently installed, or in the process of installing, on the device. For devices enrolled via Automated Device Enrollment and Device Enrollment, this list will include any apps installed via the MDM as well as any apps installed manually. System apps are not provided by the device to the MDM, therefore they are not included. Devices enrolled via User Enrollment will only display apps installed through the MDM. Apps with the trashcan icon next to them are considered “managed” apps and can be remotely updated and removed via the MDM. Apps with the gear icon are considered “unmanaged” apps and cannot be remotely updated and removed via the MDM without prompting the end user.
- Profiles: List of all apps assigned to the device in Install App profiles. Resend the command to install the app using the paper airplane icon or delete the app using the trashcan icon. The installation status will also be listed in this area. Installation status can include: Installed, Installing, Pending to Install, Waiting on VPP, PromptingUpdate, Error, Removed, etc.
- Study Apps: List of all apps assigned to the device by teachers using Study Apps. Resend the command to install the app using the paper airplane icon or delete the app using the trashcan icon. The installation status will also be listed in this area.
- VPP Licenses: List of all VPP licenses assigned to the device and/or to the user assigned to the device. The method of license assignment will be listed - Assigned to device or Assigned to user. Revoke any licenses as needed.
Books
The Books tab is organized into three sections: Installed, Profiles, and VPP Licenses.
- Installed: Lists the books that are currently installed, or in the process of installing, on the device. This list will only include books installed via the MDM. Books can be removed from the devices by clicking the trashcan icon. Note: Books can be installed on iOS and iPadOS devices using Apple Apps and Books, by uploading a PDF, epub, or iBooks file, or using a direct URL.
- Profiles: List of all books assigned to the device in Install Book profiles. Resend the command to install the book using the paper airplane icon or delete the book using the trashcan icon. The installation status will also be listed in this area. Installation status can include: Installed, Pending to install, or removed.
- VPP Licenses: List of all VPP licenses assigned to the user assigned to the device. Books installed via Apps and Books can only be assigned via User-based license assignment. Book licenses cannot be revoked once assigned.
The Commands tab will show a list of any pending or failed commands for the individual device. By default, the Mosyle MDM will attempt to resend any pending or failed commands every 15 minutes. However, a push can be manually sent as well to call the device to the MDM server to retrieve any pending/failed commands. If needed, the commands can be cleared from this area as well. Note: Devices locked with a passcode will not accept commands to change any configuration/settings on the device while locked. Unlock the device in order for the commands to go through.
The Profiles tab lists any and all profiles assigned to the device and the current installation status. The profile installation status is updated any time a profile is sent to the device to be installed, and every 24 hours as part of the full Update Information. If you wish to update sooner, click the “Send Update Info” button within the tab. Potential statuses are listed below:
- Installed: The profile is installed on the device. The installation status will reflect as “installed” after the MDM receives an “acknowledgement” response to the command to install the profile from the device and if the device indicates the profile is installed in the Update Info response.
- Pending to Install: The command to install the profile is currently pending. A pending status can be due to the device being offline, locked, or not connected to the internet.
- Removed: The profile is not installed.
- Manually Removed: The profile was manually removed from the device via the MDM.
- Disabled: The profile is toggled off and not currently active, the profile is no longer installed.
- Exception: The profile is not installed as the device or user is listed as an exception in the profile.
- On Hold: The profile is configured with the option “Do not auto-install the profile after saving”. The profile will not be installed until a manual request is made to install the profile from Device Info or from Self-Service.
- Not Compatible: The profile is not compatible with the current device hardware/software, or the current assignment status. For example, a profile using a user's variable will not install on a device that is not assigned.
The Occurrences tab provides information regarding any profiles that may be installed that are no longer assigned, or any profiles that are assigned but are not installed. It is typical for this tab to be empty.
macOS Device Information
The Device Information for macOS devices includes six tabs: Info, Security Info, Apps, Commands, Profiles, Occurrences.
The Info tab provides information regarding the device hardware and the OS. The information is similar to that received by iOS/iPadOS devices. Information obtained by Mosyle is retrieved via Apple's MDM Protocol commands as well as through the Mosyle MDM agent. The “Last Update Info” date and time will reflect the date and time of the last info retrieved via Apple's MDM Protocol. Device Information command is sent automatically every hour to update the status of the data on the first tab. The full Update Info consists of many commands to gather data for all tabs in the Device Information view, and is automatically sent every 24 hours. Request an Update Info at any time to refresh the information in the tabs.
The Security Info tab provides information regarding the status of Activation Lock, Firewall, FileVault, Bootstrap Token, and includes the DEP Admin Password. If User-Initiated Activation Lock is allowed, the Activation Lock bypass code can be found in this tab. This information is updated every 24 hours as part of the full Update Information. If you wish to update sooner, click the “Send Update Info” button within the tab.
The Apps tab provides information regarding the apps assigned and installed on the device. The list of apps is updated every 24 hours as part of the full Update Information. If you wish to update sooner, click the “Send Update Info” button within the tab. The tab is organized into four sections similar to the iOS/iPadOS Device Information. The App Profiles list will include Install App profiles using Apps and Books and Mosyle Catalog, as well as apps pushed using the Install PKG profile.
*Note: Installation status for apps installed using the Install PKG profile relies on the correct bundle identifier for the app being defined during the PKG creation. If the wrong bundle ID is used, the installation status will be incorrect.
Similar to iOS/iPadOS devices, the Commands tab lists any pending or failed commands for the individual device.
The Profiles tab lists any and all profiles assigned to the device and the current installation status. The profile installation status is updated any time a profile is sent to the device to be installed, and every 24 hours as part of the full Update Information. If you wish to update sooner, click the “Send Update Info” button within the tab. The tab is organized into two sections:
- Profiles: Lists any/all profiles installed on the device using Apple's MDM Protocol payload configurations. The profile installation status is similar to that for iOS/iPadOS devices.
- Custom Commands: Lists any/all Custom Command profiles assigned to the device, Device Group or Alert criteria, as well as Mosyle Management profiles that utilize solely the Mosyle agent (Local User profile). View the results from the command, the code sent, and/or resend the command at any time.
The Occurrences tab provides information regarding any profiles that may be installed that are no longer assigned, or any profiles that are assigned but are not installed. It is typical for this tab to be empty.
tvOS Device Information
The Device Information for tvOS devices includes six tabs: Info, Security Info, Apps, Commands, Profiles, Occurrences. Each tab is similar to the tabs available for the iOS/iPadOS devices. The Device Information command is sent automatically every hour to update the status of the data on the first tab. The full Update Info consists of many commands to gather data for all tabs in the Device Information view, and is automatically sent every 24 hours. Request updated information at any time by clicking Update Info.
Shared Device Groups
Overview
Creating a Shared Device Group
When creating a Shared Device Group, add the group name and configure the settings as described below:
- Type Icon: Choose an icon for the Shared Device Group. This is just a visual icon for the Mosyle console and will not impact functionality or any features of the group.
- Get location: Choose whether or not you want the Mosyle application to prompt for location services on iOS/iPadOS devices.
- Apple Shared iPads: If the devices assigned to this group will be Apple Shared iPad devices, check this box and configure any additional settings. (iOS/iPadOS Only)
- Choose the location(s) able to manage this Shared Device Group: Select which location(s) in Mosyle will have access to this group. The location(s) selected will impact the following - which Apps and Books tokens can be used to install apps on the devices in the Shared Device Group, which teachers can see and select the Shared Device Group when using the Mosyle Class Manager, which Location Admin users can see and manage the Shared Device Group.
- Choose the devices to assign to this group: Here you can select which devices should be assigned to the Shared Device Group.
Shared Device Group for Apple Shared iPad devices
When creating a Shared Device Group for Apple Shared iPad devices, the following preferences can also be configured:
- Enable diagnostic submission: Check the box to enable diagnostic submission
- Enable app analytics: Check the box to enable app analytics
- Passcode Lock Grace Period: By default, Apple Shared iPad devices will lock after 2 minutes of inactivity. With this option, you can choose how long of a grace period is allowed after the device locks before the user has to enter a passcode in order to unlock. If nothing is configured here, the device will lock after 2 minutes of inactivity and the user will have to enter their passcode in order to unlock.
- Passcode type: This is the configuration for the complexity of the passcode that should be expected on the Apple Shared iPad device. This should match the complexity of the user passcodes in Apple School Manager. You can choose from the following options: Complex, 4 digits, 6 digits, or Keep same info from ASM.
- Choose the classes to configure the iPads: Select the classes to be displayed on the Shared iPad Lock Screen. This setting configures the Educational Profile that will be sent to the device to configure the rosters on the Lock Screen.
Devices enrolled as Apple Shared iPad devices will be temporarily assigned to the user logging in with the Managed Apple ID registered in Mosyle. Profiles and configurations can be applied to the entire device, or scoped to individual users so they are only applied when that specific user logs in.
When using temporary or guest sessions, only the profiles and configurations applied to the device will be applied.
If the number of resident users or quota size needs to be updated after the device is enrolled, it can be done under Management > Devices Overview or Device Info > More dropdown menu: Change Shared Config. The following options are available:
- Set specific quota size
- Set the number of resident Users
- Temporary session only
- Temporary session timeout
- User session timeout
Assigning Devices to Shared Device Groups
As previously reviewed, devices can be assigned to Shared Device Groups during Automated Device Enrollment or after enrollment by editing the Shared Device Group or from the Device Info window.
Move Devices Between Shared Device Groups
Devices can be moved between Shared Device Groups of the same type. For example, devices in a Shared Device Group for Mosyle Shared devices can be moved between other Shared Device Groups with Mosyle Shared devices. Devices that are configured as Apple Shared iPad devices cannot be moved to Shared Device Groups that are configured with Mosyle Shared devices.
To change devices from Apple Shared iPad devices to Mosyle Shared, they will need to be wiped and re-enrolled. Similarly, to change from Mosyle Shared to Apple Shared iPad, the Automated Device Enrollment profile will need to be updated and the device will need to be wiped and re-enrolled.
Dynamic Device Groups
Overview
Dynamic Device Groups are a useful way to organize groups of devices based on certain criteria. The criteria can be static values, information that can dynamically change, or some combination of the two. Profiles and other configurations can be assigned to Dynamic Device Groups so that all devices in the group will receive the same profiles and/or apps. Any new devices added to the group, either manually or based on criteria will also receive the configurations.
Creating a Dynamic Device Group
Dynamic Device Groups can be created within Mosyle under Management > Device Groups > Add new Dynamic Device Group.
When creating a Device Group, add the group name and choose the criteria to determine which devices will be dynamically added and removed from the group. When finished click Save.
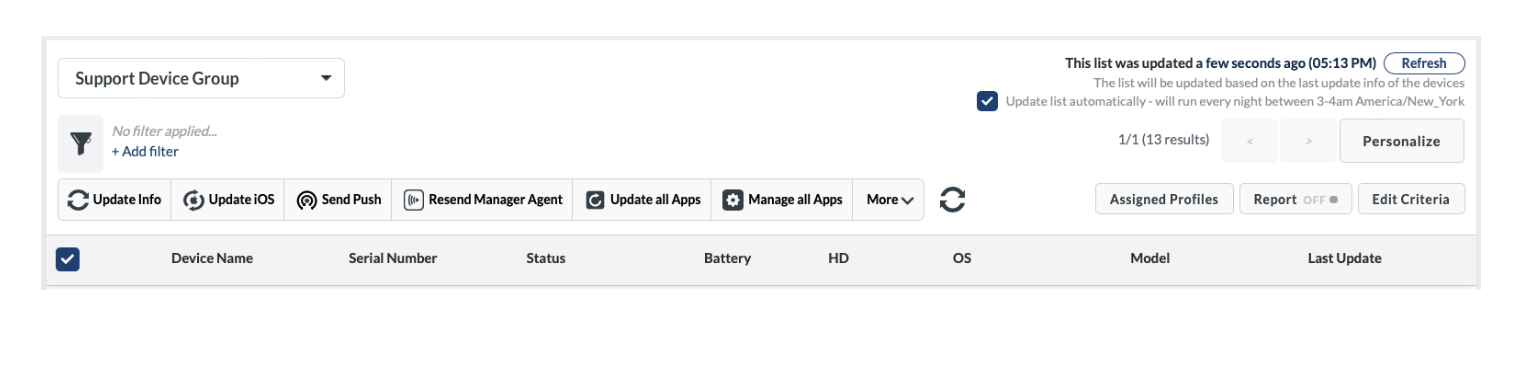
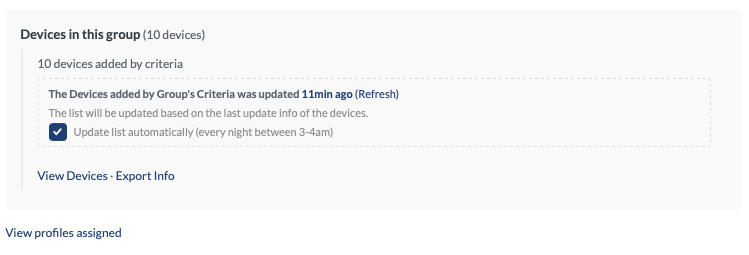
After saving a group, the Device Group Information shows the devices in the group as well as multiple features:
- Refresh: Manually refresh the group
- Update List Automatically: Select to refresh the group every day between 3 a.m. and 4 a.m. your local time
- Assigned Profiles: Review the profiles assigned to the group
- Edit Criteria: Change the configuration of the group
The list of devices in the Device Group will be listed similar to the devices listed in Devices Overview, providing multiple commands as well as options for exporting data.
To delete a Device Group, click “Edit Criteria” and scroll to the bottom. Click “Delete” in the bottom right.
Dynamic Device Group Criteria
Device Groups can be created using a variety of criteria. Criteria available includes both static information such as specific device serial numbers or models, and dynamic information such as OS version or app installation status.
When using criteria to populate devices into the Device Group, the Assigned to specific Location(s) and Last Update Info criterion is required. The Assigned to specific Location(s) indicates which devices should be added to the group based on the locations in which the devices are assigned. If devices are enrolled in Limbo, be sure to consider their location assignment. The Last Update Info indicates which devices should be added to the group based on the last time they updated information with the MDM. Other criteria are optional and added under Your Criteria. The drop-down menu features four types of criteria:
- Device Criteria: Information that the devices return to the MDM via Device Info (every hour) or Update Info (every 24 hours), such as storage or operating system version
- Mosyle Criteria: Information managed by the MDM, such as the assignment status or DEP profile that the devices installed on enrollment
- Custom Attributes: Attributes that an administrator created from a custom command (macOS only)
- Custom Commands: Scripts from a Custom Commands profile (macOS only)
After adding criteria, request a status update from devices by selecting Send an Update Info to All Devices, and then click Save. This ensures the correct devices are added to the group.
Multiple criteria can be used with logical operators AND and OR. Each criteria also has its own logical operators that are relevant to the rule configured, such as: “is”, “is not”, “like”, “is equal to”, “is not equal to”, “is greater than”, “is greater than or equal to”, “is less than”, “is less than or equal to”, “contains”, and “does not contain”. Criteria can be moved and rearranged into any order, or removed, in order to meet the needs of the school or district. Custom command responses can also be used for Dynamic Device Group criteria for macOS devices.
Dynamic Device Groups can be updated at any time by manually refreshing the group under Management > Device Groups > Click the group > Refresh, or configure to automatically update. To automatically update Device Groups every 24 hours between 3am and 4am local time, check the box for “Update list automatically”.
Note: To use Custom Attributes and Custom Commands for Device Group criteria, the Mosyle Manager app must be installed on the Macs.
Use Case
Dynamic Device Groups can be used for a variety of purposes when managing devices. One example includes targeting specific devices that need OS updates. Using the criteria for “OS Update” is “Available”, devices that are reporting available OS updates will automatically be populated to the group. The Single Shot profile can then be assigned to the Device Group to initiate the OS updates based on the defined schedule. Once configured, the OS update routine is then automated based on the Device Group criteria and its assignment to the Single Shot profile.
Basic Inventory Reports
Overview
Mosyle provides an extensive amount of data for devices enrolled in the MDM. Data can be exported from multiple areas within the product. Exports with minimal information are typically downloaded immediately, exports with larger amounts of data will be generated and available under My School > Preferences > Reports. The download link is for single use only.
Exporting User Data
User data can be exported by going to My School > Users > Select all users to be exported > Click the download icon and choose from the available options. The spreadsheet will include the user's name, user ID, personalized access code, personalized enrollment URL, email address, Managed Apple ID, user type, serial number of the assigned device, and any user groups the user is assigned.
Exporting Action Logs
Actions taken within the account by Administrators can be exported by going to My School > Preferences > Action Logs > Export. The spreadsheet will include the action, details, user name, action date, and IP from which the account was accessed and the action taken.

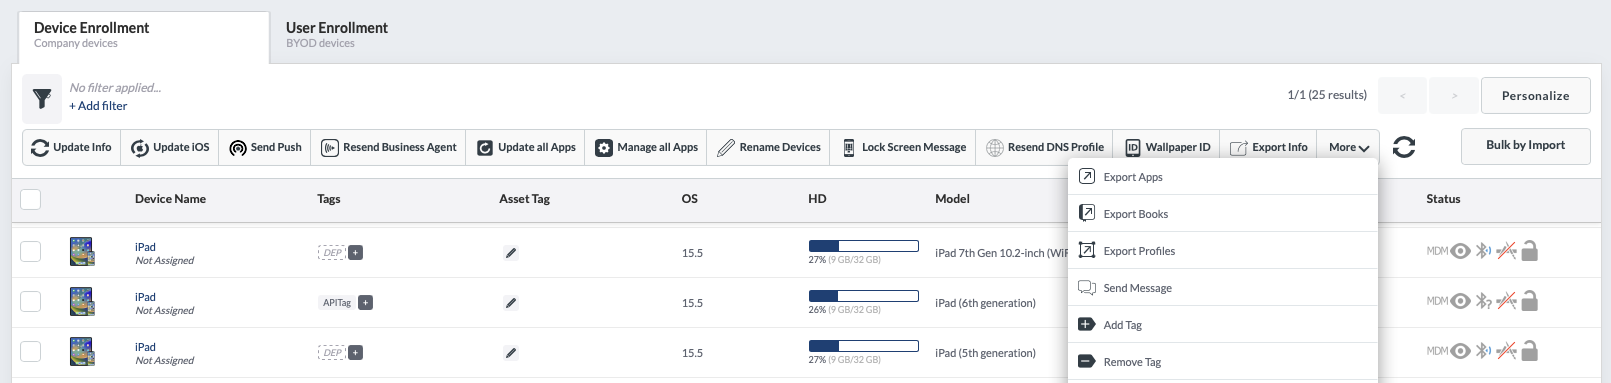
Exporting Device Data
The list of devices enrolled can be viewed at any time by going to Management > Devices Overview. From this area, Administrators can request the export of the following information:
- Export Info: A spreadsheet listing device information. Personalize the export to include only the data needed. Available data to be exported includes serial number, device UDID, device name, asset tag, tags, OS version, model, capacity, HD available, WiFi MAC address, MDM status, Enrollment information, and more.
- Export Apps: A spreadsheet listing the device name, serial number, tags (iOS only), app name, bundle ID, management status (iOS only), path (macOS only), version, category, size, enrollment type, user ID, user type, and update status. For apps installed on iOS/iPadOS devices, the spreadsheet also includes license information such as if the app is paid or free, app store vendable, or installed using Apple Apps and Books (VPP).
- Export Books (iOS/iPadOS only): A spreadsheet listing the device name, serial number, tags, name of the managed media installed, author, enrollment type, user ID, and user type. Note: The MDM only obtains a list of books installed via the MDM and are considered “managed”.
- Export Profiles: A spreadsheet listing the device name, serial number, tags, profile name, profile status, date modified, and last update info.
This information can also be exported for individual Dynamic Device Groups under Management > Device Groups > Select the Device Group from the dropdown menu > Export Info.
Exporting Commands Activity Log
In the event a large number of commands are pending, it's helpful to export the command activity for a holistic view of the type of commands pending and if there are any trends to which devices have pending commands. To export, go to Management > Commands Activity Log > Click either the Pending or Failed tab > Export.

Exporting Alerts
Export a list of devices identified by specific Alert criteria under Management > Alerts > Export Alerts.
Exporting App Data
App data can be exported from within the App Center under the Management tab > Applications. Select the apps you wish to export and click “Export apps” in the menu. Information such as the app name and details, as well as the device serial number the app is installed will be included in the spreadsheet.

Exporting Security Information
When utilizing Mosyle's Device Scout, Detection & Removal 2, and Admin On-Demand, Administrators have the ability to export device details relevant to each feature as well as the corresponding Logs. Export the devices and their security details by clicking the Devices menu option under the Security feature heading. Click the button in the upper right showing the number of devices that match the applied filters. Logs can be exported under the Logs tab.
Exporting DNS Filtering Logs
When using Mosyle's DNS Filtering, Administrators can export logs of requests as needed. To export, first filter the logs based on specific criteria such as a certain URL, start and end date, specific device, or by status (allow/deny). After applying the filters, click Export in the upper right corner.
Alerts
Overview
Mosyle Alerts provide Administrators important information regarding device status in the environment. In the Dashboard, default Alerts created by Mosyle are categorized by device type (iOS / iPadOS, macOS, tvOS) along with the number of affected devices.

Viewing Alerts
To view all default alerts, or create custom alerts, go to Management > Alerts.
Alerts are grouped into four tabs based on alert types, 1:1 users, Devices in Shared Device Groups, and devices in Limbo. Types refers to the kind of alerts, such as devices with OS updates available or full storage. The remaining three tabs refer to the assignment model of the affected devices.
Click each of the alerts to open a pop-up window with more information or click View History for historical analysis based on users and devices. If it's a custom alert, a unique icon and name can be entered to identify it. All alerts are automatically refreshed every 30 minutes.
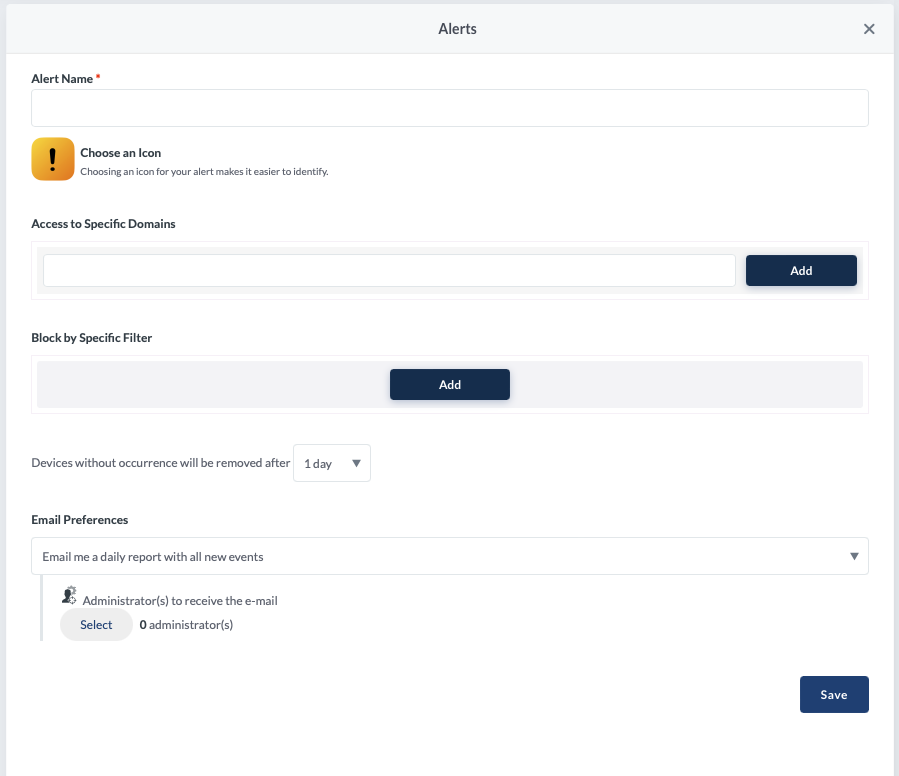
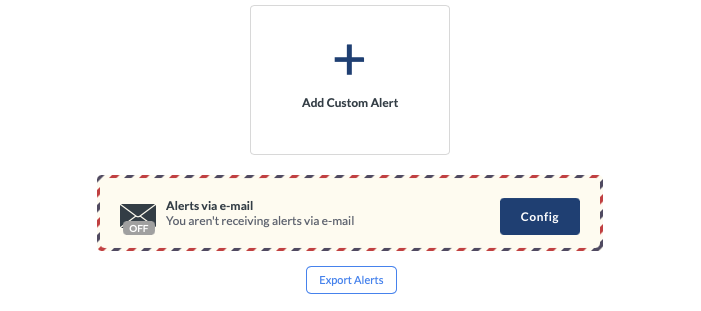
Adding Custom Alerts
Add custom alerts specific to the school environment by going to Management > Alerts > Add Custom Alert. By design, custom alerts work similar to Dynamic Device Groups. The Location and Last Update Info criteria is required. Other criteria are optional and can be added under Your Criteria. Multiple criteria can be used with logical operators AND and OR. Each criteria also has its own logical operators that are relevant to the rule configured. The drop-down menu features four types of criteria:
- Device Criteria
- Mosyle Criteria
- Custom Attributes (macOS only)
- Custom Commands (macOS only)
After adding criteria, request a status update from devices by selecting Send an Update Info to All Devices, and then click Save. This ensures the correct devices are added to the alerts.
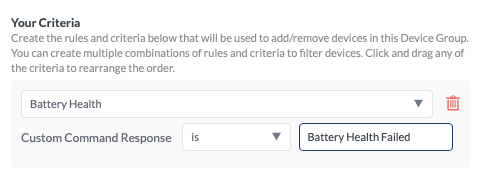
For example, if we are interested in the Battery Health of the devices in our fleet, a Custom Command can be used for criteria to retrieve the battery health information (Add Custom Alert > Add New Alert > New Custom Command). After entering the Custom Command, the expected response to add devices to the alert can be entered. In this example, we want to be alerted for devices with failed battery health so our expected response to the command is “Battery Health Failed”. The Custom Command will run on every Device Info to retrieve the current status of the device so it can be added or removed from the alert as needed.
Note: To use Custom Attributes and Custom Commands for alert criteria, the Mosyle Manager app must be installed.
Configuring Email Alerts
Alerts can be configured to be sent via email by going to Management > Alerts > Alerts via Email > Config. Toggle on the email alerts, choose what alerts to receive emails about and how frequently, and then save. The frequency is once a day, every new alert, or none. Emails are sent only to the administrator who has configured them.
In case a report of the alerts is needed, click Export Alerts at the bottom of the page, select the alerts, and then click Export Info. The report will be available under My School > Preferences > Reports.
DNS Filtering Alerts
Alerts specific to DNS Filtering can also be configured so that selected Administrators receive emailed alerts regarding browser activity. To configure the DNS Filtering alerts, go to DNS Filtering > Click the profile > Select the Alerts tab > Add New Alerts.
Name the Alert and choose an icon. Enter the specific domains or filter you wish to be alerted. Choose the frequency in which to receive emails and select the Administrators to receive the email alerts.