App deployment and management
- App Installation w/ Apple Apps and Books
- Enterprise App Installation
- Mosyle Catalog App Installation
- Install PKG
- App Center
App Installation w/ Apple Apps and Books
Overview
Remotely installing and updating apps is a critical task when managing devices. For this reason, Mosyle supports the installation of apps using managed distribution to devices and/or users. The Install App profile under the Management tab provides the ability to install, reinstall, update, and configure apps in bulk.
Once Install App profiles are created in the account, Administrators can search and filter the profiles based on the profile name and/or category.
As a reminder, the Mosyle Manager application is available for devices enrolled via Automated Device Enrollment and Device Enrollment and provides Administrators with the ability to allow users to complete the installation of apps, web clips, profiles, and more.
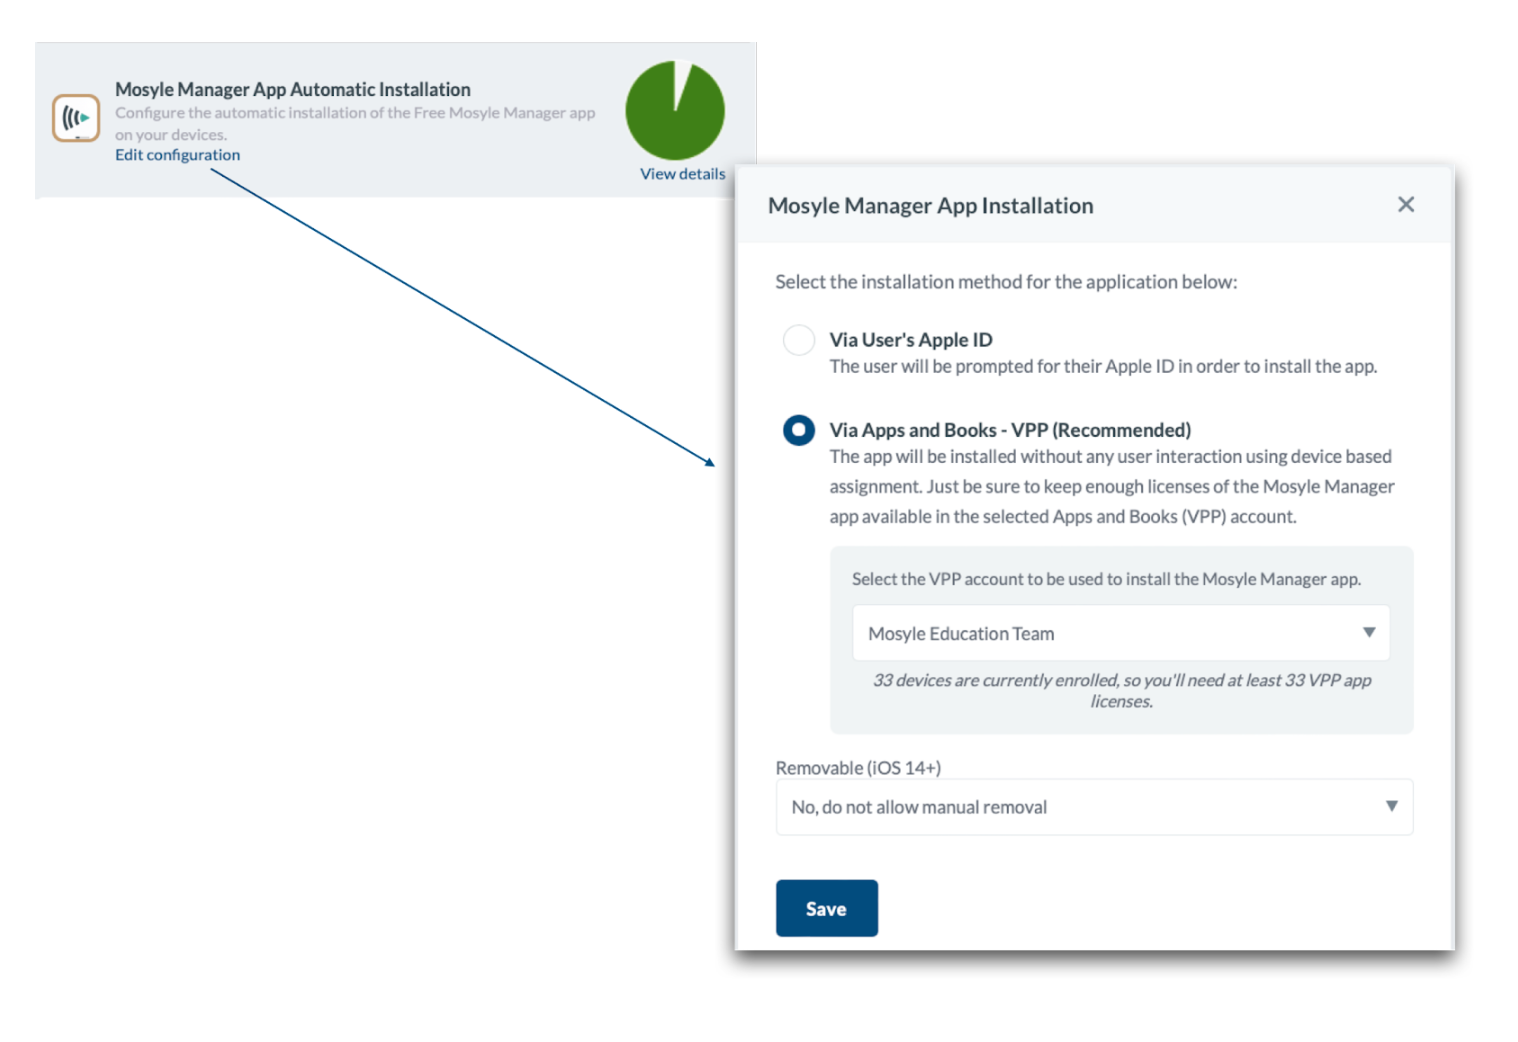
To automatically install the Mosyle Manager app so users can access Self-Service on iOS/iPadOS devices, first obtain licenses for the app in Apple School Manager. Once licenses are available and the Apps and Books token is integrated, go to Management > Install App (iOS/iPadOS) > Click Edit Configuration for the Mosyle Manager App Installation profile. Choose the Apps and Books token to use for licensing and click Save.
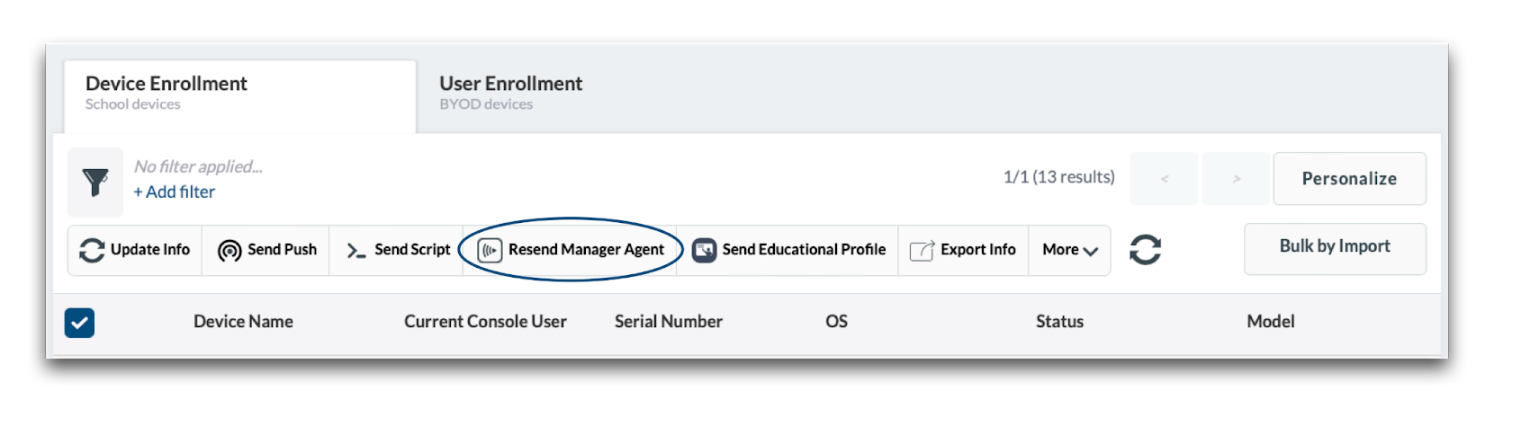
The Manager.app along with the Mosyle agent is automatically installed on macOS devices enrolled using Automated Device Enrollment and Device Enrollment. If needed, it can be reinstalled on devices using the command in Management > Devices Overview > Resend Manager agent.
Installation Source & License Assignment
To install apps, go to Management > Install App.
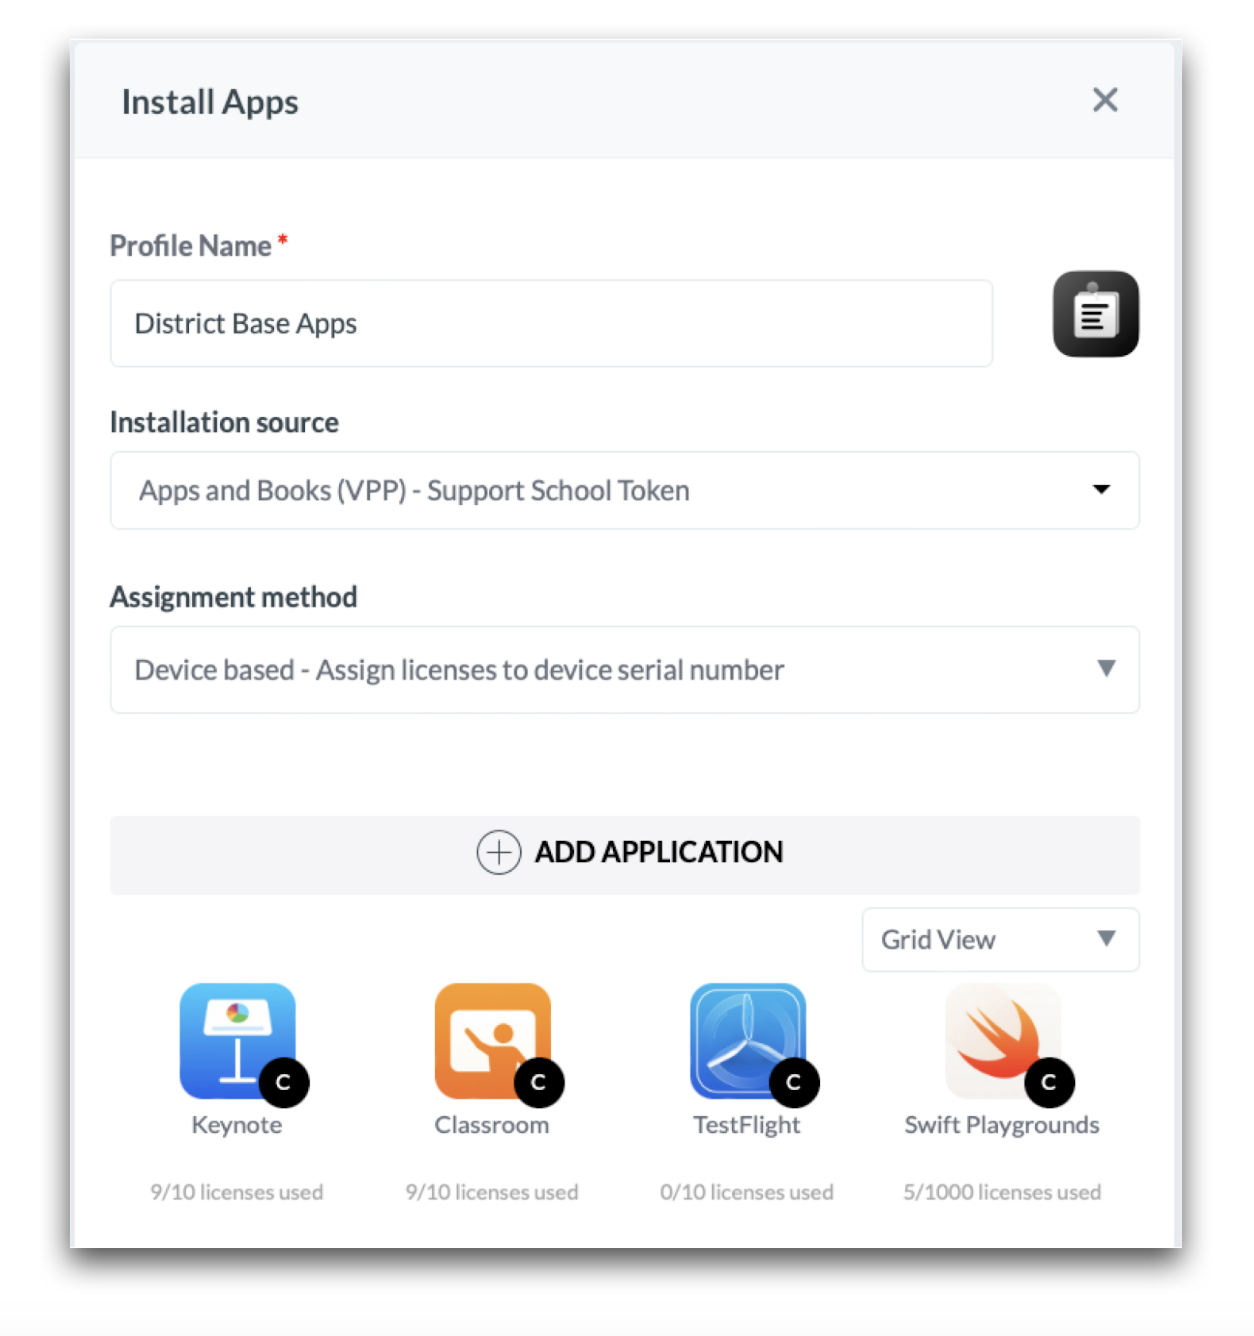
Install App profiles can be created to install a single app or groups of apps, to multiple groupings of users and devices. When creating a new configuration profile, name the profile and select the installation source which indicates the source of the app license. For apps available in the App Store, including free apps, it's recommended to obtain licenses using Apple School Manager so they can be deployed using the Apple Apps and Books (VPP) token as the installation source. Similarly, to deploy Custom Apps available in a school or district's Apple School Manager account, choose Apple Apps and Books (VPP) token as the installation source.
*Choosing the App Store as the installation source for iOS or iPadOS devices will result in users being prompted to enter a personal/consumer Apple ID in order to download/install the assigned applications.
After selecting the installation source as Apple Apps and Books (VPP), choose the method in which the license for the app will be assigned. Choosing a device-based license assignment (recommended) will assign the app license to the device serial number, allowing the installation process to be silent to the end user, requiring no user interaction.
Tip: When enrolling via User Enrollment, user-based license assignment is required. This type of license assignment will assign the app license to the user's Apple ID and requires users to be registered in Mosyle with a valid Managed Apple ID and an invite to be associated with the user (Management > Applications > Apple Apps and Books > Invites). The same Apple ID that is associated with the invite must be logged in on the device.
Next, choose the app or apps to be installed and select the users, devices, and/or device groups to assign the profile to in the Profile Assignment area.
Installation Options
Additional options can be configured when creating an Install App profile in Mosyle. These additional options provide Administrators the ability to control whether apps are automatically installed, available in Self-Service, updated automatically, and/or removed when the assignment is removed.
- Auto-Install apps: Choose whether or not the apps will be automatically installed when the device is assigned to the profile. This includes immediate installation after enrollment if the device is assigned to a specific User, Grade Level, Class Period, Device Group, or Shared Device Group that is assigned to the Install App profile. If apps are not automatically installed on devices, the installation will need to be manually requested via Device Info in the Mosyle console, or via Self-Service. Additionally, apps on iOS/iPadOS devices can be assigned to users for temporary use. After the set number of days, the app can automatically be removed and the license revoked.
- Self-Service Apps: Choose whether or not the apps will be available to end users in the Self-Service app. If available in Self-Service, users can request the installation and updates for the apps at any time using the Mosyle Manager application.
- When editing the profile (iOS/iPadOS only): Choose whether or not apps will automatically be removed if they no longer exist in the profile, or if the device is no longer assigned to the profile. More details below.
- Update Apps: Choose whether or not apps will automatically be updated. More details below.
- Reinstall Apps: Choose whether or not apps will automatically be reinstalled if they have been removed manually or through the Mosyle console.
- Categories: Apps can be organized in Self-Service through the use of Categories. Apps in profiles with the same category will be grouped together in the Self-Service Apps tab.
- Select how to use Apps and Books (VPP) licenses: Choose whether or not to assign an Apps and Books (VPP) license for an app if it has already been installed manually on the device using an Apple ID.
Managing App Updates
The Install App profile can be configured to automatically update apps. Mosyle regularly scans the App Store for updated versions of apps. If an updated version is detected, commands to update the apps can be sent automatically. There are multiple options regarding app updates to choose from:
- Update outdated apps automatically AND alert end users: Using this option you can configure apps to update automatically after a specified delay period. Users will be prompted that an update is available and the specified amount of time to initiate the update through the Self-Service app. At the end of the timeframe, if the app hasn't been updated, the update will run automatically by Mosyle ensuring the app is up to date.
- Update outdated apps automatically without alerting end users: Using this option, app updates will run automatically by Mosyle as soon as a new version of the app is identified and available. Note: This can potentially impact users when using certain applications, as the update could attempt to run while the app is in use.
- Do not update outdated apps automatically: Using this option, apps will not be updated automatically. In order for the apps to be updated, Administrators will need to save the Install App profile again or push updates via some other method.
Requests to update apps can also be pushed from the App Center, Devices Overview/Device Information, or using the Single Shot profile. The Single Shot profile provides the ability to configure a schedule for when the commands for app updates will be sent.
Notes:
- Apps available in the App Store are identified as outdated by comparing the app version installed on the device with the app version available in the App Store, and by the hasupdateavailable key returned with the value 1 by the device.
- Since Custom Apps are not available in the App Store, when an update is available for a Custom App it's recommended to request the sync with Apple School Manager to ensure the correct app version information is available to Mosyle. To do this, go to Management > Apple Apps and Books > Click the Apps and Books token > Click the small information icon to request the sync. ⓘ
- Custom App updates are identified by comparing the app version installed on the device with the app version available in Apple School Manager.
- If an app update is pushed while the app is open, the user will be prompted to allow or deny the app update. This will be displayed in Mosyle as “PROMPTING UPDATE”.
- Apps are unable to be updated while they are actively locked in App Lock.
Managing the Removal of Apps
The Install App profile can be configured to automatically remove applications no longer assigned to iOS/iPadOS devices in the profile. Choose between the following options:
- Do not uninstall apps: Using this option, apps will remain installed on the devices even if the device is no longer assigned to the profile, or the app is removed from the profile. The app licenses will also remain assigned to the devices until manually revoked.
- Uninstall apps after considering all other assigned profiles: Using this option, apps will be uninstalled from devices if the app is removed from the profile or the device is no longer assigned to the profile and the app is not assigned to the device in any other Install App profiles. Because Mosyle scans all other profiles to ensure the app is not assigned to the device in any other way before uninstalling, the commands to remove the app could take up to 2-3 days.
- Uninstall apps immediately after the profile is saved: Apps will immediately be removed from devices after a change is made to the profile to remove a recipient and/or an app and the profile is saved.
Managed apps can also be removed from devices under Devices Overview and in the App Center. If the apps are not yet managed by the MDM, the user will be prompted to enter their Apple ID and password to first confirm management of the app before the app can be removed by the MDM.
- Devices Overview: Go to Management > Devices Overview. Select the devices that will have their apps removed and click More in the toolbar. Scroll down the menu to find Remove All Apps. The command offers three options: Remove all apps; Remove all managed and unmanaged apps not assigned to device (Apps not in App Install profiles); and Remove all managed apps not assigned to the device (Apps not in App Install profiles).
- App Center: Go to Management > Applications, click App Center, select the apps and then click Remove Apps. It's recommended to revoke all app licenses.
Managed App Configuration (iOS/iPadOS)
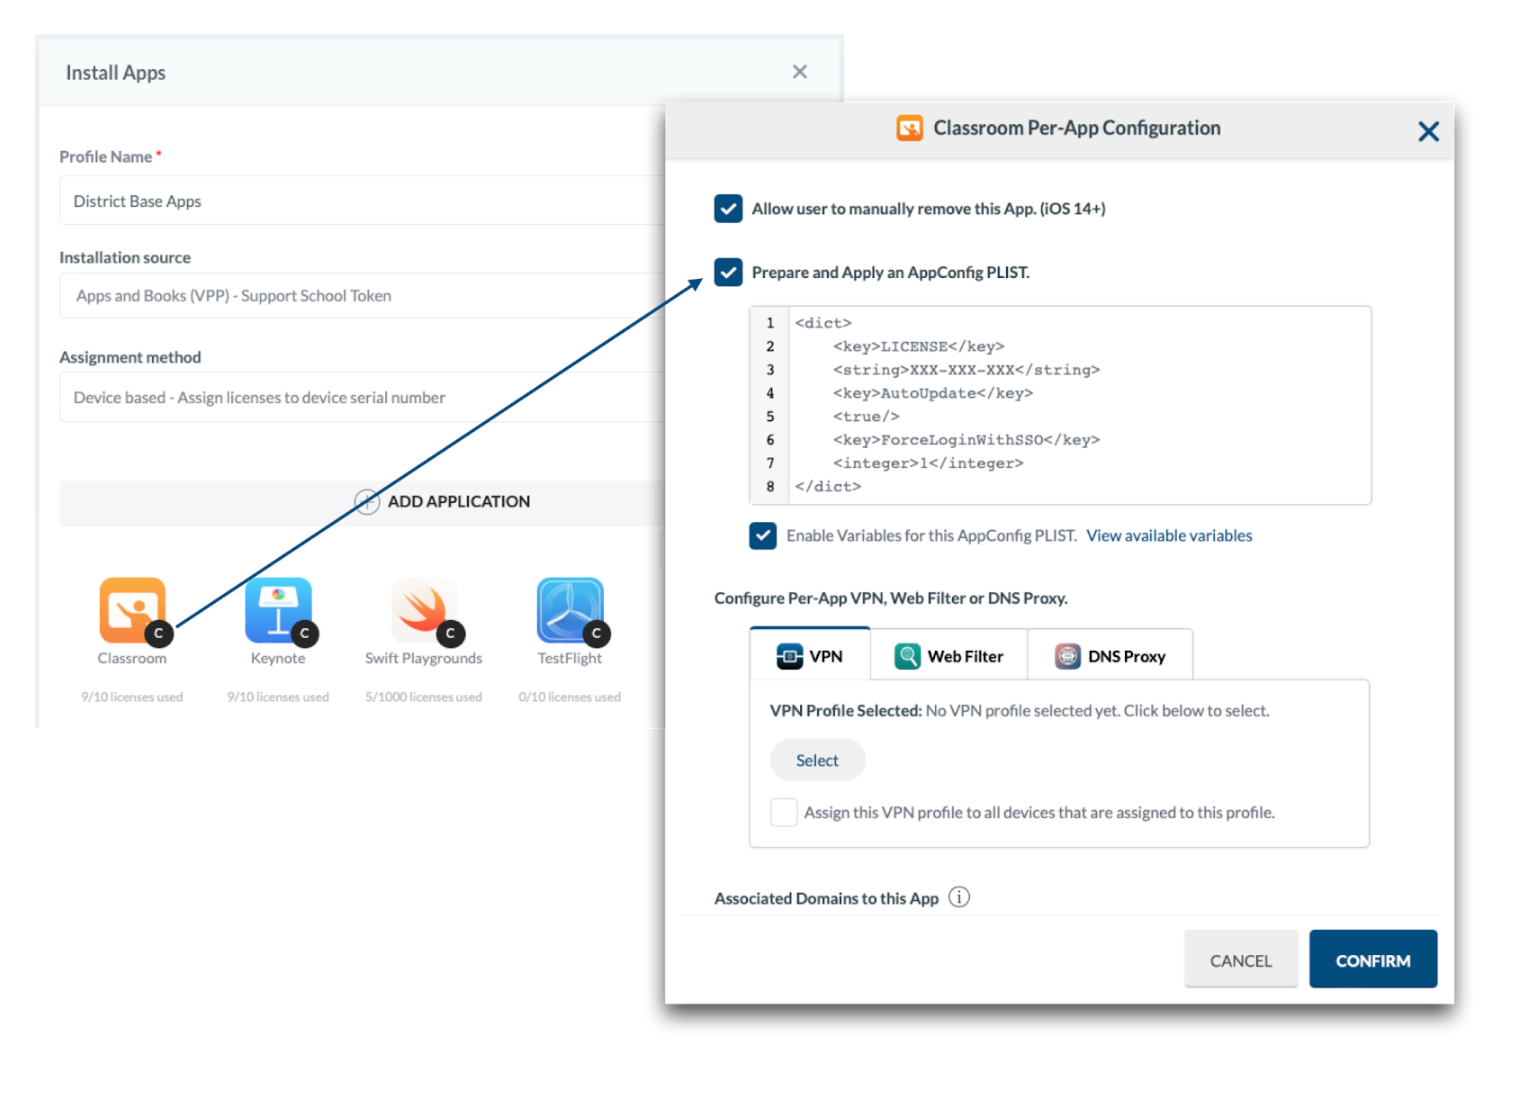
App Configuration is supported by devices running iOS 7 or later and is available in the Install App profile, allowing you to send custom configurations supported by the app developers to applications. Some examples include configuring a specific license or key code for an application. Hover an app in the profile to show the 'C' button in the bottom corner and then click on it to open the App Configuration window. Check the box for “Prepare and Apply an AppConfig PLIST”. If the app's software developer has provided keys and values for the configuration, or an XML file, paste the contents starting with and ending with . When finished, click Confirm.
Installation Flow & Status
Once an Install App profile is created and assigned to users/devices, the View Details area will display the installation status of the apps. There are multiple steps to the installation process for apps, starting with the license assignment. Because of this, it's important to understand the flow in which apps are installed on devices via the MDM.
Before commands to install an application are sent to the device, the MDM first assigns the app license to the device. Once the app license assignment is confirmed to be successful, the MDM generates and sends the command to install the app to the device. The device then validates the app license with Apple servers and proceeds to fetch the app file from the App Store or from a local network caching server. The diagram below gives a broad overview of this flow.
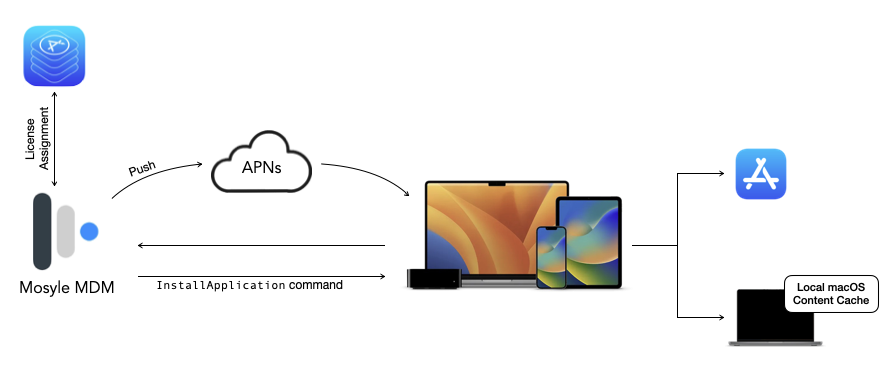
Note: This flow is specific for installing apps using device-based license assignment.
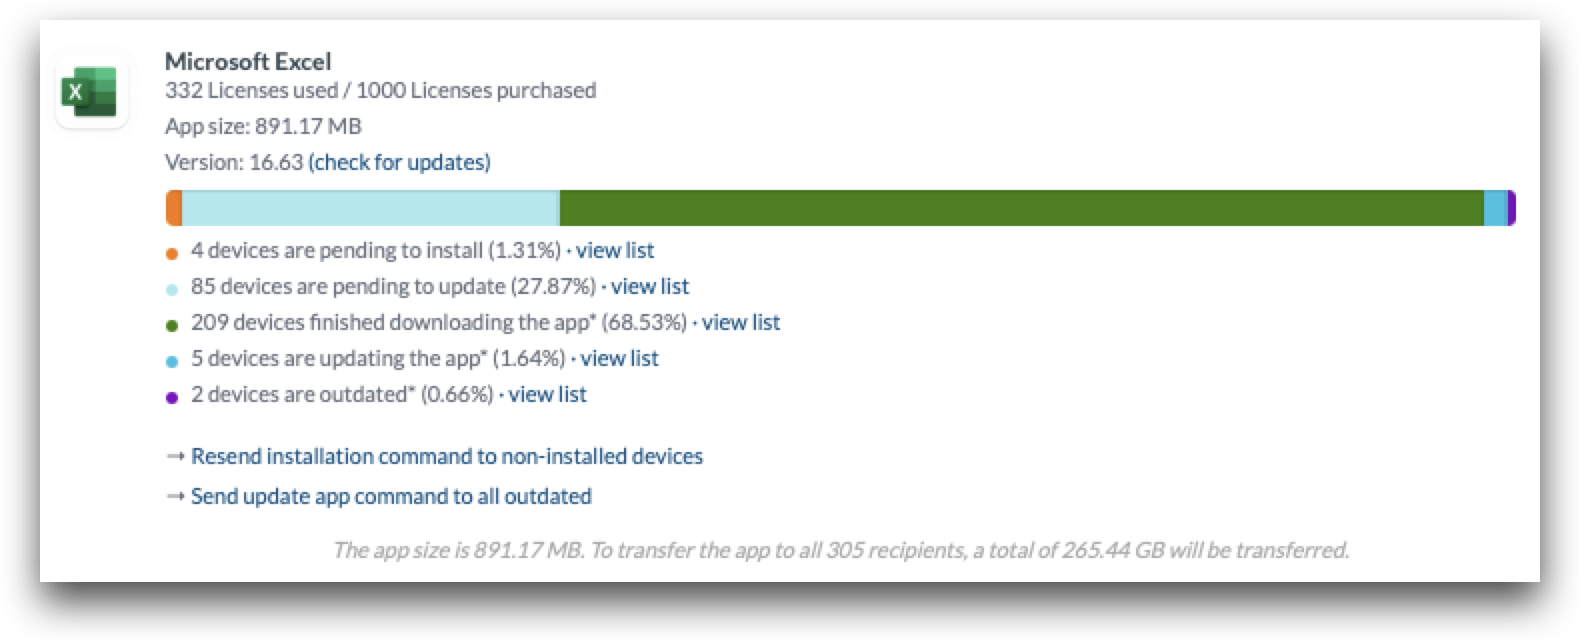
The View Details area of the Install App profile provides insight into the status of the app installation process. The app installation status will display if the command is pending or failed, any errors occurred, the app is downloading/installing, installed, outdated, removed, or available in Self-Service.
Important Notes:
- Mosyle MDM does not host App Store applications. Devices will need to be able to access Apple content servers to successfully download, install, and update apps.
- Mosyle MDM does not specify app versions when installing apps. The command to install applications simply contains the ID of the app from the App Store. The version installed on the device will be based on which app file the device retrieves from the App Store or local network caching server.
Visit Apple's documentation regarding Content Distribution with MDM for more information.
Enterprise App Installation
Overview
Mosyle supports the installation of proprietary in-house apps on iOS and iPadOS devices through the Install Enterprise profile. The installation of Enterprise apps requires self-hosting, or hosting via Mosyle's CDN, as well as the management of provisioning profiles and distribution certificates.
Reminder: Custom Apps available to organizations within their Apple School Manager account can be deployed using the Install App profile and choosing the Apple Apps and Books (VPP) token as the installation source.
Recommended resources
- Access to a Mosyle Education account
- A device enrolled into the account
- IPA file URL
Adding Enterprise Apps
To install proprietary in-house apps on iOS and iPadOS devices, go to Management > Install Enterprise.
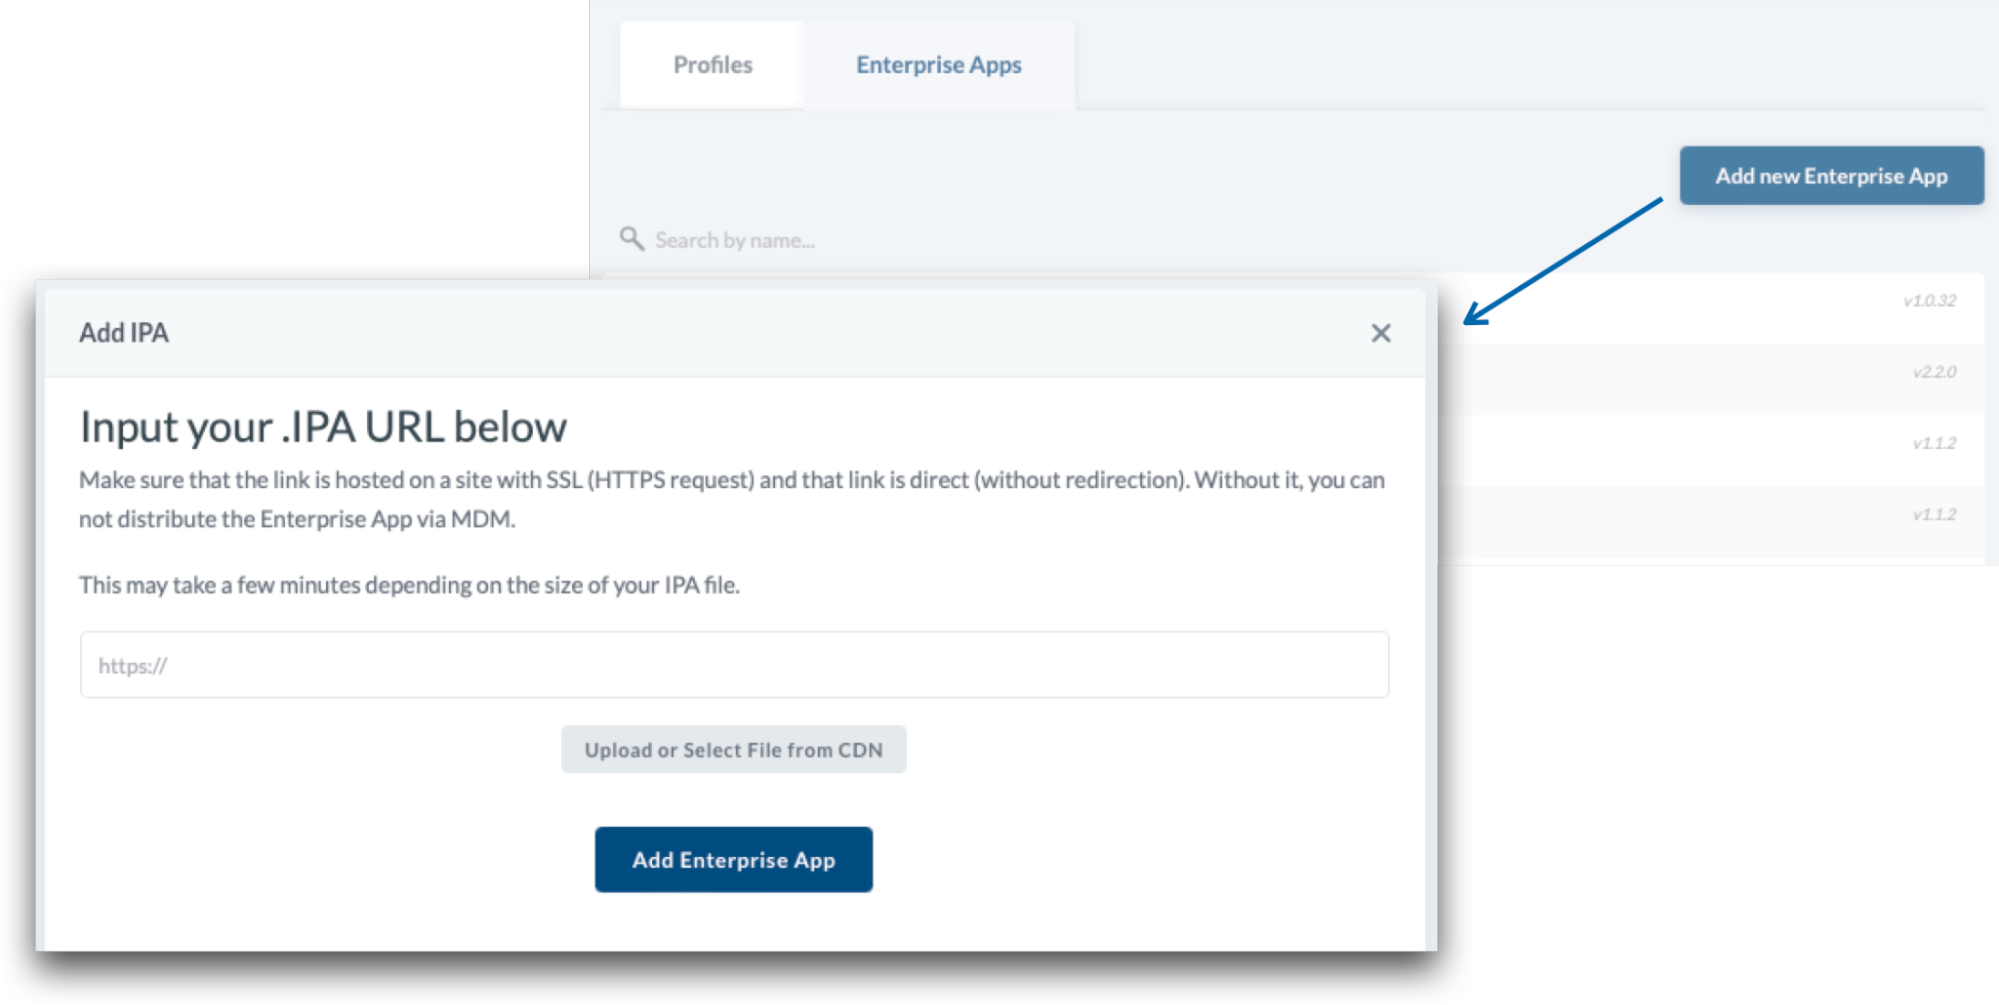
Before creating the Install Enterprise profile, the .ipa file must be hosted and publicly accessible, requiring no user interaction to download. Once hosted, click the Enterprise Apps tab > Add new Enterprise App and enter the .ipa file URL. After entering the URL, Mosyle will automatically retrieve the app name, bundle identifier, and version information. An app icon can be uploaded to the Mosyle console for easy identification of the app within the console and Self-Service.
Mosyle provides its own private cloud hosting solution that allows you to host packages directly in the MDM. If the account has access to the Mosyle CDN, simply upload the .ipa file under the Enterprise apps tab to create the app.
Creating Install Enterprise app profile
After Enterprise Apps are created in Mosyle, click the Profiles tab > Add new profile. Name the profile and select any of the Enterprise apps available in the account to be installed on the devices.
Similar to the Install App profile, options are available for auto-installation, whether the app will be available in Self-Service, as well as uninstall, reinstall, and update behavior.
Updating Enterprise Apps
To deploy updates to Enterprise apps, the .ipa file URL for the updated version will need to be added to Mosyle. Once added, the Install Enterprise profile will need to be updated to include the new version. The old version can be deleted from Mosyle under Management > Install Enterprise > Enterprise Apps, click on the previous version of the app and then click Delete in the bottom-right corner of the profile (optional).
After the new version is added to the profile, if the profile is configured to update apps automatically, upon saving the profile commands will be generated to install and update the app on the devices.
Note: Mosyle uses version comparison to determine if an app is outdated. Be sure the value of any new app versions are greater than the current version.
Managing the Removal of Enterprise Apps
Enterprise apps can be automatically uninstalled when the Install Enterprise profile is edited using the Advanced Options in the profile.
Managed Enterprise apps can also be removed from devices via Devices Overview and the App Center.
- Devices Overview: Go to Management > Devices Overview. Select the devices that will have their apps removed and click More in the toolbar. Scroll down the menu to find Remove All Apps. The command offers three options: Remove all apps; Remove all managed and unmanaged apps not assigned to device (Apps not in App Install profiles); and Remove all managed apps not assigned to the device (Apps not in App Install profiles).
- App Center: Go to Management > Applications, click App Center, select the apps and then click Remove Apps.
Installation Status
Once an Install Enterprise profile is created and assigned to users/devices, the View Details area will display the installation status of the app.
Mosyle Catalog App Installation
Overview
Mosyle Catalog provides the ability to install, update, and manage third party applications that are not available in the Mac App Store, without having to manually download and host PKG or DMG files. Installing apps using Mosyle Catalog can also automatically install any additional permissions needed for the app, such as Privacy Permissions, System Extensions, or Kernel Extensions.
Whenever available, the Universal version of the application will be installed through the Mosyle Catalog. If a Universal version of the app is not available, the appropriate version of the app will be installed on compatible devices - Apple silicon versions of the app will be installed on Apple silicon devices, and Intel versions of the app will be installed on Intel devices. If only the Intel version of the app is available by the app developer, then the Intel version of the app will be installed on devices. In this scenario, it's recommended that Rosetta 2 is installed on Apple silicon devices.
Apps added to the Mosyle Catalog are based on customer requests. All apps offered in the Mosyle app catalog are owned, distributed, and maintained by each respective software developer. When sending installation commands, Mosyle uses direct download links provided by each respective software developer, thus all packages are offered as-is, without warranty, and the functionality, compatibility, and/or availability of each package cannot be guaranteed by Mosyle. Any licensing or rights to the third party software packages is not offered by Mosyle.
The installation of apps using the Mosyle Catalog requires the Mosyle Manager app to be installed on the Macs. Installation of apps using the Mosyle Catalog is not supported on User Enrolled devices.
Creating Install App profile using Mosyle Catalog
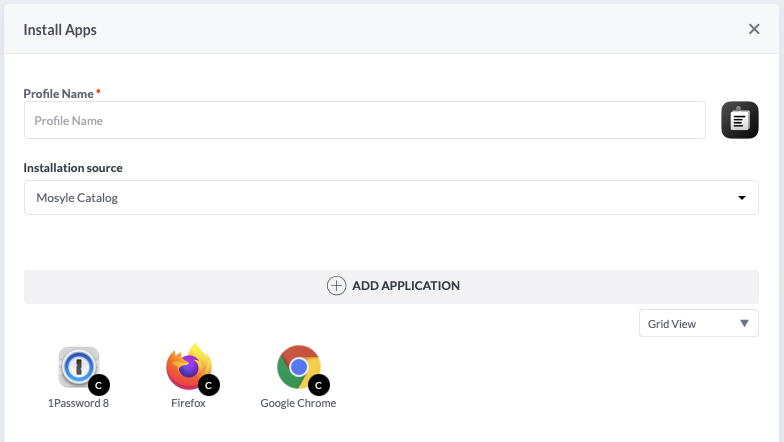
To install macOS apps using the Mosyle Catalog, go to Management > Install App > Add new Profile > Choose the installation source “Mosyle Catalog”.
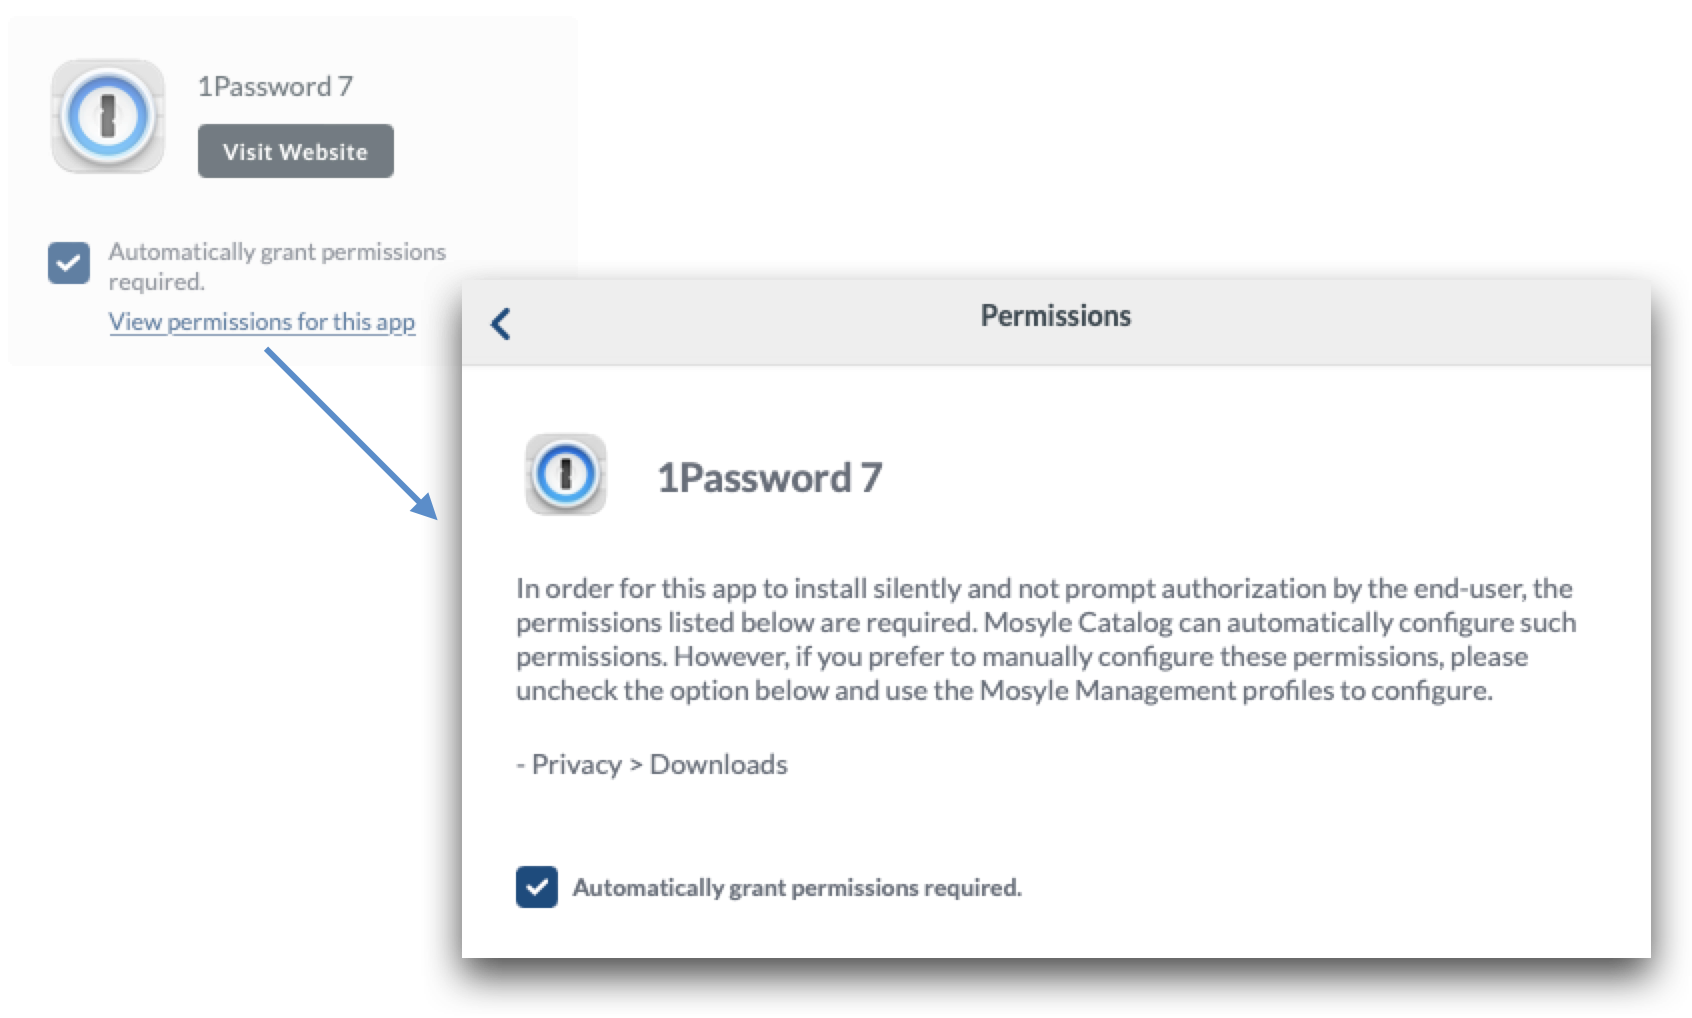
To view the list of applications available in Mosyle Catalog, click the “+ Add Application” button. Within this area, all applications available to be installed are listed along with any permissions required. To view the permissions required for the app, click the link “View permissions for this app”. If you prefer to manually manage the permissions by creating the required management profiles, uncheck the box for “Automatically grant permissions required”.
Choose the app or apps to be installed and select the users, grade levels, devices, and/or groups to assign the profile to in the Profile Assignment area.
Installation Options
Similar to installing apps from Apple Apps and Books, additional options can be configured when creating an Install App profile in Mosyle.
Administrators can control whether apps are automatically installed or available in Self-Service. If choosing the option to “Do not install all apps after saving the profile”, it's recommended to use the option to “Show the apps in Self-Service” so that users can manually request the installation of the apps as needed.
If the option is selected to “Install all apps after saving the profile”, apps will be immediately installed after enrollment if the device is assigned to a User, Grade Level, Course/Class Period, Shared Device Group, or Dynamic Device Group that is assigned to the Install App profile. Administrators can also choose whether apps that have been manually removed should be automatically reinstalled under “Show advanced options”.
Updating Apps in Mosyle Catalog
The Install App profile with Mosyle Catalog can be configured to automatically update apps without having to manually update and host the PKG and DMG. Mosyle scans for updated versions of the apps every 24 hours. If an updated version is detected, commands to update the apps can be sent automatically. There are multiple options regarding app updates to choose from:
- Update outdated apps automatically AND alert end users: Using this option you can configure apps to update automatically after a specified delay period. Users will be prompted that an update is available and the specified amount of time to initiate the update via the Self-Service app. At the end of the timeframe, the update will be run automatically by Mosyle ensuring the app is updated.
- Update outdated apps automatically without alerting end users: Using this option, app updates will run automatically by Mosyle as soon as it is detected a new version of the app is available. Note: This can potentially impact users when using certain applications, as the update could run while the app is in use.
- Do not update outdated apps automatically: Using this option, apps will not automatically be updated. In order for the apps to be updated, Administrators will need to save the Install App profile again or push updates via some other method.
Requests to update apps can also be pushed from Device Information, by clicking the paper airplane option to install/update the app, or requested using Self-Service.
Managing the Removal of Mosyle Catalog Apps
Mosyle Catalog apps can be automatically uninstalled when the Install App profile is edited using the Advanced Options in the profile. To configure the profile so that applications are automatically removed when they are no longer assigned to devices in the profile use one of the following options:
- Do not uninstall apps: Using this option, apps will remain installed on the devices even if the device is no longer assigned to the profile, or the app is removed from the profile.
- Uninstall apps after considering all other assigned profiles: Using this option, apps will be uninstalled from devices if the app is removed from the profile or the device is no longer assigned to the profile and the app is not assigned to the device in any other Install App profiles. Because Mosyle scans all other profiles to ensure the app is not assigned to the device in any other way before uninstalling, the commands to remove the app could take up to 2-3 days.
- Uninstall apps immediately after the profile is saved: Apps will immediately be removed from devices after a change is made to the profile to remove a recipient and/or an app and the profile is saved.
Installation Status
Once an Install App profile is created and assigned to users/devices, the View Details area will display the installation status of the app.
Install PKG
Overview
Mosyle supports the installation of applications not available in the App Store on macOS devices through the Install PKG profile. The installation of these apps require the PKG, DMG, or ZIP file to be hosted so that they are publicly accessible and directly downloadable without redirection and/or user interaction. They can be self-hosted on a local server (such as SMB), third party CDN, or hosted using Mosyle's CDN.
Despite only specifying “PKG” in the profile name, Mosyle supports the deployment of apps from PKGs, DMGs, and/or ZIP files. The PKG must be a flat PKG. It's recommended each PKG only contain a single application.
Adding PKGs
To install PKGs on macOS devices, go to Management > Install PKG.
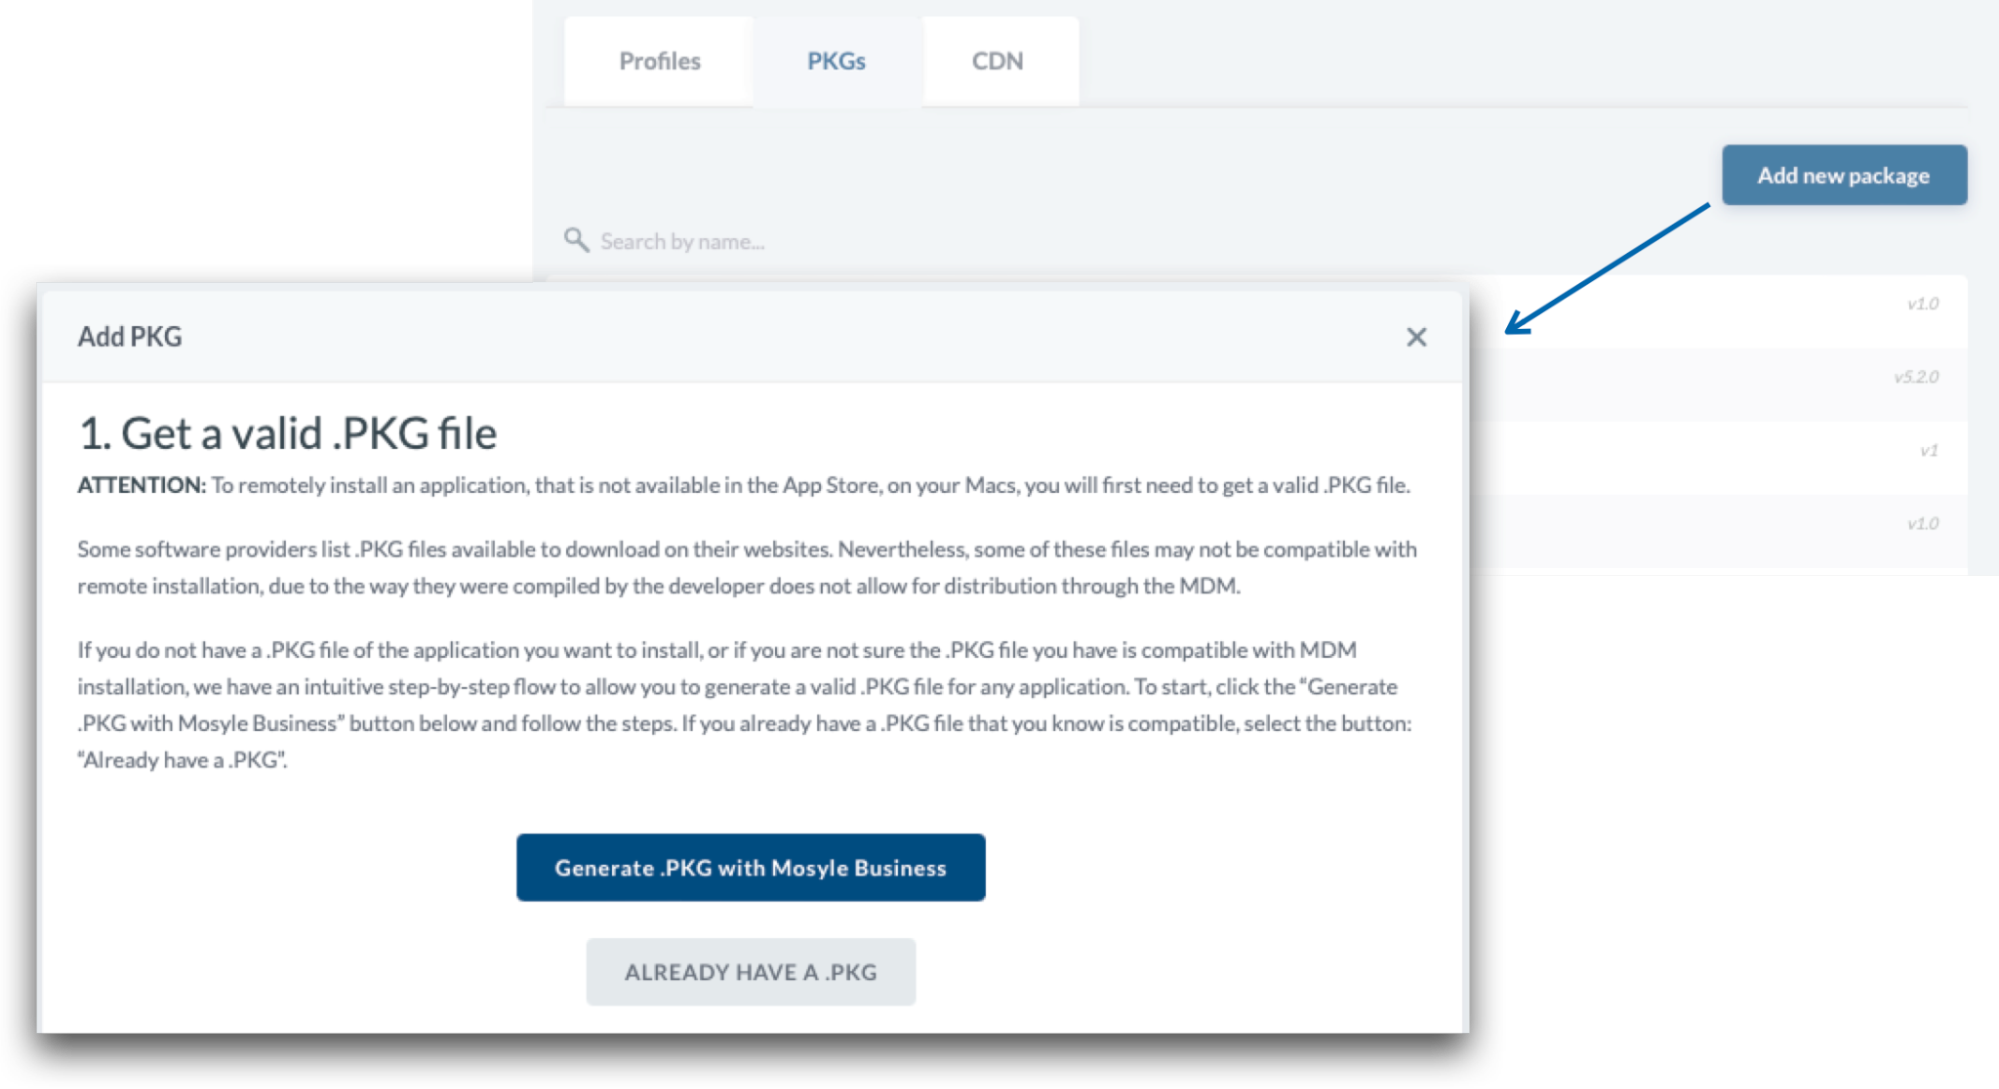
Before creating the Install PKG profile, the PKG, DMG, or ZIP file used to install the application must be created, hosted, and publicly accessible, requiring no user interaction to download. Many app developers provide a PKG, DMG, or ZIP file that can be hosted and used to remotely deploy the app to multiple devices. If the file is not provided, you can generate the PKG for the app using the Mosyle Manager app (PKGs tab > Add new package > Generate .PKG with Mosyle Manager).
After generating or obtaining the PKG file, it must be hosted so that devices can access and retrieve the file to complete the installation. Mosyle provides its own private cloud hosting solution that allows you to host packages directly in the MDM. If the account has access to the Mosyle CDN, upload the PKG, DMG, or ZIP file under the CDN tab to host.
Once hosted, click the PKGs tab > Add new package > Already have a .PKG.
Choose from the following options to configure the app information, which is used to track installation status and if the app is outdated or not:
- Automatically set App info: Mosyle will automatically validate the PKG and retrieve the app bundle ID and version. If hosting internally, do not select this option. After selecting this option, enter the URL for the PKG, upload the PKG to the Mosyle CDN, or select an already uploaded PKG from the CDN. Enter authentication credentials if required.
- Manually set App info: Manually add the app information, such as the bundle ID and version.
When editing or manually entering the app information for the PKG, the following fields are available:
- App Name
- Dropdown menu to select if the file is for an app or an OS update
- URL: Enter the URL of the hosted file, upload the file to the Mosyle CDN, or select an already uploaded file from the CDN
- App Bundle: Enter the bundle identifier for the app. This is used to track the installation status of the app. If the bundle identifier is incorrect, the installation status will be inaccurate.
- App Version: Enter the version of the app that is included in the PKG, DMG or ZIP file. This is used to track whether the app installed on the devices is outdated or not.
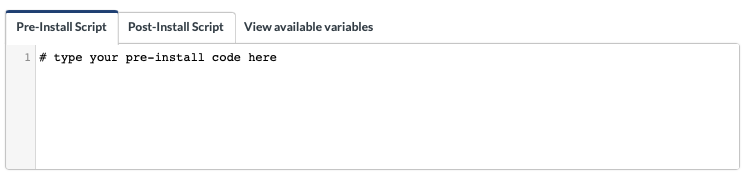
- Pre-Install or Post-Install Scripts: Enter any scripts that need to be run either before or after the app is installed. This is useful for license registration purposes.
- App icon: Upload an app icon to the Mosyle console for easy identification of the app within the console and Self-Service.
- Needs authentication: If the PKG URL requires authentication to be accessed, enter it here.
- Validate file integrity: Check the file integrity after downloading the PKG to ensure the intended file is downloaded.
- This app is signed: Check this box if the PKG will need to be installed on devices enrolled via User Enrollment. Signed applications can be installed using Apple's MDM protocol, rather than the Mosyle agent.
- Priority URLs: Add internal or public URLs to have priority during the download. If the device cannot find the file in the listed priority URLs, it will be downloaded using the initial URL entered for the PKG.
Once all app information has been entered, click Save.
Creating Install PKG profile
After the PKGs are created in Mosyle, click the Profiles tab > Add new profile. Name the profile and select any of the PKGs available in the account to be installed on the devices.
If the app is signed and it is being installed on User Enrolled devices, check the box to “Install with Apple Protocol”. This will use the MDM protocol command to install the PKG rather than using the Mosyle agent. Keep in mind, PKGs installed using MDM protocol must contain a single, signed application installed into /Applications. If the app is being installed on devices enrolled using Automated Device Enrollment or Device Enrollment, it's recommended to leave this option unchecked.
Options are available for auto-installation, delayed installation, and whether the app will be available in Self-Service.
- Install all apps after saving the profile: The apps will be automatically installed when the device is assigned to the profile. This includes immediate installation after enrollment if the device is assigned to a User, Grade Level, Course/Class, Shared Device Group, or Dynamic Device Group that is assigned to the Install App profile. If apps are not automatically installed on devices, the installation will need to be manually requested via Device Info in the Mosyle console, or via Self-Service.
- Show an alert pop-up: Choose to notify users of the installation and allow them to delay the installation as needed. Limit the number of times the installation can be delayed.
- Self-Service apps: Choose whether or not the PKGs will show in the Self-Service application for end users to install as needed.
Managing Updates with Install PKG
To deploy updates to apps installed via Install PKG, a new PKG must be created and hosted with the new app version and added to Mosyle. Be sure to update the version field when adding the updated PKG. Once added, the Install PKG profile will need to be updated to select the new/updated version. The old version can be deleted from Mosyle under Management > Install PKG > PKGs, click on the previous version of the app and then click Delete in the bottom-right corner of the profile (optional).
After the new version is added to the profile, if the profile is configured to update apps automatically, upon saving the profile commands will be generated to install and update the app on the devices.
Note: Mosyle uses version comparison to determine if an app is outdated. Be sure the value of any new app versions are greater than the current version.
Managing the Removal of Apps
Some apps installed using the Install PKG profile on devices running macOS Big Sur or later can be considered "managed" and therefore, can be removed using an MDM command. In order for an enterprise app (PKG) to be considered a managed app on macOS, it has to meet certain criteria:
- It must be signed
- It cannot contain any nested packages
- It must contain only a single app
- It must be installed in the /Applications folder
If the app is managed, it can be removed through Device Info under the Apps tab. If the app is not a managed app, or the device is not running macOS Big Sur or later, you can remove the app from the Mac using the uninstaller provided by the app developer, or a custom command such as: rm -rf /Applications/PATH_TO_APP.app
Custom Configuration of PKGs
Applications that require specific configurations, such as a registration code or license key, can be installed on devices using the Install PKG profile. When creating the PKG in Mosyle, enter the configurations necessary as a pre- or post-install script so that they are applied either before or after the installation of the app. Check the app developer documentation for more information on any configuration specifications.
If preferred, the installation of applications with specific configurations can also be done using the Custom Commands.
Installation Status
Once an Install PKG profile is created and assigned to users/devices, the View Details area will display the installation status of the app. The verification that the app has been installed relies on the bundle ID entered when creating the PKG in Mosyle. If the bundle ID for the app is incorrect, the installation status will remain as “Installing” or “Removed” due to Mosyle being unable to match the bundle ID of the PKG with a bundle ID of an app installed on the device.
App Center
Overview
The App Center itemizes all apps installed on managed devices based on platform (iOS / iPadOS, macOS, tvOS). It includes detailed information about an app's name, bundle identifier, category, status, how many devices it's installed on, and if it's managed (iOS / iPadOS).To access the App Center, go to Management > Applications > App Center.
Filter the apps by clicking Add Filter at the top of the screen. Filter the list using the Filter options along the top, or enter search criteria to find a specific device or app. The information provided by the filters is also designed to be sorted with a simple click of a column name or edited with a click of the search.
Commands available along the toolbar of the App Center include:
- Update Info: Pings devices to check in with the MDM. Check a device's last communication in Management > Devices Overview > Click on the device's name > Info
- Export Apps: Emails a report of the apps in CSV or XLSX format
- Remove Apps: Uninstalls managed apps (iOS / iPadOS and macOS 11+). It's recommended to revoke app licenses (VPP).
- Revoke Licenses: Unassign app licenses from selected devices (iOS / iPadOS). Check available licenses in Management > Applications > Apple Apps and Books (VPP) > Update
- Update Apps: Forces apps to auto-update (iOS / iPadOS)
- Manage Apps: Transfers app ownership from user to MDM. The command will prompt users to enter an Apple ID.
- Refresh button: Click the curling arrows to refresh the list
Notes: Manage Apps supports macOS devices running 11 or later. In order for an enterprise app to be manageable on macOS, it has to meet certain criteria: it must not contain any nested packages, it must contain only a single signed app, and it must be installed in /Applications.
Additional Information
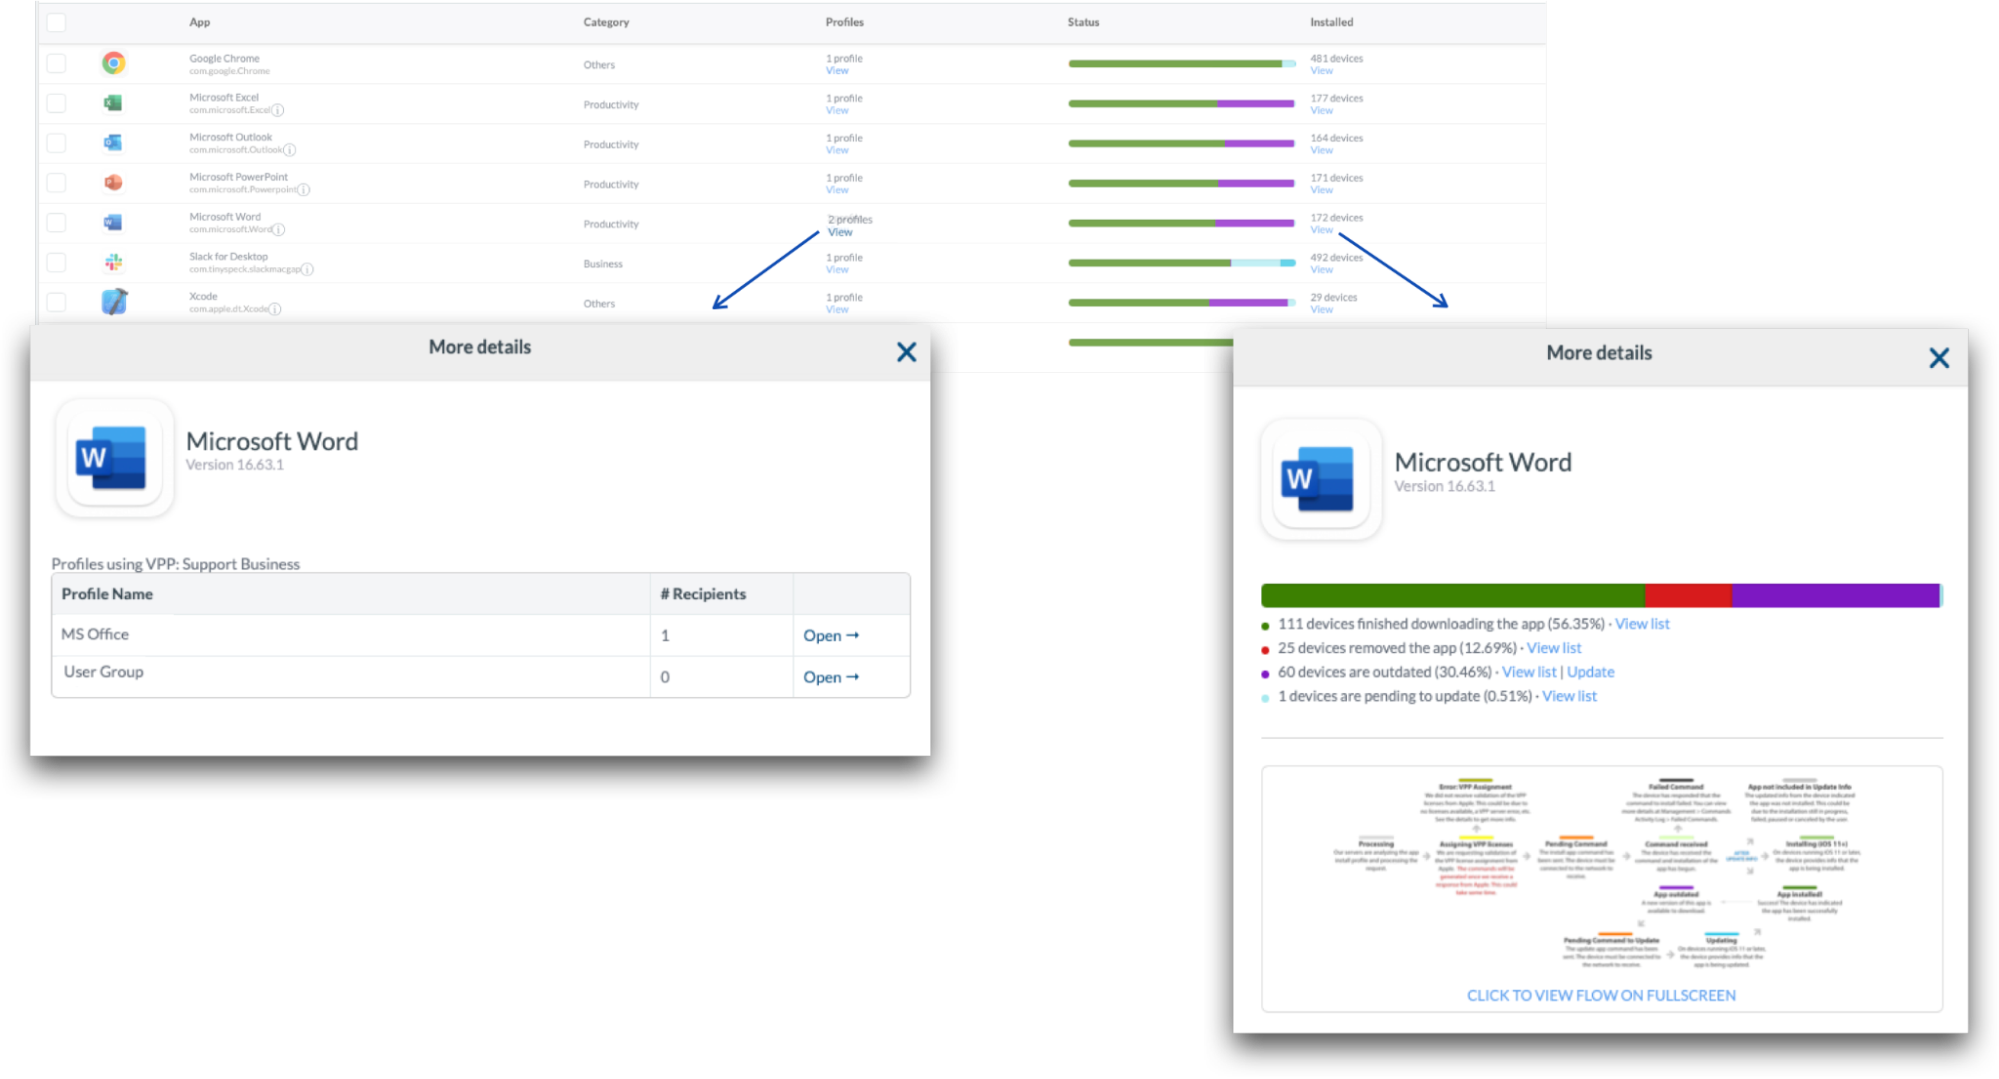
Within the App Center you can see the Install app or Install PKG profiles the app is assigned to as well as the installation status of the app. Use the Filters to search for apps installed or not installed through profiles, installation source, managed status, and more.
Click the “View” link under the Profiles column to view the Install app or Install PKG profile associated with the app.
Click the “View” link under the Installed column to view the installation status of the app or PKG. The installation status should reflect the same information that is presented in the “View Details” area of the Install App profile.