# Windows 11

Articles and guides for Windows OS solutions

# How to Fix the “User Profile Service Failed the Sign-in” Error for Windows

Are you getting the “User Profile Service failed the sign-in” or “User profile cannot be loaded” error during Windows startup? This message is shown as soon you type your password in the Windows logon screen, and your default user profile fails to launch. In its place, a corrupt user profile takes over, changing your lock screen and desktop background. Because the proper profile wouldn’t load, you’re unable to log in to your system. If you’re facing this frustrating issue, one of our solutions below will resolve it immediately.

## Causes of “User Profile Service Failed the Sign-in” Error

There are many reasons you may encounter the “User profile failed the sign-in” error. Variations of this error include: “User profile cannot be loaded” and “User profile service failed the logon.” If you get any of these error messages, it means the default Windows user profile has been corrupted, which can be traced to one or more of the following factors:

- **Improper Windows update:** User Account Control (UAC) is designed to prevent unauthorized changes to your Windows device. Any irregular or unfinished updates or a crash can sometimes corrupt host files that are required for UAC to work properly.
- **Partition resizing error**: when resizing partitions from Disk Management, those parts can occasionally get corrupted, leading to an incorrect user profile.
- **Antivirus program**: if an [antivirus program](https://www.maketecheasier.com/best-101-free-computer-software-for-your-daily-use/#anti-virus) was scanning your system while you tried to log in, it can abort the correct user profile and launch an incorrect one.
- **Improper shutdown and restarts** **in guest logons**: if you did not exit smoothly from a local account created on your PC, you may encounter a user profile error on a subsequent login.

<div class="in-content-ad ad-slot mb-8 flex justify-center" data-google-query-id="CMGmqvTdhYMDFfixgwgdM0ENNg" id="bkmrk-"></div>**Tip**: looking to [smoothly transfer user profile data to another in Windows](https://www.maketecheasier.com/transfer-user-profile-data-to-another-windows/)? This guide can help.

## Solutions for User Profile Service Failed the Logon Error in Windows

The good thing is that none of the above causes are major concerns. You can easily repair the corrupted user profile using one of the troubleshooting solutions below.

You should first attempt the first few easy methods. Go for the more intricate and time-consuming solutions toward the end – only if the easy ones fail to resolve the problem.

## 1. Restart or Shut Down Windows From Its Lock Screen

Sometimes you only need a simple restart or shutdown from the lock screen window to fix the issue.

1. Whether you’re inside an administrator or guest logon, use <kbd>Win</kbd> + <kbd>L</kbd> to exit, and go to the Windows lock screen.
2. Navigate to the administrator profile (if a guest profile was previously used to log in), and click the lock screen shutdown/restart options. Make sure you log in as the administrator during the subsequent startup. We can help if you need to [reset your administrator password](https://www.maketecheasier.com/reset-windows-administrator-password/).

<div class="wp-block-image mb-4" id="bkmrk--1"><figure class="aligncenter"><picture><source srcset="https://www.maketecheasier.com/assets/uploads/2021/11/Windows11-User-Profile-Restart-After-Removal-Local-Account.jpg.webp" type="image/webp">![Logging out of local account on Windows.](https://www.maketecheasier.com/assets/uploads/2021/11/Windows11-User-Profile-Restart-After-Removal-Local-Account.jpg)</source></picture></figure></div>**Tip**: did you know that you can [install Windows 11 even on an unsupported PC](https://www.maketecheasier.com/install-windows11-on-unsupported-pcs/)? Learn how to get started.

<div class="in-content-ad ad-slot mb-8 flex justify-center" data-google-query-id="CM-7meDehYMDFSyWgwgd7lkDGg" id="bkmrk--2"></div>## 2. Delete a Local User Account in Windows

If the user profile error is due to improper shutdowns and restarts during a guest logon, you may want to delete the unnecessary local account temporarily.

1. After signing in to your computer on an incorrect user profile, start the Windows Run command option using <kbd>Win</kbd> + <kbd>R</kbd>, and enter `netplwiz`.

<div class="wp-block-image mb-4" id="bkmrk--3"><figure class="aligncenter size-full"><picture><source srcset="https://www.maketecheasier.com/assets/uploads/2023/06/Windows1-User-Profile-Netplwiz-Run.jpg.webp" type="image/webp">![Typing "netplwiz" command in Run window.](https://www.maketecheasier.com/assets/uploads/2023/06/Windows1-User-Profile-Netplwiz-Run.jpg)</source></picture></figure></div>2. You will encounter the Advanced User Accounts Control Panel screen. Enter your administrator password to proceed. Sometimes there will be an error if the system refuses to accept your admin password. In that case, use the Windows Safe boot to perform these steps. (Described in the FAQ below.)

<div class="wp-block-image mb-4" id="bkmrk--4"><figure class="aligncenter size-full"><picture><source srcset="https://www.maketecheasier.com/assets/uploads/2021/11/Windows11-User-Profile-UAC.jpg.webp" type="image/webp">![UAC prompt to type administrator password.](https://www.maketecheasier.com/assets/uploads/2021/11/Windows11-User-Profile-UAC.jpg)</source></picture></figure></div><div class="in-content-ad ad-slot mb-8 flex justify-center" data-google-query-id="COXN3-LehYMDFUaygwgdPRAO9Q" id="bkmrk--5"></div>3. Click the “Remove” option next to your guest/local account. Even if you’re currently logged in on your computer with the local account, the local profile here will be removed.

<div class="wp-block-image mb-4" id="bkmrk--6"><figure class="aligncenter size-full"><picture><source srcset="https://www.maketecheasier.com/assets/uploads/2021/11/Windows11-User-Profile-Remove-Local-Account.jpg.webp" type="image/webp">![Removing local account via User Accounts window.](https://www.maketecheasier.com/assets/uploads/2021/11/Windows11-User-Profile-Remove-Local-Account.jpg)</source></picture></figure></div>4. Use <kbd>Win</kbd> + <kbd>L</kbd> to exit the local account logon window.
5. Restart the computer, and make sure to [use your regular Microsoft account to log back in](https://www.maketecheasier.com/use-windows-without-microsoft-account/).

<div class="in-content-ad ad-slot mb-8 flex justify-center" data-google-query-id="CN-OtuPehYMDFbCJgwgdEnUE9g" id="bkmrk--7"></div>## 3. Move NTUSER.Dat File to Default Username Folder

A user profile consists of personalized menu items for desktop, downloads, documents, music, videos, and saved links that are stored in a folder inside “C:/Users.”

For each of these profiles, a .DAT file called NTUSER.DAT is created by Windows. It contains personalized user settings. Try moving the file associated with the buggy profile to a default username folder.

1. Go to the necessary local account inside “C:/Users,” and press <kbd>Ctrl</kbd> + <kbd>X</kbd> to cut the NTUSER.DAT file for that account.

<div class="wp-block-image mb-4" id="bkmrk--8"><figure class="aligncenter size-full"><picture><source srcset="https://www.maketecheasier.com/assets/uploads/2021/11/Windows11-User-Profile-NTUserDat-Cut.jpg.webp" type="image/webp">![Locating NTUSER.DAT file under Users in "C:/."](https://www.maketecheasier.com/assets/uploads/2021/11/Windows11-User-Profile-NTUserDat-Cut.jpg)</source></picture></figure></div><div class="in-content-ad ad-slot mb-8 flex justify-center" data-google-query-id="CJOn_uPehYMDFXmagwgdPYYN5w" id="bkmrk--9"></div>2. Move the .DAT file into the “Default” username folder. You may not be able to see this folder. If so, change the “View -&gt; Show” to “Hidden items” in File Explorer.

<div class="wp-block-image mb-4" id="bkmrk--10"><figure class="aligncenter size-full"><picture><source srcset="https://www.maketecheasier.com/assets/uploads/2023/06/how-to-fix-user-profile-service-failed-error-view-hidden-folders.jpg.webp" type="image/webp">![Accessing "View" menu in File Explorer to show hidden files.](https://www.maketecheasier.com/assets/uploads/2023/06/how-to-fix-user-profile-service-failed-error-view-hidden-folders.jpg)</source></picture></figure></div>3. Delete the local account folder, and restart the PC to see whether the proper user profile is loading.

**Tip**: did you know that you can [perform a Windows Defender scan from Command Prompt](https://www.maketecheasier.com/use-windows-defender-from-command-prompt/)? We demonstrate how in our guide.

<div class="in-content-ad ad-slot mb-8 flex justify-center" data-google-query-id="CO2bg-XehYMDFVaBgwgdb4sASg" id="bkmrk--11"></div>
## 4. Windows User Profile Repair Using Command Prompt

The evergreen Command Prompt can fix some of the hard disk-related issues that may have caused the user profile error problem.

1. Go to Start, and search for “Command Prompt.” Select “Run as administrator” under the result.

<div class="wp-block-image mb-4" id="bkmrk--12"><figure class="aligncenter size-full"><picture><source srcset="https://www.maketecheasier.com/assets/uploads/2023/07/how-to-fix-user-profile-failed-the-signin-error-in-windows-command-admin.jpg.webp" type="image/webp">![Typing "command prompt" via the Start menu.](https://www.maketecheasier.com/assets/uploads/2023/07/how-to-fix-user-profile-failed-the-signin-error-in-windows-command-admin.jpg)</source></picture></figure></div><div class="in-content-ad ad-slot mb-8 flex justify-center" data-google-query-id="CNqWs-XehYMDFUyggwgdD1EHCA" id="bkmrk--13"><div id="bkmrk--14"></div></div>2. Perform a Deployment Image Servicing and Management Tool (DISM) scan, which helps repair the Windows image and may solve the user profile services error.

<div id="bkmrk-1-dism.exe-%2Fonline-%2F"><div class="cm-editor ͼ1 ͼ2 ͼ4 ͼ1p"><div aria-live="polite">  
</div><div class="cm-scroller" tabindex="-1"><div aria-hidden="true" class="cm-gutters"><div class="cm-gutter cm-lineNumbers"><div class="cm-gutterElement">  
</div><div class="cm-gutterElement">1</div></div></div><div aria-multiline="true" aria-readonly="true" autocapitalize="off" autocorrect="off" class="cm-content" contenteditable="true" role="textbox" spellcheck="false" translate="no"><div class="cm-line">DISM.exe /Online /Cleanup-image /scanhealth</div></div><div aria-hidden="true" class="cm-layer cm-layer-above cm-cursorLayer">  
</div><div aria-hidden="true" class="cm-layer cm-selectionLayer">  
</div></div><button class="cm-copy-button" type="button"><svg height="16" viewbox="0 0 24 24" width="16" xmlns="http://www.w3.org/2000/svg"></svg></button></div></div><div class="wp-block-image mb-4" id="bkmrk--15"><figure class="aligncenter size-full"><picture><source srcset="https://www.maketecheasier.com/assets/uploads/2021/11/Windows11-User-Profile-DISM-Cleanup.jpg.webp" type="image/webp">![Running DISM scan via Command Prompt.](https://www.maketecheasier.com/assets/uploads/2021/11/Windows11-User-Profile-DISM-Cleanup.jpg)</source></picture></figure></div>3. Likewise, a System File Checker (SFC) command is the best way to repair corrupt Windows files, including user profile settings.

<div id="bkmrk-1-sfc-%2Fscannow"><div class="cm-editor ͼ1 ͼ2 ͼ4 ͼ1q"><div aria-live="polite">  
</div><div class="cm-scroller" tabindex="-1"><div aria-hidden="true" class="cm-gutters"><div class="cm-gutter cm-lineNumbers"><div class="cm-gutterElement">  
</div><div class="cm-gutterElement">1</div></div></div><div aria-multiline="true" aria-readonly="true" autocapitalize="off" autocorrect="off" class="cm-content" contenteditable="true" role="textbox" spellcheck="false" translate="no"><div class="cm-line">sfc /scannow</div></div><div aria-hidden="true" class="cm-layer cm-layer-above cm-cursorLayer">  
</div><div aria-hidden="true" class="cm-layer cm-selectionLayer">  
</div></div><button class="cm-copy-button" type="button"><svg height="16" viewbox="0 0 24 24" width="16" xmlns="http://www.w3.org/2000/svg"></svg></button></div></div><div class="wp-block-image mb-4" id="bkmrk--16"><figure class="aligncenter size-full"><picture><source srcset="https://www.maketecheasier.com/assets/uploads/2023/08/how-to-fix-user-profile-service-failed-error-view-sfc.jpg.webp" type="image/webp">![How To Fix User Profile Service Failed Error View Sfc](https://www.maketecheasier.com/assets/uploads/2023/08/how-to-fix-user-profile-service-failed-error-view-sfc.jpg)</source></picture></figure></div>**Tip**: the [WDF violation error](https://www.maketecheasier.com/fix-wdf_violation-error-windows/) can sometimes arise on your Windows PC. Learn what to do about it.

<div class="in-content-ad ad-slot mb-8 flex justify-center" data-google-query-id="CO_P6uXehYMDFWqHgwgda2ANEg" id="bkmrk--17"><div id="bkmrk--18"></div></div>## 5. Use Windows Registry Editor in Safe Mode

The Windows Registry Editor (Regedit) is one of the best solutions to fix the “User profile service failed the sign-in” error. For this, the troubleshooting is achieved in Safe mode.

1. In Windows 11, go to “Advanced startup” from the Search menu. For Windows 10, the corresponding option is “Change advanced startup options.”
2. Click “Restart now” to initiate an advanced restart.

<div class="wp-block-image mb-4" id="bkmrk--19"><figure class="aligncenter size-full"><picture><source srcset="https://www.maketecheasier.com/assets/uploads/2021/11/Windows11-User-Profile-Advanced-Startup-Restart-Now.jpg.webp" type="image/webp">![Clicking "Restart now" under Advanced startup in Recovery. ](https://www.maketecheasier.com/assets/uploads/2021/11/Windows11-User-Profile-Advanced-Startup-Restart-Now.jpg)</source></picture></figure></div>3. Select “Troubleshoot” on the blue screen.

<div class="wp-block-image mb-4" id="bkmrk--20"><figure class="aligncenter size-full"><picture><source srcset="https://www.maketecheasier.com/assets/uploads/2023/07/Select-Troubleshoot-1.jpg.webp" type="image/webp">![Clicking "Troubleshoot" in recovery environment.](https://www.maketecheasier.com/assets/uploads/2023/07/Select-Troubleshoot-1.jpg)</source></picture></figure></div><div class="in-content-ad ad-slot mb-8 flex justify-center" data-google-query-id="COnpnObehYMDFW6QgwgdQCsF3g" id="bkmrk--21"></div>4. Go to “Advanced options -&gt; Startup settings,” and initiate another restart of the device.

<div class="wp-block-image mb-4" id="bkmrk--22"><figure class="aligncenter size-full"><picture><source srcset="https://www.maketecheasier.com/assets/uploads/2023/07/Startup-settings.jpg.webp" type="image/webp">![Clicking on "Startup Settings" via Advanced options.](https://www.maketecheasier.com/assets/uploads/2023/07/Startup-settings.jpg)</source></picture></figure></div>5. Following the restart, you will see a number of startup settings that can be accessed using the number keys (1-9) or function keys (F1-F9). Select the option to “Enable safe mode.”

<div class="wp-block-image mb-4" id="bkmrk--23"><figure class="aligncenter size-full"><picture><source srcset="https://www.maketecheasier.com/assets/uploads/2023/06/Enable-Safe-Mode-Recovery-Environment.jpg.webp" type="image/webp">![Selecting "Enable Safe Mode" option in Startup Settings.](https://www.maketecheasier.com/assets/uploads/2023/06/Enable-Safe-Mode-Recovery-Environment.jpg)</source></picture></figure></div><div class="in-content-ad ad-slot mb-8 flex justify-center" data-google-query-id="CMa_0efehYMDFWSUgwgdO1IOGw" id="bkmrk--24"></div>6. Once you sign in, you will enter Windows in Safe Mode. Very minimal options are visible in this mode.
7. Start the Windows Run command option using <kbd>Win</kbd> + <kbd>R</kbd>, and enter `regedit`. This task will be automatically created with administrator privileges.

<div class="wp-block-image mb-4" id="bkmrk--25"><figure class="aligncenter size-full"><picture><source srcset="https://www.maketecheasier.com/assets/uploads/2021/11/Windows11-User-Profile-SafeMode-Regedit.jpg.webp" type="image/webp">![Typing "regedit" in Run window.](https://www.maketecheasier.com/assets/uploads/2021/11/Windows11-User-Profile-SafeMode-Regedit.jpg)</source></picture></figure></div>8. Navigate to the following path in the Registry Editor:

<div id="bkmrk-1-computer%5Chkey_loca"><div class="cm-editor ͼ1 ͼ2 ͼ4 ͼ1r"><div aria-live="polite">  
</div><div class="cm-scroller" tabindex="-1"><div aria-hidden="true" class="cm-gutters"><div class="cm-gutter cm-lineNumbers"><div class="cm-gutterElement">  
</div><div class="cm-gutterElement">1</div></div></div><div aria-multiline="true" aria-readonly="true" autocapitalize="off" autocorrect="off" class="cm-content" contenteditable="true" role="textbox" spellcheck="false" translate="no"><div class="cm-line">Computer\HKEY_LOCAL_MACHINE\Software\Microsoft\Windows NT\CurrentVersion\ProfileList</div></div><div aria-hidden="true" class="cm-layer cm-layer-above cm-cursorLayer">  
</div><div aria-hidden="true" class="cm-layer cm-selectionLayer">  
</div></div><button class="cm-copy-button" type="button"><svg height="16" viewbox="0 0 24 24" width="16" xmlns="http://www.w3.org/2000/svg"></svg></button></div></div>9. Check the last few entries under “ProfileList” to see whether there are any duplicates, e.g., the entries have similar names, but at least one will contain a .BAK file. This extension will appear at the end of one of the items in the “Name” column. For instance, if you open one of the ProfileList folders, you may see .BAK after any of the values listed. If you don’t see anything with this extension, skip to the bottom of the section.

<div class="wp-block-image mb-4" id="bkmrk--26"><figure class="aligncenter size-full"><picture><source srcset="https://www.maketecheasier.com/assets/uploads/2023/07/how-to-fix-user-profile-failed-the-signin-error-in-windows-reg-profiles.jpg.webp" type="image/webp">![Checking ProfileList key in Registry Editor.](https://www.maketecheasier.com/assets/uploads/2023/07/how-to-fix-user-profile-failed-the-signin-error-in-windows-reg-profiles.jpg)</source></picture></figure></div><div class="in-content-ad ad-slot mb-8 flex justify-center" data-google-query-id="CMHHlujehYMDFVKXgwgdLkQFMg" id="bkmrk--27"></div>10. If you do have a value with the extension, and it’s present in the last entry, rename the .BAK extension to just .BA. For any duplicate entry, rename it to something else, but keep the .BAK extension. Delete any surplus .BAK extensions, if present, for duplicate entries.
11. Delete the .BA extension in the entry that was just renamed.

<div class="wp-block-image mb-4" id="bkmrk--28"><figure class="aligncenter size-full"><picture><source srcset="https://www.maketecheasier.com/assets/uploads/2021/11/Windows11-User-Profile-WindowsNT-ProfileList.jpg.webp" type="image/webp">![ProfileList keys view in Registry Editor.](https://www.maketecheasier.com/assets/uploads/2021/11/Windows11-User-Profile-WindowsNT-ProfileList.jpg)</source></picture></figure></div>12. Right-click and modify the State key of the profile entry from where the .BAK was removed. Basically, we are switching the active default user profile through a minor registry tweak.

<div class="wp-block-image mb-4" id="bkmrk--29"><figure class="aligncenter size-full"><picture><source srcset="https://www.maketecheasier.com/assets/uploads/2021/11/Windows11-User-Profile-WindowsNT-State-Renamed.jpg.webp" type="image/webp">![Modifying key in Registry Editor.](https://www.maketecheasier.com/assets/uploads/2021/11/Windows11-User-Profile-WindowsNT-State-Renamed.jpg)</source></picture></figure></div><div class="in-content-ad ad-slot mb-8 flex justify-center" data-google-query-id="CKuikunehYMDFTaGgwgdOKgHCA" id="bkmrk--30"></div>13. Change the hexadecimal DWORD value from a numerical value to “0.” Click “OK” to save the settings.

<div class="wp-block-image mb-4" id="bkmrk--31"><figure class="aligncenter size-full"><picture><source srcset="https://www.maketecheasier.com/assets/uploads/2021/11/Windows11-User-Profile-WindowsNT-ValueData0.jpg.webp" type="image/webp">![Changing DWORD value via Registry Editor.](https://www.maketecheasier.com/assets/uploads/2021/11/Windows11-User-Profile-WindowsNT-ValueData0.jpg)</source></picture></figure></div>14. Restart the PC in normal mode.
15. The “User profile service failed the logon” error should be gone once you log in again.

<div class="in-content-ad ad-slot mb-8 flex justify-center" data-google-query-id="CKXowenehYMDFTOYgwgdxxUG-Q" id="bkmrk--32"></div>### No .BAK File?

If you don’t have a .BAK file, see the workaround below.

1. Open File Explorer, and navigate to “C:\\Users\\Default\\AppData\\Local\\Application Data”

2. If you see another folder inside this one named “Application Data,” delete it, and restart your computer. If you don’t have an Application Data folder at all, this fix will not apply.

**FYI**: wondering [when you should use Command Prompt over Powershell and vice versa](https://www.maketecheasier.com/difference-command-prompt-powershell/)? We highlight the differences.

## 6. Restart the User Profile Service

Occasionally, third-party software and apps stop the User Profile service from running, resulting in this error. Restart it using Command Prompt:

1. Open Command Prompt, and run it as an administrator as shown above.
2. Enter the following command, and press <kbd>Enter</kbd>:

<div id="bkmrk-1-sc-config-profsvc-"><div class="cm-editor ͼ1 ͼ2 ͼ4 ͼ1s"><div aria-live="polite">  
</div><div class="cm-scroller" tabindex="-1"><div aria-hidden="true" class="cm-gutters"><div class="cm-gutter cm-lineNumbers"><div class="cm-gutterElement">  
</div><div class="cm-gutterElement">1</div></div></div><div aria-multiline="true" aria-readonly="true" autocapitalize="off" autocorrect="off" class="cm-content" contenteditable="true" role="textbox" spellcheck="false" translate="no"><div class="cm-line">sc config ProfSvc start= auto</div></div><div aria-hidden="true" class="cm-layer cm-layer-above cm-cursorLayer">  
</div><div aria-hidden="true" class="cm-layer cm-selectionLayer">  
</div></div><button class="cm-copy-button" type="button"><svg height="16" viewbox="0 0 24 24" width="16" xmlns="http://www.w3.org/2000/svg"></svg></button></div></div><div class="wp-block-image mb-4" id="bkmrk--33"><figure class="aligncenter size-full"><picture><source srcset="https://www.maketecheasier.com/assets/uploads/2023/07/how-to-fix-user-profile-failed-the-signin-error-in-windows-restart-service.jpg.webp" type="image/webp">![Running command in cmd.](https://www.maketecheasier.com/assets/uploads/2023/07/how-to-fix-user-profile-failed-the-signin-error-in-windows-restart-service.jpg)</source></picture></figure></div><div class="in-content-ad ad-slot mb-8 flex justify-center" data-google-query-id="CObol-rehYMDFYujgwgd4OEDkQ" id="bkmrk--34"></div>3. At the next prompt, enter the following command, and press <kbd>Enter</kbd>:

<div id="bkmrk-1-sc-start-profsvc"><div class="cm-editor ͼ1 ͼ2 ͼ4 ͼ1t"><div aria-live="polite">  
</div><div class="cm-scroller" tabindex="-1"><div aria-hidden="true" class="cm-gutters"><div class="cm-gutter cm-lineNumbers"><div class="cm-gutterElement">  
</div><div class="cm-gutterElement">1</div></div></div><div aria-multiline="true" aria-readonly="true" autocapitalize="off" autocorrect="off" class="cm-content" contenteditable="true" role="textbox" spellcheck="false" translate="no"><div class="cm-line">sc start ProfSvc</div></div><div aria-hidden="true" class="cm-layer cm-layer-above cm-cursorLayer">  
</div><div aria-hidden="true" class="cm-layer cm-selectionLayer">  
</div></div><button class="cm-copy-button" type="button"><svg height="16" viewbox="0 0 24 24" width="16" xmlns="http://www.w3.org/2000/svg"></svg></button></div></div><div class="wp-block-image mb-4" id="bkmrk--35"><figure class="aligncenter size-full"><picture><source srcset="https://www.maketecheasier.com/assets/uploads/2023/07/how-to-fix-user-profile-failed-the-signin-error-in-windows-restart-service-2.jpg.webp" type="image/webp">![Running a "sc start" command in cmd.](https://www.maketecheasier.com/assets/uploads/2023/07/how-to-fix-user-profile-failed-the-signin-error-in-windows-restart-service-2.jpg)</source></picture></figure></div>4. Restart your computer to fix the error.

5. If these commands won’t run, try restarting your PC in Safe Mode, then performing the above.

6. If another app or program has changed the status of this service, it may continue to stop. To ensure it starts automatically with Windows, open a Run dialog window, and type `services.msc`.

<div class="wp-block-image mb-4" id="bkmrk--36"><figure class="aligncenter size-full"><picture><source srcset="https://www.maketecheasier.com/assets/uploads/2023/07/how-to-fix-user-profile-failed-the-signin-error-in-windows-services.jpg.webp" type="image/webp">![Typing "services.msc" in Run window.](https://www.maketecheasier.com/assets/uploads/2023/07/how-to-fix-user-profile-failed-the-signin-error-in-windows-services.jpg)</source></picture></figure></div><div class="in-content-ad ad-slot mb-8 flex justify-center" data-google-query-id="CMut5uvehYMDFXqHgwgdlIoLew" id="bkmrk--37"></div>7. Scroll until you see “User Profile Service.”
8. If it doesn’t say “Automatic” under the “Startup Type” column, right-click “User Profile Service,” and select “Properties.”

<div class="wp-block-image mb-4" id="bkmrk--38"><figure class="aligncenter size-full"><picture><source srcset="https://www.maketecheasier.com/assets/uploads/2023/07/how-to-fix-user-profile-failed-the-signin-error-in-windows-services-properties.jpg.webp" type="image/webp">![Selecting "Properties" for "User Profile Service" in Services app.](https://www.maketecheasier.com/assets/uploads/2023/07/how-to-fix-user-profile-failed-the-signin-error-in-windows-services-properties.jpg)</source></picture></figure></div>9. Change “Startup Type” to “Automatic,” and click “Apply” to save the changes. You may need to restart your PC to log in correctly.

<div class="wp-block-image mb-4" id="bkmrk--39"><figure class="aligncenter size-full"><picture><source srcset="https://www.maketecheasier.com/assets/uploads/2023/07/how-to-fix-user-profile-failed-the-signin-error-in-windows-services-properties-automatic.jpg.webp" type="image/webp">![Setting "Startup type" to "Automatic" in "User Profile Service" properties.](https://www.maketecheasier.com/assets/uploads/2023/07/how-to-fix-user-profile-failed-the-signin-error-in-windows-services-properties-automatic.jpg)</source></picture></figure></div><div class="in-content-ad ad-slot mb-8 flex justify-center" data-google-query-id="CO7Az-zehYMDFW2ggwgdY3oARw" id="bkmrk--40"></div>## 7. Reset Windows PC

If all the above options fail, use the “Reset” option to go back to a clean factory reset of your Windows operating system. You have to be connected online to achieve this cloud-based reset.

The [Windows 11 reset method](https://www.maketecheasier.com/reset-reinstall-windows-without-losing-files/#reset-windows) has been covered in detail, but the essential steps, which are common with Windows 10, too, are summarized below:

1. Go to “System -&gt; Recovery -&gt; Reset this PC,” and click “Reset PC.”
2. Choose “Keep the files” or “Remove everything.” Choose the former option so that you don’t need to save a backup. It’s still a good idea to back up your files, just in case anything goes wrong.
3. Select the “Cloud download” option to reinstall your version of Windows. The download will take some time to finish.
4. Once you see the “Ready to reset the PC” screen, click “Next” to proceed.
5. Sit back and wait for the reset to finish, as the download will take some time. The entire procedure can consume anything from a few hours to an entire day, so we recommend the reset method only if the other methods don’t solve the problem.

**Tip**: should you opt for a [cloud download or local reinstall](https://www.maketecheasier.com/cloud-download-or-local-reinstall-windows-reset/) when performing a Windows reset? We explain the differences in our post.

<div class="in-content-ad ad-slot mb-8 flex justify-center" data-google-query-id="CKiNmO3ehYMDFc-ZgwgdBu8DDA" id="bkmrk--41"></div>## Frequently Asked Questions

<section class="sc_fs_faq sc_card    " id="bkmrk-how-do-i-fix-the-%22us">### How do I fix the "User profile failed" error during sign-in for Windows 8/8.1 and Windows 7?

If you’re using an older Windows version, such as 8.1/8/7, only a few of the above-described solutions will be able to address the user profile error. You can try a restart, use a DISM and SFC scans in Command Prompt, and move the NTUSER.DAT file to a default folder. The options to delete a local user account and enable a cloud-based reset will not work.

</section><section class="sc_fs_faq sc_card    " id="bkmrk-how-do-i-solve-the-%E2%80%9C">### How do I solve the “We can’t sign in to your account” error while restarting the User profile service?

Sometimes, while restarting the user profile service in guest/local account mode (Section 6), you’re unable to sign in to your Administrator account. To solve the problem, boot into your Windows device in Safe Mode, and perform the same steps outlined in section 2. Then, repeat the steps from Section 6 to restart the User Profile Service.

</section><section class="sc_fs_faq sc_card    " id="bkmrk-can-other-software-o">### Can other software or Windows updates interfere with the User Profile Service?

Sometimes it can. If you start getting this error the next time you sign in after installing something new, try uninstalling the new software to see whether that fixes the problem.

If your PC recently installed updates, try uninstalling them and updating again. Go to “Start,” and search for “Windows updates.” Select “Update history” and “Uninstall updates” under the list of recently installed updates. Select what you want to uninstall, and restart your PC.

</section>

# How to Delete a User Profile on Windows

The first time a user logs in on a Windows computer, a user profile is created and stored on the local hard disk. This profile contains all settings, from wallpaper to email details and network connections. If you’ve created multiple user profiles on your PC over time, this tutorial shows how to delete a user profile on Windows that is no longer needed.

## 1. Advanced System Properties

The easiest way to delete an unnecessary user profile is by accessing the Advanced System Properties on your Windows PC.

Press <kbd>Win </kbd>+ <kbd>R</kbd> on your keyboard to launch the Run dialog, type `systempropertiesadvanced` in the box, and click “OK.”

<div class="page-content clearfix" component="page-display" id="bkmrk-" option:page-display:page-id="42"><div dir="auto"><div class="wp-block-image mb-4" id="bkmrk--1"><figure class="aligncenter size-full"><picture><source srcset="https://www.maketecheasier.com/assets/uploads/2023/08/run-dialog-systemproperties-windows.jpg.webp" type="image/webp">![Typing command in Run window.](https://www.maketecheasier.com/assets/uploads/2023/08/run-dialog-systemproperties-windows.jpg)</source></picture></figure></div></div></div>In the “Advanced” tab, click the “Settings” button under “User Profiles.”

<div class="page-content clearfix" component="page-display" id="bkmrk--2" option:page-display:page-id="42"><div dir="auto"><div class="wp-block-image mb-4" id="bkmrk--3"><figure class="aligncenter size-full"><picture><source srcset="https://www.maketecheasier.com/assets/uploads/2023/08/access-system-properties-dialog-windows.jpg.webp" type="image/webp">![Clicking "Settings" button under "User profiles" in System Properties.](https://www.maketecheasier.com/assets/uploads/2023/08/access-system-properties-dialog-windows.jpg)</source></picture></figure></div></div></div>From the list of user profiles stored on your Windows computer, select the one you don’t need, and click the “Delete” button.

[![image.png](https://wiki.towne.org/uploads/images/gallery/2023-12/scaled-1680-/image.png)
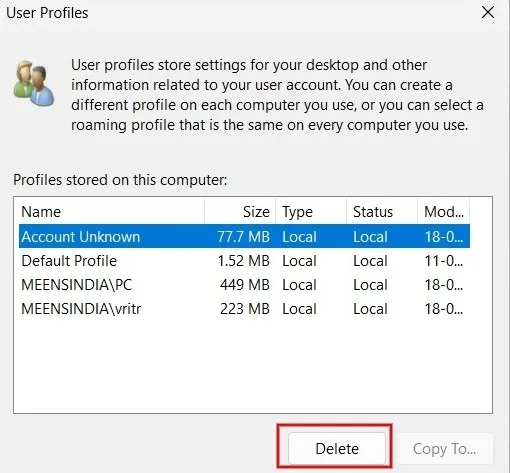
](https://wiki.towne.org/uploads/images/gallery/2023-12/image.png)

Click “Yes” in the confirmation dialog that pops up on your screen.

<div class="page-content clearfix" component="page-display" id="bkmrk--5" option:page-display:page-id="42"><div dir="auto"><div class="wp-block-image mb-4" id="bkmrk--6"><figure class="aligncenter size-full"><picture><source srcset="https://www.maketecheasier.com/assets/uploads/2023/08/delete-user-profile-using-system-properties-confirmation-windows.jpg.webp" type="image/webp">![Clicking "Yes"" in "Confirm Delete" pop-up.](https://www.maketecheasier.com/assets/uploads/2023/08/delete-user-profile-using-system-properties-confirmation-windows.jpg)</source></picture></figure></div></div></div>The user profile has now been successfully deleted from your computer.

**Tip**: experiencing [issues with the Settings app on Windows](https://www.maketecheasier.com/fix-settings-app-not-working-in-windows-10/)? Check out the most effective solutions for this problem.

## 2. Settings App

You can also delete a user profile and all of its associated data from your Windows PC by using the Settings app.

Click the Start button, and launch the Settings app.

<div class="page-content clearfix" component="page-display" id="bkmrk--7" option:page-display:page-id="42"><div dir="auto"><div class="wp-block-image mb-4" id="bkmrk--8"><figure class="aligncenter size-full"><picture><source srcset="https://www.maketecheasier.com/assets/uploads/2023/06/Windows-access-settings-menu.jpg.webp" type="image/webp">![Clicking Start menu and selecting the Settings app.](https://www.maketecheasier.com/assets/uploads/2023/06/Windows-access-settings-menu.jpg)</source></picture></figure></div><div class="in-content-ad ad-slot mb-8 flex justify-center" data-google-query-id="CPCii7vdhYMDFc-Tgwgd6QoDJg" id="bkmrk--9"><div id="bkmrk--10"></div></div></div></div>Click “Accounts” in the left pane, scroll down and click “Other users” in the right pane.

<div class="page-content clearfix" component="page-display" id="bkmrk--11" option:page-display:page-id="42"><div dir="auto"><div class="wp-block-image mb-4" id="bkmrk--12"><figure class="aligncenter size-full"><picture><source srcset="https://www.maketecheasier.com/assets/uploads/2023/08/access-settings-accounts-other-users-windows.jpg.webp" type="image/webp">![Clicking on "Other users" under Accounts in Settings. ](https://www.maketecheasier.com/assets/uploads/2023/08/access-settings-accounts-other-users-windows.jpg)</source></picture></figure></div></div></div>You will see a list of other users accessing your computer. Click the arrow next to the user profile that you want to delete.

<div class="page-content clearfix" component="page-display" id="bkmrk-click-the-%E2%80%9Cremove%E2%80%9D-b" option:page-display:page-id="42"><div dir="auto"><div class="wp-block-image mb-4" id="bkmrk--13"><figure class="aligncenter size-full is-resized"><picture><source srcset="https://www.maketecheasier.com/assets/uploads/2023/08/list-of-other-users-windows.jpg.webp" type="image/webp">![Selecting user profile for deletion in Windows Settings. ](https://www.maketecheasier.com/assets/uploads/2023/08/list-of-other-users-windows.jpg)</source></picture></figure></div>4. Click the “Remove” button.

<div class="wp-block-image mb-4" id="bkmrk--14"><figure class="aligncenter size-full"><picture><source srcset="https://www.maketecheasier.com/assets/uploads/2023/08/remove-user-profile-using-settings-app-windows.jpg.webp" type="image/webp">![Clicking "Remove" button next under specific user profile in Windows. ](https://www.maketecheasier.com/assets/uploads/2023/08/remove-user-profile-using-settings-app-windows.jpg)</source></picture></figure></div></div></div>Click “Delete account and data,” and you’re done.

<div class="page-content clearfix" component="page-display" id="bkmrk--15" option:page-display:page-id="42"><div dir="auto"><div class="wp-block-image mb-4" id="bkmrk--16"><figure class="aligncenter size-full"><picture>![Pressing on "Delete account and data" button to complete process.](https://www.maketecheasier.com/assets/uploads/2023/08/remove-user-profile-using-settings-app-confirmation-windows.jpg)</picture></figure></div></div></div>## 3. Registry Editor

If you prefer, you can also delete a user profile from Windows through the Registry Editor. Make sure you [create a backup of the registry](https://www.maketecheasier.com/backup-restore-windows-registry/) before you proceed, in case something goes wrong during the process.

Press <kbd>Win</kbd> + <kbd>R</kbd> to launch the Run utility, then type `regedit` in the box, and click “OK.”

<div class="page-content clearfix" component="page-display" id="bkmrk--17" option:page-display:page-id="42"><div dir="auto"><div class="wp-block-image mb-4" id="bkmrk--18"><figure class="aligncenter size-full"><picture><source srcset="https://www.maketecheasier.com/assets/uploads/2023/07/enter-regedit-run-dialog-windows.jpg.webp" type="image/webp">![Typing "regedit" in Run dialog to launch Registry Editor.](https://www.maketecheasier.com/assets/uploads/2023/07/enter-regedit-run-dialog-windows.jpg)</source></picture></figure></div></div></div>Navigate to the following path on the Registry Editor:

<div class="page-content clearfix" component="page-display" id="bkmrk-1-hkey_local_machine" option:page-display:page-id="42"><div dir="auto"><div><div class="cm-editor ͼ1 ͼ2 ͼ4 ͼ1p"><div aria-live="polite">  
</div><div class="cm-scroller" tabindex="-1"><div aria-hidden="true" class="cm-gutters"><div class="cm-gutter cm-lineNumbers"><div class="cm-gutterElement">  
</div><div class="cm-gutterElement">1</div></div></div><div aria-multiline="true" aria-readonly="true" autocapitalize="off" autocorrect="off" class="cm-content" contenteditable="true" role="textbox" spellcheck="false" translate="no"><div class="cm-line">HKEY_LOCAL_MACHINE\SOFTWARE\Microsoft\Windows NT\CurrentVersion\ProfileList</div></div><div aria-hidden="true" class="cm-layer cm-layer-above cm-cursorLayer">  
</div><div aria-hidden="true" class="cm-layer cm-selectionLayer">  
</div></div><button class="cm-copy-button" type="button"><svg height="16" viewbox="0 0 24 24" width="16" xmlns="http://www.w3.org/2000/svg"></svg></button></div></div><div class="wp-block-image mb-4" id="bkmrk--19"><figure class="aligncenter size-full"><picture><source srcset="https://www.maketecheasier.com/assets/uploads/2023/08/registry-editor-list-of-user-profiles-windows.jpg.webp" type="image/webp">![Navigating to location in Registry Editor. ](https://www.maketecheasier.com/assets/uploads/2023/08/registry-editor-list-of-user-profiles-windows.jpg)</source></picture></figure></div><div class="in-content-ad ad-slot mb-8 flex justify-center" data-google-query-id="CKHuncXdhYMDFYaJgwgdNScLlQ" id="bkmrk--20"><div id="bkmrk--21"><div id="bkmrk--22"><div class="air-ad__generic-container" id="bkmrk--23"><iframe frameborder="0" id="bkmrk--24" name="air-ad__generic/e2f067af1a9adbde9a871333781545fc/placement/d10464785beeb55af84db50e355aa4e5" scrolling="no"></iframe>

</div><iframe class="adDfpFrame" frameborder="0" height="100%" id="bkmrk--25" marginheight="0" marginwidth="0" scrolling="0" width="100%"></iframe>

</div></div></div></div></div>In the left pane, you’ll find multiple keys under the ProfileList folder. Click each subfolder one by one. In the right pane, find the path to the profile you wish to delete in the “Data” field for the “ProfileImagePath” key. In this example, we’re looking to remove the “vritr” user.

Right-click the ProfileImagePath key associated with the user profile you are looking to eliminate and select “Delete.”

<div class="page-content clearfix" component="page-display" id="bkmrk--26" option:page-display:page-id="42"><div dir="auto"><div class="wp-block-image mb-4" id="bkmrk--27"><figure class="aligncenter size-full"><picture><source srcset="https://www.maketecheasier.com/assets/uploads/2023/08/delete-user-profile-using-registry-editor-on-windows.jpg.webp" type="image/webp">![Deleting key associated with specific user profile in Registry Editor.](https://www.maketecheasier.com/assets/uploads/2023/08/delete-user-profile-using-registry-editor-on-windows.jpg)</source></picture></figure></div></div></div>Click “Yes” in the confirmation dialog to remove the user profile from your Windows computer.

<div class="page-content clearfix" component="page-display" id="bkmrk--28" option:page-display:page-id="42"><div dir="auto"><div class="wp-block-image mb-4" id="bkmrk--29"><figure class="aligncenter size-full"><picture>![Pressing "Yes" on "Confirm Value Delete" window. ](https://www.maketecheasier.com/assets/uploads/2023/08/delete-user-profile-registry-editor-confirmation-windows.jpg)</picture></figure></div></div></div>## 4. PowerShell

With PowerShell, you can do all kinds of things, including deleting user profiles, as shown in the steps below:

Press <kbd>Win</kbd> + <kbd>X</kbd>, and click “Terminal(Admin)” to launch PowerShell.

<div class="page-content clearfix" component="page-display" id="bkmrk--30" option:page-display:page-id="42"><div dir="auto"><div class="wp-block-image mb-4" id="bkmrk--31"><figure class="aligncenter size-full"><picture><source srcset="https://www.maketecheasier.com/assets/uploads/2023/07/launch-powershell-admin-windows.jpg.webp" type="image/webp">![Opening Terminal (Admin) app from WinX menu. ](https://www.maketecheasier.com/assets/uploads/2023/07/launch-powershell-admin-windows.jpg)</source></picture></figure></div></div></div>Type the below command, and press <kbd>Enter</kbd> to view the list of user profiles on your computer. Make a note of the user profile you want to remove from your PC.

<div class="page-content clearfix" component="page-display" id="bkmrk-1-get-localuser" option:page-display:page-id="42"><div dir="auto"><div><div class="cm-editor ͼ1 ͼ2 ͼ4 ͼ1q"><div aria-live="polite">  
</div><div class="cm-scroller" tabindex="-1"><div aria-hidden="true" class="cm-gutters"><div class="cm-gutter cm-lineNumbers"><div class="cm-gutterElement">  
</div><div class="cm-gutterElement">1</div></div></div><div aria-multiline="true" aria-readonly="true" autocapitalize="off" autocorrect="off" class="cm-content" contenteditable="true" role="textbox" spellcheck="false" translate="no"><div class="cm-line">Get-LocalUser</div></div><div aria-hidden="true" class="cm-layer cm-layer-above cm-cursorLayer">  
</div><div aria-hidden="true" class="cm-layer cm-selectionLayer">  
</div></div><button class="cm-copy-button" type="button"><svg height="16" viewbox="0 0 24 24" width="16" xmlns="http://www.w3.org/2000/svg"></svg></button></div></div><div class="wp-block-image mb-4" id="bkmrk--32"><figure class="aligncenter size-full"><picture><source srcset="https://www.maketecheasier.com/assets/uploads/2023/08/get-list-of-user-profiles-powershell-windows.jpg.webp" type="image/webp">![Typing command in PowerShell. ](https://www.maketecheasier.com/assets/uploads/2023/08/get-list-of-user-profiles-powershell-windows.jpg)</source></picture></figure></div><div class="in-content-ad ad-slot mb-8 flex justify-center" data-google-query-id="CPqIpeLdhYMDFQydgwgdDk8HJA" id="bkmrk--33"></div></div></div>To delete a specific user profile, use the below command, followed by <kbd>Enter</kbd>. Replace &lt;userprofilename&gt; with the name of the user profile you want to delete from your Windows computer.

<div class="page-content clearfix" component="page-display" id="bkmrk-1-remove-localuser--" option:page-display:page-id="42"><div dir="auto"><div><div class="cm-editor ͼ1 ͼ2 ͼ4 ͼ1r"><div aria-live="polite">  
</div><div class="cm-scroller" tabindex="-1"><div aria-hidden="true" class="cm-gutters"><div class="cm-gutter cm-lineNumbers"><div class="cm-gutterElement">  
</div><div class="cm-gutterElement">1</div></div></div><div aria-multiline="true" aria-readonly="true" autocapitalize="off" autocorrect="off" class="cm-content" contenteditable="true" role="textbox" spellcheck="false" translate="no"><div class="cm-line">Remove-LocalUser -Name &lt;userprofilename&gt;</div></div><div aria-hidden="true" class="cm-layer cm-layer-above cm-cursorLayer">  
</div><div aria-hidden="true" class="cm-layer cm-selectionLayer">  
</div></div><button class="cm-copy-button" type="button"><svg height="16" viewbox="0 0 24 24" width="16" xmlns="http://www.w3.org/2000/svg"></svg></button></div></div></div></div>Since you won’t see a success message for the above command, you can use the same command in step #2 to verify whether the user profile was deleted.

<div class="page-content clearfix" component="page-display" id="bkmrk--34" option:page-display:page-id="42"><div dir="auto"><div class="wp-block-image mb-4" id="bkmrk--35"><figure class="aligncenter size-full"><picture><source srcset="https://www.maketecheasier.com/assets/uploads/2023/08/delete-user-profile-powershell-windows.jpg.webp" type="image/webp">![Inputting commands in PowerShell. ](https://www.maketecheasier.com/assets/uploads/2023/08/delete-user-profile-powershell-windows.jpg)</source></picture></figure></div></div></div>
## 5. File Explorer

You can also delete a user profile and its data on a Windows PC via the File Explorer app, but make sure you are logged in as an administrator before you attempt to do so.

Press <kbd>Win</kbd> + <kbd>E</kbd> to launch File Explorer and click “This PC” in the left pane.

<div class="page-content clearfix" component="page-display" id="bkmrk--36" option:page-display:page-id="42"><div dir="auto"><div class="wp-block-image mb-4" id="bkmrk--37"><figure class="aligncenter size-full"><picture><source srcset="https://www.maketecheasier.com/assets/uploads/2023/08/access-this-pc-windows.jpg.webp" type="image/webp">![Clicking "This PC" in File Explorer.](https://www.maketecheasier.com/assets/uploads/2023/08/access-this-pc-windows.jpg)</source></picture></figure></div><div class="in-content-ad ad-slot mb-8 flex justify-center" data-google-query-id="CKaawevdhYMDFeiygwgd3s4ImA" id="bkmrk--38"></div></div></div>Double-click “Windows (C:)” under “Devices and drives.”

<div class="page-content clearfix" component="page-display" id="bkmrk--39" option:page-display:page-id="42"><div dir="auto"><div class="wp-block-image mb-4" id="bkmrk--40"><figure class="aligncenter size-full"><picture><source srcset="https://www.maketecheasier.com/assets/uploads/2023/08/access-c-drive-windows.jpg.webp" type="image/webp">![Double-clicking (C:) to access the drive. ](https://www.maketecheasier.com/assets/uploads/2023/08/access-c-drive-windows.jpg)</source></picture></figure></div></div></div>Click on the “Users” folder.

<div class="page-content clearfix" component="page-display" id="bkmrk--41" option:page-display:page-id="42"><div dir="auto"><figure class="wp-block-image mb-4 aligncenter size-full" id="bkmrk--42"><picture><source srcset="https://www.maketecheasier.com/assets/uploads/2023/08/access-users-folder-windows.jpg.webp" type="image/webp">![Selecting the "Users" folder in "C:\.""
](https://www.maketecheasier.com/assets/uploads/2023/08/access-users-folder-windows.jpg)</source></picture></figure></div></div>Select the name of the user profile you wish to delete, and press the <kbd>Del</kbd> key on your keyboard to delete the user profile from your Windows PC.

<div class="page-content clearfix" component="page-display" id="bkmrk--43" option:page-display:page-id="42"><div dir="auto"><div class="wp-block-image mb-4" id="bkmrk--44"><figure class="aligncenter size-full"><picture><source srcset="https://www.maketecheasier.com/assets/uploads/2023/08/list-of-user-profiles-windows.jpg.webp" type="image/webp">![Selecting user profile for deletion via File Explorer.](https://www.maketecheasier.com/assets/uploads/2023/08/list-of-user-profiles-windows.jpg)</source></picture></figure></div></div></div>**FYI**: [are you frequently encountering problems with the File Explorer app](https://www.maketecheasier.com/fix-common-file-explorer-issues-windows/)? Check out the most effective solutions.

<div class="page-content clearfix" component="page-display" id="bkmrk--45" option:page-display:page-id="42"><div dir="auto"><div class="in-content-ad ad-slot mb-8 flex justify-center" data-google-query-id="CIfu4ezdhYMDFYWsgwgdoGoNGg" id="bkmrk--46"></div></div></div>## Cleaning Up Your Windows PC

While deleting inactive user profiles will not significantly [free up storage on your “C:\\” drive](https://www.maketecheasier.com/recover-free-space-windows-c-drive/), learn additional methods to recover free space. If you’ve encountered the “[User profile service failed the sign-in](https://www.maketecheasier.com/fix-user-profile-service-failed-the-sign-in-error/)” error message, try to delete the user profile and create a new one.

# Snap Layouts (screenshot)

Here is a cool feature that is new in Windows 11 that everyone now has on their desktop. It's for snap layouts. It's convenient because you can save the layout you want for certain classes or work and not have to redo it every time.

## Snap Layouts

If you’re the kind of person who likes their apps arranged on the desktop just so, you’ll likely be interested in Snap Layouts. With it, you group your open windows into one of a half-dozen pre-built screen layouts, such as having two apps side by side, each taking up half the screen. Or you might have one app on the left and two stacked vertically on the right, or four apps in a grid. The hope is that you’ll be able to find the layout that fits the way you work.

To use Snap Layouts, open the applications you want to be in it, then hover your mouse over an application’s maximize icon on the upper right of the screen, located between the minimize and close icons. Choose the layout you want and which position you want the application to be in, and the app window snaps into that position. Then you can choose from your other open apps to fill in the rest of the spots in the layout.

<div id="bkmrk-idg">[![win11 cheat sheet 10 snap layout](https://images.idgesg.net/images/article/2021/12/win11-cheat-sheet-10-snap-layout-100913749-large.jpg?auto=webp&quality=85,70)<div>  
</div>](https://images.idgesg.net/images/article/2021/12/win11-cheat-sheet-10-snap-layout-100913749-orig.jpg?auto=webp&quality=85,70 "<div class='credit'>IDG</div>
<p>A Snap Layout in action. (Click image to enlarge it.)</p>")<small>IDG</small></div>A Snap Layout in action. (Click image to enlarge it.)

Once all the places in a Snap Layout are filled, that app grouping is saved as a Snap Group that you can quickly return to later if you’ve opened other apps or minimized any of the app windows in the group. Hover your mouse over the taskbar icon of any of the applications in a Snap Group, and you’ll see two small popups — one that’s a thumbnail of what’s open in the application itself, and another that shows the Snap Group. Choose the Snap Group icon, and you’ll switch to the whole group in the layout you set up previously, rather than to the individual application.